Machine learning operations, MLOps, are best practices for businesses to run AI successfully with help from an expanding smorgasbord of software products and…
Machine learning operations, MLOps, are best practices for businesses to run AI successfully with help from an expanding smorgasbord of software products and cloud services. as a service.
Virtual agents or voice-enabled assistants have been around for quite some time. But in the last decade, their usefulness and popularity have exploded with the…
Virtual agents or voice-enabled assistants have been around for quite some time. But in the last decade, their usefulness and popularity have exploded with the use of AI.
According to Gartner, virtual assistants will automate up to 75% of tasks for call center agents by 2025–up from 30% in 2021. This translates to a better experience for both contact center agents and customers.
From healthcare to financial services, AI has transformed customer service making it more efficient and personalized. Today’s virtual agents, powered by speech AI technology, handle not only repetitive customer requests in contact centers, but also assist human agents in solving complex questions faster than ever before.
Based in Los Angeles, NVIDIA partner Gridspace is a voice technology and AI software company creating natural-sounding virtual agents and voice bots to enhance the customer service experience. They are also a member of the NVIDIA Inception Program, which helps startups evolve by providing access to cutting-edge technology and NVIDIA experts.
A study conducted by a Fortune 10 healthcare company reported that 72% of consumers found Gridspace virtual agents sounded more human-like than a leading and well-known company’s virtual agents.
Virtual agents for complex contact centers
To deliver great customer service over the phone, human agents must be able to talk and communicate effectively. Even the best live agents in a contact center have limited time and context when helping a caller.
Virtual agents have infinite availability, capacity for context, and consistent communication skills. They can also route calls to designated specialists.
Most of the Gridspace virtual agents operate in the financial and healthcare industries. They must be capable of handling complex tasks that require a high level of accuracy, which is extremely important when a customer’s money, health, or emotional well-being is involved.
For instance, virtual agents can assist with the patient discharge processes in hospitals. They can also assist nurses by providing prior information about a patient’s wellness and any discharge-related instructions.
In these demanding situations, the virtual agents complete calls for more than 70% of the patients they reach, which is comparable to the performance of human administrators and nurses.
Video 1: A virtual agent and human agent interact while providing customer service
Advancements in speech AI technology have enabled a new breed of virtual agents in contact centers that engage in natural conversations, understand industry jargon, and execute more tasks.
By using a natural-sounding voice to greet callers, virtual agents can establish a strong rapport with a customer to help them feel more at ease. With cutting-edge speech models and GPU-optimized inference techniques, Gridspace virtual agents sound human-like and run in real time.
Every industry also has its own vernacular. With the latest advancements in ASR and modern training pipelines, virtual agents can understand domain-specific conversational speech and reduce resolution times to new customer problems. Additionally, virtual agents can eliminate hold times by calling customers back when they are ready. This means more patients or customers can be served day or night regardless of their location or the language they speak.
Enhancing the customer service experience
Gridspace virtual agents and voice observability software are powered by NVIDIA GPUs. Because GPUs can handle thousands of requests on a large scale, virtual agents can continue to serve customers efficiently.
The company uses GPUs, including the NVIDIA T4 and NVIDIA A100 for training and inference, serving over 50 K concurrent calls. They are also used to power text-to-speech models for conversational analysis. This includes emotion recognition, dialog actions, voice biometrics, and multimodal conversational AI.
“NVIDIA GPUs accelerate neural network computations and empower Gridspace real-time speech and language models at enterprise scale,” said Cooper Johnson, voice designer at Gridspace.
Future of virtual agents across industries
Contact centers are at the center of every global business. Virtual agents can both empower live agents and facilitate a smoother customer service experience across industries
Virtual agents reduce the likelihood of costly operational mistakes or missed opportunities by handling repetitive tasks, such as onboarding customers or making follow-up calls. They free up live agents to address more complex issues that require human-to-human interactions.
Recently, Gridspace deployed Grace, a voice-enabled assistant that skillfully closes gaps in patient care and new customer onboarding processes. In a natural, friendly way, Grace can handle multi-turn customer interactions.
Empower your contact center agents
Interested in adding speech AI to your virtual agent application? Following are some of the resources to get started:
Get a detailed overview of the growing Speech AI landscape in this free ebook, Introduction to Speech AI.
Learn how to achieve natural-sounding speech by adding TTS skills to your application with the free ebook, End-to-End Speech AI Pipelines.
According to IDC, the volume of data generated each year is growing exponentially. IDC’s Global DataSphere projects that the world will generate 221 ZB…
According to IDC, the volume of data generated each year is growing exponentially. IDC’s Global DataSphere projects that the world will generate 221 ZB of data by 2026. This data holds fantastic information. But as the volume of data grows, so does the processing cost. As a data scientist or engineer, you’ve certainly felt the pain of slow-running, data processing jobs.
Apache Spark addressed this data-rocessing problem at the scale of thousands of terabytes in the 2010s. However, in the 2020s, the amount of data that requires processing has exceeded the current CPU-based infrastructure compute capacity.
For organizations with hundreds of thousands of terabytes, this CPU-based infrastructure is limiting them and adding massive costs for expansion. Compute limitations are constricting their ability to expand insights with their data, get the data usable for training AI/ML pipelines, and experiment with new model types.
The old rule holds true: 80% of the time is spent on data prep rather than model development, which is hindering the growth of data science.
To address these challenges, the recent update of Apache 3.x delivers new functions for optimization, such as resource-aware scheduling and columnar data processing. With the RAPIDS Accelerator for Apache Spark, jobs can automatically be scheduled on NVIDIA GPUs for faster data processing. This solution requires zero code changes.
We are excited to announce a new integration with Google Cloud’s Dataproc. On the cloud, it costs up to 80% less to run data processing jobs than on an equivalent CPU-based infrastructure with acceleration speedup up to 5x faster.
Dataproc provides a fully managed Apache Spark service in the cloud. With the ability to create any Spark cluster within 90 seconds on average, enterprise-level security, and tight integration with other Google Cloud services, Dataproc provides a strong platform to deploy Apache Spark applications.
This post provides instructions on how to get started with using GPU acceleration on Spark workloads on Dataproc. We discuss the different challenges of CPU-to-GPU migration and explain how to speed up data processing pipelines. We highlight new RAPIDS Accelerator user tools for Dataproc that help set you up for success, such as providing insights into which jobs will perform best on GPU.
Speeding up data processing jobs
By combining the RAPIDS cuDF library with the scale-out capabilities of Apache Spark, data practitioners can process data quickly and cost-efficiently with GPUs. The RAPIDS Accelerator for Apache Spark is a plugin that enables you to speed up Apache Spark 3 jobs by leveraging GPUs.
Requiring no API changes from you, the RAPIDS Accelerator for Apache Spark tool automatically replaces GPU-supported SQL operations with the GPU-accelerated version whenever possible, while falling back to Spark CPU for other cases. Because no code or major infrastructure changes are required, you can iteratively design your workloads to be optimized for both performance and budget.
Finally, the new RAPIDS Accelerator user tools for Dataproc provide a set of functionality to support data scientists when migrating Spark jobs to GPU. This includes gap analysis and workload recommendations. Data practitioners can better determine which Spark jobs will see the best speedups when migrated to the GPU.
Pain points in CPU-to-GPU migration
Despite the supported migration to GPU provided by the RAPIDS Accelerator for Apache Spark, Spark users are often reluctant to make the jump because of assumed pain points in the process. In this post, we dive deeper into those common concerns, and show how the features of the new RAPIDS Accelerator user tools for Dataproc mitigate those issues.
Challenge #1: The cost associated with moving Spark jobs to GPU is not easy to predict
Many data practitioners assume that running an application on GPU will be more expensive, despite taking less time. In practice, this is rarely the case.
Resolution: The RAPIDS Accelerator for Apache Spark workload qualification tool analyzes Spark event logs generated from CPU-based Spark applications. It provides you with upfront cost estimates to help quantify the expected acceleration and cost savings of migrating a Spark application or query to GPU.
Challenge #2: It’s unclear which Spark jobs are suitable for GPU migration
Not every application is suitable for GPU acceleration. You don’t want to allocate GPU resources to a Spark job that would not benefit from the resulting acceleration.
Resolution: The workload qualification tool also enables you to pre-determine which of your applications or jobs are recommended for running on GPU with the RAPIDS accelerator for Apache Spark.
Challenge #3:There’s no predetermined way to compute GPU resource requirements
Selecting and sizing hardware for any workload, whether CPU or GPU, can be challenging. Incorrectly setting resources and configurations can impact cost and performance.
Resolution: The RAPIDS Accelerator for Apache Spark bootstrap tool supports the functionality of applyingoptimal configuration settingsfor a Spark cluster size and shape for GPU clusters.
Challenge #4:Too many parameters for tuning and configuration are available
When running jobs on the GPU, you want to narrow down the best candidates for GPU. This requires you to provide the optimal parameters for tuning and configuration.
Resolution: With the new profiling tool, Spark logs from CPU job runs are used to compute the recommended per-app Spark RAPIDS config settings for running a GPU application.
Challenge #5: There’s a high cost associated with changing compute infrastructure
It takes time, money, and labor to switch workloads over. This becomes a barrier to trying new technology,even if it addresses key pain points, because of the perceived risk to making an investment on business-critical applications.
Resolution: On the cloud, the switch is simplified. Data scientists can test it out without making code changes, and the cost is minimal. When using Dataproc, you rent your infrastructure on an hourly basis so there isn’t a need to pay upfront for hardware to be shipped to your data center. You can also track your cost and performance differences.
If you choose to switch back to the CPU, you can revert with next to no effort.
Migrating workloads with the RAPIDS Accelerator for Apache Spark in Google Cloud Dataproc
Now that we’ve discussed how the RAPIDS Accelerator speeds up your Spark jobs while reducing costs, here’s how to use it in practice.
Qualification
Qualification helps data scientists identify and estimate the cost savings and acceleration potential of RAPIDS Accelerator for Apache Spark. Qualification requires an active CPU Spark cluster that is selected for GPU migration. The qualification output shows a list of apps recommended for RAPIDS Accelerator for Apache Spark with estimated savings and speedup.
Bootstrap
Bootstrap provides and updates the GPU Dataproc cluster with an optimized RAPIDS Accelerator for Apache Spark configs based on the cluster shape. This ensures that Spark jobs executed on GPU Dataproc cluster can use all the resources and complete without errors.
Tuning
Bootstrap also ensures that the job is functionally passing but tuning optimizes the RAPIDS Accelerator for Apache Spark configs based on the initial (bootstrap) job run using Spark event logs. The output shows the recommended per-app RAPIDS Accelerator for Apache Spark config settings.
With these new features, you can address CPU-to-GPU migration concerns and speed up your Spark code implementation without the challenges of increased cost or complex processes.
Results
Figure 1 shows the speedup and cost comparison for a Spark NDS benchmark* run on Dataproc and NVIDIA GPUs. On this benchmark, we saw a near 5x speedup and 78% reduction in cost compared to running on CPU only.
Figure 1. Bar charts comparing the NDS power run on Google Cloud with associated cost when using CPU-only compared to with GPUs.
* Benchmark and infrastructure details: CPU-only four-node cluster: 4xn1-standard-32 (32vCPU, 120 GB RAM). GPU four-node cluster: 4xn1-standard-32 (32vCPU, 120 GB RAM) and 8xT4 NVIDIA GPU. NDS stands for NVIDIA Decision Support benchmark, which is derived from the TPC-DS benchmark and is used for internal testing. Results from NDS are not comparable to TPC-DS.
Next steps
With the RAPIDS accelerator for Apache Spark, you can leverage GPU compute power for your Spark 3 workloads. By providing clear insights into which jobs are most suitable for acceleration and optimized GPU configurations and no API changes, you can run your critical Spark workloads faster. This helps you process more data in the same amount of time while saving on compute costs!
With Dataproc, you can do all of this in a fully supported environment, connected to the rest of the Google Cloud Ecosystem.
The latest NVIDIA Cybersecurity Hackathon brought together 10 teams to create exciting cybersecurity innovations using the NVIDIA Morpheus cybersecurity AI…
The event featured seven onsite Israeli teams and three remote teams from India and the UK. Working around the clock for 24 hours, the teams were challenged with developing new solutions for solving modern cybersecurity challenges.
“NVIDIA hackathons are a welcoming launchpad for innovation. We put DOCA and Morpheus developers in the center, providing them with everything they need to bring their ideas to fruition and into the spotlight. We see traction as the DOCA developer community keeps growing, and we believe hackathons play a significant role in that”, said Dror Goldenberg, the SVP of Software Architecture at NVIDIA.
Figure 1. Cybersecurity hackathon in NVIDIA Tel-Aviv
NVIDIA Cybersecurity Hackathon winners
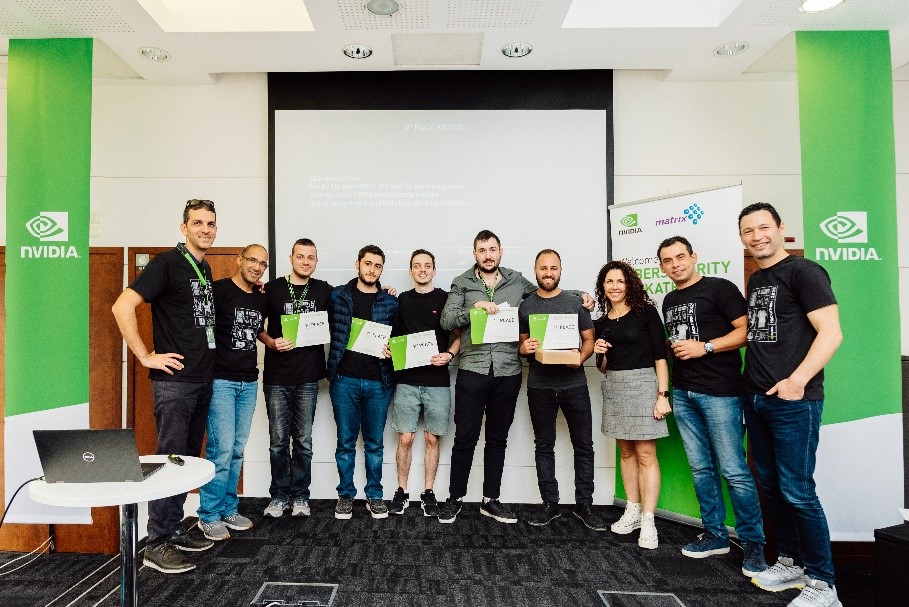
First place
Team Yahalom, C4I Unit
The Yahalom team created a next-generation load balancer that supports dynamic node addition or removal and load-balancing based on user-defined fields.
The design uses BlueField DPUs as a tailor-made network device, implemented with NVIDIA DOCA FLOW APIs. Using the DPU results in accelerated throughput at scale.
Figure 2. First place Team Yahalom with the judging team
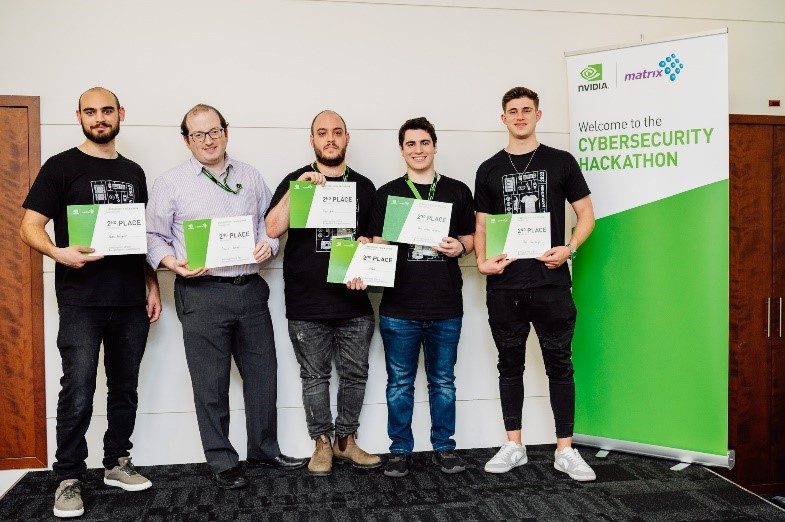
Second place
Team GAPU, Ministry of Defense with Octopus Computer Solutions
Team GAPU focused on developing a new layer of security and governance on the DPU between the platform and infrastructure. This delivers a modular and scalable first line of defense against malicious packets, including a 5-tuple firewall, DNS filtering, and deep packet inspection.
Named ARMadillo, after the BlueField Arm-based cores and the protective shield of the animal, the solution uses DOCA FLOW. ARMadillo accelerates security workflows and illustrates offloading security workloads from the host CPU and memory to the DPU.
Figure 3. The GAPU team, second place winners of the NVIDIA Cybersecurity Hackathon
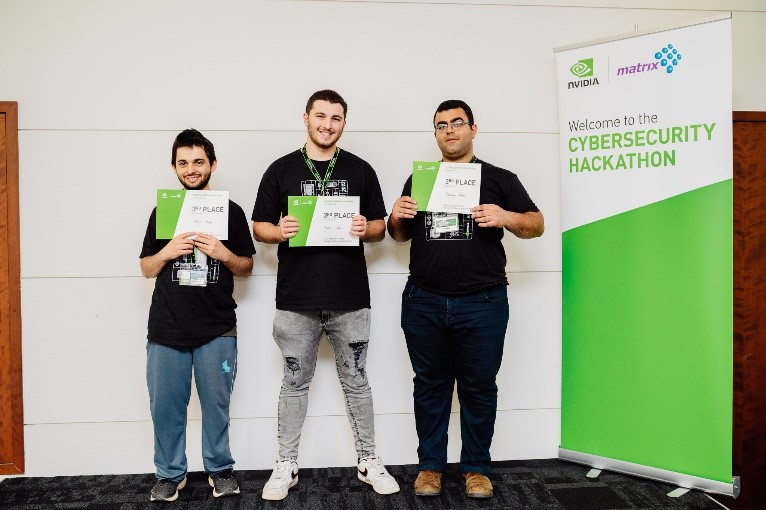
Third place
Team Ariel-2, Ariel University
This team worked on a malware-encrypted traffic detection solution based on Morpheus and GPU acceleration. Using deep learning, the team created a Morpheus training model using random forest (an ensemble learning method for classification), regression, and other tasks. The model operates by constructing a multitude of decision trees at training time, on a variety of datasets.
The team selected meaningful attributes from each dataset into the model, to classify malicious data, albeit encrypted. The team demonstrated efficient machine learning tasks and lowered AI training costs using Morpheus and GPU acceleration.
Figure 4. Team Ariel-2, third place winners of the NVIDIA Cybersecurity Hackathon
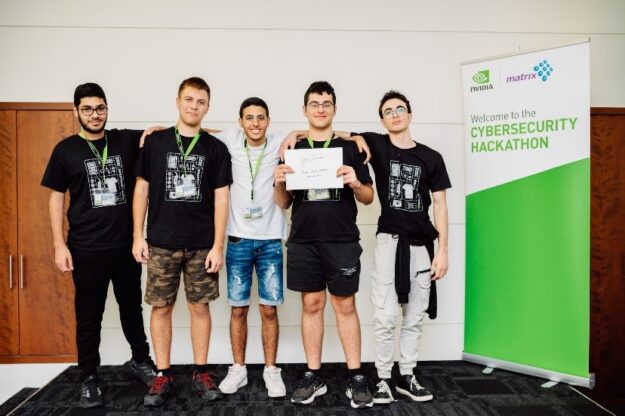
Honorable mention
Team 8200-2B, Aharai-Tech organization
Team 8200-2B, was composed of a group of high-school students that take part in the tech-leadership organization Aharai-Tech. The group worked on a cybersecurity solution that identifies malicious log-in attacks in real time. This is a marked improvement to most existing solutions that identify a breach after it has occurred.
The team used Morpheus pipelines for filtering, processing, and classifying large-scale data.
Figure 5. Team 8200-2B received an honorable mention
Join the DOCA Community
NVIDIA is building a broad community of DOCA developers to create applications and services on top of BlueField DPUs for efficient data centers.
Learn about the newest CUDA features such as release compatibility, dynamic parallelism, lazy module loading, and support for the new NVIDIA Hopper and NVIDIA…
Learn about the newest CUDA features such as release compatibility, dynamic parallelism, lazy module loading, and support for the new NVIDIA Hopper and NVIDIA Ada Lovelace GPU architectures.
After three years of uncertainty caused by the pandemic and its post-lockdown hangover, enterprises in 2023 — even with recession looming and uncertainty abounding — face the same imperatives as before: lead, innovate and problem solve. AI is becoming the common thread in accomplishing these goals. On average, 54% of enterprise AI projects made it Read article >
The latest version of the NVIDIA TAO Toolkit 4.0 boosts developer productivity with all-new AutoML capability, integration with third-party MLOPs services, and…
The latest version of the NVIDIA TAO Toolkit 4.0 boosts developer productivity with all-new AutoML capability, integration with third-party MLOPs services, and new pretrained vision AI models. The enterprise version now includes access to the full source code and model weights for pretrained models.
The toolkit enables efficient model training for vision and conversational AI. By simplifying complex AI models and deep learning frameworks, even developers without AI expertise can use the toolkit to produce AI models. Using transfer learning to fine-tune NVIDIA pretrained models with your own data, it is now possible to optimize model inference throughput without AI expertise or large training datasets.
Developers can create custom production-ready models optimized for specific environments and scenarios with TAO. A notable new feature helps developers build object detection models without massive amounts of data. The use cases include detecting assembly line defects, translating particular phrases across languages, or managing city traffic.
Access to TAO source code and model weights for pretrained models.
Train high-quality models with AutoML without the hassle of manually fine-tuning hundreds of parameters.
Deploy on VMs from leading cloud providers and Kubernetes services like Amazon EKS or Azure AKS.
Simplify infrastructure management and scaling on cloud machine learning services such as Google Colab, Google Vertex AI, and Microsoft Azure Machine Learning.
New cloud integrations and third-party MLOps services, such as W&B and ClearML, provide developers and enterprises with an optimized AI workflow.
Integrate with REST APIs. Quickly build a new AI service or integrate into an existing one with REST APIs.
Use new transformer-based pretrained models (CitySemSegformer, Peoplenet Transformer) and retail-specific pretrained models (RetailObjectDetection, RetailObjectRecognition, and ReIdentificationNet.)
Watch a video to experiment with the NVIDIA TAO Toolkit and pretrained models on Google Colab.
Solutions using TAO Toolkit
Next-generation IT and business service provider, Trifork uses TAO Toolkit to accelerate the development of the AI-based baggage tracking solution for airports.
Fingermark, a company developing data-driven solutions for decision-making, uses TAO Toolkit in developing industrial vision AI solutions to improve worker safety.
A fundamental shift is currently taking place in how AI applications are built and deployed. AI applications are becoming more sophisticated and applied to…
A fundamental shift is currently taking place in how AI applications are built and deployed. AI applications are becoming more sophisticated and applied to broader use cases. This requires end-to-end AI lifecycle management—from data preparation, to model development and training, to deployment and management of AI apps. This approach can lower upfront costs, improve scalability, and decrease risk for customers using AI applications.
While the cloud-native approach to app development can be appealing to developers, machine learning (ML) projects are notoriously time-intensive and cost-intensive, as they require a team with a varied skill set to build and maintain.
This post explains how you can accelerate your vision AI model development using NVIDIA TAO Toolkit and deploying it for inference with NVIDIA Triton Inference Server—all on the Azure Machine Learning (Azure ML) platform.
NVIDIA Triton Inference Server is an open-source inference serving software that helps standardize model deployment and execution and delivers fast and scalable AI in production.
Azure ML is a cloud service for accelerating and managing the machine learning project lifecycle that enables developers to automate AI workflows, from data preparation and model training to model deployment. Developers can easily train, deploy, and manage AI models at scale with Azure ML.
Watch the video below to see a complete walkthrough of how to fine-tune your models with NVIDIA TAO Toolkit and deploy them for inference with NVIDIA Triton Inference Server—all on Azure ML.
Video 1. Create and deploy a custom AI model with NVIDIA TAO Toolkit on Azure Machine Learning
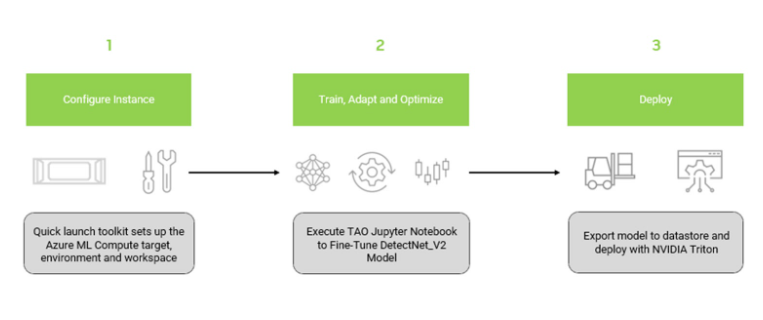
The overall workflow comprises three main steps:
Install the NGC Azure ML Quick Launch Toolkit
Train and optimize a pretrained object detection model
Deploy the optimized model on Azure ML with NVIDIA Triton Inference Server
Figure 1. Workflow for running NVIDIA TAO Toolkit on Azure ML
This section covers the steps required to install the NGC quick launch toolkit, which configures the Azure ML resources and uploads the necessary containers and models for training. The required config files are provided on the AzureML Quick Launch – TAO resource on the NVIDIA NGC Catalog.
Create a conda environment to install the Azure ML Quick Launch Toolkit to avoid any possible conflicts with existing libraries in your machine using the following code:
The azure_config.json file contains the details pertaining to the user credentials, Azure workspace, and GPU compute resources that need to be updated. Edit the azureml_user section with your Azure subscription ID, resource group, and workspace name. Next, edit the aml_compute section with GPU cluster details.
Recommended VMs: NCsv3, NDv2, or NC A100 v4 or ND A100 v4 series
The ngc_config.json file contains the content from the NGC Catalog, such as Docker containers and Jupyter notebooks, that you can upload into the Azure Machine Learning Resources.
Several scripts are packaged that will be used for model deployment.
This will upload all the resources to the Azure ML Datastore. After the upload, a URL is generated for the Jupyter session, which enables you to interact with the session from your local web browser. You can verify that all the resources have been uploaded in the Azure ML portal. The steps to check the resources in Azure ML portal are provided in the video above.
Train and optimize an object detection model with NVIDIA TAO Toolkit
This section covers the steps for training the model with NVIDIA TAO Toolkit on the Azure ML platform.
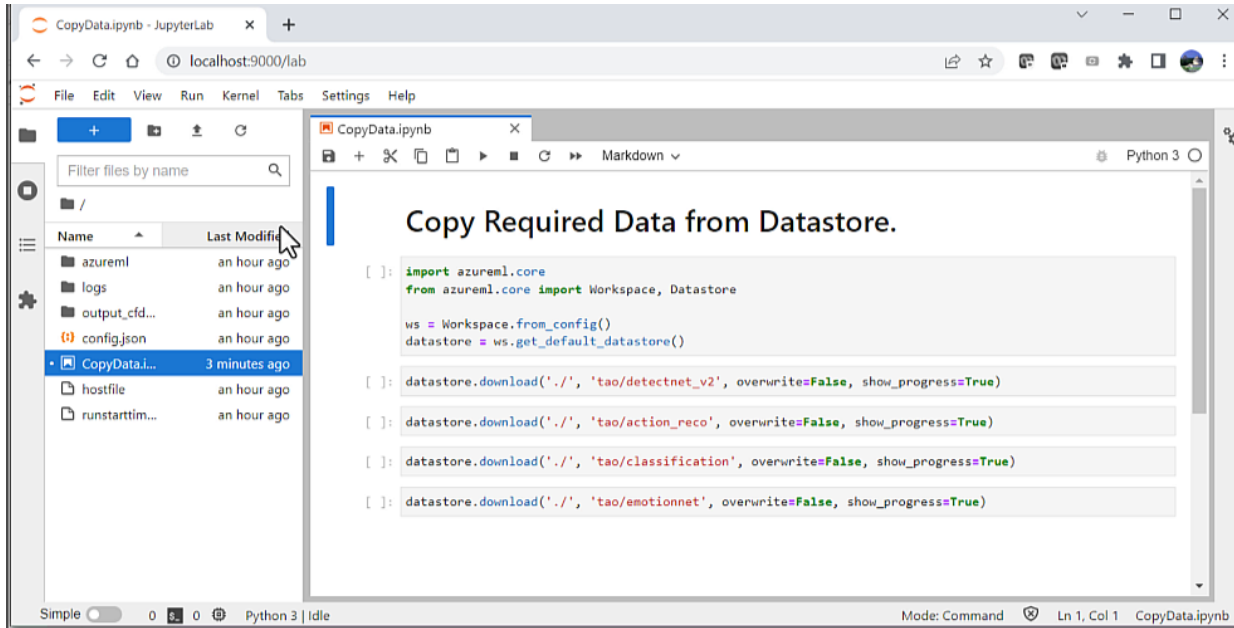
Before you begin the training process, you need to run the auxiliary notebook called CopyData.ipynb. The notebook is automatically generated with azureml-ngc-tools. This copies the notebooks from the Datastore to the compute cluster.
Figure 2. CopyData.ipynb Jupyter notebook for copying notebooks from the Datastore to the compute cluster
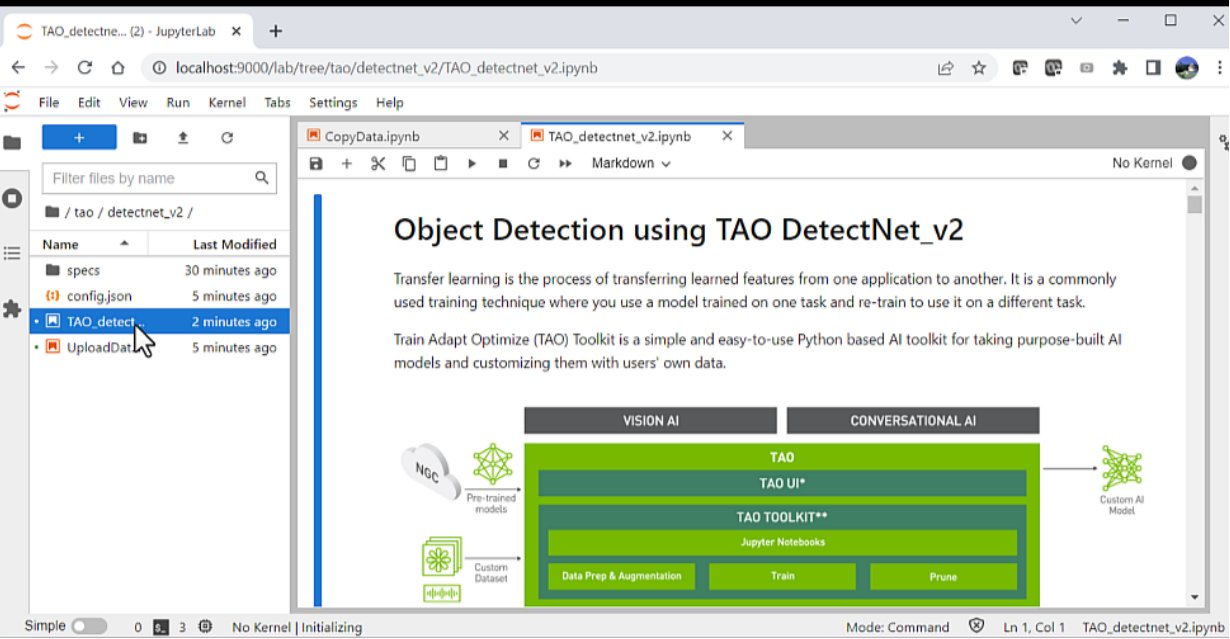
A new folder called tao is created with all the additional data provided. This folder contains the Jupyter notebook, along with the required configuration files for training. Navigate to the TAO_detectnet_v2.ipynb notebook under folder tao/detectnet_V2. The DetectNet_v2 is one of the many computer vision notebooks available for training.
Figure 3. TAO DetectNet_v2 Jupyter notebook used for training the model
Once you load up the notebook, simply execute each cell shown. For more information on this network or on how to configure hyperparameters, refer to the TAO Toolkit documentation. Some of the main steps covered in the notebook include:
Setting environment variables
Downloading and converting training data
Downloading the model from the NGC catalog
Training the model
Pruning the model to remove unwanted layers and reduce model size
Retraining the pruned model to recover lost accuracy
Quantize Aware Training (QAT), which changes the precision of the model to INT8, reducing model size without sacrificing accuracy
Exporting the model for inference
Once the model is generated on the compute cluster, you will need to upload the model to the Azure ML workspace. To upload, run the UploadData.ipnyb notebook to copy the model to the Datastore. This model will be used for deployment.
Deploy the model using NVIDIA Triton Inference Server
Next, deploy the exported model using NVIDIA Triton Inference Server. Use the model trained in the previous step with NVIDIA TAO Toolkit and stored in the Datastore. Pull the model directly from the Datastore.
Once the model has been uploaded, push the NVIDIA Triton container to the Azure Container Registry (ACR), create the inference end point, and test it using some sample images.
Register the model for inference
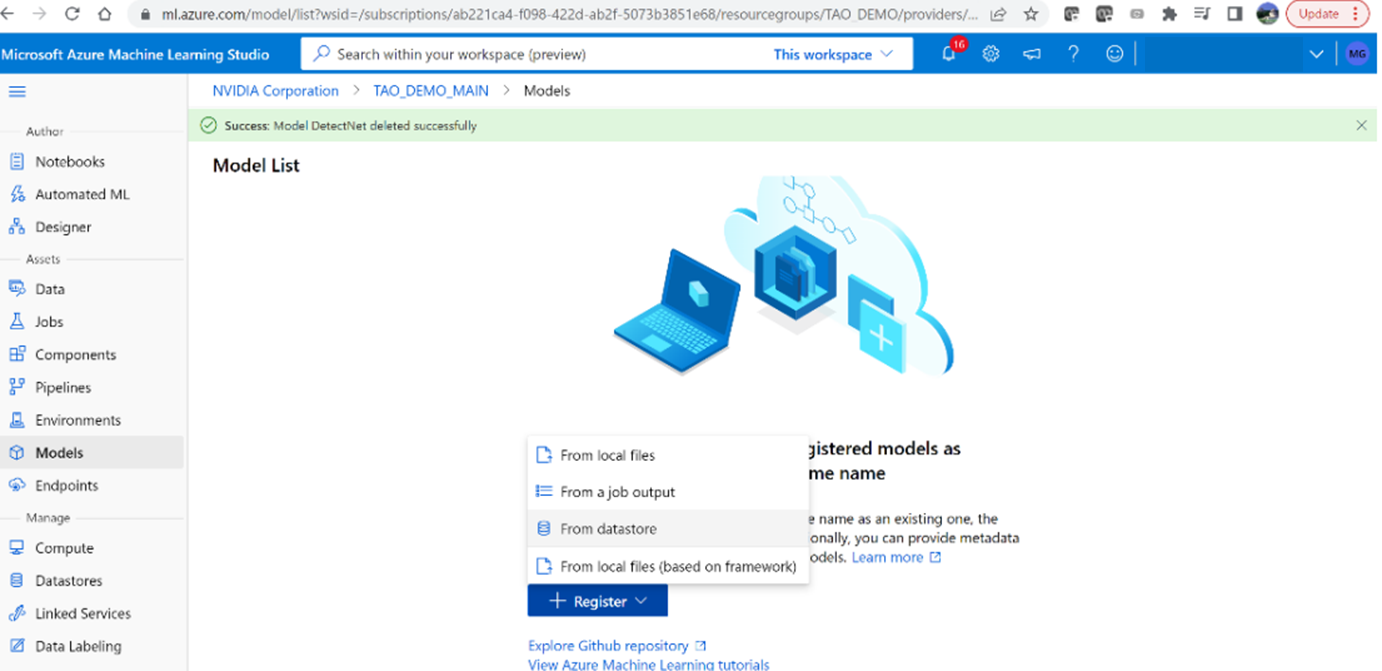
The next steps entail uploading the model for inference. Upload the trained model from the Datastore. Navigate to the Azure Machine Learning Studioto load the local model.
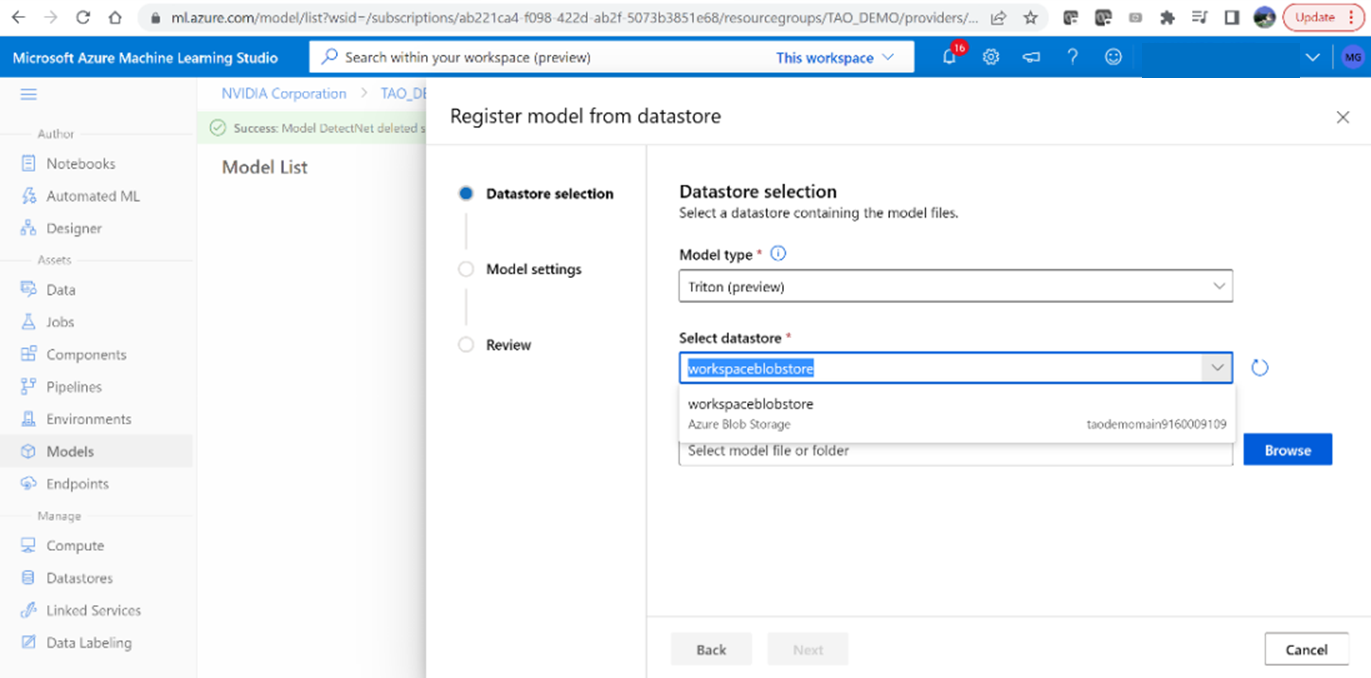
1. After logging in, go to the Azure ML workspace (created earlier) using the azureml-ngc-tool script. Select ‘Models’ from the left menu, then click ‘Register’ and ‘From datastore.’
Figure 4. Register the model for deploymentfrom Azure ML Studio
2. Select the ‘Triton’ model type to upload the model.
Figure 5. Upload the modelfrom Azure ML Studio
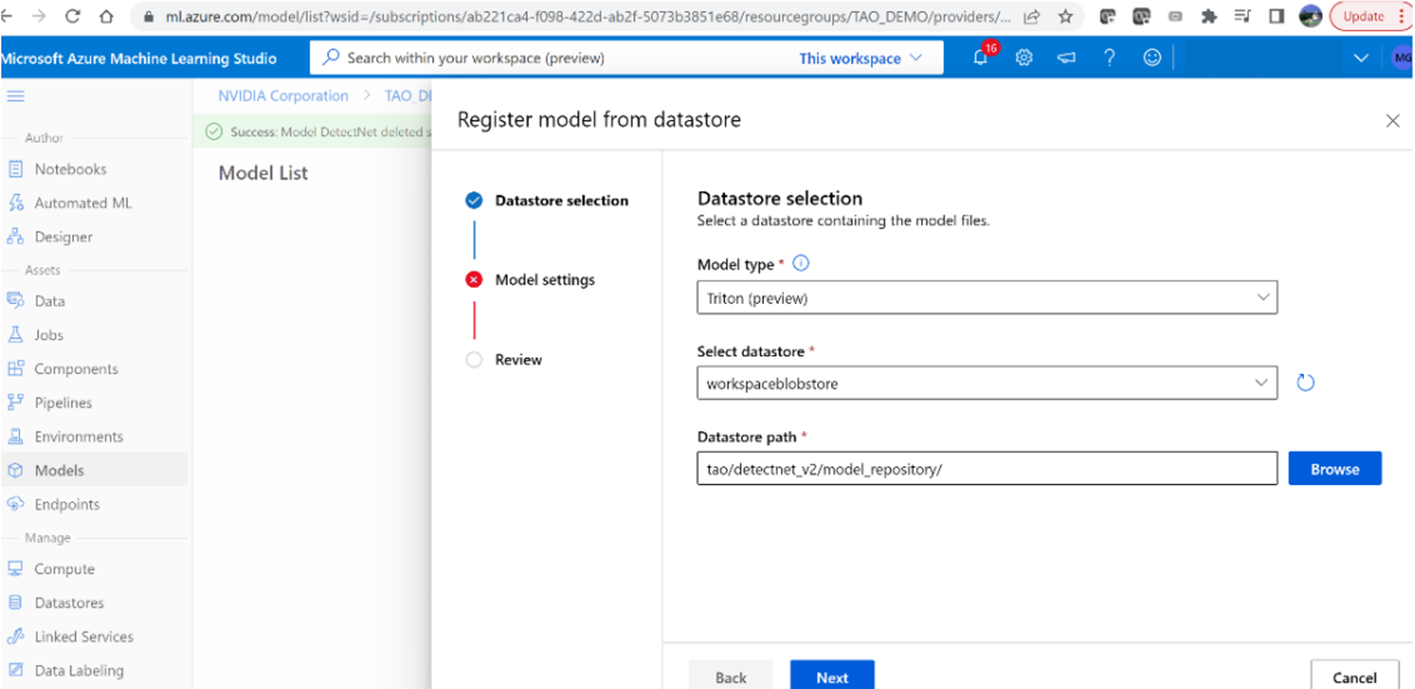
3. Browse and select the path: tao/detectnet _v2/model _repository
Figure 6. Datastore selection
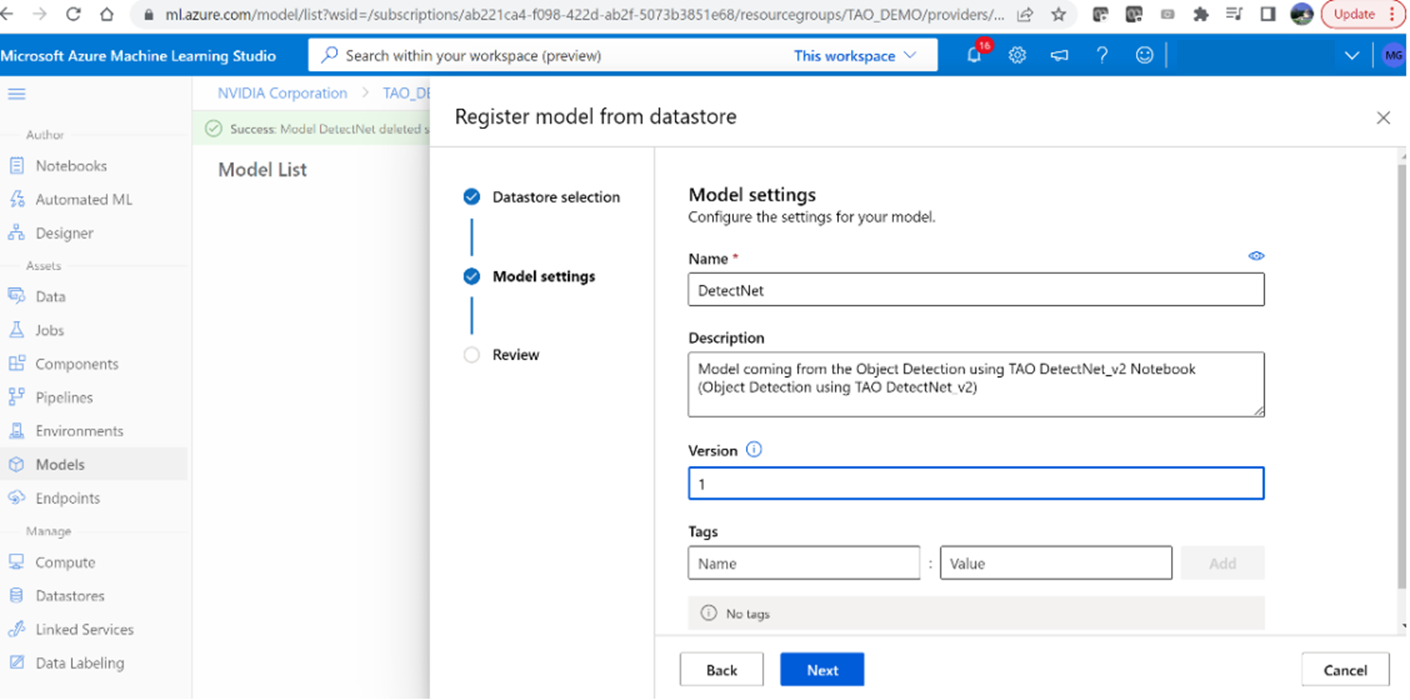
4. Name the model ‘DetectNet’ and set the version to ‘1’
Figure 7. Register the model
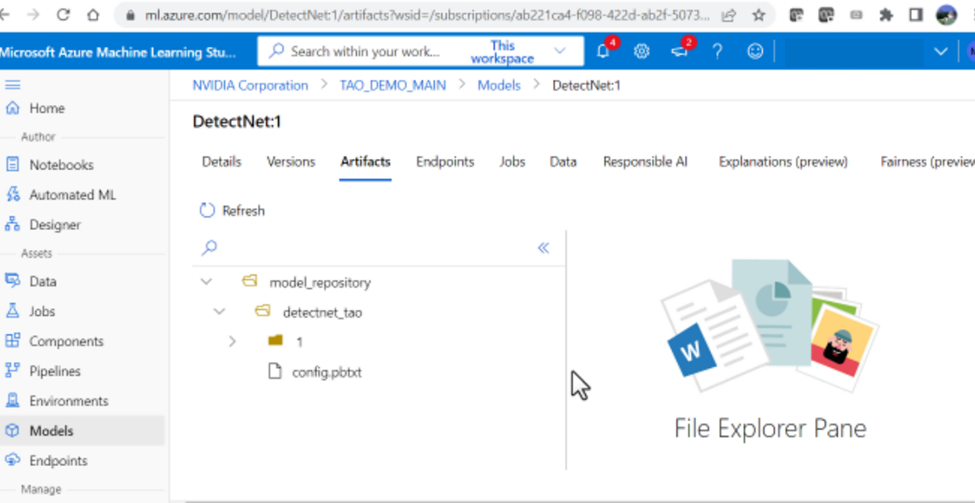
5. Once the model has successfully uploaded, you should be able to see the directory structure.
Figure 8. Model artifacts in Azure ML model store
Build and upload NVIDIA Triton image to Azure Container Registry
Next, build the NVIDIA Triton container with necessary dependencies and upload the image to Azure Container Registry (ACR).
1. On your local machine, run the following script to create the NVIDIA Triton container with the necessary dependencies:
bash scripts/build_container.sh
2. Verify that the image has been created locally by executing:
docker image ls
If successful, you should see the repo named nvcr.io/nvidia/tao/triton-apps.
3. Push the Docker image to ACR using the following script:
bash scripts/push_container_to_ACR.sh
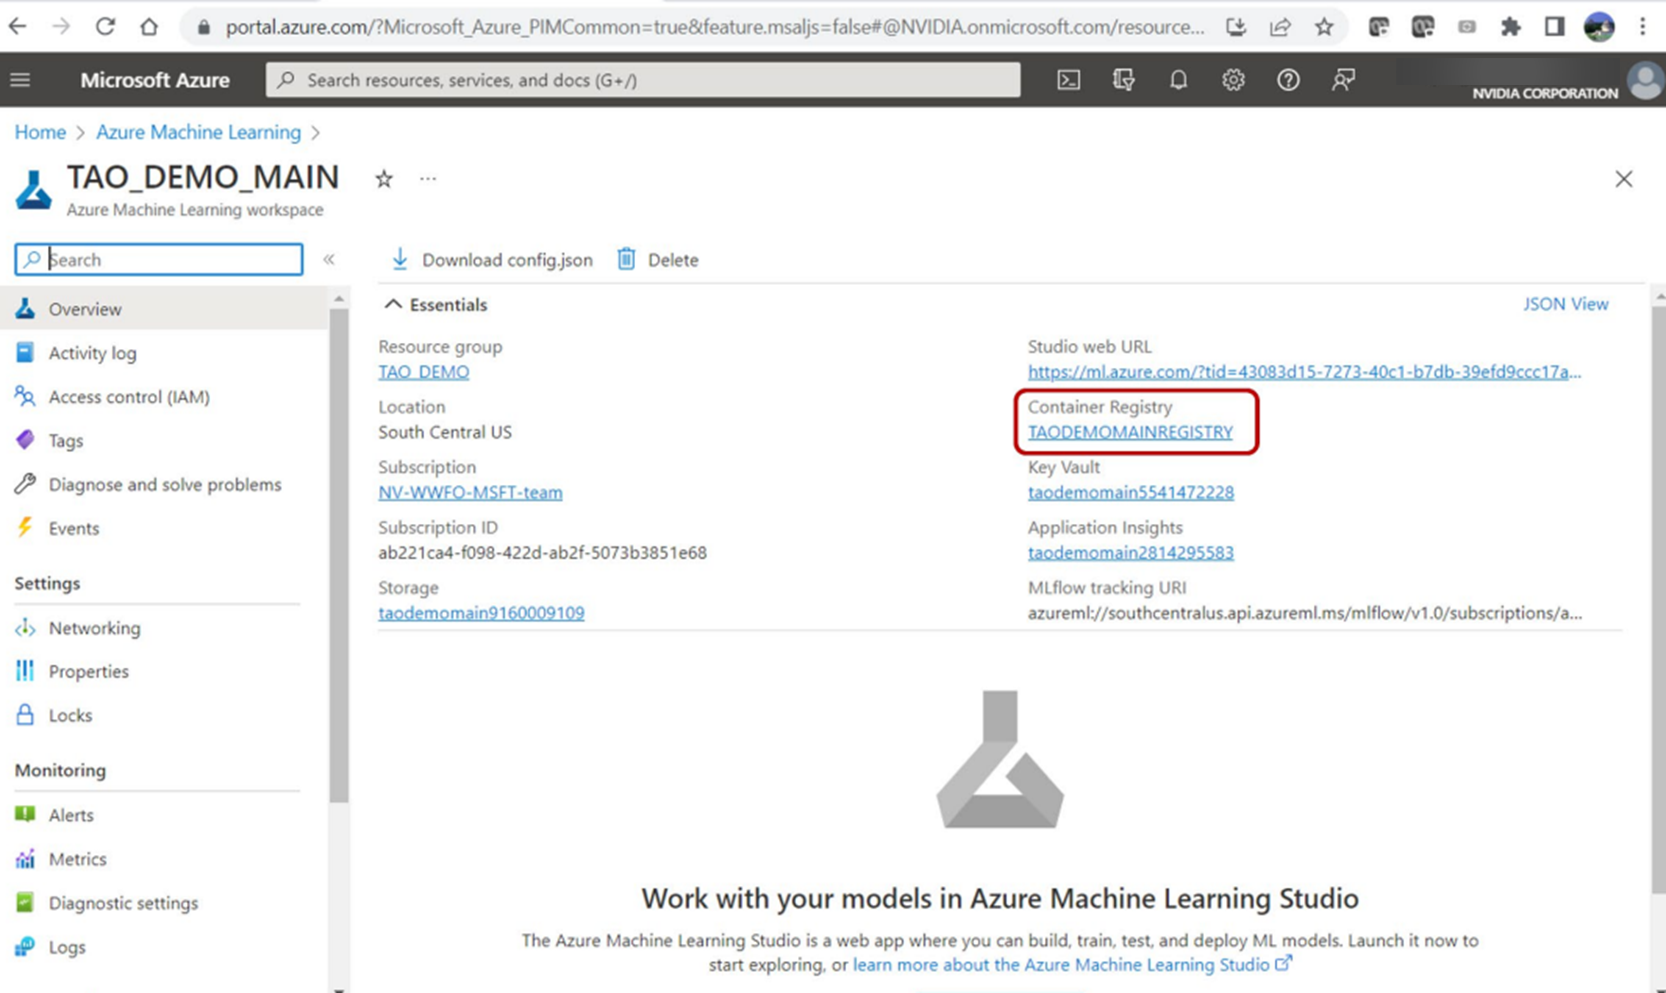
The registryname parameter is the name of the provided Azure ML workspace default container registry. Navigate to the Workspace essential properties dashboard to find it in the Azure portal. This script will push the Docker image to ACR and tag it as ${registryname}.azurecr.io/tao:latest.
Figure 9. Get the Container Registry name, where the container will be uploaded
Once the script completes, navigate to ACR to see the container in the tao repository.
Create the Azure ML endpoint and deployment
On your local machine, run the following script to create an Azure ML Endpoint followed by the deployment:
bash scripts/create_endpoint _and_deployment.sh
The script will create the Azure ML Endpoint with the endpoint names provided in the endpoint_aml.yml file. It then deploys the NVIDIA Triton service on Azure using the deployment_aml.yml file.
In this file, you can specify VM size. For this example, use the Standard_NC6s_v3 VM. These files are provided in scripts/auxiliary_files.
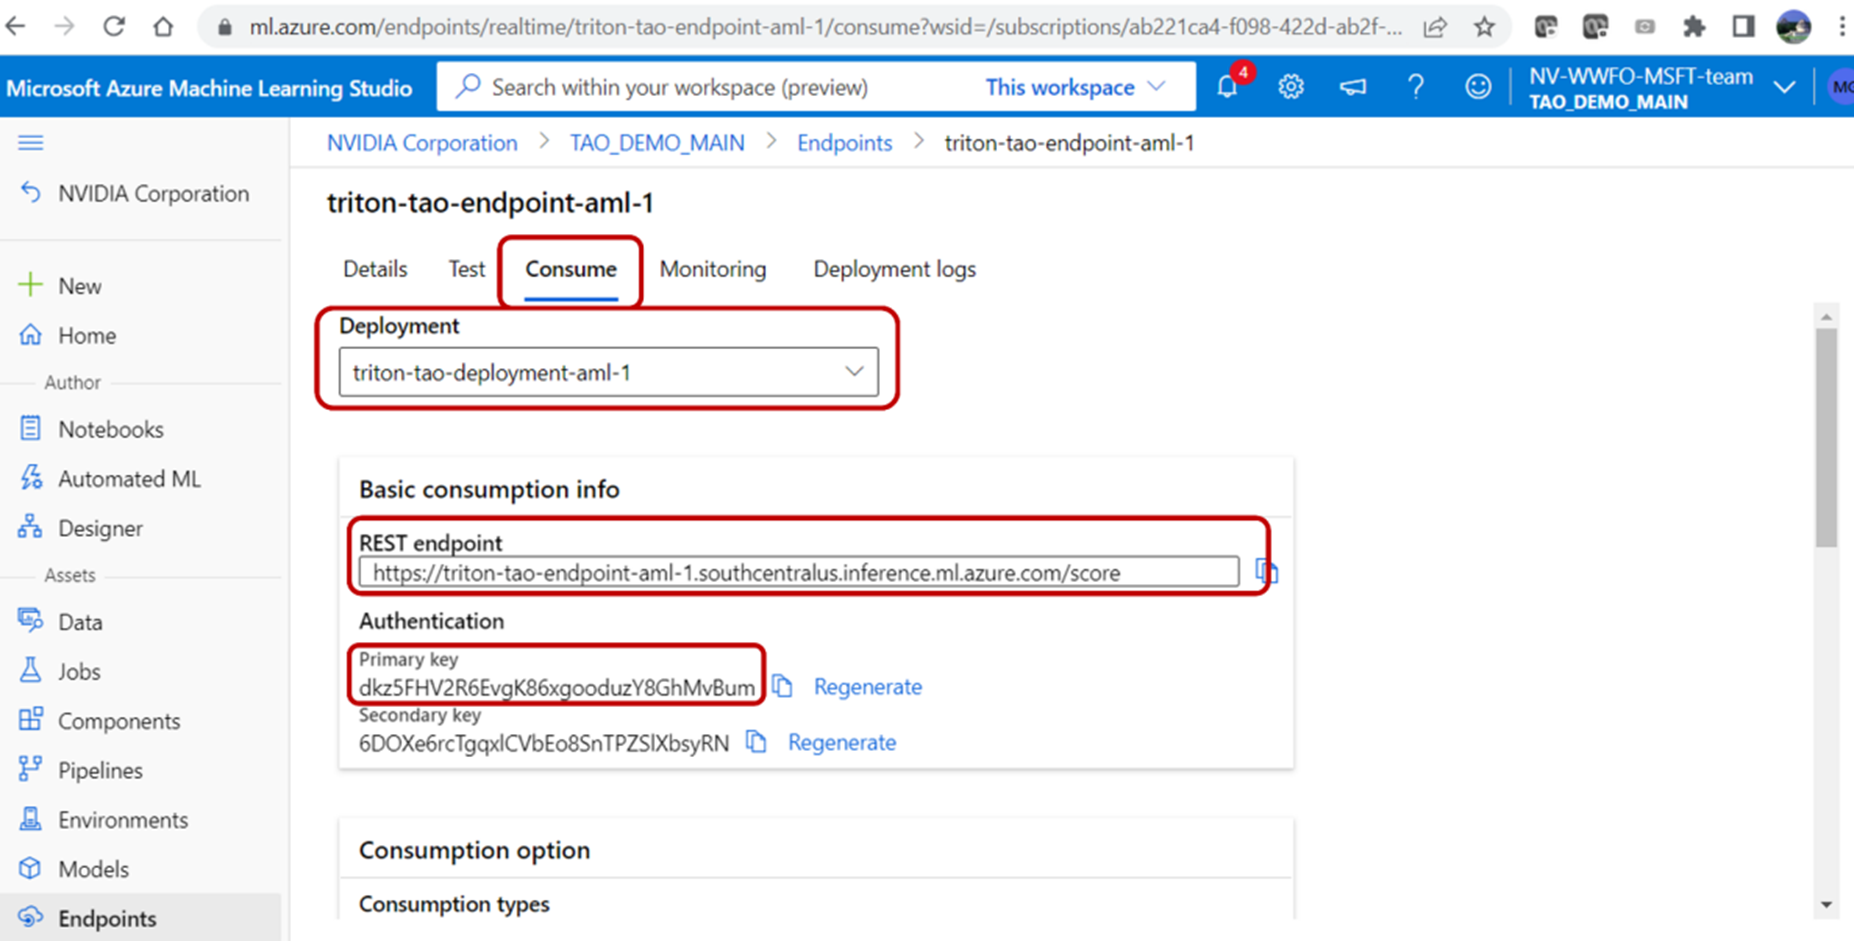
Once the script execution is complete, you should be able to see the deployment information, REST endpoint, and authentication key on the Azure portal. The deployment information can be found by clicking into the endpoint and navigating to the Deployment Logs tab.
Figure 10. NVIDIA Triton deployment endpoint
Validate the endpoint
You can validate the endpoint by using the REST endpoint URL and the primary key found under the Endpoints tab on the Azure portal. To query the Azure ML endpoint from the user local machine, run the following script:
bash scripts/infer.sh
This script is provided in the zip file pulled from AzureML Quick Launch: TAO in the first step.
Next, provide the REST endpoint URL from the NVIDIA Triton deployment endpoint. The endpoint is queried with the test image provided with the option. The output image with bounding boxes is stored in .
Summary
This post showed the end-to-end workflow for fine-tuning a model with NVIDIA TAO Toolkit and deploying the trained object detection model using NVIDIA Triton Inference Server, all on Azure Machine Learning. These tools abstract away the AI framework complexity, enabling you to build and deploy AI applications in production without the need for AI expertise.
There has been tremendous growth in AI over the years. With that, comes a larger demand for AI models and applications. Creating production-quality AI requires…
There has been tremendous growth in AI over the years. With that, comes a larger demand for AI models and applications. Creating production-quality AI requires expertise in AI and data science and can still be intimidating for many developers.
To develop accurate AI, you must choose what model architecture to use, what data to collect, and finally how to tune the model to meet the desired KPIs. There are thousands of combinations of model architectures and hyperparameters that you’d have to try to get the best model for your specific use case. This process is extremely laborious and requires model architecture expertise to tune hyperparameters.
Automated machine learning (AutoML) automates the manual task of finding the best models and hyperparameters for the desired KPI. It can algorithmically derive the best model for your given KPI and abstract away a lot of the complexity of AI model creation and optimization.
AutoML makes it easy for even a novice developer to create a highly accurate AI model.
AutoML in TAO
AutoML in TAO is fully configurable for automatically optimizing the hyperparameters of a model, which reduces the need for manual tuning. It caters to both AI experts and non-experts.
For non-experts, the guided Jupyter notebook provides a simple, efficient way to create an accurate AI model.
For experts, TAO gives you full control of which hyperparameters to tune and which algorithm to use for sweeps.
TAO currently supports two optimization algorithms: Baysian and Hyperband optimization. These algorithms can effectively sweep across a range of hyperparameters to find the best combination to optimize the user-provided metric.
Hyperband yields faster because it doesn’t have to run through the entire training configuration. It runs for a limited number of epochs, discards the runs that are performing poorly, and only continues on the remaining runs. This process of elimination continues until there is a single configuration that gives the best results.
For Bayesian, the training runs to completion for all the sweeps.
AutoML is supported for a wide range of CV tasks: image classification, object detection, segmentation, and OCR. Table 1 shows the full list of supported networks.
The entire AutoML workflow can be run from the provided Jupyter notebooks. AutoML uses the TAO API services to manage all training jobs.
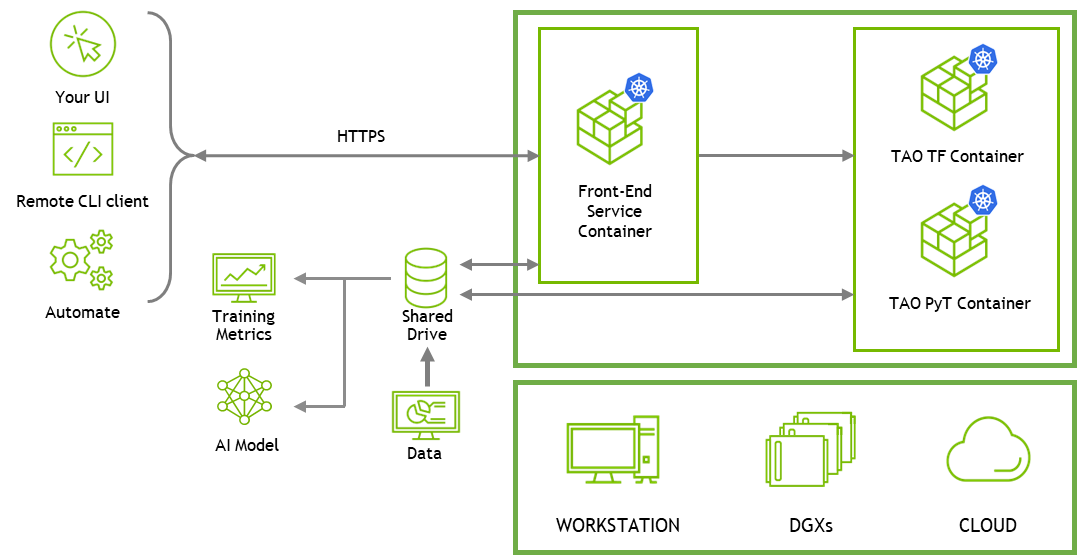
TAO API services
TAO API is a Kubernetes service that enables deployment of TAO as a microservice either on your own Kubernetes cluster or with cloud Kubernetes services such as Amazon EKS or Azure AKS.
TAO API services provide an additional layer of abstraction over containers. You can manage and deploy TAO services using Helm charts and remotely run jobs using REST API calls. With the APIs, you can remotely create and upload datasets, run training jobs, evaluate models, and export models for deployment.
Figure 1. Cloud-native TAO API service architecture
API services make it easy to integrate TAO into your own custom application or build a web-UI application on top of TAO. To get started with building your custom applications with REST APIs, see the API guide and the API notebooks in TAO Toolkit Getting Started. For more information, see the Notebook section later in this post.
To train using the CLI, use the lightweight CLI client application that you can install on a client system to access TAO services and CLI notebooks. CLI notebooks are available on NGC in TAO getting started resources.
AutoML requires a higher-level service on top of your training runs to determine and manage the set of experiments. TAO services keep track of all the experiments that they have tried with the KPIs and build the next set of experiments to improve on the KPIs. You can run AutoML with TAO API services either through the remote CLI application or directly using REST APIs. Jupyter notebooks for both are provided. For more information, see the Notebook section.
The REST API notebooks mainly serve as a reference if you are building your own applications or UI on top of TAO.
Set up TAO services
The TAO API service can run on any Kubernetes platform. To simplify the deployment of TAO services, we have provided a one-click deploy script. This simplifies the deployment of TAO services on bare-metal setup or on Amazon EKS. For this post, we use the bare-metal setup but instructions to deploy on cloud are provided in the API guide.
tar -xvf tao-toolkit-api-bare-metal.tar
cd tao-toolkit-api-bare-metal
Add the host IP address and login credentials in the hosts file. This is the system where you plan to run the TAO services. It could be a local or remote system but you must have sudo privileges.
For credentials, you can use either a password (ansible_ssh_pass) or an SSH private key file (ansible_ssh_private_key_file). For a single-node cluster, you can list only the master node.
You can validate SSH credentials for remote machines with the following command. The proper answer would be root.
ssh @ 'sudo whoami'
Next, modify the tao-toolkit-api-ansible-values.yml file to add your NGC credentials and the Helm chart. This pulls the Helm chart from the NGC registry. For more information, see Generating Your NGC API Key.
Install the dependencies and deploy the TAO service. Before installation, first check whether all the dependencies are met by running check-inventory.yml. If everything looks good, you should see a message that says 0 failed. Then, run install, which takes 10–15 minutes.
For this post, use the object detection notebook (TAO API Starter Kit/Notebooks/client/automl/object_detection.ipynb) but you can also do AutoML on other computer vision tasks.
Use AutoML to fine-tune an object detection model with TAO
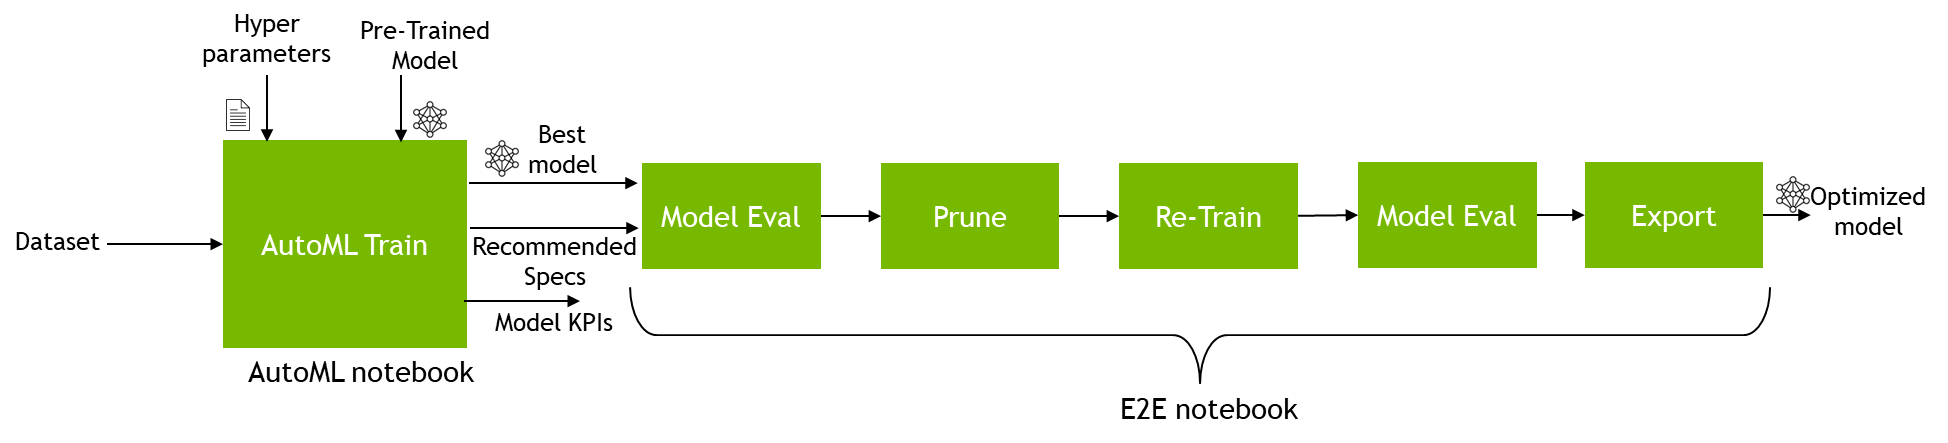
Here is a quick walkthrough of the AutoML workflow with the Object Detection AutoML notebook. For this walkthrough, you use the client/automl/object_detection.ipynb notebook from the hierarchy shown earlier. We highlight the key steps here, but all the steps are captured in the Jupyter notebook.
Figure 2. Step-by-step TAO AutoML workflow
Select a model topology
Choose any one of the available models listed for that notebook. Each notebook has a default model for that domain. In this example, the default model is DetectNet V2 but you can change it to FasterRCNN, SSD, DSSD, Retinanet, EfficientDet, Yolo V3, Yolo V4, or YoloV4 tiny.
model_name = "detectnet-v2"
Create a dataset
The next step is to use the dataset given as an example in the notebook or use your own dataset. The folder structure of the dataset requirement is provided in the notebooks.
When you have the dataset ready, upload it to the TAO Toolkit REST API-deployed machine through the Unix rsync command for TAO-Client notebooks. You must upload the images and labels for both training and validation data.
After the dataset has been uploaded, convert the dataset to tfrecords through the dataset-convert action. All object detection models require dataset conversion, but some models from other domains, like classification, can operate on the raw data uploaded.
The next step is to choose which AutoML algorithm to run. There are options to tweak some AutoML-specific parameters. You can view the parameters that are enabled by default for the AutoML search for a model, along with all the parameters that are available for a network
tao-client {model_name} model-automl-defaults --id {model_id} | tee ~/shared/users/{os.environ['USER']}/models/{model_id}/specs/automl_defaults.json
This outputs a list of hyperparameters that are used for AutoML. For this experiment, you are choosing five different hyperparameters to sweep.
You can add additional parameters or remove existing defaulted parameters. For example, to sweep the soft_start hyperparameter, add the following in your notebook:
There are also options to tweak algorithm-specific parameters, but the default parameters work well. For more information, see AutoML.
Train with AutoML
At this point, you have all the tools necessary to start the AutoML run. You can also change default training specs, like image extension or class mapping, before triggering the AutoML run:
When AutoML run starts, you can see various stats, such as the best accuracy score at that time, how many experiments have been completed, an approximate estimated time for completion, and so on. You should see an output log similar to the following.
{
  "best_map": 0.59636,
  "Estimated time for automl completion": "23.13 minutes remaining approximately",
  "Current experiment number": 3,
  "Number of epochs yet to start": 429.0,
  "Time per epoch in seconds": 3.24
}
Compare models
At the end of the AutoML run, you can see the results of all experiments. You are presented with the spec file and the binary weight file of the model achieving the highest accuracy among the AutoML sweeps.
The best model for this experiment was ID 9 with a mAP of 0.627. This is stored in the best_model/recommendataion_9.kitti file.
After saving the best model obtained from AutoML, you can plug the model and spec file in the end-to-end notebook and then prune and optimize the model for inference.
Figure 3. End-to-end workflow from AutoML training to model optimization
To plug the model into the new notebook, copy the train job ID from the AutoML notebook. The AutoML train job ID is printed when you run the training job.
When you have the train job ID, open the end-to-end notebook from the notebook hierarchy from earlier. For this post, use the TAO API Starter Kit/Notebooks/client/end2end/detectnet_v2.ipynb notebook. As you have already trained a model, just run the import statement in the first cell and skip all the way down to the Run Evaluate section. In this section, create a code cell before evaluating.
train_job_id = “id_you_copied”
After adding the job_map code cell, you can evaluate the model, prune the model for compression, and even do a quantization-aware training of the original model or the pruned model as showcased in the end-to-end notebooks
Results
We trained various models with AutoML on public datasets to see how much improvement in accuracy we could achieve. We compared the best AutoML-based accuracy against a baseline accuracy number from the default spec file provided in the packages. The results are in Table 2.
For object detection, we trained on the FLIR dataset, which contains images from both thermal and RGB sensors.
For semantic segmentation, we used the ISBI dataset.
For accuracy, we used mAP (mean average precision) for object detection, average accuracy of all classes and tasks for image classification, and mean IoU (intersection over union) score for semantic segmentation.
Task
Model
Baseline Accuracy (default spec)
Best AutoML accuracy
Dataset
Object Detection
DetectNet_v2 – ResNet18
44.16
51.37
FLIR
Object Detection
FasterRCNN – ResNet18
56.42
60.44
FLIR
Object Detection
YOLOv4 – ResNet18
40.12
63.46
FLIR
Object Detection
YOLOv3 – ResNet18
42.36
61.84
FLIR
Object Detection
RetinaNet – ResNet18
50.54
63.09
FLIR
Image Classification
ResNet18
53.95
66.28
Pascal VOC
Semantic Segmentation
UNET
71.64
76.65
ISBI
Table 2. Accuracy gain across networks by using AutoML
Across all the models that we tested, the increase in model accuracy is substantial compared to static default hyperparameters. The amount of improvement varies depending on the model, but we have generally seen improvements ranging from 5% to more than 20%. This shows that AutoML can work on various datasets to train the best model for a given KPI.
Summary
As the number of use cases and customization grows, it becomes imperative to accelerate the AI creation process. AutoML can eliminate the need for manual tuning, saving valuable time for developers.
With TAO AutoML, you can now automatically tune models for object detection, classification, and segmentation use cases using various popular model architectures. TAO AutoML provides simplicity for novice users to get started, as well as configurability for experts to choose their own hyperparameters to sweep.

 Machine learning operations, MLOps, are best practices for businesses to run AI successfully with help from an expanding smorgasbord of software products and…
 Virtual agents or voice-enabled assistants have been around for quite some time. But in the last decade, their usefulness and popularity have exploded with the…
 According to IDC, the volume of data generated each year is growing exponentially. IDC’s Global DataSphere projects that the world will generate 221 ZB…
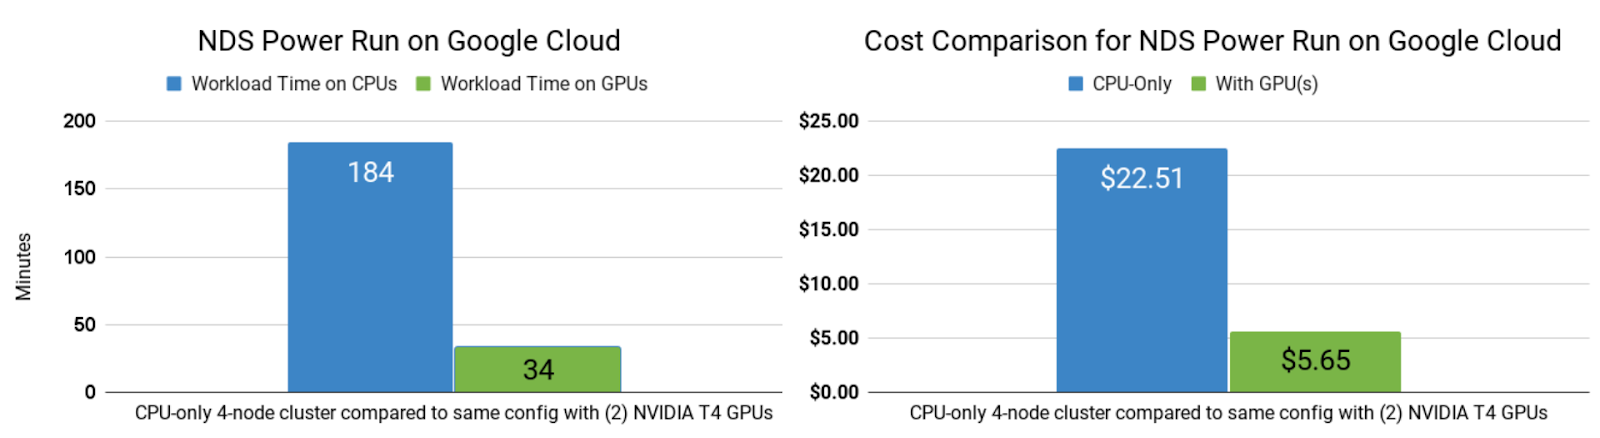
 The latest NVIDIA Cybersecurity Hackathon brought together 10 teams to create exciting cybersecurity innovations using the NVIDIA Morpheus cybersecurity AI…
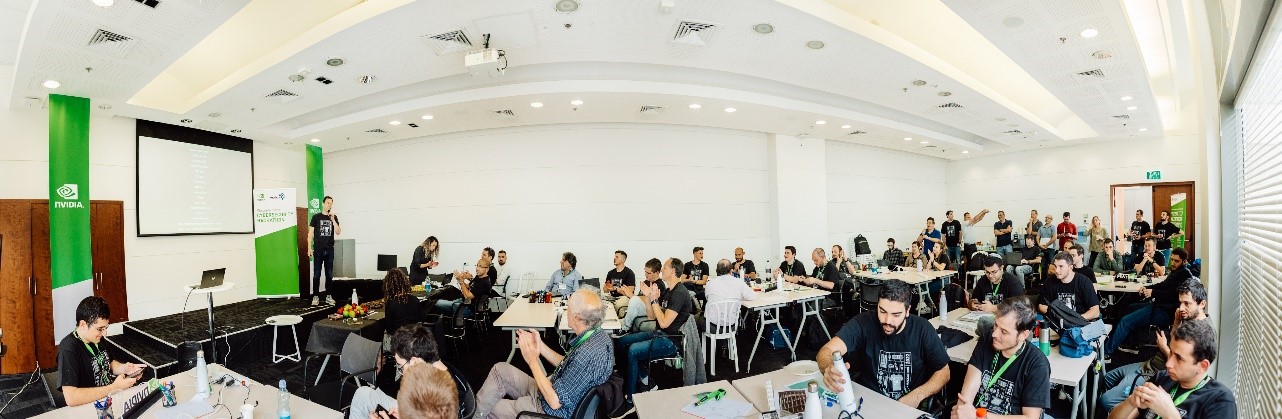
 Learn about the newest CUDA features such as release compatibility, dynamic parallelism, lazy module loading, and support for the new NVIDIA Hopper and NVIDIA…
 The latest version of the NVIDIA TAO Toolkit 4.0 boosts developer productivity with all-new AutoML capability, integration with third-party MLOPs services, and…
 A fundamental shift is currently taking place in how AI applications are built and deployed. AI applications are becoming more sophisticated and applied to…