Categories
Misc

Can TensorFlow or other machine learning detect objects on your desktop?

For example, can you run an app that will look at your desktop and identify icons / mouse / live video / certain applications like it can do for real world objects in videos?

I don’t know how to Google this, I can’t find any real results for this question of using your live desktop in place of a video as you source.

Hope this is clear, thanks.

submitted by /u/Iamjohnmiller
[visit reddit] [comments]

Categories
Misc

Discover New CUDA 11.4 Features

The new release consists of GPU-accelerated libraries, debugging and optimization tools, an updated C/C++ compiler, and a runtime library to build and deploy your application on major architectures.

NVIDIA announces our newest release of the CUDA development environment consisting of GPU-accelerated libraries, debugging and optimization tools, an updated C/C++ compiler, and a runtime library to build and deploy your application on major architectures including NVIDIA Ampere, x86, Arm server processors, and POWER. The latest release, CUDA 11.4, and its features are focused on enhancing the programming model, new language support, and performance of your CUDA applications.

Key features:

  • CUDA Programming model enhancements
    • CUDA Graph launch performance
    • Multi-process Service (MPS) features
    • Asynchronous Programming model
  • Language support – CUDA
    • C++ support enhancements
    • Python support
  • Compiler enhancements
  • CUDA Driver enhancements
    • GPUDirect RDMA package inclusion
    • GPUDirect Storage package inclusion

CUDA 11.4 ships with R470 driver. The driver now includes GPUDirect RDMA, as well as GPUDirect Storage packages that streamline and enable you to leverage these technologies without the need for separate installation of additional packages. The driver also enables new MIG configurations for the recently launched NVIDIA A30 GPU to double the amount of memory per MIG slice. This results in optimal performance for various workloads on the A30 GPU, especially for AI Inference workloads.

Resources:

Learn More & Download Now

Categories
Misc

How to view MSE for individual predictions?

I am using tensorflow for a regression problem and I would like to see the error for each prediction that the model makes during training. At the end of epoch it prints the MSE for that epoch but I would like to be able to print or view all the errors for each prediction. Is there a way to do that? I was thinking about adding some print statements or modifying the tensorflow source code in some way. Thanks!

submitted by /u/NameError-undefined
[visit reddit] [comments]

Categories
Misc

Hidden GEM: Canadian Weather Forecasts to Run on NVIDIA-Powered System

The supercomputer behind Canada’s weather forecasts is getting an upgrade, adopting NVIDIA networking to support long-running, computationally intensive environmental models. Located in Quebec, the system runs a complex forecasting and data assimilation system known as GEM — the Global Environmental Multiscale model. The model processes information about temperature, air pressure and wind to produce both Read article >

The post Hidden GEM: Canadian Weather Forecasts to Run on NVIDIA-Powered System appeared first on The Official NVIDIA Blog.

Categories
Misc

Latest Nsight Compute 2021.2 Release Now Available for Download

The new release helps identify more performance issues, and makes it easier to understand and fix them.

The new Nsight Compute 2021.2 release helps identify more performance issues, and makes it easier to understand and fix them.

Register Dependency Visualization

This latest release adds a new feature for register dependency visualization. It helps identify long dependency chains and inefficient register usage that can limit performance. The SASS view in the Source page has new columns that track all the potential writes for a register each time it is read. Columns show all dependencies for registers, predicates, uniform registers and uniform predicates.

Standalone Source Viewer

Developers have frequently requested this feature to allow the view of side-by-side assembly and correlated source code for CUDA kernels in the Source page without needing to collect a profile. Users can directly open .cubin files from disk in the GUI to see the code correlation. This feature helps users understand how their code is being translated into assembly by the compiler and can be used to identify compiler optimizations and inefficiencies.

Guided Analysis Improvements

Several other features have been added to improve the guided analysis experience within the GUI. These include highlighted focus metrics, report cross-links, increased rule visibility and documentation references. These all add to the built-in profile and optimization guided analysis that Nsight Compute provides to help users understand and fix performance bottlenecks.

OptiX 7 Resource Tracking

In addition to existing Optix API tracing, this release provides support for tracking OptiX objects in the Resources tool window. OptiX 7 users can now see the properties and lifetime for objects like OptixDeviceContext, OptixProgramGroup, OptixDenoiser and more. Understanding when objects are created, destroyed, and interacted with can reveal unexpected behaviours that may cause performance or correctness issues in an OptiX application.

Additional Improvements

There have been additional improvements to management of baseline reports, font settings, CLI filters, and a new Python interface for reading report data. There is also support for tracking the new memory alloc/free nodes in CUDA graphs. For full details, see the latest release notes.

Resources:

Learn More & Download Now  
Documentation
Forums
GTC On-Demand Session: “CUDA is Evolving, and the Latest Developer Tools are Adapting to Keep Up”
GTC On-Demand Session: “Requests, Wavefronts, Sectors Metrics: Understanding and Optimizing Memory-Bound Kernels with Nsight Compute”
Demo Video: New Nsight Systems and Nsight Compute Highlights
Additional instructional videos and blog posts for more information.

Categories
Offsites

Quickly Training Game-Playing Agents with Machine Learning

In the last two decades, dramatic advances in compute and connectivity have allowed game developers to create works of ever-increasing scope and complexity. Simple linear levels have evolved into photorealistic open worlds, procedural algorithms have enabled games with unprecedented variety, and expanding internet access has transformed games into dynamic online services. Unfortunately, scope and complexity have grown more rapidly than the size of quality assurance teams or the capabilities of traditional automated testing. This poses a challenge to both product quality (such as delayed releases and post-launch patches) and developer quality of life.

Machine learning (ML) techniques offer a possible solution, as they have demonstrated the potential to profoundly impact game development flows – they can help designers balance their game and empower artists to produce high-quality assets in a fraction of the time traditionally required. Furthermore, they can be used to train challenging opponents that can compete at the highest levels of play. Yet some ML techniques can pose requirements that currently make them impractical for production game teams, including the design of game-specific network architectures, the development of expertise in implementing ML algorithms, or the generation of billions of frames of training data. Conversely, game developers operate in a setting that offers unique advantages to leverage ML techniques, such as direct access to the game source, an abundance of expert demonstrations, and the uniquely interactive nature of video games.

Today, we present a ML-based system that game developers can use to quickly and efficiently train game-testing agents, helping developers find serious bugs quickly while allowing human testers to focus on more complex and intricate problems. The resulting solution requires no ML expertise, works on many of the most popular game genres, and can train an ML policy, which generates game actions from game state, in less than an hour on a single game instance. We have also released an open source library that demonstrates a functional application of these techniques.

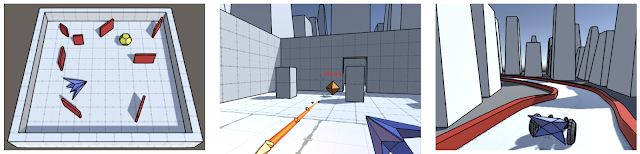
Supported genres include arcade, action/adventure, and racing games.

The Right Tool for the Right Job
The most elemental form of video game testing is to simply play the game. A lot. Many of the most serious bugs (such as crashes or falling out of the world) are easy to detect and fix; the challenge is finding them within the vast state space of a modern game. As such, we decided to focus on training a system that could “just play the game” at scale.

We found that the most effective way to do this was not to try to train a single, super effective agent that could play the entire game from end-to-end, but to provide developers with the ability to train an ensemble of game-testing agents, each of which could effectively accomplish tasks of a few minutes each, which game developers refer to as “gameplay loops”.

These core gameplay behaviors are often expensive to program through traditional means, but are much more efficient to train than a single end-to-end ML model. In practice, commercial games create longer loops by repeating and remixing core gameplay loops, which means that developers can test large stretches of gameplay by combining ML policies with a small amount of simple scripting.

Simulation-centric, Semantic API
One of the most fundamental challenges in applying ML to game development is bridging the chasm between the simulation-centric world of video games and the data-centric world of ML. Rather than ask developers to directly convert the game state into custom, low-level ML features (which would be too labor intensive) or attempting to learn from raw pixels (which would require too much data to train), our system provides developers with an idiomatic, game-developer friendly API that allows them to describe their game in terms of the essential state that a player observes and the semantic actions they can perform. All of this information is expressed via concepts that are familiar to game developers, such as entities, raycasts, 3D positions and rotations, buttons and joysticks.

As you can see in the example below, the API allows the specification of observations and actions in just a few lines of code.

Example actions and observations for a racing game.

From API to Neural NetworkThis high level, semantic API is not just easy to use but also allows the system to flexibly adapt to the specific game being developed – the specific combination of API building blocks employed by the game developer informs our choice of network architecture, since it provides information about the type of gaming scenario in which the system is deployed. Some examples of this include: handling action outputs differently depending on whether they represent a digital button or analog joystick, or using techniques from image processing to handle observations that result from an agent probing its environment with raycasts (similar to how autonomous vehicles probe their environment with LIDAR).

Our API is sufficiently general to allow modeling of many common control-schemes (the configuration of action outputs that control movement) in games, such as first-person games, third-person games with camera-relative controls, racing games, twin stick shooters, etc. Since 3D movement and aiming are often an integral aspect of gameplay in general, we create networks that automatically tend towards simple behaviors such as aiming, approach or avoidance in these games. The system accomplishes this by analyzing the game’s control scheme to create neural network layers that perform custom processing of observations and actions in that game. For example, positions and rotations of objects in the world are automatically translated into directions and distances from the point of view of the AI-controlled game entity. This transformation typically increases the speed of learning and helps the learned network generalize better.

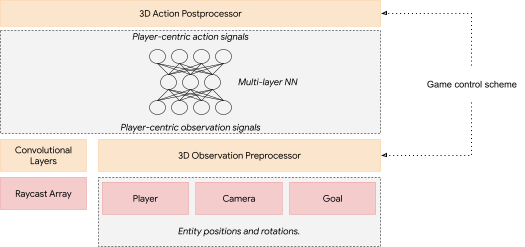
An example neural network generated for a game with joystick controls and raycast inputs. Depending on the inputs (red) and the control scheme, the system generates custom pre- and post-processing layers (orange).

Learning From The Experts in Real Time
After generating a neural network architecture, the network needs to be trained to play the game using an appropriate choice of learning algorithm.

Reinforcement learning (RL), in which an ML policy is trained directly to maximize a reward, may seem like the obvious choice since they have been successfully used to train highly competent ML policies for games. However, RL algorithms tend to require more data than a single game instance can produce in a reasonable amount of time, and achieving good results in a new domain often requires hyperparameter tuning and strong ML domain knowledge.

Instead, we found that imitation learning (IL), which trains ML policies based by observing experts play the game, works well for our use case. Unlike RL, where the agent needs to discover a good policy on its own, IL only needs to recreate the behavior of a human expert. Since game developers and testers are experts in their own games, they can easily provide demonstrations of how to play the game.

We use an IL approach inspired by the DAgger algorithm, which allows us to take advantage of video games’ most compelling quality – interactivity. Thanks to the reductions in training time and data requirements enabled by our semantic API, training is effectively realtime, giving a developer the ability to fluidly switch between providing gameplay demonstrations and watching the system play. This results in a natural feedback loop, in which a developer iteratively provides corrections to a continuous stream of ML policies.

From the developer’s perspective, providing a demonstration or a correction to faulty behavior is as simple as picking up the controller and starting to play the game. Once they are done, they can put the controller down and watch the ML policy play. The result is a training experience that is real-time, interactive, highly experiential, and, very often, more than a little fun.

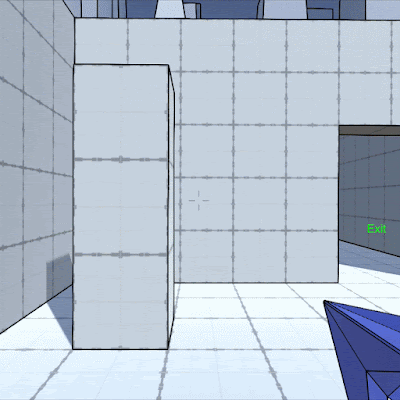
ML policy for an FPS game, trained with our system.

Conclusion
We present a system which combines a high-level semantic API with a DAgger-inspired interactive training flow that enables training of useful ML policies for video game testing in a wide variety of genres. We have released an open source library as a functional illustration of our system. No ML expertise is required and training of agents for test applications often takes less than an hour on a single developer machine. We hope that this work will help inspire the development of ML techniques that can be deployed in real-world game-development flows in ways that are accessible, effective, and fun to use.

Acknowledgements
We’d like to thank the core members of the project: Dexter Allen, Leopold Haller, Nathan Martz, Hernan Moraldo, Stewart Miles and Hina Sakazaki. Training algorithms are provided by TF Agents, and on-device inference by TF Lite. Special thanks to our research advisors, Olivier Bachem, Erik Frey, and Toby Pohlen, and to Eugene Brevdo, Jared Duke, Oscar Ramirez and Neal Wu who provided helpful guidance and support.

Categories
Misc

convolutional layer – trainable weights TensorFlow2

I am using TF2.5 & Python3.8 where a conv layer is defined as:

 Conv2D( filters = 64, kernel_size = (3, 3), activation='relu', kernel_initializer = tf.initializers.GlorotNormal(), strides = (1, 1), padding = 'same', ) 

Using a batch of 60 CIFAR-10 dataset as input:

 x.shape # TensorShape([60, 32, 32, 3]) 

Output volume of this layer preserves the spatial width and height (32, 32) and has 64 filters/kernel maps applied to the 60 images as batch-

 conv1(x).shape # TensorShape([60, 32, 32, 64]) 

I understand this output. But when I do:

 conv1.trainable_weights[0].shape # TensorShape([3, 3, 3, 64]) 

I don’t understand this?

Help

submitted by /u/grid_world
[visit reddit] [comments]

Categories
Misc

Access filters within a convolutional layer – TensorFlow2

I am using TF2.5 & Python3.8 where a conv layer is defined as:

 Conv2D( filters = 64, kernel_size = (3, 3), activation='relu', kernel_initializer = tf.initializers.GlorotNormal(), strides = (1, 1), padding = 'same', ) 

Using a batch of 60 CIFAR-10 dataset as input:

 x.shape # TensorShape([60, 32, 32, 3]) 

Output volume of this layer preserves the spatial width and height (32, 32) and has 64 filters/kernel maps applied to the 60 images as batch-

 conv1(x).shape # TensorShape([60, 32, 32, 64]) conv1.kernel.shape # TensorShape([3, 3, 3, 64]) 

In this output, the first (3, 3) is the spatial width and height of the filters/kernels applied in this conv layer. The third 3 refers to the number of input channels provided to this layer and 64 refers to the number of filters applied.

How can I access the 64 filters applied in this conv layer?

Currently I am using the code:

 filters = conv1.kernel[:, :, 0, :] filters.shape # TensorShape([3, 3, 64]) 

Is this correct? Also, how can I iterate over the 64 different filters of this conv layer?

Thanks

submitted by /u/grid_world
[visit reddit] [comments]

Categories
Misc

Autoencoder TensorFlow2 – ValueError

I am trying to train an Autoencoder using TensorFlow2.5 and Python3.8 as follows: Inception NetV3 was used to perform feature extraction using an image dataset containing 289229 images. The final output of Inception NetV3 is 2048-d vector. I pickled all of them in a Python3 list and load it along with the filenames:

 # Read pickled Python3 list containing 2048-d extracted feature representation per image- features_list = pickle.load(open("DeepFashion_features_inceptionnetv3.pickle", "rb")) # Convert from Python3 list to numpy array- features_list_np = np.asarray(features_list) features_list_np.shape # (289229, 2048) del features_list # Read pickled Python3 list containing abolute path and filenames- filenames_list = pickle.load(open("DeepFashion_filenames_inceptionnetv3.pickle", "rb")) len(features_list), len(filenames_list) # (289229, 289229) # Note that the absolute path contains Google colab path- filenames_list[1] # '/content/img/1981_Graphic_Ringer_Tee/img_00000002.jpg' # Create 'tf.data.Dataset' using np array- batch_size = 32 features_list_dataset = tf.data.Dataset.from_tensor_slices(features_list_np).batch(batch_size) x = next(iter(features_list_dataset)) # 2021-06-28 13:10:00.229937: W tensorflow/core/kernels/data/model_dataset_op.cc:205] Optimization loop failed: Cancelled: Operation was cancelled x.shape # TensorShape([32, 2048]) 

My first question is why does it give the message “Optimization loop failed”? I am using Nvidia RTX 3080 with 16GB GPU. Note that since this is an autoencoder, there are no accompanying labels for the given data!

Is there any other better way of feeding this Python3 list as input to a TF2 neural network that I am missing?

I am checking for available GPU:

 num_gpus = len(tf.config.list_physical_devices('GPU')) print(f"number of GPUs available = {num_gpus}") # number of GPUs available = 1 

Second, I coded an autoencoder with the architecture:

 class FeatureExtractor(Model): def __init__(self): super(FeatureExtractor, self).__init__() self.encoder = Sequential([ Dense( units = 2048, activation = 'relu', kernel_initializer = tf.keras.initializers.glorot_normal(), input_shape = (2048,) ), Dense( units = 1024, activation = 'relu', kernel_initializer = tf.keras.initializers.glorot_normal() ), Dense( units = 512, activation = 'relu', kernel_initializer = tf.keras.initializers.glorot_normal() ), Dense( units = 256, activation = 'relu', kernel_initializer = tf.keras.initializers.glorot_normal() ), Dense( units = 100, activation = 'relu', kernel_initializer = tf.keras.initializers.glorot_normal() ), ] ) self.decoder = Sequential([ Dense( units = 256, activation = 'relu', kernel_initializer = tf.keras.initializers.glorot_normal() ), Dense( units = 512, activation = 'relu', kernel_initializer = tf.keras.initializers.glorot_normal() ), Dense( units = 1024, activation = 'relu', kernel_initializer = tf.keras.initializers.glorot_normal() ), Dense( units = 2048, activation = 'relu', kernel_initializer = tf.keras.initializers.glorot_normal() ), ] ) def call(self, x): encoded = self.encoder(x) decoded = self.decoder(encoded) return decoded # Initialize an instance of Autoencoder- autoencoder = FeatureExtractor() autoencoder.build(input_shape = (None, 2048)) # Compile model- autoencoder.compile( optimizer = tf.keras.optimizers.Adam(learning_rate = 0.001), loss = tf.keras.losses.MeanSquaredError() ) # Sanity check- autoencoder(x).shape # TensorShape([32, 2048]) x.shape # TensorShape([32, 2048]) 

But, when I try to train the model:

 # Train model- history_autoencoder = autoencoder.fit( features_list_dataset, epochs = 20 ) 

It gives me the error:

ValueError: No gradients provided for any variable:

[‘dense_10/kernel:0’, ‘dense_10/bias:0’, ‘dense_11/kernel:0’,

‘dense_11/bias:0’, ‘dense_12/kernel:0’, ‘dense_12/bias:0’,

‘dense_13/kernel:0’, ‘dense_13/bias:0’, ‘dense_14/kernel:0’,

‘dense_14/bias:0’, ‘dense_15/kernel:0’, ‘dense_15/bias:0’,

‘dense_16/kernel:0’, ‘dense_16/bias:0’, ‘dense_17/kernel:0’,

‘dense_17/bias:0’, ‘dense_18/kernel:0’, ‘dense_18/bias:0’].

What is going wrong?

Thanks!

submitted by /u/grid_world
[visit reddit] [comments]

Categories
Misc

How to use an optimizer in tensorflow 2.5?

Hello everyone,

I want to use Adam optimizer in tensorflow

I understand that you need to create the forward propagation, and let tensorflow deals with the backward propagation

my model goes like this

We start with initialization (HE method)

def initialize_HE(arr):
params={}

for i in range(1,len(arr)):
l=str(i)
params[‘W’+l] = tf.Variable(tf.random.normal((arr[i],arr[i-1])),name=’W’+l) * np.sqrt(2 / arr[i-1])
params[‘b’+l] = tf.Variable(tf.zeros((arr[i],1)),name=’b’+l)

return params

this will give me a dictionary of W1,W2,b1,b2 …etc

the forward goes like this

def forward(params,X,types):
L = len(types)
out = {}
out[‘A0’]=X

for i in range(1,L+1):
l = str(i)
l0 = str(i-1)
out[‘Z’+l] = params[‘W’+l] @ out[‘A’+l0] + params[‘b’+l]
if types[i-1] ==’relu’:
out[‘A’+l] = tf.nn.relu(out[‘Z’+l])
if types[i-1] == ‘sigmoid’:
out[‘A’+ l] = tf.nn.sigmoid(out[‘Z’+l])

return out[‘A’+ l]

This will give me the last layer output, let’s call it y_hat

so far I’m only replacing numpy variables with tensorflow’s

Here is the loss function

bce = tf.keras.losses.BinaryCrossentropy(from_logits=True)

loss = bce(train_Y,Y_hat)

I want to minimize this loss then get the parameters after some amount of iterations

the tutorials says I need to do something like this

opt = tf.keras.optimizers.Adam(learning_rate=0.1)

opt.minimize(cost,params)

this gives an error of

`tape` is required when a `Tensor` loss is passed.

if I did this

with tf.GradientTape() as tape:
Y_hat =forward(params,train_X,types)
cost = bce(train_Y,Y_hat)
grads = tape.gradient(cost,var_list)

opt.apply_gradients(zip(grads,var_list))

I get

Tensor.name is meaningless when eager execution is enabled.

I understand the sequential api can do all of that for me, right now I just want to use the optimizer by itself

Thank you

submitted by /u/RepeatInfamous9988
[visit reddit] [comments]