Manufacturing and fulfillment centers are profoundly complex. Whenever new earbuds or socks land at your doorstep in hours or a vehicle rolls off an assembly line, a maze of magic happens with AI-driven logistics. Massive facilities like these are constantly in flux. Robots travel miles of aisles to roll up millions of products to assist Read article >
Combining Omniverse and Reallusion software accelerates the creation of realistic and stylized characters with a library of high-quality character assets and motions.
Character creation and animation are two distinct disciplines that demand the skill of well-trained artists with specialized background knowledge. These domains can be difficult and frustrating for artists who come from unrelated backgrounds with different skill sets, and it’s a pain point that Character Creator and iClone were specifically created to resolve.
Character Creator is well-positioned as the go-to solution for creating realistic and stylized characters with robust pipelines for mainstream tools like ZBrush, Substance, and Blender. Combined with the ability to export FBX with LODs (levels of detail), digital human shaders, and a rich collection of motion assets, iClone stands out as an animation editor without a steep learning curve.
The launch of NVIDIA Omniverse in 2020 was a momentous occasion that attracted our attention. Omniverse represents the next-generation 3D virtual collaboration and real-time simulation platform that connects people and applications for broad-based collaboration. The Reallusion software suite combined with a massive library of high-quality character assets and motions can play a crucial role in this ecosystem, while Omniverse provides the path-traced rendering and AI technology that makes for a powerful synergy.
Where to start?
To build the connector, you start by referencing the Connect Sample code available for download on the NVIDIA launcher application.
Figure 1. Build your own Omniverse Connector with sample code
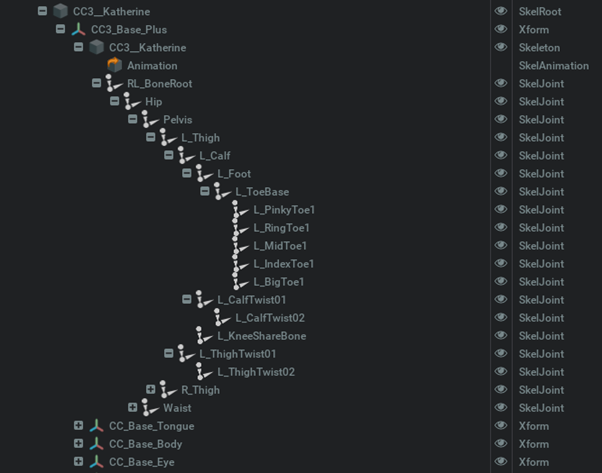
iClone and Character Creator’s 3D scene consists of nodes with basic transforms consisting of translation, rotation, and scale values. Characters, meshes, lights, and cameras are all attached under these nodes.
The bones of a character skeleton are also represented by these nodes. Nodes that only represent transforms are exported as USD XForm and nodes that represent the body and facial bones are exported as USD skeleton joints. Additional bones and skinning are added to accessory nodes that are attached to bones before converting to USD format.
Figure 2. Scene graph of transforms (Xforms) and joints
USD Xform scaling works in fundamentally different ways to iClone. In iClone, a node can be made to inherit or ignore the parent scale, whereas in Omniverse, the node scale is always inherited from its parent node. Under such conditions, bone node scale inheritance must be removed with its values reset before exporting to Omniverse, in order for the scale values to match.
Most of iClone’s facial expressions are composed of morph animations that are exported as USD blend-shapes. In contrast to FBX blend-shapes, which are stored in local-space positions, USD blend-shapes store positional offsets.
Because iClone also stores positional offsets (in combination with strength multipliers), it is completely compatible with Omniverse, enabling direct conversion to USD format. It should be noted that Omniverse requires a skeleton root for props with blend-shapes attached and additional processing may be required.
Material conversion
The following section contains MDL code excerpts for iClone’s USD exporter. For more information, see USD Shader Attributes.
Within the USD file, MDLs are specified using info:mdl:sourceAsset with info:mdl:sourceAsset:subIdentifier as the entry function. The new subIndentifier attribute was introduced by NVIDIA and PIXAR. input: is later called to feed the texture and material parameters. OmniPBR.mdl and OmniSurface(Base).mdl provided with Omniverse were used as starting points.
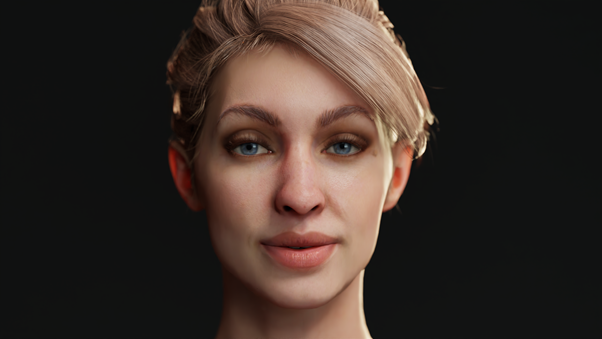
OmniPBR.mdl was chosen from the start because it works well in both NVIDIA RTX Real-time and Path-traced mode. On the other hand, OmniSurface and OmniHairare photo-realistic MDLs for RTX Path-traced mode. The existing PBR, Skin, Head, and SSS shaders were then rewritten from HLSL to MDL.
Figure 3. Omniverse using OmniSurface and OmniHairare MDLs for a photorealistic character
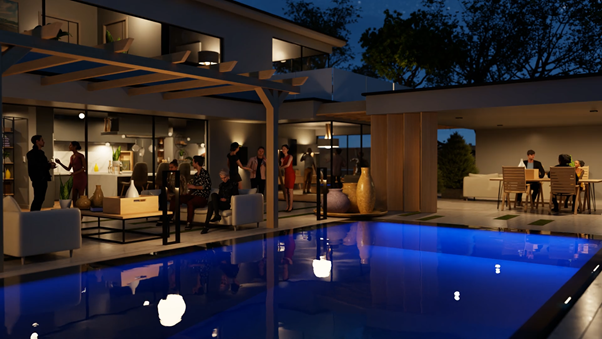
Figure 4. Creating realistic floating water in the swimming pool with Omniverse
Besides the previously mentioned built-in MDLs, there is also a base.mdl on GitHub with some reusable functions that can be deployed in a jiffy.
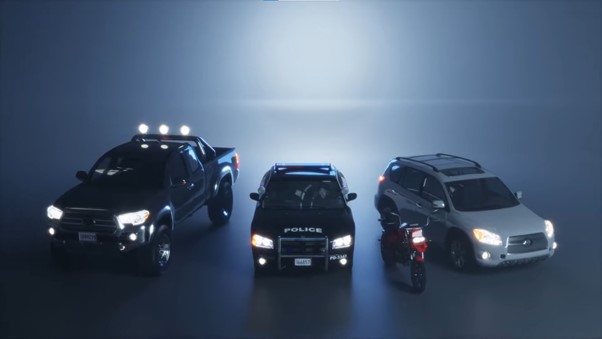
Light conversion
Point lights and spotlights use UsdLuxSphereLight with adjusted cone angles. Tube and rectangle lights use UsdLuxCylinderLight and UsdLuxRectLight, respectively. The Light IES profile file is also one of the shaping attributes. Light intensity in USD is similar to luminous intensity per unit surface area. The USD intensity of a spherical light with radius (r in meters) can be approximated with the following formula:
USD intensity = candela * 1000 * / (4PI r*r)
The following formula is used when radius is in centimeters:
Figure 5. Displaying lighting realism within Omniverse Renderer
What’s next
A prototype of a one-way live sync connector is under development. Because iClone’s undo/redo system is similar to the memento pattern, you use a table for keeping track of live objects with universal IDs. This table updates after performing an undo and redo function.
CES—NVIDIA today set out the next direction of the ultimate platform for gamers and creators, unveiling more than 160 gaming and Studio GeForce®-based laptop designs, as well as new desktop and laptop GeForce RTX® GPUs and technologies.
Competitive gamers prefer to play at the highest refresh rate possible, but new higher resolution monitors increase aiming performance for small targets.
The majority of esports professionals today tend to play on high-refresh-rate 240 or 360 Hz monitors, the bulk of which are available with 24 to 25 inch diagonal sizes and 1080p resolution. In the past, we’ve seen that higher refresh rates help aiming performance, particularly because of the lower system latency that comes with them. Many productivity users prefer higher resolutions and screen sizes, gravitating toward 27 to 32 inch diagonals and 1440p to 4k resolution.
With the latest products announced at CES, 27″ 1440p 360 Hz monitors will soon be available, so we set out to find a situation where the hypothesized advantage of this monitor could be seen in first person shooter (FPS) gameplay (Figure 1).
Figure 1. Small targets experiment designed to test the difference between 24.5″ 1080p and 27″ 1440p at 360 Hz. Notice how the targets (green) are so small that you can barely see them in the 1080p screenshot. They become slightly more visible at 1440p.
Experiment design
The experiment we designed focuses on very small targets (Figure 1), which could be thought of as proxies for mid-to-long distance headshots in games like Valorant, CS:GO or PUBG. For such small targets, we might hypothesize that the higher resolution monitor would show the edges of the target more accurately than a lower resolution one. In fact, based on the double total pixel count available at 1440p compared to 1080p, we could estimate that any given target will have roughly twice the number of pixels at 1440p. In addition to these extra pixels, the larger screen makes the target itself cover a larger area based on the extra 2.5 inches diagonal (24.5″ vs 27″).
The aiming task we selected was to have each user complete a series of random target eliminations where a group of four targets all appear at the same time at the start of the task, and the task is considered complete once the player clicks on all four targets one time each. This makes task completion time or “aiming time,” a negative metric; lower aiming time is better.
As a secondary measure, we can consider the player’s accuracy, or number of hits over total number of shots. Because it takes time to take shots, we would expect these measures to relate to each other, thus lower aiming time should correspond with higher accuracy and a lower number of shots taken.
To test our hypothesis, that a bigger, higher resolution display helps players click on a series of targets faster, we implemented the task above in our FPS research platform, First Person Science. This is a program similar to commercially available aim trainers, but allows careful low level control of the game loop and hardware configuration. In case you’re curious to try the task for yourself, you can download this particular experiment from github.
We had 13 NVIDIA employees complete this task 75 times each (as 5 blocks of 15 trials) on each of two different monitors. The first was a 24.5″ 1080p 360 Hz Alienware 25 and the second was a 27″ 1440p 360 Hz Asus ROG Swift PG27AQN. It took roughly 20 minutes for each user to complete all 150 trials (75 on each monitor). We used a counter-balanced randomized order and each participant had the option to decline or stop participating at any point if they chose. One of the participants had difficulty with the task, therefore we exclude that user’s results from the following analysis. The remaining 12 participants had counterbalanced display ordering.
Task completion time
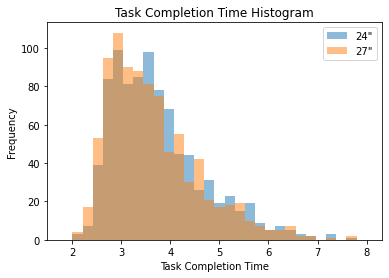
As a primary metric of success, we measured the time it took for each trial to be completed. In the histogram plot in Figure 2, you can see the spread of these times colored by the screen size. While the distribution of times follows roughly the same shape for both displays, you can see how there are slightly more trials at the low end of task completion time for the larger, higher resolution display and slightly more high completion times for the smaller, lower resolution display. Remember that both of these displays were set to update at 360 Hz.
Figure 2. Histogram of task completion times
Figure 2 shows that while the 24 inch and 27 inch monitors led to similar task completion times, there was a small shift to faster completion time in the distribution as a whole for the 27 inch, 1440p, 360 Hz monitor.
The mean completion time for the 24.5″ 1080p trials was 3.75 seconds while the 27″ 1440p display resulted in a mean completion time of 3.64 seconds. The improvement in mean completion time for this experiment was therefore 111 ms. We performed a pairwise t test on this data, indicating that the difference in these means is statistically significant for the 900 trials that we included in the analysis (p-value=0.000325).
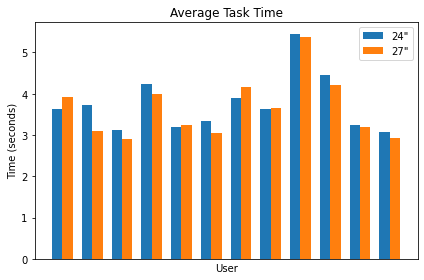
We also considered the per-user completion time (Figure 3). Four users had a small to medium increase in task completion time when moving to the larger monitor. The majority of the users (8) showed a reduction in task completion time on the larger display. While the average improvement is clearly within the realm of normal per-user variation in aiming time for this task, there’s still a strong trend of improvement among these users. Most users showed reduced completion time on the 27 inch, 1440p, 360 Hz monitor.
Figure 3. Per-user (anonymized) task completion time by display size
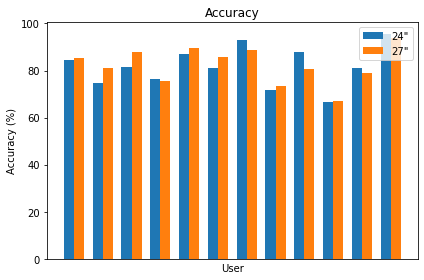
Accuracy
I’d like to state up front that all pairwise t tests on accuracy could not reach significance, so the differences in accuracy should not be considered statistically significant. It’s also important to note that per-trial accuracy is entirely a function of how many shots were taken to eliminate the target.
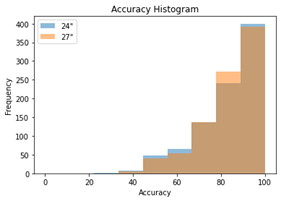
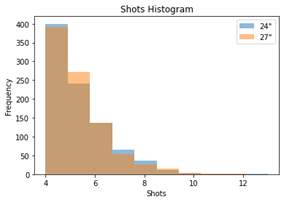
As you can see by the Accuracy and Shots histograms in Figure 4, each additional shot reduces the accuracy for that round proportionally as accuracy is computed as the hits/shots ratio. Given that there are four targets in each trial, hits is always 4, thus the per-trial accuracy is selected from a small set of specific values (4/4, 4/5, 4/6, and so on).
Figure 4. Accuracy and number of shots histograms, which show an inverse relationship.
If instead, we sum up all hits and all shots across all trials per user, we can consider the per-user accuracy. The below plot pairs the 24.5″ 1080p and 27″ 1440p accuracy results per user in our study. Across all users, the mean accuracy was 81.78% for the 1080p display and 82.34% for the 1440p display, resulting in a 0.56% increase in accuracy. Once again, this change in mean accuracy was not found to be statistically significant in a pairwise t test. Though it may have been a minor contributing factor to the difference in task completion time that was shown to be statistically significant.
Figure 5. Per-user accuracy has mixed results
Figure 5 shows that per-user accuracy has more mixed results when compared to the task completion times shown in Figure 3. While you can aim faster with the bigger display, it appears to be due to increased speed in aiming and not a significant change in accuracy.
Conclusion
Because this experiment coupled a change in physical display size with a change in display resolution, it’s not clear from the results how much the size or resolution may have contributed to the difference in task completion time individually. Further study is needed to isolate these factors.
Our choice of task was also intentionally intended to find an aiming challenge where display size and resolution were likely to make a difference. For any given FPS game, you may find more or less of this style of task in practice, and the value of these results varies depending on game, role, skill level, and numerous other factors.
We conclude from these results that for players who regularly aim at small targets and want to hit them as quickly as possible, there is a small but practical benefit to upgrading from 24.5 inch, 1080p, 360 Hz monitors to the latest and greatest 27 inch, 1440p, 360 Hz displays coming later this year.
Check out the new G-SYNC monitors that were just announced and stay tuned for more experiment results when they’re ready to share. We intend to continue these types of investigations to help gamers and esports tournaments know which PC hardware to use to unlock maximum human performance.
I am using an ImageDataGenerator with the method flow_from_directory() to grab the images for my CNN. According to the documentation flow_from_directory() returns a tuple (x, y) where x is the data and y the labels for every item in the batch.
I tried to get the labels of every batch with the next() method and a loop but received the ValueError: too many values to unpack (expected 2).
What’s the recommended way to get all the matching labels for every image? I couldn’t find anything online except the approach with next(), which only worked for a single batch without a loop.
test_datagen = ImageDataGenerator(rescale=1./255) test_df = test_datagen.flow_from_directory( path, target_size=(512, 512), batch_size=32, class_mode='categorical') y = [] steps = test_df.n//32 #My approach that wasn't working for i in range(steps): a, b = test_df.next() y.extend(b)
Hello! I am trying to train a model to recognize plural and singular nouns; input is a noun and output is either 1 or 2, 1 for singular and 2 for plural. Truth be told, I am not sure entirely how to tackle this… I saw a few tutorials about TF NN and image processing, but I don’t know how does that relate. Every time I try to run model.fit(nouns, labels, epoc=N) it either doesn’t do anything or it fails due to bad input.
The challenges I am facing are as follows: * Can I have a variable sized input? * How can I get the text, stored in a CSV, to a form that can be input into the NN model?
The code I have so far is something like this: “`python model = keras.models.Sequential() model.add(keras.layers.Input(INPUT_LENGTH,)) ## I am padding the string to have this length model.add(keras.layers.Dense(10, activation=’relu’, name=”First_Layer”)) model.add(keras.layers.Dense(2, activation=’relu’, name=”Output_Layer”))
I couldn’t find any tutorials or documentation, that I can clearly understand, talking about inputting string to a NN. Any advice or links would be appreciated.
—- Addendum:
I followed the linked YouTube tutorial to turn the text into tokens and it worked great. I didn’t use the suggested embedded layer and just stuck with the ordinary input dense dense model. Thanks everyone!
Hi everyone. I’m deploying a resnet based 928×928 UNet on an android device. Performance is suboptimal even with GPU. Currently I’m only optimizing the models using the tf.lite.Optimize.DEFAULT flag. I was wondering if any of you have had experience with more intricate optimization techniques aimed specifically at latency and not neccesarily size reduction.
I see multiple options on the internet to optimize inference, and i don’t know which would be the best fit for me. My goal is to maximize throughput on GPU, and preferably reduce GPU memory usage.
I have a reinforcement learning project, where i have multiple cpu processes generating input data in batches and sending them over to a single GPU for inference. Each process loads the same resnet model with two different weight configurations at a time. The weights used get updated about every 30 minutes and get distributed between the processes. I use Python and Tensorflow 2.7 on Windows(don’t judge) and the only optimization is use right now is the built-in XLA optimizations. My GPU does not support FP-16.
I have seen TensorRT being suggested to optimize inference, i have also seen TensorflowLite, Intel has an optimization tool too, and then there is Tensorflow Serve. What option do you think would fit my needs best?

 Combining Omniverse and Reallusion software accelerates the creation of realistic and stylized characters with a library of high-quality character assets and motions.
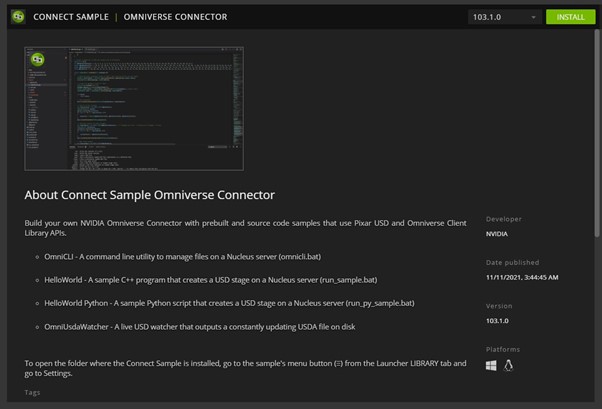
 Competitive gamers prefer to play at the highest refresh rate possible, but new higher resolution monitors increase aiming performance for small targets.