Categories
Offsites

Simple and Effective Zero-Shot Task-Oriented Dialogue

Modern conversational agents need to integrate with an ever-increasing number of services to perform a wide variety of tasks, from booking flights and finding restaurants, to playing music and telling jokes. Adding this functionality can be difficult — for each new task, one needs to collect new data and retrain the models that power the conversational agent. This is because most task-oriented dialogue (TOD) models are trained on a single task-specific ontology. An ontology is generally represented as a list of possible user intents (e.g., if the user wants to book a flight, if the user wants to play some music, etc.) and possible parameter slots to extract from the conversation (e.g., the date of the flight, the name of a song, and so on). A rigid ontology can be limiting, preventing the model from generalizing to new tasks or domains. For instance, a TOD model trained on a certain ontology only knows the intents in that ontology, and lacks the ability to generalize its knowledge to unseen intents. This is true even for new ontologies that overlap with ones already known to the agent — for example, if an agent already knows how to book train tickets, adding the ability to book airline tickets would require training on completely new data. Ideally, the agent should be able to leverage its existing knowledge from one ontology, and apply it to new ones.

New benchmarks, such as the the Schema Guided Dialogue (SGD) dataset, have been designed to evaluate the ability to generalize to unseen tasks, by distilling each ontology into a schema of slots and intents. In the SGD setting, TOD models are trained on multiple schemas, and evaluated on how well they generalize to unseen ones — instead of how well they overfit to a single ontology. However, recent work shows the top models still have room for improvement.

To address this problem, we introduce two different sequence-to-sequence approaches toward zero-shot transfer for dialogue modeling, presented in the papers “Description-Driven Task-Oriented Dialogue” and “Show, Don’t Tell: Demonstrations Outperform Descriptions for Schema-Guided Task-Oriented Dialogue”. Both models condition on additional contextual information, either slot and intent descriptions, or single demonstrative examples. Results obtained on multiple dialogue state tracking benchmarks show that by doing away with the fixed schemas and ontologies, these new approaches lead to state-of-the-art results on the dialogue state tracking task with more efficient models. The source code for the described approaches can be found here.

Background: Dialogue State Tracking
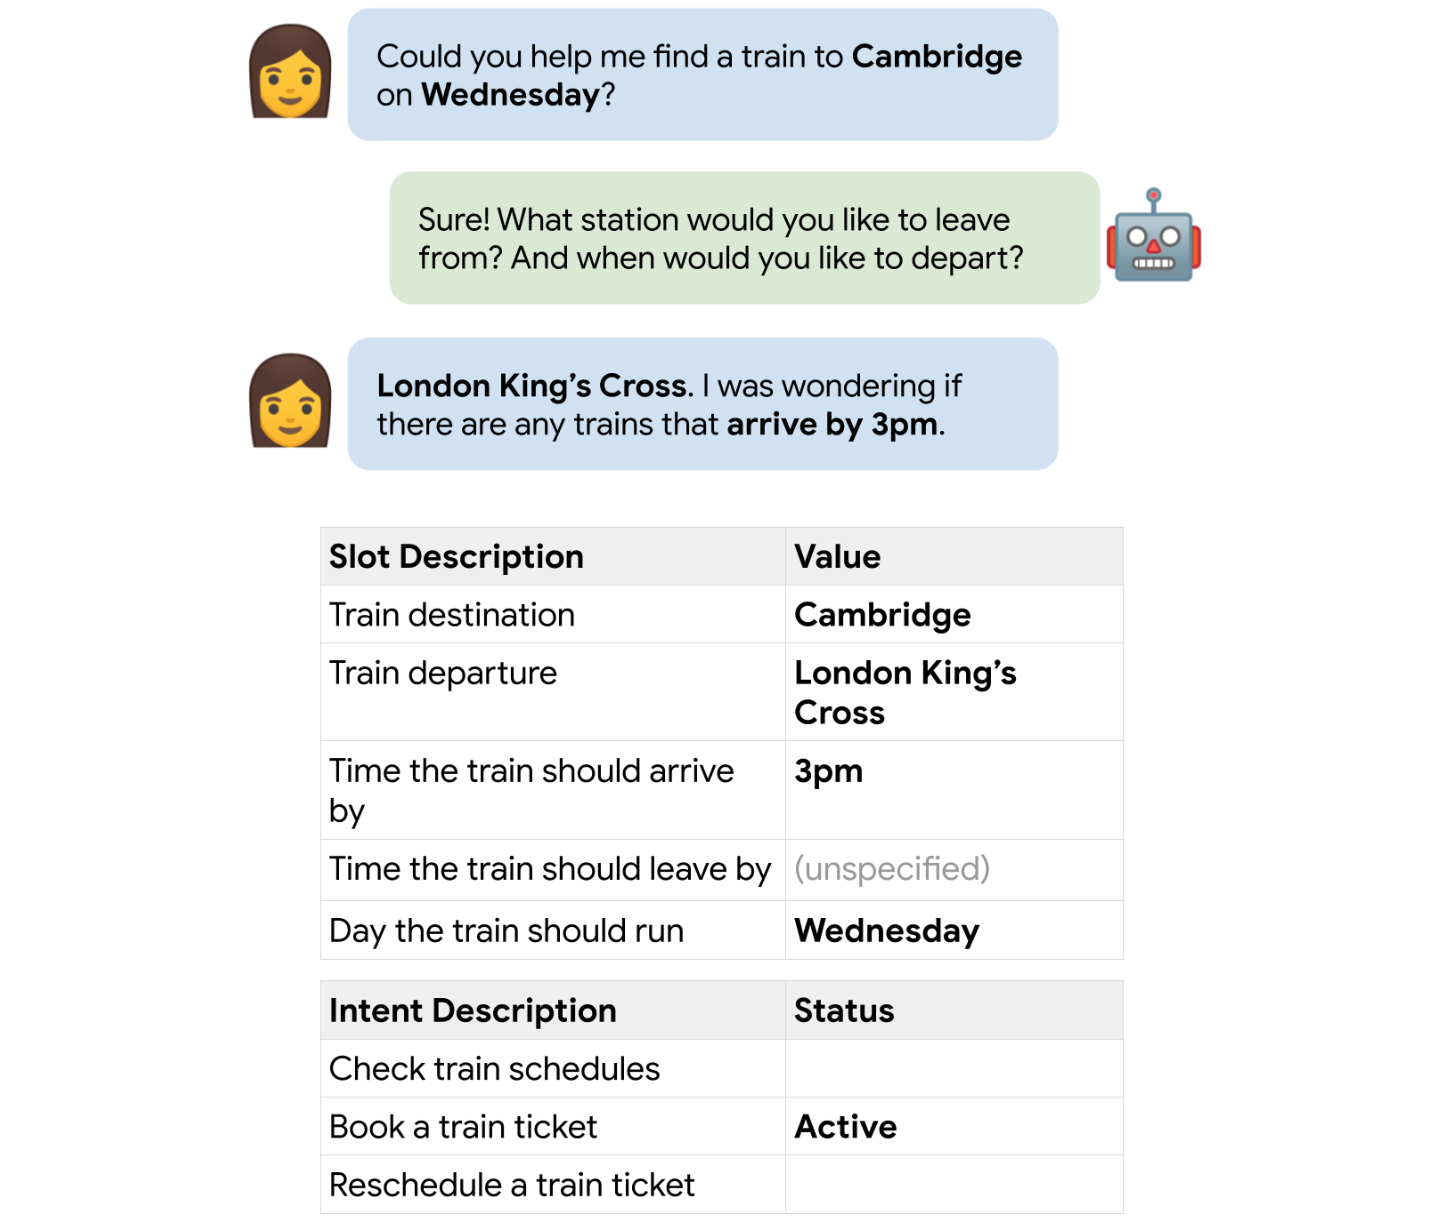
To address the challenge of zero-shot transfer for dialogue models, we focus on the problem of Dialogue State Tracking (DST). DST is a fundamental problem for conversational agents, in which a model predicts the belief state of a conversation, i.e., the agent’s understanding of the user’s indicated preferences. The belief state is typically modeled as an assignment of values to slots for which the user has indicated a preference in the conversation. An example is shown below.

An example conversation and its ground truth slots and intents for dialogue state tracking. Here, the active user intent is “Book a train”, and pertinent information for booking this train is recorded in the slot values.

Description-Driven Task-Oriented Dialogue
In our first paper, we introduce Description-Driven Dialogue State Tracking (D3ST), a DST model that leverages slot and intent descriptions when making predictions about the belief state. D3ST is built on top of the T5 sequence-to-sequence language model, which was shown in previous work to be pretrained effectively for DST problems.

D3ST prompts the input sequence with slot and intent descriptions, allowing the T5 model to attend to both this contextual information and the conversation. Its ability to generalize comes from the formulation of these descriptions. Instead of using a name for each slot, we assign a random index for every slot. For categorical slots (i.e., slots that only take values from a small, predefined set), possible values are also arbitrarily enumerated and then listed. The same is done with intents, and together these descriptions form the schema representation to be included in the input string. This is concatenated with the conversation text and fed into the T5 model. The target output is the belief state and user intent, again identified by their assigned indices. An example is shown below.
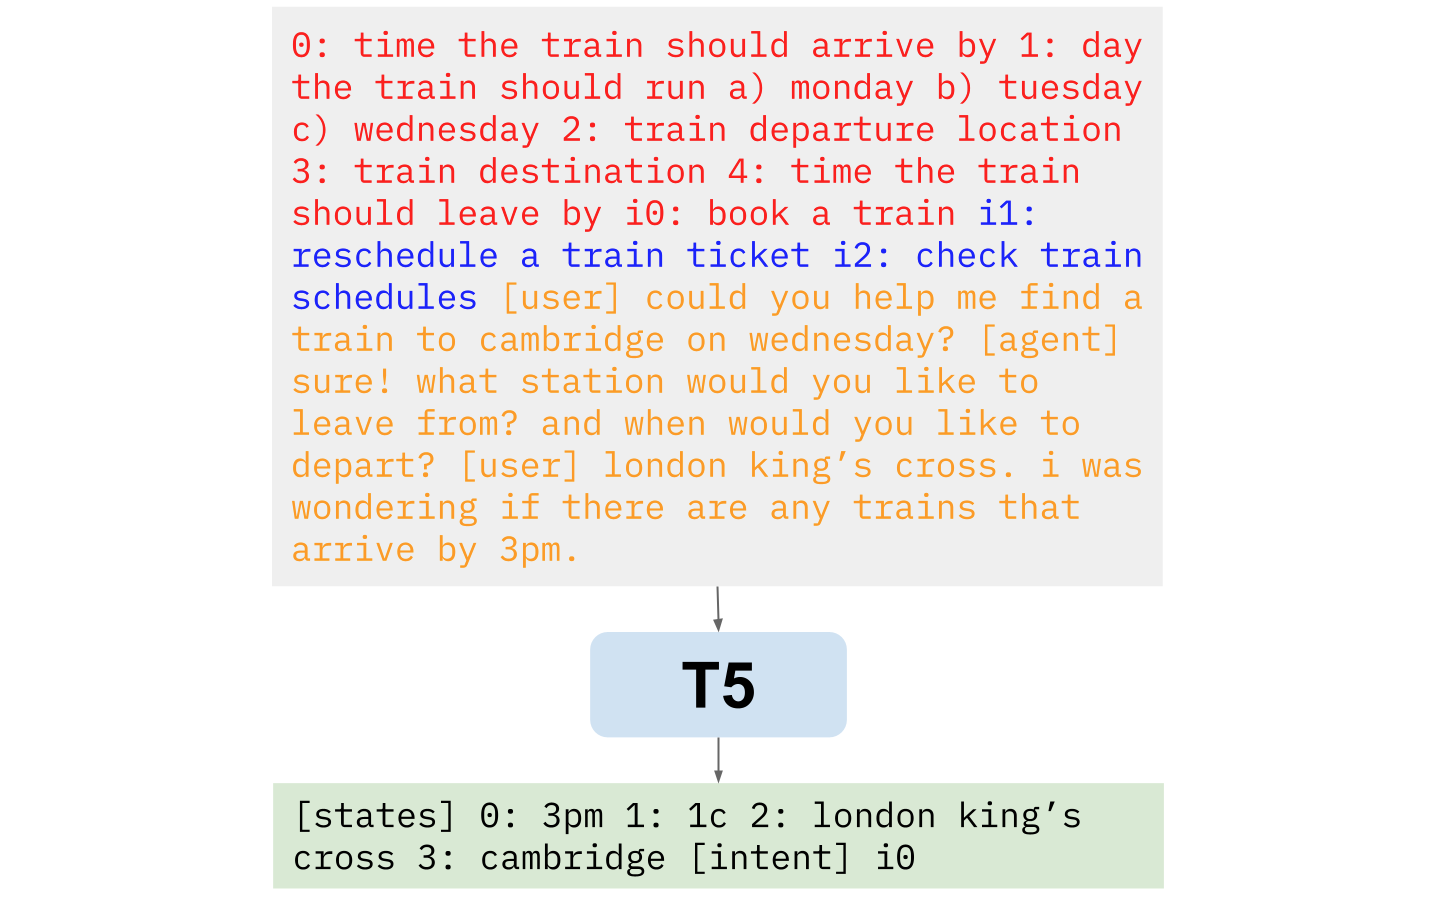
An example of the D3ST input and output format. The red text contains slot descriptions, while the blue text contains intent descriptions. The yellow text contains the conversation utterances.

This forces the model to predict conversation contexts using a slot’s index, and not that specific slot. By randomizing the index we assign to each slot between different examples, we prevent the model from learning specific schema information. The slot with index 0 could be the “Train Departure” slot in one example, and the “Train Destination” in another — as such, the model is encouraged to use the slot description given in index 0 to find the correct value, and discouraged from overfitting to a specific schema. With this setup, a model that sees enough different tasks or domains will learn to generalize the action of belief state tracking and intent prediction.

Show Don’t Tell
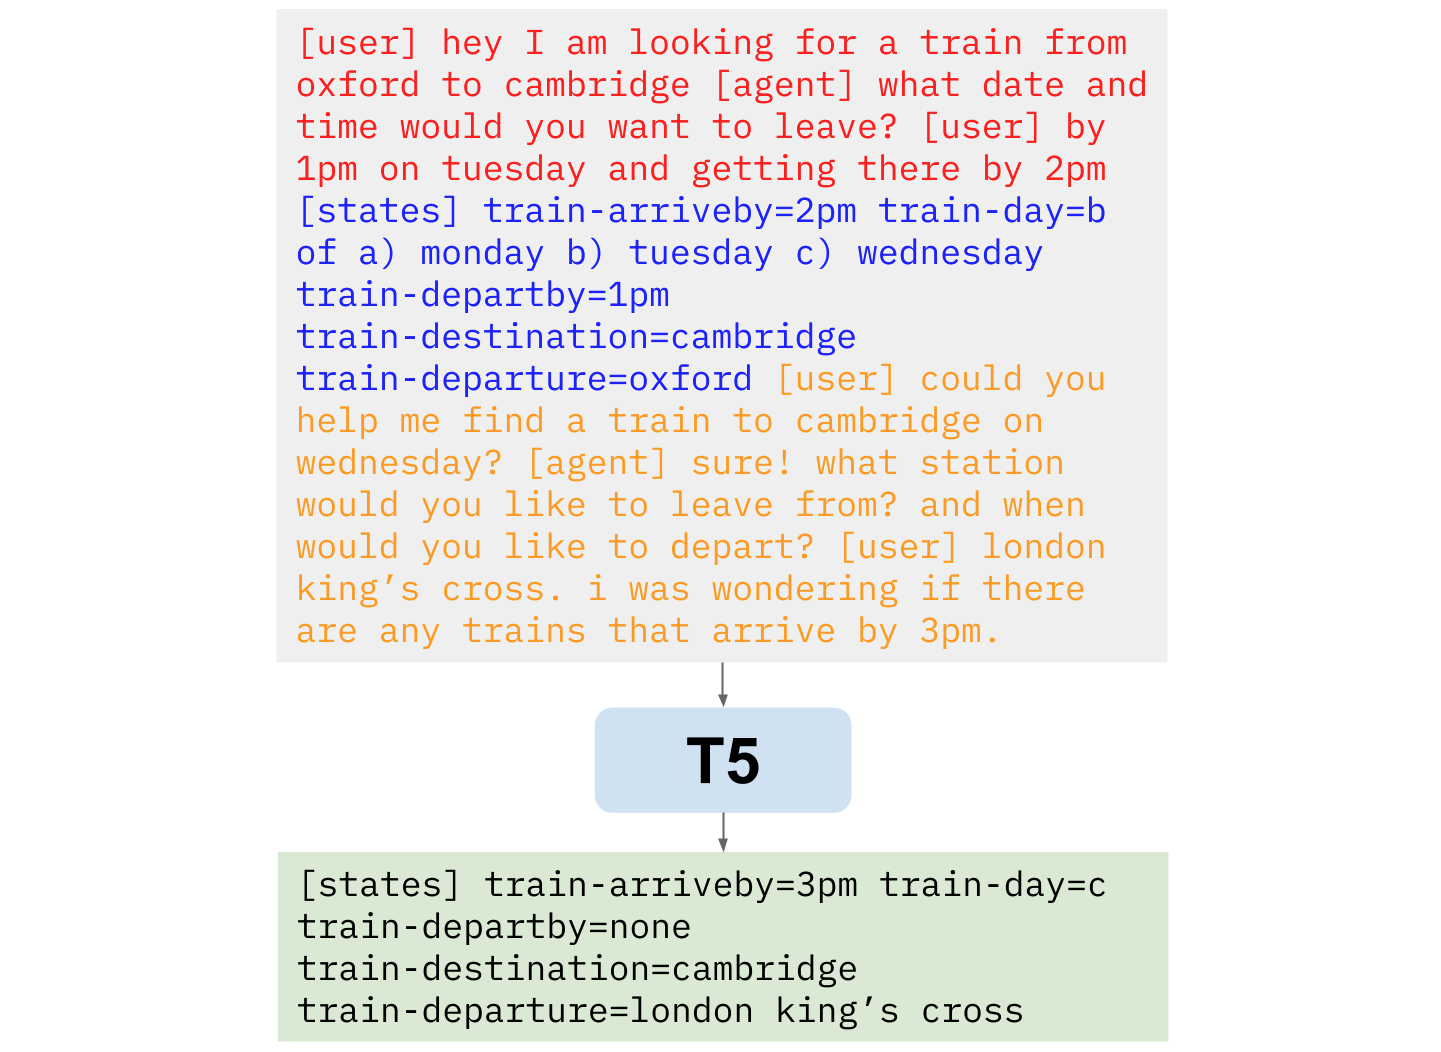
In our subsequent paper, “Show, Don’t Tell: Demonstrations Outperform Descriptions for Schema-Guided Task-Oriented Dialogue”, we employ a single annotated dialogue example that demonstrates the possible slots and values in a conversation, instead of relying on slot descriptions. In this sense, we “show” the semantics of the schema rather than “tell” the model through descriptions — hence the name “Show Don’t Tell” (SDT). SDT is also built on T5, and improves zero-shot performance beyond D3ST.

n example of the SDT input and output format. The text in red contains the demonstrative example, while the text in blue contains its ground truth belief state. The actual conversation for the model to predict is in yellow. While the D3ST prompt relies entirely on slot descriptions, the SDT prompt contains a concise example dialogue followed by the expected dialogue state annotations, resulting in more direct supervision.

The rationale for SDT’s single example demonstration is simple: there can still be ambiguities that are not fully captured in a slot or intent description, and require a concrete example to demonstrate. Moreover, from a developer’s standpoint, creating short dialogue examples to describe a schema can often be easier than writing descriptions that fully capture the meaning behind each slot and intent.

Benchmark Results
We evaluate both D3ST and SDT on a number of benchmarks, most notably the SGD dataset, which tests zero-shot generalization to unseen schemas in its test set. We evaluate our state tracking models on joint goal accuracy (JGA), the fraction of dialogue turns for which the model predicts an exactly correct belief state.

Both of our models either match or outperform existing state-of-the-art baselines (T5DST and paDST) at comparable model sizes, as shown below. In general, SDT performs slightly better than D3ST. Note that our models can be trained on different sizes of the underlying T5 language model. In addition, while the baseline models can only make predictions for one slot per forward pass, both our models can decode the entire dialogue state in a single forward pass — a much more efficient method in both training and inference.

Joint Goal Accuracy on the SGD dataset plotted against model size for existing baselines and our proposed models D3ST and SDT. Note that paDST* includes additional data augmentation.

Additional metrics are reported in both papers. D3ST exhibits state-of-the-art quality on the MultiWOZ dataset, with 75.9% JGA on MultiWOZ 2.4. Both D3ST and SDT show state-of-the-art performance in the MultiWOZ cross-domain leave-one-out setting. In addition, both D3ST and SDT were evaluated using the SGD-X dataset, and demonstrated strong robustness to linguistic variations in schema. These benchmarks all indicate that D3ST and SDT are state-of-the-art TOD models, with the ability to generalize to unseen tasks and domains.

Zero-Shot Capability
D3ST and SDT sometimes demonstrate a surprising ability to generalize to unseen tasks, and we saw many interesting examples when trying completely new dialogues with the model. We’ve included one such example below:

A D3ST model trained on the SGD dataset makes predictions (right) for an unseen meta conversation (left) about creating this blog post. The model predicts a completely correct belief state, even though it is not fine-tuned on anything related to blogs, authors or NLP.

Future Work
These papers demonstrate the feasibility of a zero-shot TOD system that can generalize to unseen tasks or domains. However, we’ve limited ourselves to the DST problem for now — we plan to extend this research to enable zero-shot dialogue policy modeling, allowing TOD systems to take actions following arbitrary instructions. In addition, the current input format can often lead to long input sequences, which can be slow for inference — we’re exploring new and more efficient methods to encode schema information.

Acknowledgements
This post reflects the combined work of Jeffrey Zhao, Raghav Gupta, Harrison Lee, Mingqiu Wang, Dian Yu, Yuan Cao, and Abhinav Rastogi. We’d like to thank Yonghui Wu and Izhak Shafran for their continued advice and guidance.

Categories
Misc

MLCommons’ David Kanter, NVIDIA’s David Galvez on Improving AI with Publicly Accessible Datasets

In deep learning and machine learning, having a large enough dataset is key to training a system and getting it to produce results. So what does a ML researcher do when there just isn’t enough publicly accessible data? Enter the MLCommons Association, a global engineering consortium with the aim of making ML better for everyone. Read article >

The post MLCommons’ David Kanter, NVIDIA’s David Galvez on Improving AI with Publicly Accessible Datasets appeared first on NVIDIA Blog.

Categories
Offsites

Lidar-Camera Deep Fusion for Multi-Modal 3D Detection

LiDAR and visual cameras are two types of complementary sensors used for 3D object detection in autonomous vehicles and robots. LiDAR, which is a remote sensing technique that uses light in the form of a pulsed laser to measure ranges, provides low-resolution shape and depth information, while cameras provide high-resolution shape and texture information. While the features captured by LiDAR and cameras should be merged together to provide optimal 3D object detection, it turns out that most state-of-the-art 3D object detectors use LiDAR as the only input. The main reason is that to develop robust 3D object detection models, most methods need to augment and transform the data from both modalities, making the accurate alignment of the features challenging.

Existing algorithms for fusing LiDAR and camera outputs, such as PointPainting, PointAugmenting, EPNet, 4D-Net and ContinuousFusion, generally follow two approaches — input-level fusion where the features are fused at an early stage, decorating points in the LiDAR point cloud with the corresponding camera features, or mid-level fusion where features are extracted from both sensors and then combined. Despite realizing the importance of effective alignment, these methods struggle to efficiently process the common scenario where features are enhanced and aggregated before fusion. This indicates that effectively fusing the signals from both sensors might not be straightforward and remains challenging.

In our CVPR 2022 paper, “DeepFusion: LiDAR-Camera Deep Fusion for Multi-Modal 3D Object Detection”, we introduce a fully end-to-end multi-modal 3D detection framework called DeepFusion that applies a simple yet effective deep-level feature fusion strategy to unify the signals from the two sensing modalities. Unlike conventional approaches that decorate raw LiDAR point clouds with manually selected camera features, our method fuses the deep camera and deep LiDAR features in an end-to-end framework. We begin by describing two novel techniques, InverseAug and LearnableAlign, that improve the quality of feature alignment and are applied to the development of DeepFusion. We then demonstrate state-of-the-art performance by DeepFusion on the Waymo Open Dataset, one of the largest datasets for automotive 3D object detection.

InverseAug: Accurate Alignment under Geometric Augmentation
To achieve good performance on existing 3D object detection benchmarks for autonomous cars, most methods require strong data augmentation during training to avoid overfitting. However, the necessity of data augmentation poses a non-trivial challenge in the DeepFusion pipeline. Specifically, the data from the two modalities use different augmentation strategies, e.g., rotating along the z-axis for 3D point clouds combined with random flipping for 2D camera images, often resulting in alignment that is inaccurate. Then the augmented LiDAR data has to go through a voxelization step that converts the point clouds into volume data stored in a three dimensional array of voxels. The voxelized features are quite different compared to the raw data, making the alignment even more difficult. To address the alignment issue caused by geometry-related data augmentation, we introduce Inverse Augmentation (InverseAug), a technique used to reverse the augmentation before fusion during the model’s training phase.

In the example below, we demonstrate the difficulties in aligning the augmented LiDAR data with the camera data. In this case, the LiDAR point cloud is augmented by rotation with the result that a given 3D key point, which could be any 3D coordinate, such as a LiDAR data point, cannot be easily aligned in 2D space simply through use of the original LiDAR and camera parameters. To make the localization feasible, InverseAug first stores the augmentation parameters before applying the geometry-related data augmentation. At the fusion stage, it reverses all data augmentation to get the original coordinate for the 3D key point, and then finds its corresponding 2D coordinates in the camera space.

During training, InverseAug resolves the inaccurate alignment from geometric augmentation.
Left: Alignment without InverseAug. Right: Alignment quality improvement with InverseAug.

LearnableAlign: A Cross-Modality-Attention Module to Learn Alignment
We also introduce Learnable Alignment (LearnableAlign), a cross-modality-attention–based feature-level alignment technique, to improve the alignment quality. For input-level fusion methods, such as PointPainting and PointAugmenting, given a 3D LiDAR point, only the corresponding camera pixel can be exactly located as there is a one-to-one mapping. In contrast, when fusing deep features in the DeepFusion pipeline, each LiDAR feature represents a voxel containing a subset of points, and hence, its corresponding camera pixels are in a polygon. So the alignment becomes the problem of learning the mapping between a voxel cell and a set of pixels.

A naïve approach is to average over all pixels corresponding to the given voxel. However, intuitively, and as supported by our visualized results, these pixels are not equally important because the information from the LiDAR deep feature unequally aligns with every camera pixel. For example, some pixels may contain critical information for detection (e.g., the target object), while others may be less informative (e.g., consisting of backgrounds such as roads, plants, occluders, etc.).

LearnableAlign leverages a cross-modality attention mechanism to dynamically capture the correlations between two modalities. Here, the input contains the LiDAR features in a voxel cell, and all its corresponding camera features. The output of the attention is essentially a weighted sum of the camera features, where the weights are collectively determined by a function of the LiDAR and camera features. More specifically, LearnableAlign uses three fully-connected layers to respectively transform the LiDAR features to a vector (ql), and camera features to vectors (kc) and (vc). For each vector (ql), we compute the dot products between (ql) and (kc) to obtain the attention affinity matrix that contains correlations between the LiDAR features and the corresponding camera features. Normalized by a softmax operator, the attention affinity matrix is then used to calculate weights and aggregate the vectors (vc) that contain camera information. The aggregated camera information is then processed by a fully-connected layer, and concatenated (Concat) with the original LiDAR feature. The output is then fed into any standard 3D detection framework, such as PointPillars or CenterPoint for model training.

LearnableAlign leverages the cross-attention mechanism to align LiDAR and camera features.

DeepFusion: A Better Way to Fuse Information from Different Modalities
Powered by our two novel feature alignment techniques, we develop DeepFusion, a fully end-to-end multi-modal 3D detection framework. In the DeepFusion pipeline, the LiDAR points are first fed into an existing feature extractor (e.g., pillar feature net from PointPillars) to obtain LiDAR features (e.g., pseudo-images). In the meantime, the camera images are fed into a 2D image feature extractor (e.g., ResNet) to obtain camera features. Then, InverseAug and LearnableAlign are applied in order to fuse the camera and LiDAR features together. Finally, the fused features are processed by the remaining components of the selected 3D detection model (e.g., the backbone and detection head from PointPillars) to obtain the detection results.

The pipeline of DeepFusion.

Benchmark Results
We evaluate DeepFusion on the Waymo Open Dataset, one of the largest 3D detection challenges for autonomous cars, using the Average Precision with Heading (APH) metric under difficulty level 2, the default metric to rank a model’s performance on the leaderboard. Among the 70 participating teams all over the world, the DeepFusion single and ensemble models achieve state-of-the-art performance in their corresponding categories.

The single DeepFusion model achieves new state-of-the-art performance on Waymo Open Dataset.
The Ensemble DeepFusion model outperforms all other methods on Waymo Open Dataset, ranking No. 1 on the leaderboard.

The Impact of InverseAug and LearnableAlign
We also conduct ablation studies on the effectiveness of the proposed InverseAug and LearnableAlign techniques. We demonstrate that both InverseAug and LearnableAlign individually contribute to a performance gain over the LiDAR-only model, and combining both can further yield an even more significant boost.

Ablation studies on InverseAug (IA) and LearnableAlign (LA) measured in average precision (AP) and APH. Combining both techniques contributes to the best performance gain.

Conclusion
We demonstrate that late-stage deep feature fusion can be more effective when features are aligned well, but aligning features from two different modalities can be challenging. To address this challenge, we propose two techniques, InverseAug and LearnableAlign, to improve the quality of alignment among multimodal features. By integrating these techniques into the fusion stage of our proposed DeepFusion method, we achieve state-of-the-art performance on the Waymo Open Dataset.

Acknowledgements:
Special thanks to co-authors Tianjian Meng, Ben Caine, Jiquan Ngiam, Daiyi Peng, Junyang Shen, Bo Wu, Yifeng Lu, Denny Zhou, Quoc Le, Alan Yuille, Mingxing Tan.

Categories
Misc

Capture 6x Better Temporal Resolution Cardiac Imaging at any Heart Rate with FujiFilm Healthcare Cardio StillShot 

Using NVIDIA GPUs, Fujifilm Healthcare developed Cardio StillShot to capture cardiac imaging at any heart rate, with 6x better temporal resolution of cardiac CT images.

Capturing clear diagnostic images of the heart and its vasculature is challenging in cardiac computed tomography (CT) imaging because the heart is always moving and the resulting images can be blurry. When a heart is beating quickly, at above 75 beats per minute or irregularly, good image resolution is almost impossible. 

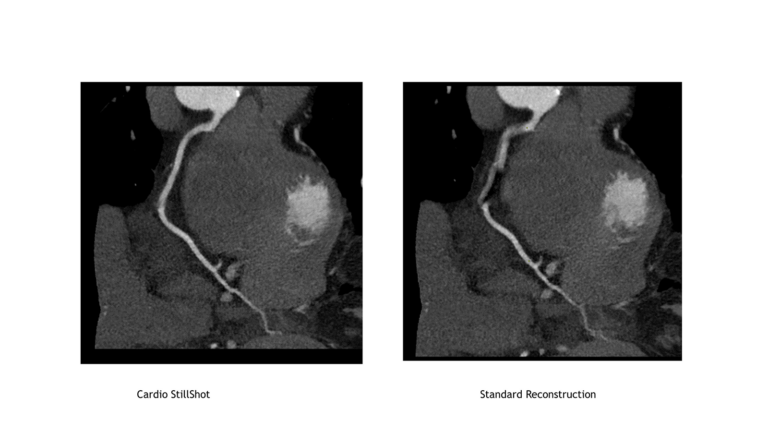
Global diagnostic imaging leader Fujifilm Healthcare developed Cardio StillShot software, which uses NVIDIA GPUs and integrates with their existing whole-body X-ray CT system SCENARIA View, for precise cardiac imaging at any heart rate. This software improves diagnostic imaging without a high-speed rotation scanner. Also, Cardio StillShot achieves over 6x better temporal resolution than conventional image reconstruction methods by detecting cardiac motion and preventing image blurring through motion correction. 

Clear cardiac CT images help clinical teams visualize structures such as coronary arteries, aortic valves, and myocardium noninvasively and diagnose heart problems such as heart failure, cardiomyopathy, and structural abnormalities.

Cardiovascular disease rates and noninvasive diagnostic tools

Cardiovascular disease (CVD) is the leading cause of death globally. According to WHO, an estimated 17.9 million people died from CVDs in 2019, representing 32% of all global deaths. Of those deaths, 85% were due to heart attack and stroke. Imaging techniques such as coronary computed tomography angiography (CCTA) is a widely available noninvasive diagnostic tool for assessing a patient’s cardiovascular disease risk early.

CCTA helps identify plaque deposits in the coronary arteries, which supply oxygen and nutrients to the heart. Plaque is the build up of fats, cholesterol, and other substances in artery walls leading to constricted blood flow to the heart. 

Identifying plaque buildup early can help prevent heart attacks. In ECG-gated cardiac CT, X-ray images are obtained during the cardiac phase with little cardiac motion, or image reconstruction is performed using multiple samples to create a static image of the coronary artery.

SCENARIA View, a whole-body X-ray CT system
Figure 1: Fujifilm Healthcare’s latest model of SCENARIA View, pictured above, will have Cardio StillShot as a software enablement option along with a RTX A6000 GPU console.

Difficulties with imaging during high heart rates

Patients with high heart rates or irregular heart rates need to be scanned just like every other patient. Unfortunately, it is hard for scanners to get clear diagnostic images under these conditions. At heart rates of 60-75 beats per minute (BPM), there is adequate time to take images between heartbeats. But, when the heart rates rise above 75 BPM, the imaging time window becomes too short, leading to blurry images. Detailed imaging of the coronary arteries requires high temporal resolution. 

Cardio StillShot was developed to achieve high temporal resolution by detecting and correcting motions in the heart even when the patient’s heart rate is high, without using beta-blockers or other medications to lower heart rate.

Transitioning from CPUs to GPUs to develop Cardio StillShot

Cardio StillShot image reconstruction software addresses the conventional issues of time resolution. Previously, Fujifilm Healthcare was using CPUs to reconstruct images and remove blurriness. However, CPUs are no longer a viable option for Cardio StillShot due to a 10x increase in the number of calculations required for each image. Fujifilm Healthcare transitioned to NVIDIA GPUs and NVIDIA software to develop Cardio StillShot. The adoption of NVIDIA RTX A6000 GPUs with 77 TFLOPS of compute performance helps calculate the motion vector field (MVF), resulting in clear images for clinical use. Fujifilm Healthcare also used NVIDIA software stack and tools, including NVIDIA Optical Flow SDK to estimate pixel-level motion, CUDA for accelerated calculations, and NVIDIA Nsight Compute to optimize performance.

Exploring 4D motion vector fields to improve image clarity

Fujifilm Healthcare used a 4D MVF to estimate the motion in CCTA images. The MVF approach automatically tracks and corrects the heart’s motion resulting in sharper images. The improvement is a 6.25x higher temporal resolution—from 175msec temporal resolution in a standard reconstruction to 28 msec with the Cardio StillShot software. With NVIDIA GPUs, clear views of the heart can be reconstructed in as little as 30 seconds.

Workflow of Motion Vector Field Synthesis
Figure 2: Motion Vector Field Synthesis from CT Scan.

Accelerated compute adds premium capabilities to existing scanners

For Fujifilm Healthcare, using accelerated compute shifted the system performance and cost of the CT design. Usually, high-performance features require costly design and manufacturing upgrades. Fujifilm Healthcare broke this trend with NVIDIA GPUs to add premium capabilities to scanners via a software enhancement. Adding GPU acceleration to the StillShot image reconstruction software improved cardiac image quality of an existing CT scanner with over 6x temporal resolution. The Cardio StillShot software runs on Fujifilm Healthcare’s latest model of SCENARIA View, which is available in Japan today and offered worldwide soon. Fujifilm Healthcare will be demonstrating the Cardio StillShot software and SCENARIA View CT scanner at the International Technical Exhibition of Medical Imaging 2022 Conference held in Yokohama, Japan from April 15 to 17. 

Categories
Misc

Automatic signal recognition – Need audio data for machine learning

Automatic signal recognition - Need audio data for machine learning submitted by /u/NeoHolo
[visit reddit] [comments]
Categories
Misc

How to properky install tensorflow and keras?

So im trying to use tnesorflow.keras, but im getting this error:

Import "tensorflow.keras" could not be resolvedPylance 

Im new to coding and have very little experience so im not sure if im supposed to do anything besides writing “pip install tensorflow” in the terminal. I’ve also typed “pip install keras” but it was already installed.

When i typed pip install tensorflow in the terminal i did get som yellow text saying that the directory is not in PATH, or something like that. Then i tried adding what i think was the directory to path in environment variables, but that didn’t help either.

submitted by /u/WannaKnow231
[visit reddit] [comments]

Categories
Misc

Tensorflow Federated Examples

Hi,

are there any examples for a Tensorflow Federated Client/Server setup?

I only find jupyter notebooks but cant figure out how to set up a client/server.

Thanks

submitted by /u/BToDIrt
[visit reddit] [comments]

Categories
Misc

How to label mass amounts of pictures for model?

Hello,

I am relatively new to TensorFlow and want to create my own model. I will have four label categories and will be using about 50+ pictures for each. At the moment I am using labelImg to create boxes over my images one by one to develop the data for my labels.

Is there a quicker way to accomplish this task for large numbers of pictures? Or another software than can be used other than labelImg? Thanks in advance.

submitted by /u/Embedded_bro
[visit reddit] [comments]

Categories
Misc

Why are Google releasing new models based on TF1 if they don’t want us to use it?

Google release SpaghettiNet a few months ago. Why did they decide to use a deprecated API for their flagship phone?

https://ai.googleblog.com/2021/11/improved-on-device-ml-on-pixel-6-with.html

https://github.com/tensorflow/models/blob/master/research/object_detection/README.md#spaghettinet-for-edge-tpu

submitted by /u/Curld
[visit reddit] [comments]

Categories
Misc

Properly save custom DRL Agent in TF 2

So I have a DDQN model, that looks like this:

class DDQN(keras.Model):
def __init__(self, n_actions, fc1_dims, fc2_dims):
super(DDQN, self).__init__()
self.dense1 = keras.layers.Dense(fc1_dims, activation=’relu’)
self.dense1.trainable = True
self.dense2 = keras.layers.Dense(fc2_dims, activation=’relu’)
self.dense1.trainable = True
self.V = keras.layers.Dense(1, activation=None) #Value stream layer
self.V.trainable = True
self.A = keras.layers.Dense(n_actions, activation=None) #Advantage stream layer
self.A.trainable = True
def call(self, state):
x = self.dense1(state)
x = self.dense2(x)
V = self.V(x)
A = self.A(x)
Q = (V + (A – tf.math.reduce_mean(A, axis=1, keepdims=True)))
return Q
def advantage(self, state):
x = self.dense1(state)
x = self.dense2(x)
A = self.A(x)
return A

I do call my model like this:

self.q_eval = DDQN(n_actions, fc1_dims, fc2_dims)

with tf.device(device):
self.q_eval.compile(optimizer=Adam(learning_rate=lr), loss=’mean_squared_error’)

now training and all works, results are great n stuff.

But that’s all pointless, if I can’t save the model, right?

Well, that’s where the trouble began.

def save_model(self):
self.q_eval.save(‘test’)

whenever I call this, I get this error:

Exception has occurred: ValueError

Model <__main__.DDQN object at 0x0000014483B8E948> cannot be saved because the input shapes have not been set. Usually, input shapes are automatically determined from calling `.fit()` or `.predict()`. To manually set the shapes, call `model.build(input_shape)`.

If I do model.build() n shit before saving, nothing changes. Now what would be the proper way to save a model like this?

Please excuse spelling mistakes or dumb sentences in the post and comments, since English is not my native language.

submitted by /u/Chris-hsr
[visit reddit] [comments]