Posted by Thang Luong, Staff Research Scientist, Google Research and Jingcao Hu, Senior Staff Software Engineer, Google Search
Supervised learning, the machine learning task of training predictive models using data points with known outcomes (i.e., labeled data), is generally the preferred approach in industry because of its simplicity. However, supervised learning requires accurately labeled data, the collection of which is often labor intensive. In addition, as model efficiency improves with better architectures, algorithms, and hardware (GPUs / TPUs), training large models to achieve better quality becomes more accessible, which, in turn, requires even more labeled data for continued progress.
To mitigate such data acquisition challenges, semi-supervised learning, a machine learning paradigm that combines a small amount of labeled data with a large amount of unlabeled data, has recently seen success with methods such as UDA, SimCLR, and many others. In our previous work, we demonstrated for the first time that a semi-supervised learning approach, Noisy Student, can achieve state-of-the-art performance on ImageNet, a large-scale academic benchmark for image classification, by utilizing many more unlabeled examples.
Inspired by these results, today we are excited to present semi-supervised distillation (SSD), a simplified version of Noisy Student, and demonstrate its successful application to the language domain. We apply SSD to language understanding within the context of Google Search, resulting in high performance gains. This is the first successful instance of semi-supervised learning applied at such a large scale and demonstrates the potential impact of such approaches for production-scale systems.
Noisy Student Training
Prior to our development of Noisy Student, there was a large body of research into semi-supervised learning. In spite of this extensive research, however, such systems typically worked well only in the low-data regime, e.g., CIFAR, SVHN, and 10% ImageNet. When labeled data were abundant, such models were unable to compete with fully supervised learning systems, which prevented semi-supervised approaches from being applied to important applications in production, such as search engines and self-driving cars. This shortcoming motivated our development of Noisy Student Training, a semi-supervised learning approach that worked well in the high-data regime, and at the time achieved state-of-the-art accuracy on ImageNet using 130M additional unlabeled images.
Noisy Student Training has 4 simple steps:
- Train a classifier (the teacher) on labeled data.
- The teacher then infers pseudo-labels on a much larger unlabeled dataset.
- Then, it trains a larger classifier on the combined labeled and pseudo-labeled data, while also adding noise (noisy student).
- (Optional) Going back to step 2, the student may be used as a new teacher.
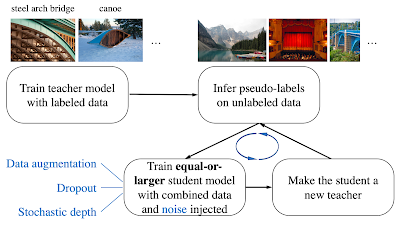 |
| An illustration of Noisy Student Training through four simple steps. We use two types of noise: model noise (Dropout, Stochastic Depth) and input noise (data augmentation, such as RandAugment). |
One can view Noisy Student as a form of self-training, because the model generates pseudo-labels with which it retrains itself to improve performance. A surprising property of Noisy Student Training is that the trained models work extremely well on robustness test sets for which it was not optimized, including ImageNet-A, ImageNet-C, and ImageNet-P. We hypothesize that the noise added during training not only helps with the learning, but also makes the model more robust.
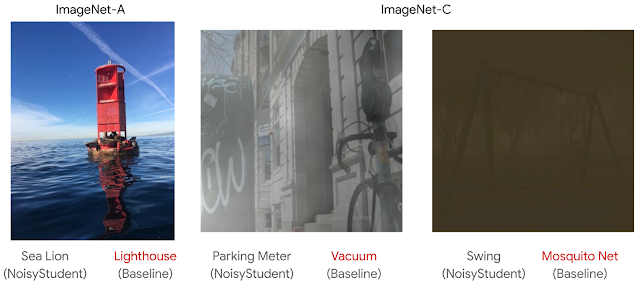 |
| Examples of images that are classified incorrectly by the baseline model, but correctly by Noisy Student. Left: An unmodified image from ImageNet-A. Middle and Right: Images with noise added, selected from ImageNet-C. For more examples including ImageNet-P, please see the paper. |
Connections to Knowledge Distillation
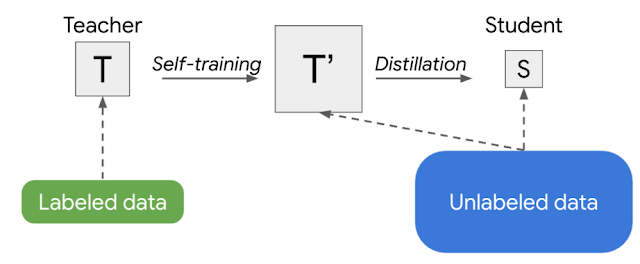
Noisy Student is similar to knowledge distillation, which is a process of transferring knowledge from a large model (i.e., the teacher) to a smaller model (the student). The goal of distillation is to improve speed in order to build a model that is fast to run in production without sacrificing much in quality compared to the teacher. The simplest setup for distillation involves a single teacher and uses the same data, but in practice, one can use multiple teachers or a separate dataset for the student.
 |
| Simple illustrations of Noisy Student and knowledge distillation. |
Unlike Noisy Student, knowledge distillation does not add noise during training (e.g., data augmentation or model regularization) and typically involves a smaller student model. In contrast, one can think of Noisy Student as the process of “knowledge expansion”.
Semi-Supervised Distillation
Another strategy for training production models is to apply Noisy Student training twice: first to get a larger teacher model T’ and then to derive a smaller student S. This approach produces a model that is better than either training with supervised learning or with Noisy Student training alone. Specifically, when applied to the vision domain for a family of EfficientNet models, ranging from EfficientNet-B0 with 5.3M parameters to EfficientNet-B7 with 66M parameters, this strategy achieves much better performance for each given model size (see Table 9 of the Noisy Student paper for more details).
Noisy Student training needs data augmentation, e.g., RandAugment (for vision) or SpecAugment (for speech), to work well. But in certain applications, e.g., natural language processing, such types of input noise are not readily available. For those applications, Noisy Student Training can be simplified to have no noise. In that case, the above two-stage process becomes a simpler method, which we call Semi-Supervised Distillation (SSD). First, the teacher model infers pseudo-labels on the unlabeled dataset from which we then train a new teacher model (T’) that is of equal-or-larger size than the original teacher model. This step, which is essentially self-training, is then followed by knowledge distillation to produce a smaller student model for production.
 |
| An illustration of Semi-Supervised Distillation (SSD), a 2-stage process that self-trains an equal-or-larger teacher (T’) before distilling to a student (S). |
Improving Search
Having succeeded in the vision domain, an application in the language understanding domain, like Google Search, is a logical next step with broader user impact. In this case, we focus on an important ranking component in Search, which builds on BERT to better understand languages. This task turns out to be well-suited for SSD. Indeed, applying SSD to the ranking component to better understand the relevance of candidate search results to queries achieved one of the highest performance gains among top launches at Search in 2020. Below is an example of a query where the improved model demonstrates better language understanding.
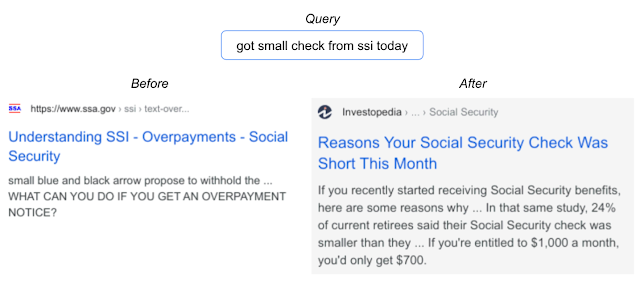 |
| With the implementation of SSD, Search is able to find documents that are more relevant to user queries. |
Future Research & Challenges
We have presented a successful instance of semi-supervised distillation (SSD) in the production scale setting of Search. We believe SSD will continue changing the landscape of machine learning usage in the industry from predominantly supervised learning to semi-supervised learning. While our results are promising, there is still much research needed in how to efficiently utilize unlabeled examples in the real world, which is often noisy, and apply them to various domains.
Acknowledgements
Zhenshuai Ding, Yanping Huang, Elizabeth Tucker, Hai Qian, and Steve He contributed immensely to this successful launch. The project would not have succeeded without contributions from members of both the Brain and Search teams: Shuyuan Zhang, Rohan Anil, Zhifeng Chen, Rigel Swavely, Chris Waterson, Avinash Atreya. Thanks to Qizhe Xie and Zihang Dai for feedback on the work. Also, thanks to Quoc Le, Yonghui Wu, Sundeep Tirumalareddy, Alexander Grushetsky, Pandu Nayak for their leadership support.


 Edge computing has been around for a long time, but has recently become a hot topic because of the convergence of three major trends – IoT, 5G, and AI.

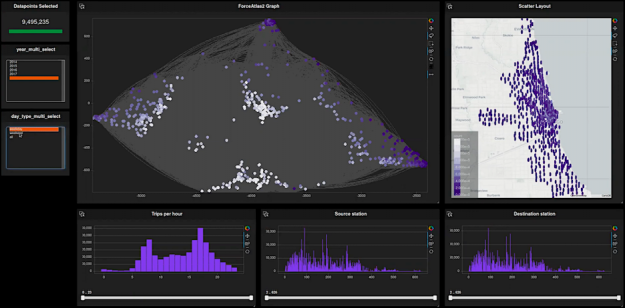
 Work continues on improving the UX and capabilities of our GPU cross-filter dashboard library, cuxfilter. Here is a quick recap of its latest features. First, it is as easy as ever to access cuxfilter. Just run a standard RAPIDS install as shown in the getting started page. Additionally, you can try it online at PaperSpace. …
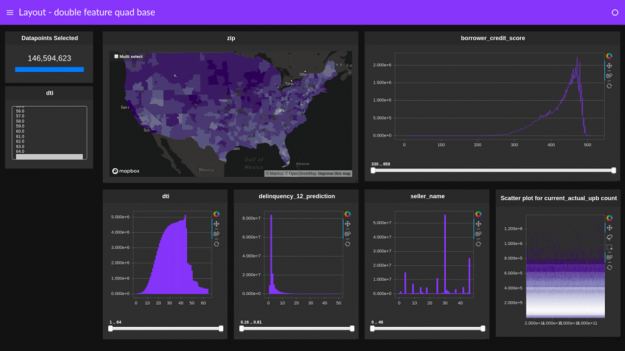


 When you see a browser ad for a new restaurant, or the perfect gift for that hard-to-please family member, you probably aren’t thinking about the infrastructure used to deliver that ad. However, that infrastructure is what allows advertising companies like Criteo to provide these insights. The NVIDIA networking portfolio is essential to Criteo technology stack. …
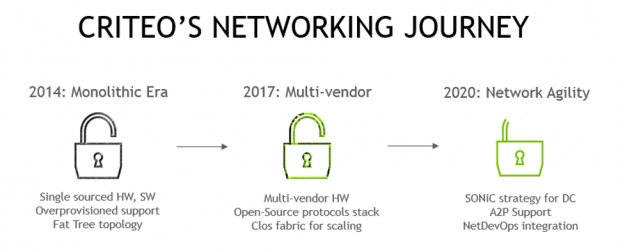
