
|
submitted by /u/AugmentedStartups [visit reddit] [comments] |

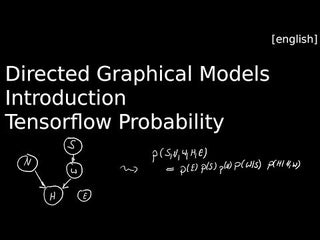
 DataBloom
|
|
submitted by /u/AugmentedStartups [visit reddit] [comments] |

|
submitted by /u/OB_two [visit reddit] [comments] |
Data is the new oil in today’s age of AI, but only a lucky few are sitting on a gusher. So, many are making their own fuel, one that’s both inexpensive and effective. It’s called synthetic data. What Is Synthetic Data? Synthetic data is annotated information that computer simulations or algorithms generate as an alternative Read article >
The post What Is Synthetic Data? appeared first on The Official NVIDIA Blog.
Autonomous truck technology is making its way across the Great White North. Self-driving trucking startup NuPort Robotics is leveraging NVIDIA DRIVE to develop autonomous driving systems for middle-mile short-haul routes. The Canada-based company is working with the Ontario government as well as Canadian Tire on a two-year pilot project to accelerate the commercial deployment of Read article >
The post Oh, Canada: NuPort Brings Autonomous Trucking to Toronto Roads with NVIDIA DRIVE appeared first on The Official NVIDIA Blog.

submitted by /u/reps_up
[visit reddit] [comments]
Trying to write a custom Keras layer to perform RoI pooling quickly. I have an implementation that relies on repeated tf.map_fn() calls but it is painfully slow. I’ve seen some that use ordinary Python for-loops and I thought I’d try my own. Executed on its own using a model that consists only of this custom layer, it works just fine. However when used in a training loop (where I repeatedly call Model.predict_on_batch and Model.train_on_batch), it produces bizarre results.
It’s quite difficult to figure out what exactly is going on because reading the layer output is non-trivial and I suspect is giving me a result different than what Keras sees during training.
So I’ve inserted a print statement and notice that during training, it will produce numerical tensors on some steps, e.g.:
tf.Tensor( [8.87275487e-02 0.00000000e+00 0.00000000e+00 0.00000000e+00 6.44880116e-01 0.00000000e+00 2.37839603e+00 0.00000000e+00 0.00000000e+00 2.50582743e+00 0.00000000e+00 0.00000000e+00 4.21218348e+00 0.00000000e+00 0.00000000e+00 0.00000000e+00 0.00000000e+00 4.73125458e+00 0.00000000e+00 0.00000000e+00 0.00000000e+00 0.00000000e+00 9.98033524e-01 0.00000000e+00 0.00000000e+00 0.00000000e+00 4.39077109e-01 0.00000000e+00 0.00000000e+00 0.00000000e+00 1.72268832e+00 0.00000000e+00 1.20860779e+00 0.00000000e+00 0.00000000e+00 2.05427575e+00 0.00000000e+00 0.00000000e+00 0.00000000e+00 0.00000000e+00 0.00000000e+00 0.00000000e+00 0.00000000e+00 0.00000000e+00 2.32518530e+00 0.00000000e+00 8.84961128e-01 0.00000000e+00 0.00000000e+00 1.05681539e+00 0.00000000e+00 0.00000000e+00 0.00000000e+00 0.00000000e+00 3.33451724e+00 1.71899879e+00 0.00000000e+00 0.00000000e+00 0.00000000e+00 9.97039509e+00
But on most steps I see this:
Tensor("model_3/roi_pool/map/while/Max:0", shape=(512,), dtype=float32) Tensor("model_3/roi_pool/map/while/Max_1:0", shape=(512,), dtype=float32) Tensor("model_3/roi_pool/map/while/Max_2:0", shape=(512,), dtype=float32) Tensor("model_3/roi_pool/map/while/Max_3:0", shape=(512,), dtype=float32) Tensor("model_3/roi_pool/map/while/Max_4:0", shape=(512,), dtype=float32) Tensor("model_3/roi_pool/map/while/Max_5:0", shape=(512,), dtype=float32)
I believe these are tensor objects being used to construct a compute graph for deferred execution? I’m not sure why it is choosing to do this on most steps but not all.
This is causing training to fail to progress because it behaves similarly to returning a tensor full of zeros.
My layer code:
“` class RoIPoolingLayer(Layer): “”” Input shape: Two tensors [xmaps, x_rois] each with shape: x_maps: (samples, height, width, channels), representing the feature maps for this batch, of type tf.float32 x_rois: (samples, num_rois, 4), where RoIs have the ordering (y, x, height, width), all tf.int32 Output shape: (samples, num_rois, pool_size, pool_size, channels) “”” def __init(self, pool_size, **kwargs): self.pool_size = pool_size super().init_(**kwargs)
def get_config(self): config = { “pool_size”: self.pool_size, } base_config = super(RoIPoolingLayer, self).get_config() return dict(list(base_config.items()) + list(config.items()))
def compute_output_shape(self, input_shape): map_shape, rois_shape = input_shape assert len(map_shape) == 4 and len(rois_shape) == 3 and rois_shape[2] == 4 assert map_shape[0] == rois_shape[0] # same number of samples num_samples = map_shape[0] num_channels = map_shape[3] num_rois = rois_shape[1] return (num_samples, num_rois, self.pool_size, self.pool_size, num_channels)
def call(self, inputs): return tf.map_fn( fn = lambda input_pair: RoIPoolingLayer._compute_pooled_rois(feature_map = input_pair[0], rois = input_pair[1], pool_size = self.pool_size), elems = inputs, fn_output_signature = tf.float32 # this is absolutely required else the fn type inference seems to fail spectacularly )
def _compute_pooled_rois(feature_map, rois, pool_size): num_channels = feature_map.shape[2] num_rois = rois.shape[0] pools = [] for roi_idx in range(num_rois): region_y = rois[roi_idx, 0] region_x = rois[roi_idx, 1] region_height = rois[roi_idx, 2] region_width = rois[roi_idx, 3] region_of_interest = tf.slice(feature_map, [region_y, region_x, 0], [region_height, region_width, num_channels]) x_step = tf.cast(region_width, dtype = tf.float32) / tf.cast(pool_size, dtype = tf.float32) y_step = tf.cast(region_height, dtype = tf.float32) / tf.cast(pool_size, dtype = tf.float32) for y in range(pool_size): for x in range(pool_size): pool_y_start = y pool_x_start = x
pool_y_start_int = tf.cast(pool_y_start, dtype = tf.int32) pool_x_start_int = tf.cast(pool_x_start, dtype = tf.int32) y_start = tf.cast(pool_y_start * y_step, dtype = tf.int32) x_start = tf.cast(pool_x_start * x_step, dtype = tf.int32) y_end = tf.cond((pool_y_start_int + 1) < pool_size, lambda: tf.cast((pool_y_start + 1) * y_step, dtype = tf.int32), lambda: region_height ) x_end = tf.cond((pool_x_start_int + 1) < pool_size, lambda: tf.cast((pool_x_start + 1) * x_step, dtype = tf.int32), lambda: region_width ) y_size = tf.math.maximum(y_end - y_start, 1) # if RoI is smaller than pool area, y_end - y_start can be less than 1 (0); we want to sample at least one cell x_size = tf.math.maximum(x_end - x_start, 1) pool_cell = tf.slice(region_of_interest, [y_start, x_start, 0], [y_size, x_size, num_channels]) pooled = tf.math.reduce_max(pool_cell, axis=(1,0)) # keep channels independent print(pooled) pools.append(pooled) return tf.reshape(tf.stack(pools, axis = 0), shape = (num_rois, pool_size, pool_size, num_channels))
“`
Note the print statement in the loop.
Strangely, if I build a simple test model consisting of only this layer (i.e., in my unit test), I can verify that it does work:
input_map = Input(shape = (9,8,num_channels)) # input map size input_rois = Input(shape = (num_rois,4), dtype = tf.int32) # N RoIs, each of length 4 (y,x,h,w) output = RoIPoolingLayer(pool_size = pool_size)([input_map, input_rois]) model = Model([input_map, input_rois], output)
I can then call model.predict() on some sample input and I get valid output.
But in a training loop, where I perform a prediction followed by a training step on the trainable layers, it’s not clear what it is doing. My reference implementation works fine (it does not use for-loops).
How can I debug this further?
Thank you 🙂
submitted by /u/BartTrzy
[visit reddit] [comments]
 San Francisco startup Clockwork recently launched a pop-up location offering the first robot nail painting service in the form of 10-minute “minicures.”
San Francisco startup Clockwork recently launched a pop-up location offering the first robot nail painting service in the form of 10-minute “minicures.”
The robot uses structured-light 3D scanners to detect the shape of a customer’s fingernails — with AI models directing a plastic-tipped cartridge that paints nails one at a time. Appointments don’t yet include other manicure services such as nail trimming, buffing and shaping.
After taking photos of a client’s fingernail, Clockwork uses CUDA to accelerate the 3D point cloud reconstruction from 20 seconds to under a second. The images from both cameras are stitched together and handed over to the AI model, which identifies edges with 0.3 mm accuracy. The process repeats for each fingernail.
An NVIDIA GPU on the robot is used for real-time inference during the minicure, while the AI models are trained on NVIDIA Tensor Core GPUs on Google Cloud.
The company, which is charging $8 per nail painting appointment, plans to make its devices available in offices, retail stores and apartment buildings. After going viral on TikTok, appointments at its San Francisco store are booked up for weeks.
Read the full article in The New York Times >>
Who knew AI would have an impact on organic produce markets? Bakur Kvezereli did. Raised on an Eastern European organic tomato farm, he saw labor shortages, pesticide problems and rising energy costs. Years later, studying at MIT in 2014, it dawned on him that AI could help address these issues for farmers. A few years Read article >
The post Tilling AI: Startup Digs into Autonomous Electric Tractors for Organics appeared first on The Official NVIDIA Blog.
 Motivation Custom “row-by-row” processing logic (sometimes called sequential User-Defined Functions) is prevalent in ETL workflows. The sequential nature of UDFs makes parallelization on GPUs tricky. This blog post covers how to implement the same UDF logic using RAPIDS to parallelize computation on GPUs and unlock 100x speedups. Introduction Typically, sequential UDFs revolve around records with … Continued
Custom “row-by-row” processing logic (sometimes called sequential User-Defined Functions) is prevalent in ETL workflows. The sequential nature of UDFs makes parallelization on GPUs tricky. This blog post covers how to implement the same UDF logic using RAPIDS to parallelize computation on GPUs and unlock 100x speedups.
Typically, sequential UDFs revolve around records with the same grouping key. For example, analyzing a user’s clicks per session on a website where a session ends after 30 minutes of inactivity. In Apache Spark, you’d first cluster on user key, and then segregate user sessions using a UDF like in the example below. This UDF uses multiple CPU threads to run sequential functions in parallel.
Dask-CUDA clusters use a single process and thread per GPU, so running a single sequential function won’t work for this model. To run serial functions on the hundreds of CUDA cores available in GPUs, you can take advantage of the following properties:
Let’s look at how you can use Numba to transform our sessionization UDF for use on GPUs. Let’s break the algorithm into two parts.
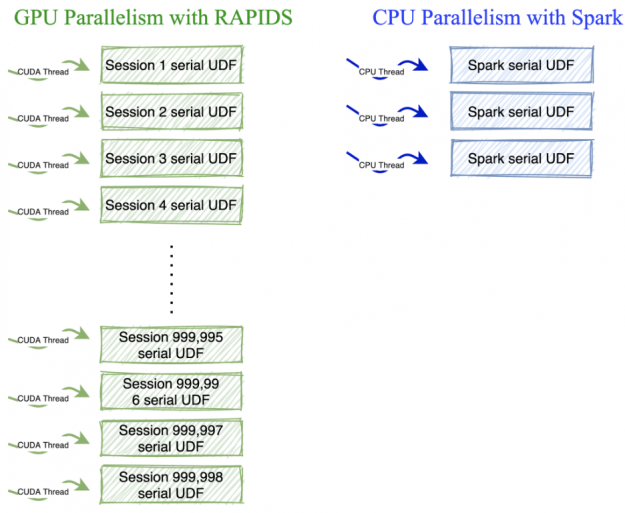
With this function, we create session boundaries. This function is embarrassingly parallel so that we can launch threads for each row of the dataframe.
For session analysis, we have to set a unique session flag across all the rows that belong to that session for each user. This function is serial at the session level, but as we have many sessions (approx 18 M) in each dataframe, we can take advantage of GPU parallelism by launching threads for each session.
We invoke the above functions on each partition of a dask-cudf dataframe using a map_partition call. The main logic of the code above is still similar to pure python while providing a lot of speedups. A similar serial function in pure python takes about `17.7s` vs. `14.3 ms` on GPUs. That’s a whopping 100x speedup.
When working with serial user-defined functions that operate on many small groups, transforming the UDF using numba, as shown above, will maximize performance on GPUs. Thus, with the power of numba, Dask, and RAPIDS, you can now supercharge the map-reduce UDF ETL jobs to run at the speed of light.
Want to start using Dask and RAPIDS to analyze big data at the speed of light? Check out the RAPIDS Getting Started webpage, with links to help you download pre-built Docker containers or install directly via Conda.


|
submitted by /u/hudadong [visit reddit] [comments] |