To make transportation safer, autonomous vehicles (AVs) must have processes and underlying systems that meet the highest standards. NVIDIA DRIVE OS is the operating system for in-vehicle accelerated computing powered by the NVIDIA DRIVE platform. DRIVE OS 5.2 is now functional safety-certified by TÜV SÜD, one of the most experienced and rigorous assessment bodies in Read article >
A national initiative in semiconductors provides a once-in-a-generation opportunity to energize manufacturing in the U.S. The CHIPS and Science Act includes an $13 billion R&D investment in the chip industry. Done right, it’s a recipe for bringing advanced manufacturing techniques to every industry and cultivating a highly skilled workforce. The semiconductor industry uses the most Read article >
The great thing about the GPU is that it offers tremendous parallelism; it allows you to perform many tasks at the same time. At its most granular level, this comes down to the fact that there are thousands of tiny processing cores that run the same instruction at the same time. But that is not where such parallelism stops. There are other ways that you can leverage parallelism that are often overlooked, particularly when it comes to AI.
When you consider the performance of an AI feature, what exactly do you mean? Are you just considering the time the model itself takes to run or are you considering the time it takes to load the data, preprocess the data, transfer the data, and write back to disk or display?
This question is perhaps best answered by the user who will experience the feature in question. It can often transpire that the actual model execution time is only a small part of that overall experience.
This post is the first in a series that walks you through several use cases that are specific to APIs, including:
ONNX Runtime and Microsoft WinML
NVIDIA TensorRT
NVIDIA cuDNN
Microsoft DirectML
AI on workstation is a relatively new phenomenon. It’s traditionally been the stuff of servers and the cloud, but that is changing, particularly in the content creation space. As such, there are many existing code bases now being complemented with new AI features.
One of the first questions to ask when implementing an AI feature is, how do you run inference? What are the constraints? What platforms do you need to support?
Depending on the constraints that you identify, you may choose a DirectML and WinML–based approach or a CUDA and TensorRT–based approach. Whatever approach you choose, you should also consider how to integrate your feature into an existing workflow or pipeline.
Consider a relatively common workflow for generative AI in the content creation space: a denoise feature. To run this denoiser, the following steps must happen:
Load the model into GPU memory.
Make input data available to the model.
Pass the input data through the model.
Do something with the output data.
There are a lot of ambiguities in this list, so I want to discuss each step.
Figure 1. AI is not always the entirety of the feature
Load the model into GPU memory
When and how do you do this?
Models come in all sorts of shapes and sizes, from just a few kilobytes to many gigabytes. If your model executes as a part of a long-running pipeline, you may not be able to keep a large model in memory persistently.
Ideally, you would keep the model loading as far from the performance path as possible, but there may be times that this is intractable. You may have to load and unload models as a pipeline runs.
The best-case scenario is to load a model one time and use it as many times as possible. In cases where this can’t be done, most frameworks enable a serialized model to be unloaded and streamed back to the GPU relatively quickly.
Make input data available to the model
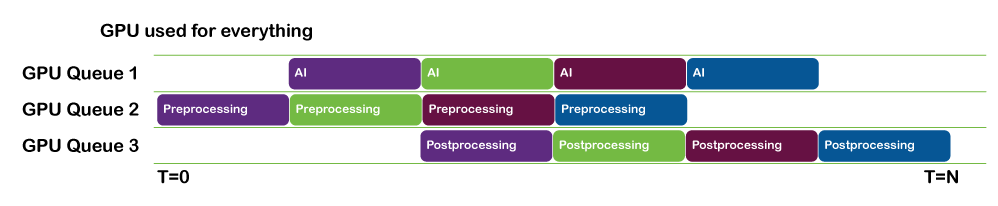
Figure 2. Unoptimized pipeline with all operations serialized
This step is where things can get interesting. Usually, this is where there is a lot of low-hanging fruit to improve your performance.
Ultimately, the model expects to consume input data in a specific format. This almost always means a particular scaling and offset, format conversion (for example, UINT8 to FP16), and possibly some layout transformation as well. On NVIDIA hardware, Tensor Cores prefer the NHWC layout.
Often, there is other preprocessing that must be done. Perhaps there is a conversion from or to frequency space or a decode from some compressed format.
This is all work that the GPU can do effectively so it’s important that you allow the GPU to do it. It can be tempting to either allow the CPU to do this work or offload the work to third-party libraries. The latter is a perfectly sensible way to do this. In either case, you must ensure that you minimize the transfers to and from the GPU and speed up the operations themselves. If you are using third-party GPU solutions for pre- and postprocessing, can you ensure that the data remains on the GPU for as long as possible?
In many cases, there may be solutions to preprocessing and format conversion that can be performed by the model itself using native operators. Conversion to FP16, scaling, and offsetting can be performed in most cases by adding those operators to the beginning and end of the model.
However you do your preprocessing, at some point, you will of course have to transfer your input data to the GPU so that the model can consume it. This raises another important consideration.
When your input data is large, you have to perform inference in tiles, if you can. This means that you load a batch of one or more tiles and run inference before loading the next batch.
Figure 3. Optimized pipeline with operations shared across multiple queues
Loading data and running inference can be done in parallel. You can pipeline this work so that by the time batch N has finished inferencing, batch N+1 has finished loading and is ready to be run.
If you are using NVIDIA CUDA or NVIDIA TensorRT, use CUDA streams to facilitate this.
If you are using a DML-based inference solution, use DirectX queues in parallel to keep things moving.
Tiling operations such as this are highly parallelizable and a good candidate for performing on the GPU itself. In cases where it is intractable to deal with an entire image in GPU memory, you can split the image up into sections that can be tiled while the next section is streamed onto the GPU.
Pass the input data through the model
To get the best possible performance out of the model by the time that you run the inference itself, make sure that all the following statements are true:
The input data is provided in the fastest device local memory
You are making use of the features that NVIDIA hardware provides, such as Tensor Cores.
The GPU is fully saturated, by which I mean that the GPU is given enough work to keep it busy.
Using the right memory
There are several physical heaps that most GPUs can access. Generally speaking, the programmable heaps are usually one of the following:
Host-visible
Lives in system memory and is read over the PCI bus on a PCI system
You can write to this memory but may not be the fastest for GPU access
Device-local
Lives in device (GPU) memory
Fast memory but you can’t write to this directly
The general workflow to get the fastest memory access is to write your data to host-visible memory. Then, issue a GPU command to copy the data from host-visible to device-local memory
If you are using a CUDA-based platform such as TensorRT or cuDNN, then this is relatively easy to manage as the driver does this for you. However, one thing you can do on the host to speed things up is to use pinned memory on the host. That is, when allocating host memory, use hostAlloc rather than malloc. This enables the GPU DMA to directly dispatch a memory transfer without having to involve a separate CPU transfer into the DMA memory pool, resulting in lower latencies.
If you are using a DirectML-based approach, then you must manage this transfer to fast memory yourself. It is worth the effort, as it gives you full control over exactly when your data is transferred, as well as the opportunity to perform your transfers in parallel with other work.
Saturating the GPU
One commonly overlooked bottleneck when doing any GPU-related work is not giving the GPU enough work to do. When this happens, you may find that there is not enough work to keep all the streaming multiprocessors (SMs) on the GPU busy.
In such cases, strategies such as increasing the spatial dimensions or batch size can help significantly. You may find that a batch size of eight runs at the same speed as a batch size of one.
Just as models can vary in size and complexity, so do GPUs. What is an optimum batch size for one GPU may not be optimal for another. Profiling using NVIDIA NSight Systems can help you identify cases where utilization is low on a given system and help you to design your inferencing strategy accordingly.
Other strategies to keep the GPU busy is to do other compute or even AI work in parallel using multiple CUDA streams or DirectX Command queues.
Every case is unique but both CUDA and DirectML and DirectX provide you with the means to keep the GPU as busy as possible for a given problem.
Do something with the output data
When inference is complete and you have your output, you can apply similar principles as you did for the input data. That is, you can post-process the data in a similar way to the input data, either by adding nodes to your graph or by employing a custom compute step.
If your data must be read back to host memory, this can also be done in parallel with the next inference batch. If your data must go directly to display, then you should avoid any unnecessary round trip to the CPU by making use of the appropriate interop capabilities of the platforms involved (for example, CUDA to OpenGL).
Conclusion
Remember that every case is different and what works well for one particular use case may not work for another.
This post is the second in a series about optimizing end-to-end AI for workstations. For more information, see part 1, End-to-End AI for Workstation: An…
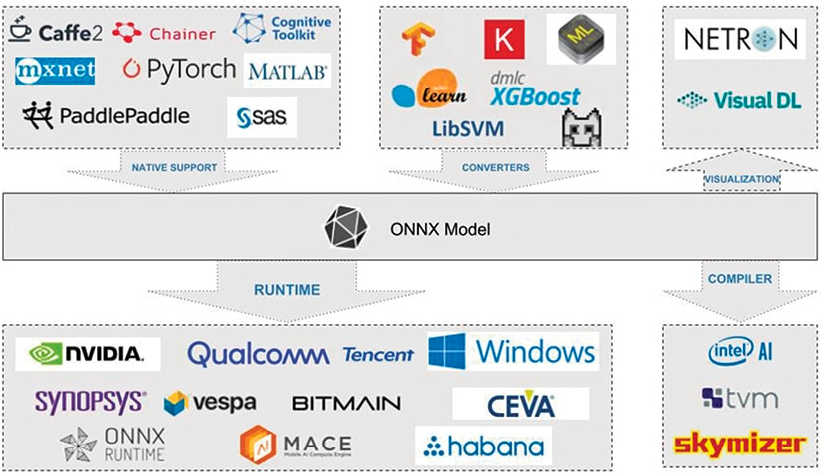
In this post, I discuss how to use ONNX to transition your AI models from research to production while avoiding common mistakes. Considering that PyTorch has become the most popular machine learning framework, all my examples use it but I also supply references to TensorFlow tutorials.
Figure 1. ONNX ecosystem
Interoperability with ONNX
ONNX (Open Neural Network Exchange) is an open standard for describing deep learning models designed to facilitate framework compatibility.
Consider the following scenario: you can train a neural network in PyTorch, then run it through the TensorRT optimizing compiler before deploying it to production. This is just one of many interoperable deep-learning tool combinations, which include visualizations, performance profilers, and optimizers.
Researchers and DevOps no longer have to make do with a single toolchain that is unoptimized for modeling and deployment performance.
To do this, ONNX defines a standard set of operators as well as a standard file format based on the Protocol Buffers serialization format. The model is described as a directed graph with edges indicating data flow between the various node inputs and outputs, and nodes expressing an operator and its parameters.
Exporting a model
I defined a simple model consisting of two Convolution-BatchNorm-ReLu blocks for the following cases.
You can use the PyTorch built-in exporter to export this model to ONNX by creating a model instance and calling torch.onnx.export. You must also supply a dummy input with the appropriate input dimensions and data type, as well as symbolic names for the given inputs and outputs.
In the code example, I defined that index 0 for both inputs and outputs is dynamic to run the model with varying batch sizes at runtime.
Internally, PyTorch calls torch.jit.trace, which executes the models using the given arguments and records all operations during that execution as a directed graph.
Tracing unrolls loops and if statements, producing a static graph identical to the traced run. There is no data-dependent control flow being captured. This export type is adequate for many use cases but keep these limitations in mind.
If dynamic behavior is required, you can use scripting. As a result, the model must be exported to a ScriptModule object before being converted to ONNX, as shown in the following example.
Converting a model to a ScriptModule object is not always trivial and usually necessitates some code changes. For more information, see Avoiding Pitfalls and TorchScript.
Because there are no data dependencies in the forward call, you can convert the model to a scriptable model without making any more changes in the code.
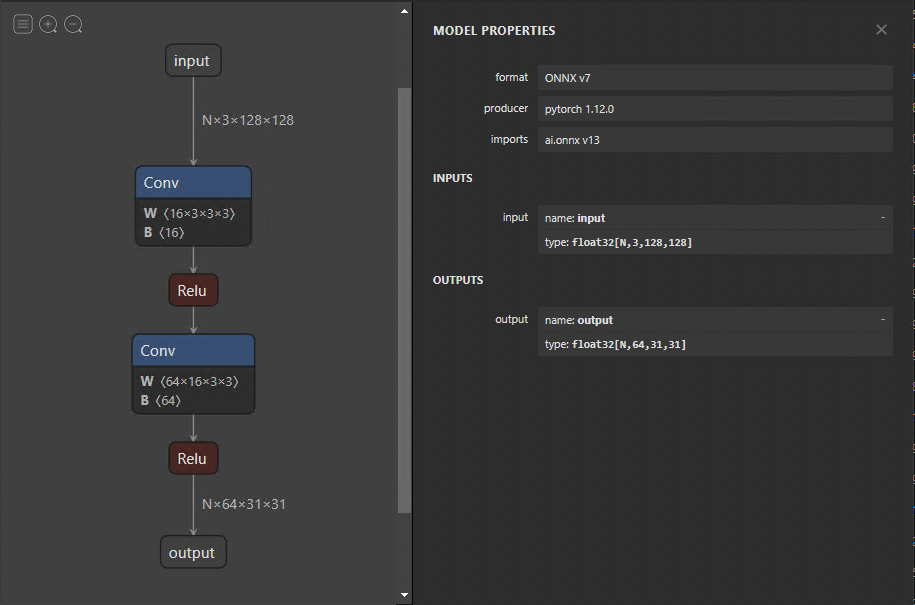
When the model has been exported, you can visualize it using Netron. The default view provides a graph of models and a properties panel (Figure 2). If you select the input or output, the properties panel displays generic information, such as name, OpSet, and dimensions.
Similarly, selecting a node in the graph reveals the node’s properties. This is an excellent approach to check whether your model was exported correctly and also to debug and analyze problems later on.
Figure 2. Exported ONNX model, visualized using Netron
Custom operator
Right now, ONNX currently defines about 150 operations. They range in complexity from arithmetic addition to a complete long short-term memory (LSTM) implementation. Although this list grows with each new release, you may encounter times when an operator from your research model is not included.
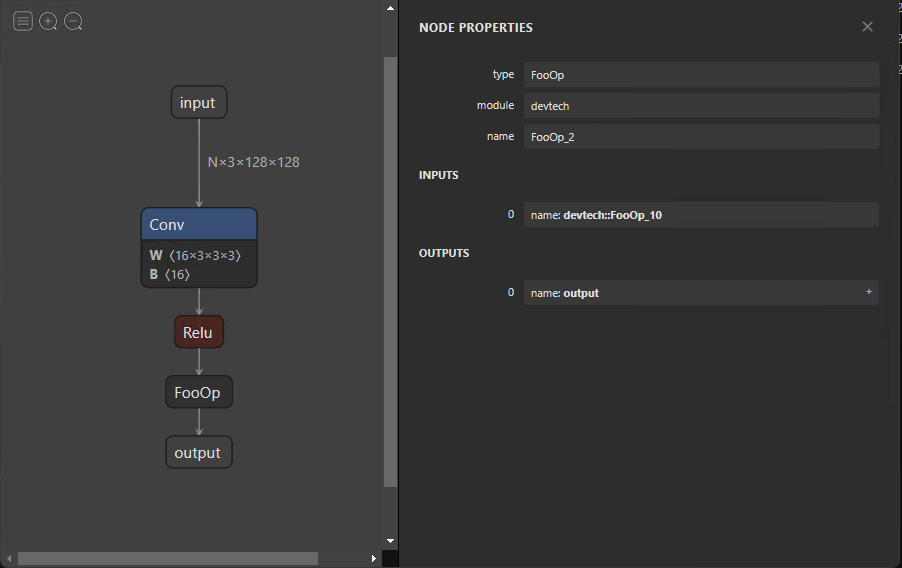
In such a scenario, you can define torch.autograd.Function, which includes the custom functionality in the forward function and a symbolic definition in symbolic. In this case, the forward function implements a no-operation by returning its input.
This example demonstrates how to define a symbolic node for exporting your model to ONNX. Although the functionality of symbolic nodes is offered in the forward function, it must be implemented and provided to the runtime used to infer the ONNX model. This is specific to the execution provider and is addressed later in this post.
Figure 3. ONNX model with custom FooOp
Modifying ONNX models
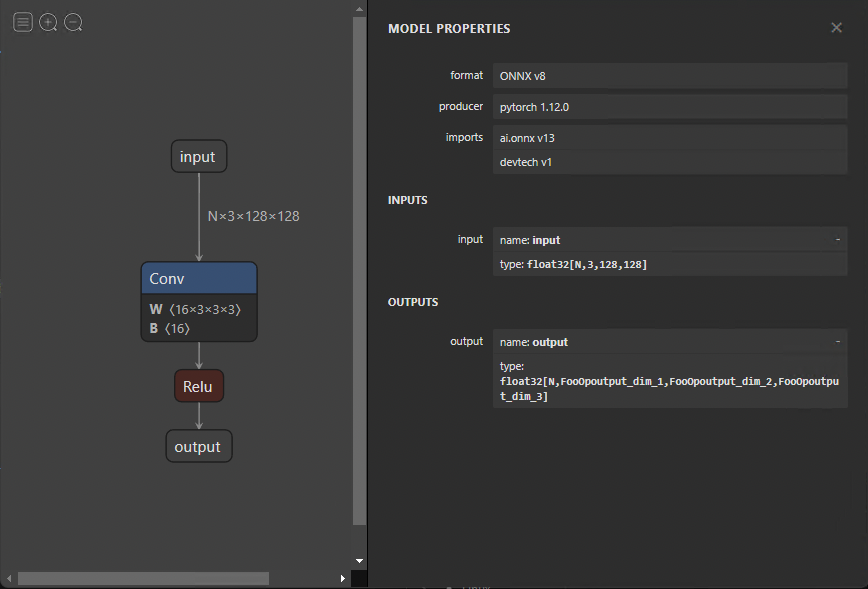
You may want to make changes to your ONNX model without having to export it again. Changes can range from changing names to eliminating entire nodes. Modifying the model directly is difficult because all the information was encoded as protocol buffers. Fortunately, you can simply alter your models using GraphSurgeon.
The following code example shows how to remove the fake FooOp node from the exported model. There are numerous other ways you can use GraphSurgeon to modify and debug the model that I can’t cover here. For more information, see the GitHub repo.
import onnx_graphsurgeon as gs
import onnx

graph = gs.import_onnx(onnx.load("model_foo.onnx"))

fake_node = [node for node in graph.nodes if node.op == "FooOp"][0]

# Get the input node of the fake node
# For example, node.i() is equivalent to node.inputs[0].inputs[0]
inp_node = fake_node.i()

# Reconnect the input node to the output tensors of the fake node, so that the first identity
# node in the example graph now skips over the fake node.
inp_node.outputs = fake_node.outputs
fake_node.outputs.clear()

# Remove the fake node from the graph completely
graph.cleanup()
onnx.save(gs.export_onnx(graph), "removed.onnx")
To remove a node, you must first load the model with the GraphSurgeon API. Next, iterate through the graph, looking for the node to replace and matching it with the FooOp node type. Replace the output tensors of its input node with its own outputs and then remove its own connection to its outputs, removing the node.
Figure 4 shows the resulting graph.
Figure 4. Resulting ONNX model after removing the custom FooOp using GraphSurgeon
Summary
This post walked through running a model with ONNX runtime, model optimizations, and architecture considerations. If you have any further questions about these topics, reach out on Developer Forums or join NVIDIA Developer Discord.
This post is the third in a series about optimizing end-to-end AI for workstations. For more information, see part 1, End-to-End AI for Workstation: An…
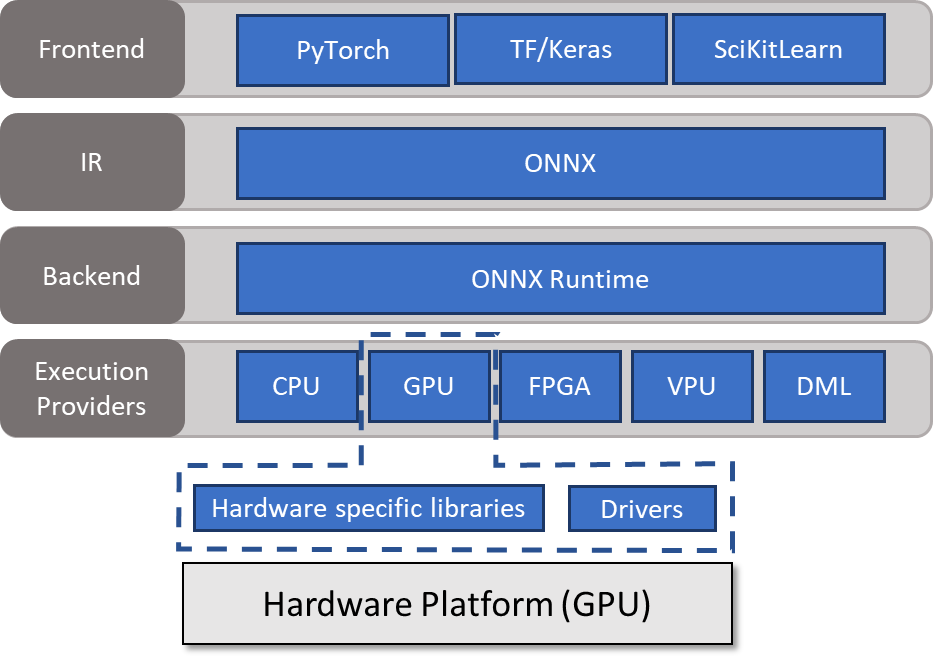
When your model has been converted to the ONNX format, there are several ways to deploy it, each with advantages and drawbacks.
One method is to use ONNX Runtime. ONNX Runtime serves as the backend, reading a model from an intermediate representation (ONNX), handling the inference session, and scheduling execution on an execution provider capable of calling hardware-specific libraries. For more information, see Execution Providers.
In this post, I discuss how to use ONNX Runtime at a high level. I also go into more depth about how to optimize your models.
Figure 1. ONNX Runtime high-level architecture
Run a model with ONNX Runtime
ONNX Runtime is compatible with most programming languages. As in the other post, this post uses Python for simplicity and readability. These examples are just meant to introduce the key ideas. For more information about the libraries for all popular operating systems, programming languages, and execution providers, see ONNX Runtime.
To infer a model with ONNX Runtime, you must create an object of the InferenceSession class. This object is responsible for allocating buffers and performing the actual inference. Pass the loaded model and a list of execution providers to use to the constructor. In this example, I opted for the CUDA execution provider.
import onnxruntime as rt

# Create a session with CUDA and CPU ep
session = rt.InferenceSession(model,
                              providers=['CUDAExecutionProvider',
                                         'CPUExecutionProvider']
					)
You can define session and provider options. ONNX Runtime’s global behavior can be modified using session options for logging, profiling, memory strategies, and graph parameters. For more information about all available flags, see SessionOptions.
The following code example sets the logging level to verbose:
# Session Options
import onnxruntime as rt
options = rt.SessionOptions()
options.log_severity_level = 0

# Create a session with CUDA and CPU ep
session = rt.InferenceSession(model,
                              providers=['CUDAExecutionProvider',
                                         'CPUExecutionProvider'],
															sess_options = options
					)
Use provider options to change the behavior of the execution provider that has been chosen for inference. For more information, see ONNX Runtime Execution Providers.
You can also obtain the available options by executing get_provider_options on your newly created session:
After you build a session, you must generate input data that you can then bind to ONNX Runtime. Following that, you can invoke run on the session, passing it a list of output names as well as a dictionary containing the input names as keys and ONNX Runtime bindings as values.
# Generate data and bind to ONNX Runtime
input_np = np.random.rand((1,3,256,256))
input_ort = rt.OrtValue.ortvalue_from_numpy(input_np)

# Run model
results = session.run(["output"], {"input": input_ort})
ONNX Runtime always places inputs and outputs on the CPU by default. As a result, buffers are constantly copied between the host and device, which you should avoid as much as possible. It is feasible to use and reuse device-generated buffers.
Model optimizations
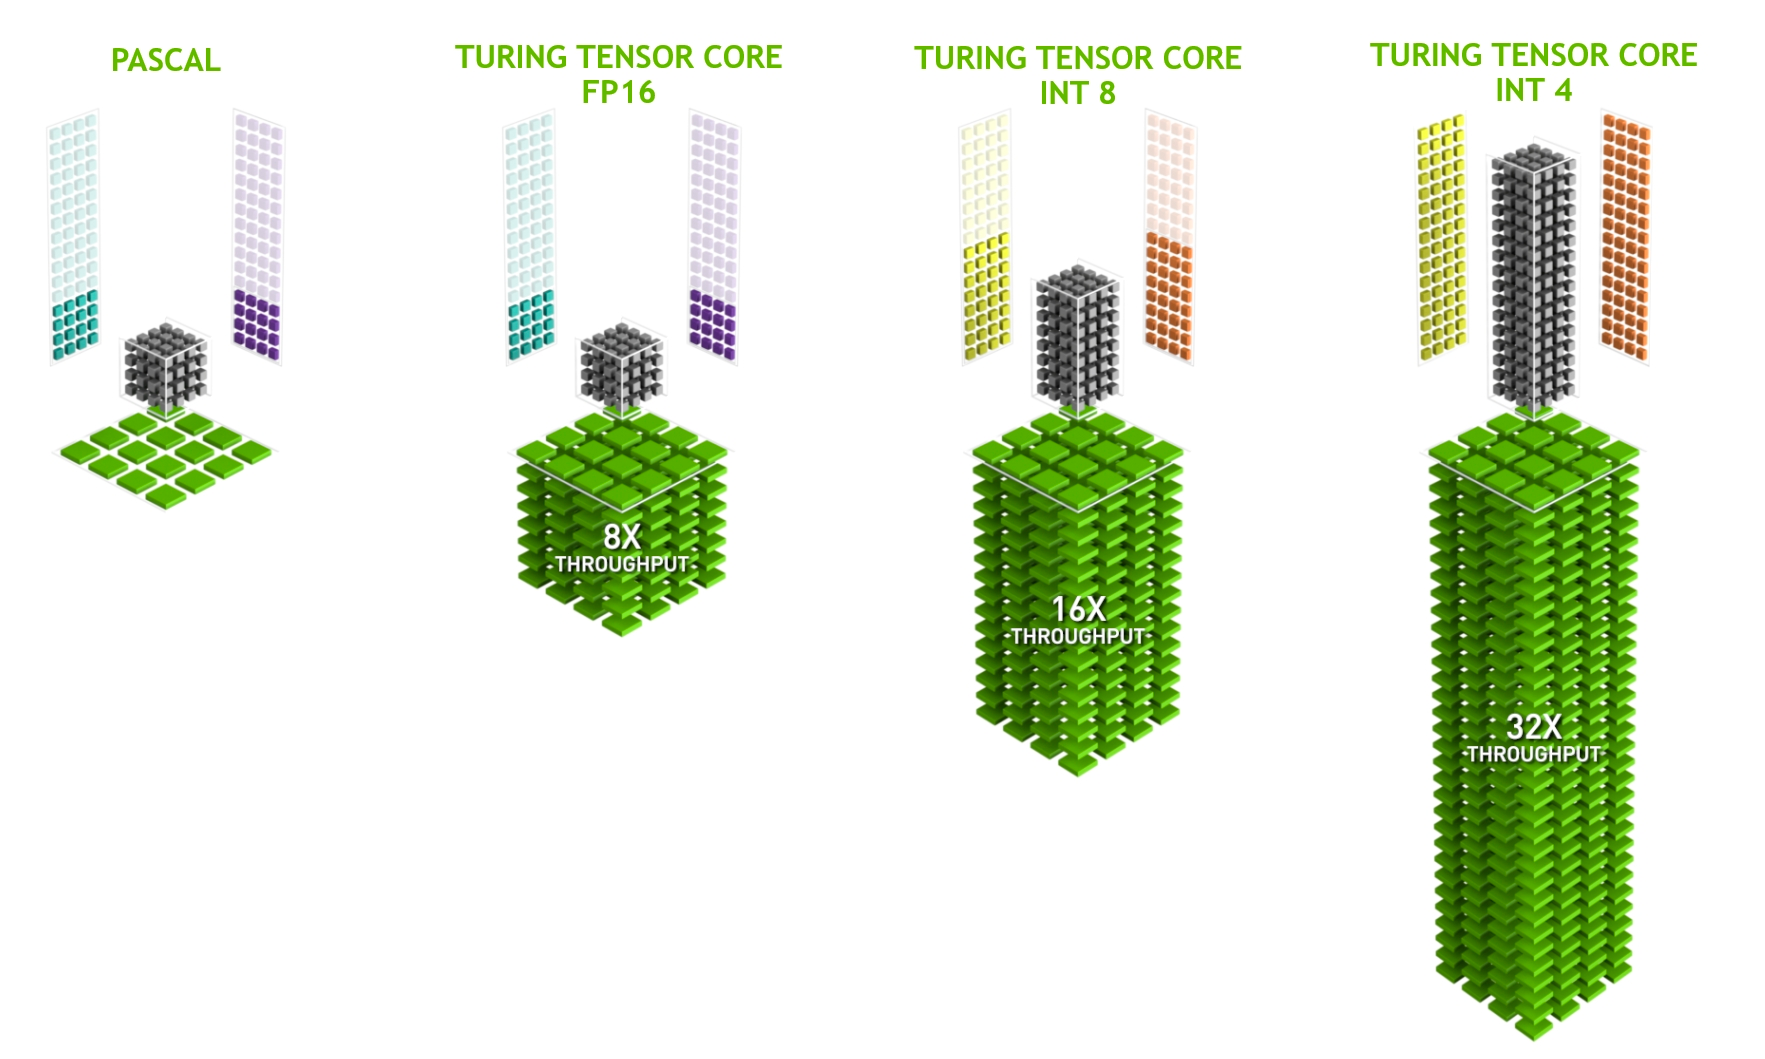
To get the most performance out of inference, I recommend that you make use of hardware-specific accelerators: Tensor Cores.
On NVIDIA RTX hardware, from the NVIDIA Volta architecture (compute capability 7.0+) forward, the GPU includes Tensor Cores to accelerate some of the heavy-lift operations involved with deep learning.
Essentially, Tensor Cores enable an operation called warp matrix multiply-accumulate (WMMA), providing optimized paths for FP16-based (HMMA) and integer-based multiply-accumulate (IMMA).
Figure 2. NVIDIA Tensor Cores
Precision conversion
The first step in using Tensor Cores is to export the model to a lower precision of FP16 or INT8. In most circumstances, INT8 provides the best performance, but it has two drawbacks:
You must recalibrate or quantize weights.
The precision may be worse.
The second point depends on your application. However, when working with INT8 input and output data such as photos, the consequences are often negligible.
On the other hand, FP16 does not require recalibration of the weights. In most cases, it achieves similar accuracy as FP32. To convert a given ONNX model to FP16, use the onnx_converter_common toolbox.
If the weight in the original model exceeds the dynamic range of FP16, there will be overflow. Any unwanted behavior can be overcome by using the auto-mixed precision (amp) exporter. This converts the model’s Ops to FP16 one by one, checking its accuracy after each change to ensure that the deltas are within a predefined tolerance. Otherwise, the Op is kept in FP32.
You need two more things for this type of conversion:
An input feed dictionary containing the input names as keys and data as values. It is important that the data provided is in the right data range, though it is best if actual inference data is used.
A validation function to compare if the results are in an acceptable error margin. In this case, I implemented a simple function that returns true if two arrays are element-wise equal within a tolerance.
import onnx
import numpy as np
from onnxconverter_common.auto_mixed_precision import auto_convert_mixed_precision

# Could also use rtol/atol attributes directly instead of this
def validate(res1, res2):
    for r1, r2 in zip(res1, res2):
        if not np.allclose(r1, r2, rtol=0.01, atol=0.001):
            return False
    return True

model_fp32 = onnx.load("model.onnx")
feed_dict = {"input": 2*np.random.rand(1, 3, 128, 128).astype(np.float32)-1.0}
model_amp = auto_convert_mixed_precision(model_fp32, feed_dict, validate)
onnx.save(model_amp, "model_amp.onnx")
During the conversion from FP32 to FP16, there are still possible problems apart from the dynamic range. It can happen that unnecessary or unwanted cast operations are inserted into the model. You must check this manually.
Architecture considerations
The data and weights must be in the correct layout. Tensor Cores consume data in NHWC format. As I mentioned earlier, ONNX only supports the NCHW format. However, this is not an issue as the backends insert conversion kernels before Tensor Core–eligible operations.
Having the backend handle the layout can result in performance penalties. Because not all operations support the NHWC format, there might be multiple NCHW-NHWC conversions and the reverse throughout the model. They have a short runtime but, when executed repeatedly, can add more harm than benefit. Try to avoid explicit layout conversions in your model by profiling it.
All operations should use filters with a size multiple of 8, optimally 32, to be Tensor Core–eligible. This involves the actual model architecture and should be kept in mind while designing the model.
When you use NVIDIA TensorRT, filters are automatically padded to be feasible for Tensor Core consumption. Nonetheless, it might be better to adjust the model architecture. The extra dimensions are computed anyways and might offer the potential for improved feature extraction
As a third requirement, GEMM operations must have packed strides. This means that the stride cannot exceed the filter size.
General
ONNX Runtime includes several graph optimizations to boost performance. Graph optimizations are essentially alterations at the graph level, ranging from simple graph simplifications and node eliminations to more complicated node fusions and layout conversions.
Within ONNX Runtime, these are separated into the following levels:
Basic: These optimizations cover all semantics-preserving modifications like constant folding, redundant node elimination, and a limited number of node fusion.
Extended: The extended optimizations are only applicable when running either the CPU or CUDA execution provider. They include more complex fusions.
Layout optimizations: These layout conversions are only applicable for running on the CPU.
These optimizations are not relevant when running on the TensorRT execution provider as TensorRT uses its built-in optimizer that uses a wide variety of fusions and kernel tuners.
Online or offline
All optimizations can be performed either online or offline. When an inference session is started in online mode, ONNX Runtime runs all enabled graph optimizations before model inference starts.
Applying all optimizations every time that a session starts may increase the model startup time, especially for complex models. In this case, the offline mode can be beneficial. When the graph optimizations are complete, ONNX Runtime saves the final model to disk in offline mode. Using the existing optimized model and removing all optimizations reduce the startup time for each consecutive start.
Summary
This post walked through running a model with ONNX runtime, model optimizations, and architecture considerations. If you have any further questions about these topics reach out on NVIDIA Developer Forums or join NVIDIA Developer Discord.
Quantum algorithm researchers in government, enterprise, and academia are interested in developing and benchmarking novel quantum algorithms on ever-larger…
Quantum algorithm researchers in government, enterprise, and academia are interested in developing and benchmarking novel quantum algorithms on ever-larger quantum systems. Use cases include drug discovery, cybersecurity, high energy physics, and risk modeling.
However, these systems are still small, quality still needs to improve, and capacity on them is limited. Developing applications and algorithms on quantum circuit simulators is therefore common.
NVIDIA cuQuantum is a software development kit (SDK) that enables users to easily accelerate and scale quantum circuit simulations with GPUs. A natural tool for calculating state vectors, it enables users to simulate quantum circuits deeper (more gates) and wider (more qubits) than they could on today’s quantum computers.
cuQuantum includes the recently released NVIDIA cuQuantum Appliance, a deployment-ready software container with multi-GPU, multi-node state vector simulation support. Generalized multi-GPU APIs are also now available in NVIDIA cuStateVec for easy integration into any simulator.
For tensor network simulation, the slicing API provided by the cuQuantum cuTensorNet library enables accelerated tensor network contractions distributed across multiple GPUs or multiple nodes. An additional higher-level API is also now available to make this easier for multi-node, enabling users to take advantage of NVIDIA A100 systems with nearly linear strong scaling.
Capabilities of cuQuantum Appliance on the ABCI 2.0 supercomputer
NVIDIA participated in the AI Bridging Cloud Infrastructure (ABCI) grand challenge this past year to benchmark multi-node cuQuantum Appliance capabilities with their system configurations. ABCI is a supercomputer hosted by Japan’s National Institute of Advanced Industrial Science and Technology (AIST).
ABCI 2.0 is ranked at 22 on the TOP500 list as of November 2022, executing the High Performance Linpack (HPL) benchmark with 22.21 petaflops per second. The supercomputer is ranked 32 on the Green500 list with 21.89 gigaflops per watt as of November 2022.
The ABCI system consists of 1,088 compute nodes, with 4,352 NVIDIA V100 GPUs, (dubbed “Compute Node (V)”), and 120 compute nodes with 960 A100 GPUs (dubbed “Compute Node (A)”). The NVIDIA cuQuantum team worked with the NVIDIA Ampere architecture nodes to test a range of circuits, in addition to solution accuracy for a range of precisions.
The ABCI Compute Node (A) GPU systems are NVIDIA A100 40 GB, 8 GPUs per node, with the third-generation NVLink. They have a theoretical peak of 19.3 petaflops, and a theoretical peak memory bandwidth of 1,555 GB/s. Nodes are connected with InfiniBand HDR.
Quantum computing performance benchmarks on the ABCI Compute Node (A)
Three commonly used algorithms, which are relevant for applications research and quantum computer benchmarking, were run.
These three benchmarks leverage the multi-node cuQuantum Appliance: Quantum Volume, the Quantum Approximate Optimization Algorithm (QAOA), and Quantum Phase Estimation (QPE). The Quantum Volume Circuit ran with a depth of 10 and a depth of 30. QAOA is a common algorithm used to solve combinatorial optimization problems like routing and resource optimization on relatively, near-term quantum computers.
NVIDIA ran QAOA with p=1. QPE is a key subroutine in many fault-tolerant quantum algorithms with a wide range of applications, including Shor’s Algorithm for factoring and a range of chemistry calculations like molecular simulations. Weak scaling was demonstrated for all three common quantum algorithms (Figures 1 and 2).
In addition, strong scaling was examined with quantum volume (Figures 3 and 4). The cuQuantum Appliance has effectively turned the ABCI Compute Node (A) into a perfect 40-41 qubit quantum computer. It is clear that scaling to a supercomputer like ABCI’s is valuable for both accelerating time-to-solution and extending the phase space researchers can explore with state vector quantum circuit simulation techniques.
Figure 1. NVIDIA cuQuantum Appliance multi-node weak scaling performance from 30 to 40 qubits for complex 128
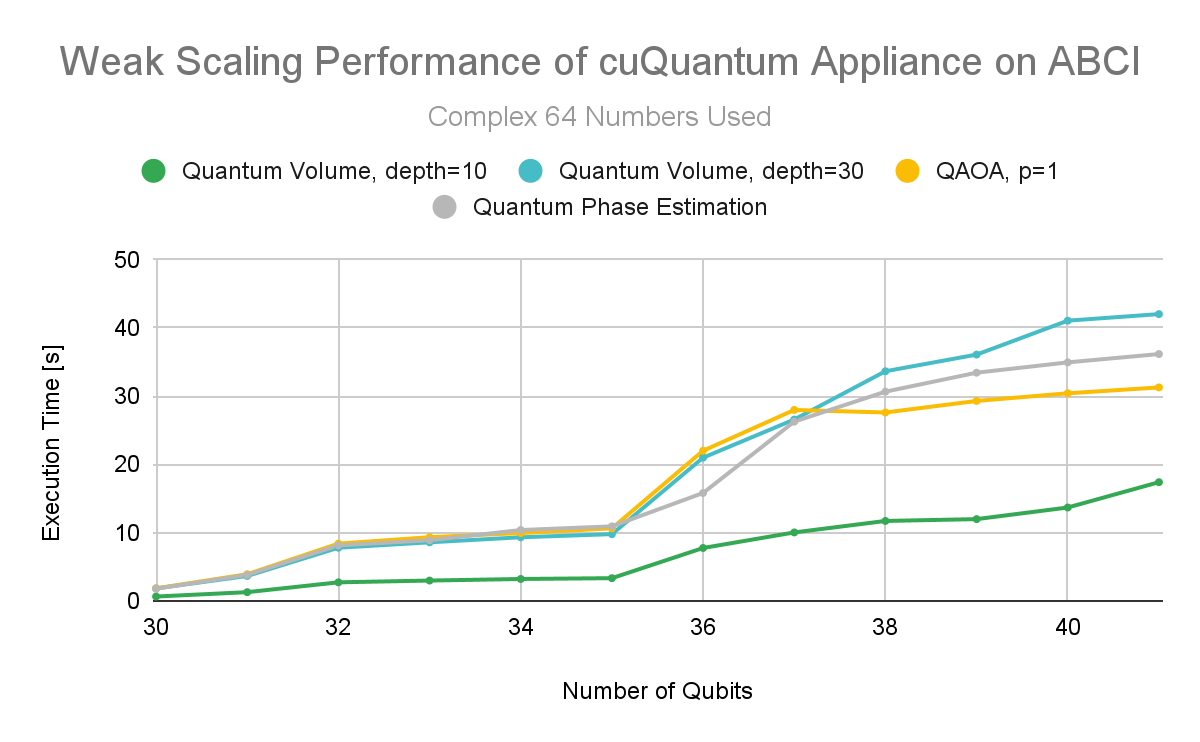
One of the test objectives was to compare the difference between complex 128 (c128) and complex 64 (c64) implementations. When reducing precision, results showed that more memory can be used for an additional qubit. However, it is important to confirm that the reduced precision is not achieved at the cost of producing useful results from the simulations. This experiment used Quantum Phase Estimation to calculate the number pi, which was measured to 16 digits and matched.
Figure 2. cuQuantum Appliance multi-node weak scaling performance from 30 to 40 qubits for complex 64
Test results show excellent weak scaling performance for lower precision as well. cuQuantum Appliance users can expect to take advantage of lower precision with confidence that both performance and accuracy are minimally impacted.
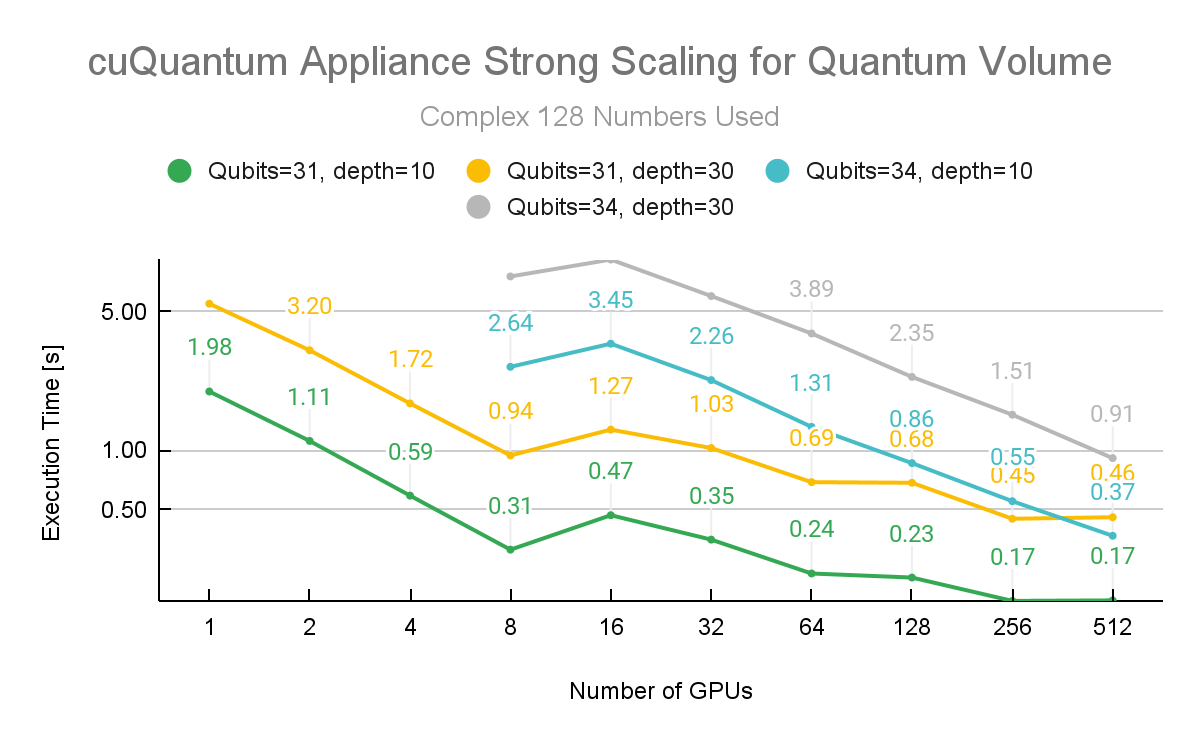
Figure 3. cuQuantum Appliance multi-node strong scaling performance for quantum volume at depth 10 and 30, for 31 and 34 qubits with complex 128 precision
Additional measurements were made to test the strong scaling of the cuQuantum Appliance multi-node capabilities. These numbers were generated with the Quantum Volume Circuit of depth 10 and depth 30. Both of these results are measured for 31 and 34 qubit Quantum Volume.
Figure 3 shows the performance metrics when using incremental amounts of GPUs with complex 128 precision. It is clear that scaling to multiple nodes results in time savings for a range of problem sizes.
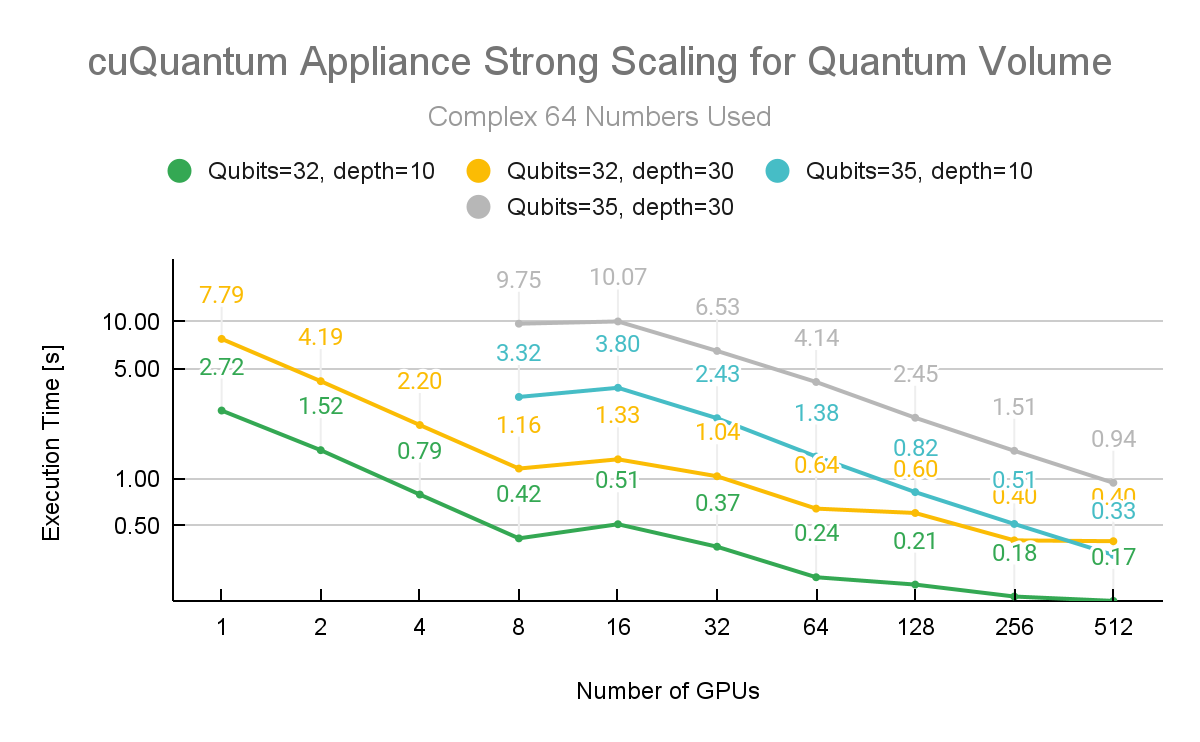
Figure 4. cuQuantum Appliance multi-node strong scaling performance for quantum volume at depth 10 and 30, for 32 and 35 qubits with complex 64 precision
The NVIDIA cuQuantum team conducted additional experiments varying the precision as depicted in Figure 4. This figure shows Quantum Volume running again at depth 10 and depth 30. In this instance, the simulation was held to 32 and 35 qubits and distributed across 512 NVIDIA A100 40GB GPUs on the ABCI Compute Node (A).
The jump in execution time from 8 to 16 GPUs is related to the extra initialization overhead to distribute the workload to two nodes instead of one. This cost is quickly amortized when scaling nodes to an arbitrarily large number.
Comparing cuQuantum Appliance performance
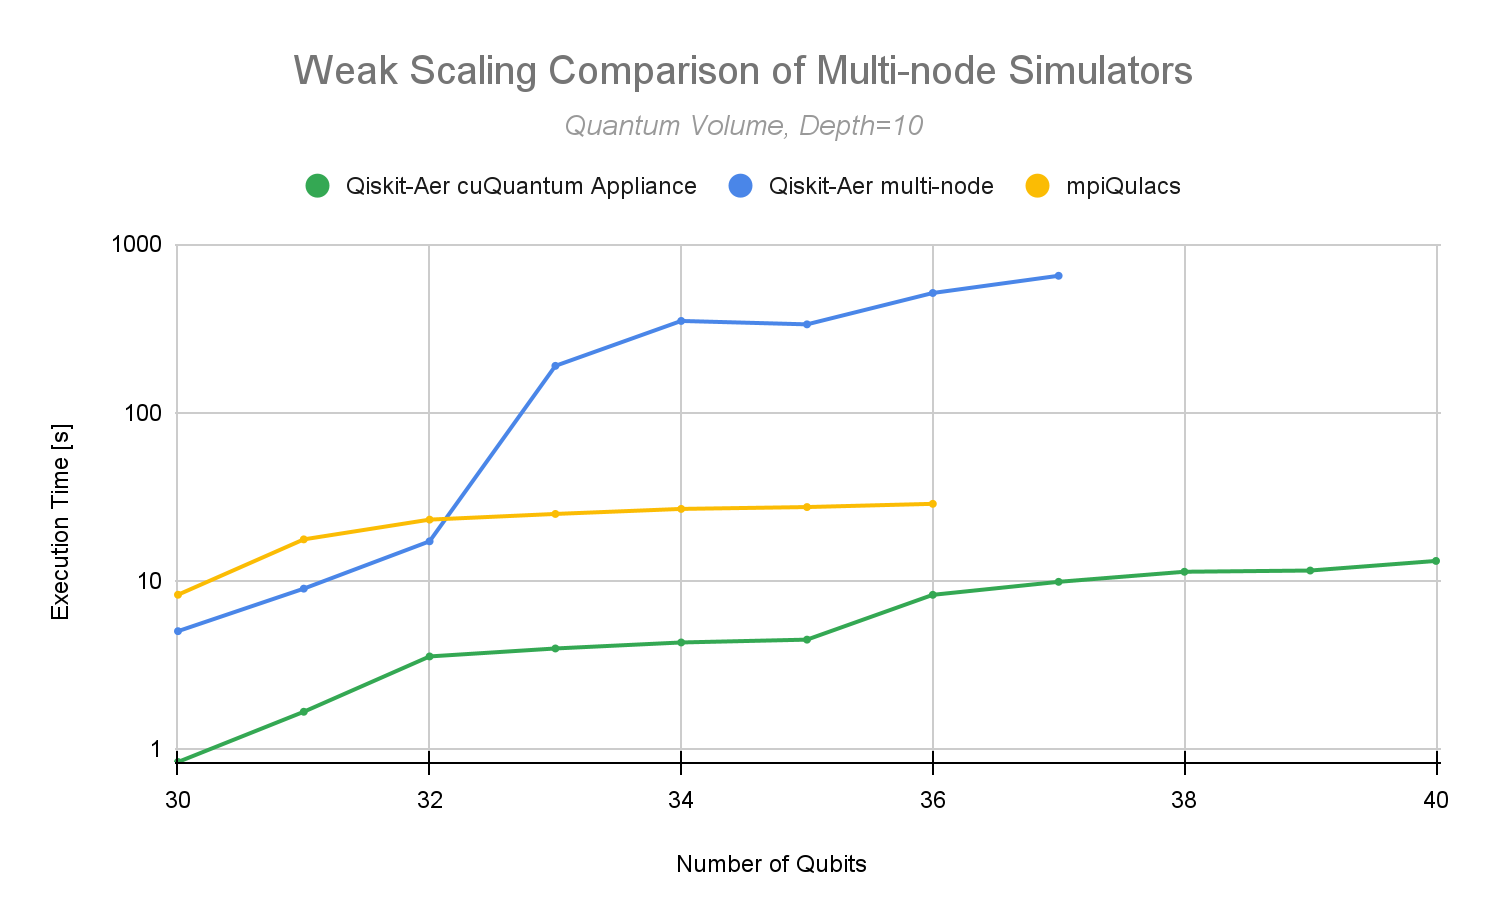
Users are enabled to achieve scale with the updated NVIDIA cuQuantum Appliance. cuQuantum benchmarks were run up to a total of 40 qubits with 64 A100 40 GB nodes. However, users are only limited by the number of accessible GPUs. It is now possible to scale simulations easily, with no changes to existing Qiskit code, and up to 81x faster than the previous implementation without cuQuantum Appliance.
Figure 5. cuQuantum Appliance multi-node weak scaling performance on ABCI from 30 to 40 qubits, compared with Qiskit Aer multi-node and mpiQulacs
NVIDIA has also benchmarked against a very fast multi-node full state vector quantum circuit simulator called mpiQulacs. An impressive simulator, it was developed to run on the Fujitsu A64FX CPU architecture. In March of 2022, they announced their multi-node simulator’s performance results on a quantum volume depth of 10 with up to 36 qubits. The NVIDIA cuQuantum Appliance now enables users to scale out to 40 qubits with c128, or 41 qubits with c64, on the ABCI 2.0 supercomputer with similar best-in-class performance.
Other preliminary tests on NVIDIA Hopper GPUs have shown that the cuQuantum Appliance multi-node performance numbers will be approximately 2x better than the results presented here, using the new NVIDIA H100 GPUs.
The cuQuantum team at NVIDIA is accelerating state vector simulation at scale. cuQuantum enables scale, and best-in-class performance, showing weak scaling and strong scaling across nodes. In addition, the previously announced results have been validated externally on the AIST ABCI 2.0 supercomputer, showing versatility across different HPC infrastructures.
NVIDIA has also introduced the first cuQuantum-powered IBM Qiskit image. Users are able to pull this container today, making it easier and faster to scale up quantum circuit simulations with this popular framework.
The cuQuantum team has already begun working to bring these multi-node APIs to a wider range of developers and will include these in the next cuQuantum release.
Get started with cuQuantum Appliance
The multi-node cuQuantum Appliance is available today. You can access it directly from the NGC catalog for containers. To request features or to report bugs, reach out to the cuQuantum team at NVIDIA/cuQuantum on GitHub.
As the global service economy grows, companies rely increasingly on contact centers to drive better customer experiences, increase customer satisfaction, and…
As the global service economy grows, companies rely increasingly on contact centers to drive better customer experiences, increase customer satisfaction, and lower costs with increased efficiencies. Customer demand has increased far more rapidly than contact center employment ever could. Combined with the high agent churn rate, customer demand creates a need for more automated real-time customer communication augmenting the agents.
Researchers recognized these trends as early as the 1970s and began developing primitive voice menus navigable through touch-tone phones. While voice menus may answer frequently asked questions and reduce pressure on contact center agents, customers often find it frustrating to interact with them.
Chances are that you may have been one of the callers who wanted to speak to an agent directly, instead listening to multiple layers of prerecorded voice prompts, due to any of the following reasons:
Listening to menu options that best match your queries takes time. Moreover, after you reach a contact center agent, your issue may be complex enough that it cannot be resolved in one call.
Your issue may not closely match the menu options, or it might fall under multiple options.
You and the contact center agent may not speak the same native languages, particularly if the contact center is outsourced to another country.
Some contact centers may not be staffed at a convenient time for you to call.
To effectively resolve these issues, companies have begun integrating intelligent virtual assistants (IVAs), also known as AI virtual assistants, into their contact center solutions.
In this post, we provide an overview of building and deploying contact center IVAs with the NVIDIA contact center IVA workflow and components such as NVIDIA Riva voice technology and speech AI skills:
Automatic speech recognition (ASR) or speech-to-text (STT)
Text-to-speech (TTS)
Reducing development time for IVA applications
IVAs are AI-powered software that recognize human speech, understand the intent, and provide precise and personalized responses in human-like voices while engaging with customers in conversation.
Around the clock, IVAs collect customer information and reasons for the call and manage customer issues without the need for a live agent. For complex cases, this information is automatically prepared for the live agent, to optimize servicing customers with a personal touch.
You can use NVIDIA Riva speech AI building blocks to create IVA applications. To reduce development time, you can leverage NVIDIA contact center IVA workflow with integrated Riva skills.
This NVIDIA AI solution workflow provides a reference for you to get started without preparation, helping you achieve the desired AI outcome more quickly.
NVIDIA contact center IVA workflow and components
The NVIDIA contact center IVA workflow (Figure 1) was designed as a microservice, which means it can be deployed on Kubernetes alone or with other microservices to create a production-ready application for seamless scaling.
Figure 1. NVIDIA Contact Center IVA architecture with NVIDIA Riva ASR and TTS, Rasa Dialog Manager, and Haystack NLP IRQA components
How services and dialog managers are integrated for deployment
This workflow integrates NVIDIA Riva ASR and TTS services with Haystack, a third-party open-source natural language information retrieval question answering (NLP IRQA) service, and Rasa, an open-source dialog manager.
Figure 1 shows that the Riva ASR service transcribes a user’s spoken question. Rasa and Haystack are used to interpret the user’s intent in the question and construct a relevant response. This response is delivered to the user in synthesized natural speech using Riva TTS.
For context, NVIDIA Riva provides tools for building and deploying conversational AI and speech AI pipelines to any device containing an NVIDIA GPU, whether on the edge, in a data center, or in the cloud. The tools also run inference with those pipelines.
Language-specific customizations for the financial industry
The NVIDIA contact center IVA workflow features Riva ASR customizations for the financial services industry use case.
These Riva ASR customizations are performed in two sample Jupyter notebooks:
To improve the recognition of finance-specific terms.
To enhance recognition of finance terms in challenging acoustic environments, including noise, accents, and dialects.
To provide explicit guides for pronunciation of finance-specific words.
After Riva ASR customization, you can work on the IVA dialog manager on information retrieval and question-answering (IRQA) components. Every IVA requires a way to manage the state and flow of the conversation.
A dialog manager employs a language model like BERT to recognize the user intent in the transcribed text obtained from the Riva ASR service. It then routes the question to the correct prepared response or a fulfillment service. This provides context for the question and frames how the IVA can give the proper response.
The Rasa dialog manager also maintains the dialog state, by filling slots set by the developer for remembering the context of the conversation. It can be trained to understand user intent by giving it a few examples of each intent and the slots to be recognized.
IRQA with Haystack NLP is then used to search a list of given documents and generate a long-form response to the user’s question. This assists companies with massive amounts of unstructured data that need to be consumed in a form that is helpful to the customer. After IRQA generates the answer, Riva TTS synthesizes a human-like audio response.
To summarize, the NVIDIA contact center IVA workflow can be deployed on any cloud Kubernetes distribution as a collection of Helm charts, each running a microservice.
While the NVIDIA contact center IVA architecture uses Haystack and Rasa components, you can use your preferred components.
All the NVIDIA contact center IVA workflow-packaged components include enterprise-ready implementation best practices that range from authentication, monitoring, reporting, and load balancing while enabling customization.
Optimal inference based on usage metrics
The NVIDIA contact center IVA workflow includes NVIDIA Triton Inference Server, which provides Prometheus with metrics indicating GPU and request statistics. The metric format is plain text so you can view them directly in the Grafana dashboard.
Some of the metrics available are shown in Table 1.
Category
Metric
Description
Count
Success Count
nv_inference_request_success
Failure Count
nv_inference_request_failure
Number of failed inference requests received by NVIDIA Triton (each request is counted as 1, even if the request contains a batch)
Inference Count
nv_inference_count
Number of inferences performed (a batch of n is counted as n inferences and does not include cached requests)
Execution Count
nv_inference_exec_count
Number of inference batch executions (see Count Metrics, does not include cached requests)
Latency
Request Time
nv_inference_request_duration_us
Queue Time
nv_inference_queue_duration_us
Cumulative time requests spend waiting in the scheduling queue (includes cached requests)
Compute Input Time
nv_inference_compute_input_duration_us
Cumulative time requests spend processing inference inputs (in the framework backend, does not include cached requests)
Compute Time
nv_inference_compute_infer_duration_us
Cumulative time requests spend executing the inference model (in the framework backend, does not include cached requests)
Compute Output Time
nv_inference_compute_output_duration_us
Cumulative time requests spend processing inference outputs (in the framework backend, does not include cached requests)
Table 1. NVIDIA Triton Server metrics used for Riva pods manual or automatic scaling
Depending on these usage metrics, the Riva pods can be scaled manually or automatically.
Conclusion
NVIDIA Riva provides speech AI tools that enable companies to build and deploy IVAs in contact centers. These assistants relieve the pressure on human agents while granting customers the interactivity and personal treatment that they expect from live employees. This all drives a better customer experience.
IVAs can also significantly increase contact center efficiency by reducing customer wait times, providing real-time translation, resolving customer challenges faster, reducing agent onboarding time, and enabling customers to reach contact centers 24/7. Companies can also use contact center call transcripts to further hone their products and services.
Related resources
The NVIDIA contact center IVA workflow will be available on NGC for NVIDIA AI Enterprise software customers at the end of December.
In the meantime, you can sign up for NVIDIA LaunchPad to gain hands-on experience and immediately tap into the necessary hardware and software stacks to test and prototype your conversation-based solutions. The workflow solutions will be available on LaunchPad beginning January 20, 2023.
While the weather outside may or may not be frightful this holiday season, new games on GeForce NOW each week make every GFN Thursday delightful. It doesn’t matter whether you’re on the naughty or nice list. With over 1,400 titles streaming from the cloud, there’s something for everyone to play across nearly all of their Read article >
A growing number of network applications need to exercise GPU real-time packet processing in order to implement high data rate solutions: data filtering, data…
A growing number of network applications need to exercise GPU real-time packet processing in order to implement high data rate solutions: data filtering, data placement, network analysis, sensors’ signal processing, and more.
One primary motivation is the high degree of parallelism that the GPU can enable to process in parallel multiple packets while offering scalability and programmability.
This post explains how the new NVIDIA DOCA GPUNetIO Library can overcome some of the limitations found in the previous DPDK solution, moving a step closer to GPU-centric packet processing applications.
Introduction
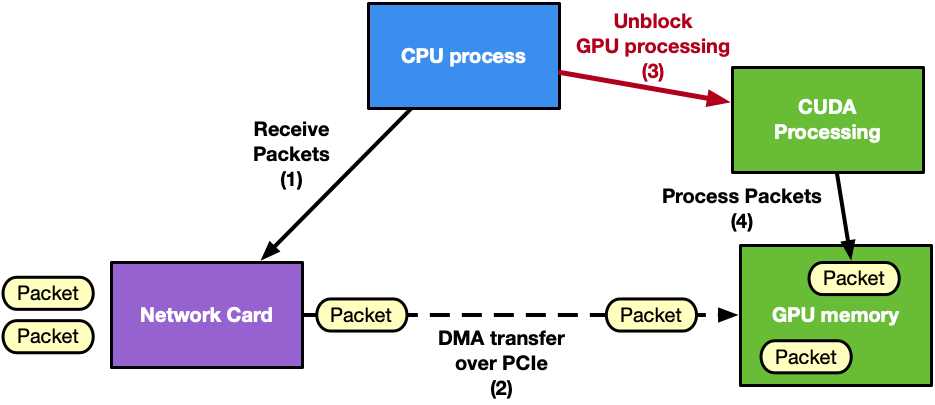
Real-time GPU processing of network packets is a technique useful to several different application domains, including signal processing, network security, information gathering, and input reconstruction. The goal of these applications is to realize an inline packet processing pipeline to receive packets in GPU memory (without staging copies through CPU memory); process them in parallel with one or more CUDA kernels; and then run inference, evaluate, or send over the network the result of the calculation.
Typically, in this pipeline, the CPU is the intermediary because it has to synchronize network card (NIC) receive activity with the GPU processing. This wakes up the CUDA kernel as soon as new packets have been received in GPU memory. Similar considerations can be applied to the send side of the pipeline.
Figure 1. CPU-centric application with the CPU orchestrating the GPU and network card work
Looking at Figure 1, it is clear that the CPU is the main bottleneck. It has too many responsibilities in synchronizing NIC and GPU tasks and managing multiple network queues. As an example, consider an application with many receive queues and an incoming traffic of 100 Gbps. A CPU-centric solution would have:
CPU invoking the network function on each receive queue to receive packets in GPU memory using one or multiple CPU cores
CPU collecting packets’ info (packets addresses, number)
CPU notifying the GPU about new received packets
GPU processing the packets
This CPU-centric approach is:
Resource consuming: To deal with high-rate network throughput (100 Gbps or more) the application may need to dedicate an entire CPU physical core to receive (and/or send) packets
Not scalable: In order to receive (or send) in parallel with different queues, the application may need to use multiple CPU cores even on systems where the total number of CPU cores may be limited to a low number (depending on the platform)
Platform dependent: The same application on a low-power CPU will decrease the performance
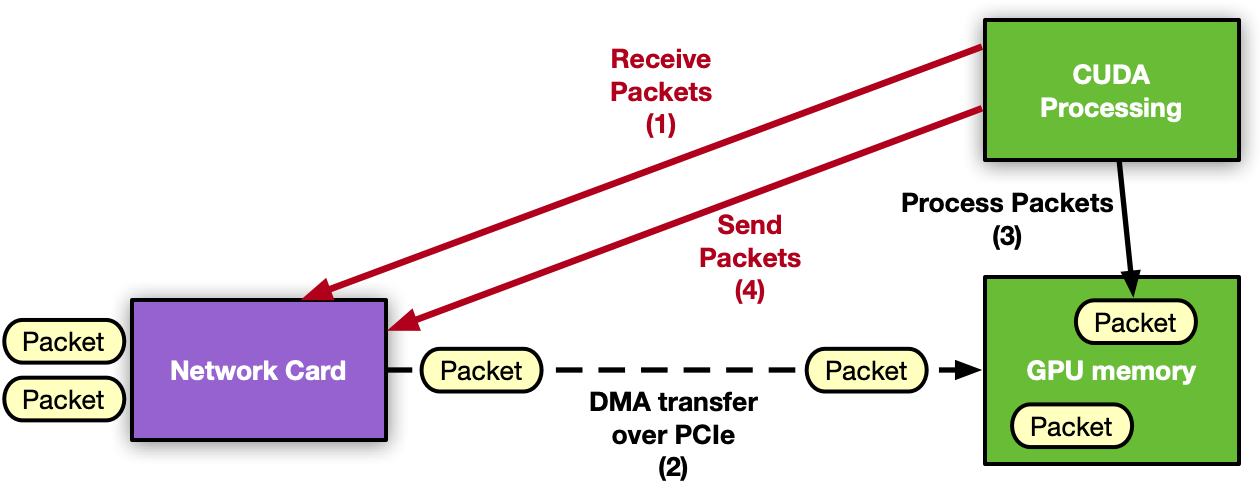
The next natural step for GPU inline packet processing applications is to remove the CPU from the critical path. Moving to a GPU-centric solution, the GPU can directly interact with the NIC to receive packets so the processing can start as soon as packets arrive in GPU memory. The same considerations can be applied to the send operation.
The capability of a GPU to control the NIC activity from a CUDA kernel is called GPU-initiated communications. Assuming the use of an NVIDIA GPU and an NVIDIA NIC, it is possible to expose the NIC registers to the direct access of the GPU. In this way, a CUDA kernel can directly configure and update these registers to orchestrate a send or a receive network operation without the intervention of the CPU.
Figure 2. GPU-centric application with the GPU controlling the network card and packet processing without the need of the CPU
DPDK is, by definition, a CPU framework. To enable GPU-initiated communications, it would be necessary to move the whole control path on the GPU, which is not applicable. For this reason, this feature is enabled by creating a new NVIDIA DOCA library.
NVIDIA DOCA GPUNetIO Library
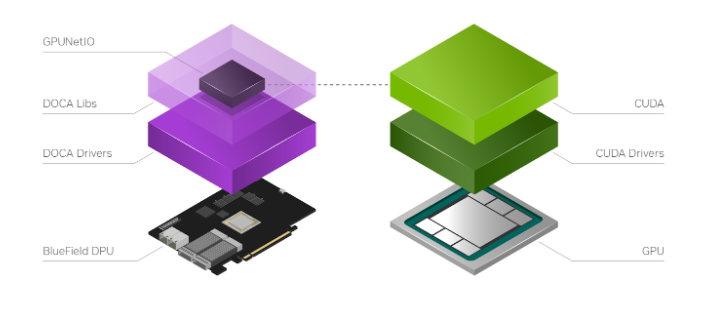
NVIDIA DOCA SDK is the new NVIDIA framework composed of drivers, libraries, tools, documentation, and example applications. These resources are needed to leverage your application with the network, security, and computation features the NVIDIA hardware can expose on host systems and DPU.
NVIDIA DOCA GPUNetIO is a new library developed on top of the NVIDIA DOCA 1.5 release to introduce the notion of a GPU device in the DOCA ecosystem (Figure 3). To facilitate the creation of a DOCA GPU-centric real-time packet processing application, DOCA GPUNetIO combines GPUDirect RDMA for data-path acceleration, smart GPU memory management, low-latency message passing techniques between CPU and GPU (through GDRCopy features) and GPU-initiated communications.
This enables a CUDA kernel to directly control an NVIDIA ConnectX network card. To maximize the performance, DOCA GPUNetIO Library must be used on platforms considered GPUDirect-friendly, where the GPU and the network card are directly connected through a dedicated PCIe bridge. The DPU converged card is an example but the same topology can be realized on host systems as well.
DOCA GPUNetIO targets are GPU packet processing network applications using the Ethernet protocol to exchange packets in a network. With these applications, there is no need for a pre synchronization phase across peers through an OOB mechanism, as for RDMA-based applications. There is also no need to assume other peers will use DOCA GPUNetIO to communicate and no need to be topology-aware. In future releases, the RDMA option will be enabled to cover more use-cases.
DOCA GPUNetIO features enabled in the current release are:
GPU-initiated communications: A CUDA kernel can invoke the CUDA device functions in the DOCA GPUNetIO Library to instruct the network card to send or receive packets
Accurate Send Scheduling: With GPU-initiated communications, it is possible to schedule packets’ transmission in the future according to some user-provided timestamp
GPUDirect RDMA: Receive or send packets in contiguous fixed-size GPU memory strides without CPU memory staging copies
Semaphores: Provide a standardized low-latency message passing protocol between CPU and GPU or between different GPU CUDA kernels
CPU direct access to GPU memory: CPU can modify a GPU memory buffers without using CUDA memory API
Figure 3. NVIDIA DOCA GPUNetIO is a new DOCA library requiring a GPU and CUDA drivers and libraries installed on the same platform
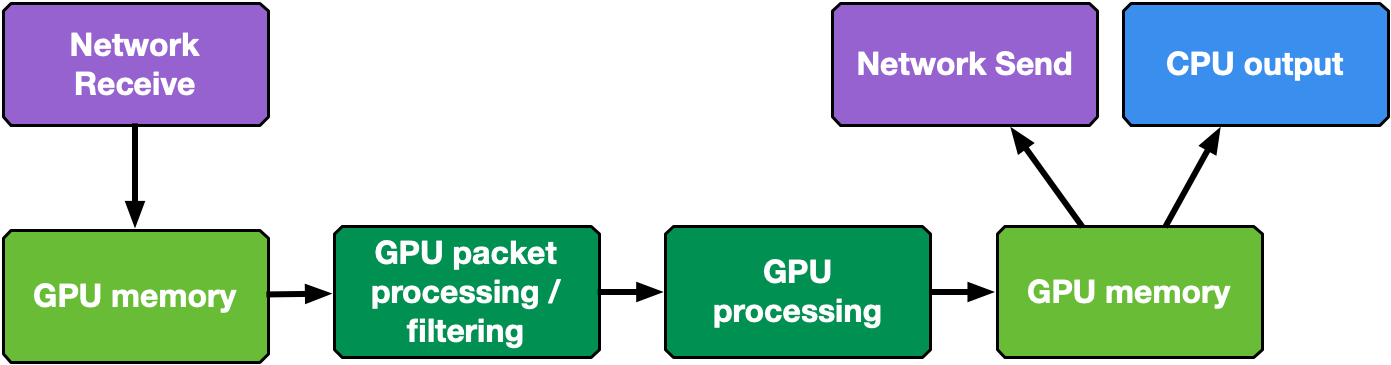
As shown in Figure 4, the typical DOCA GPUNetIO application steps are:
Initial configuration phase on CPU
Use DOCA to identify and initialize a GPU device and a network device
Use DOCA GPUNetIO to create receive or send queues manageable from a CUDA kernel
Use DOCA Flow to determine which type of packet should land in each receive queue (for example, subset of IP addresses, TCP or UDP protocol, and so on)
Launch one or more CUDA kernels (to execute packet processing/filtering/analysis)
Runtime control and data path on GPU within CUDA kernel
Use DOCA GPUNetIO CUDA device functions to send or receive packets
Use DOCA GPUNetIO CUDA device functions to interact with the semaphores to synchronize the work with other CUDA kernels or with the CPU
Figure 4. Generic GPU packet processing pipeline data flow composed by several building blocks
The following sections present an overview of possible GPU packet processing pipeline application layouts combining DOCA GPUNetIO building blocks.
CPU receive and GPU process
This first example is CPU-centric and does not use the GPU-initiated communication capability. It can be considered as the baseline for the following sections. The CPU creates receive queues manageable from the CPU itself to receive packets in GPU memory and assign flow steering rules to each queue.
At runtime, the CPU receives packets in GPU memory. It notifies one or multiple CUDA kernels, through the DOCA GPUNetIO semaphores, of the arrival of a new set of packets per queue, providing information like GPU memory address and number of packets. On the GPU, the CUDA kernel, polling on the semaphore, detects the update and begins to process the packets.
Figure 5. GPU packet processing pipeline with CPU receiving packets in GPU memory and using NVIDIA DOCA GPUNetIO semaphore to notify the packet processing CUDA kernel about incoming packets
Here, the DOCA GPUNetIO semaphore has a functionality similar to the DPDK gpudev communication list, enabling a low-latency communication mechanism between the CPU receiving packets and the GPU waiting for these packets to be received before processing them. The semaphore can also be used from the GPU to notify the CPU when packet processing completes, or between two GPU CUDA kernels to share information about processed packets.
This approach can be used as a baseline for performance evaluation. As it is CPU-centric, it is heavily dependent on the CPU model, power, and number of cores.
GPU receive and GPU process
The CPU-centric pipeline described in the previous section can be improved with a GPU-centric approach managing the receive queues with a CUDA kernel using GPU-initiated communications. Two examples are provided in the following sections: multi-CUDA kernel and single-CUDA kernel.
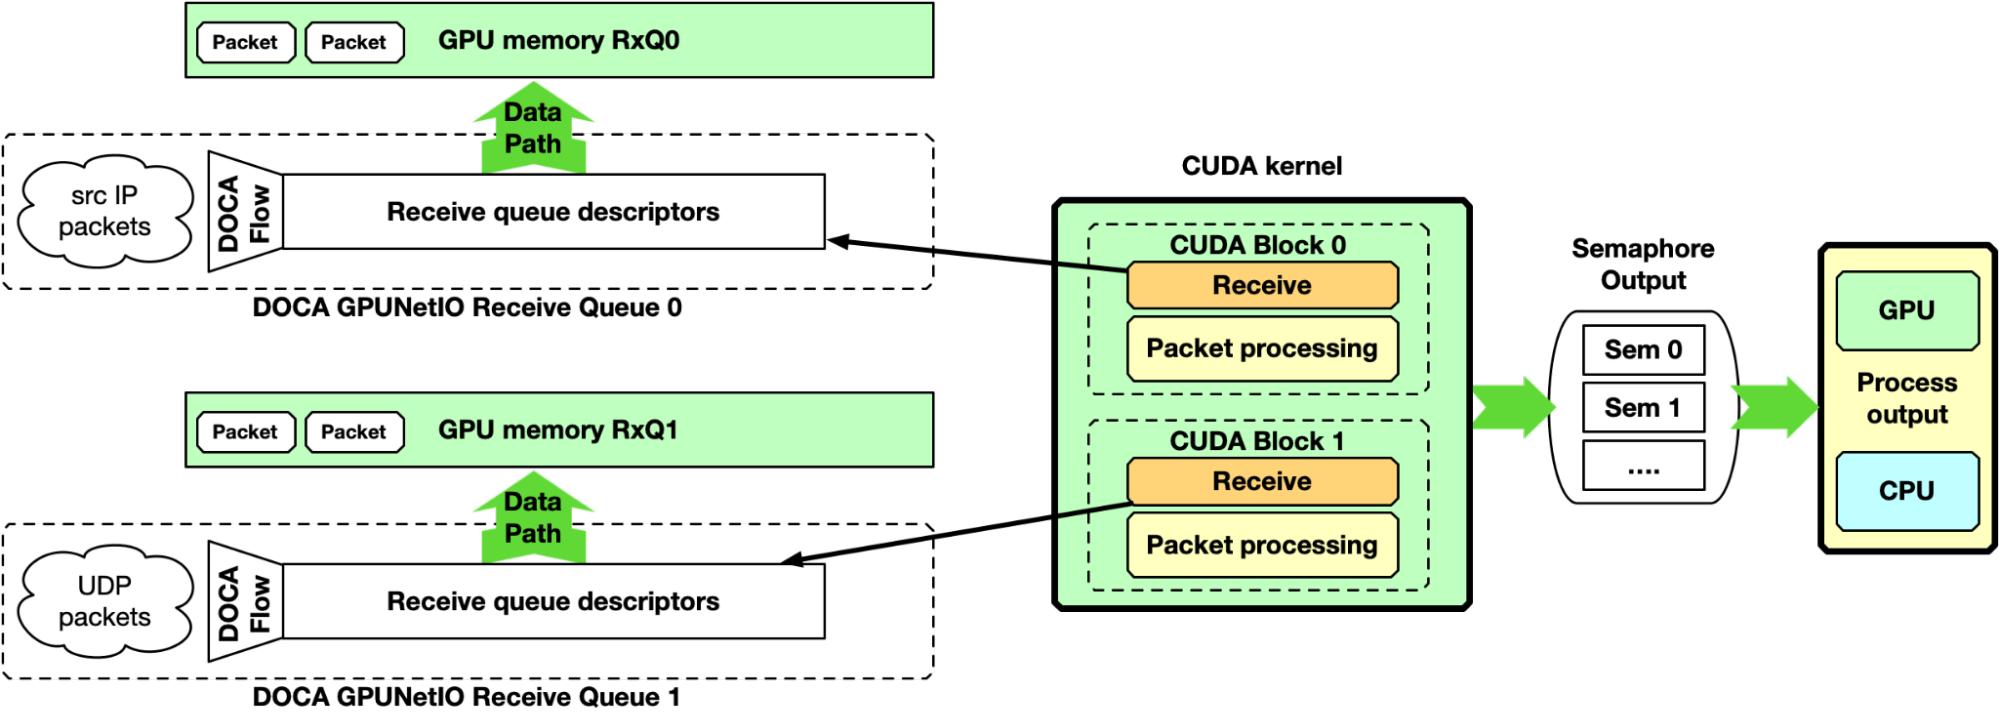
Multi-CUDA kernel
With this approach, at least two CUDA kernels are involved, one dedicated to receive packets and a second dedicated to the packet processing. The receiver CUDA kernel can provide packet information to the second CUDA kernel through a semaphore.
Figure 6. GPU packet processing pipeline with CPU receiving packets in GPU memory and using DOCA GPUNetIO semaphore to notify the packet processing CUDA kernel about incoming packets
This approach is suitable for high-speed network and latency-sensitive applications because the latency between two receive operations is not delayed by other tasks. It is desirable to associate each CUDA block of the receiver CUDA kernel to a different queue, receiving all packets from all the queues in parallel.
Single-CUDA kernel
Previous implementation may be simplified by having a single CUDA kernel responsible for receiving and processing packets, still dedicating one CUDA block per queue.
Figure 7. GPU packet processing pipeline with a single GPU CUDA kernel receiving packets in GPU memory and doing the packet processing
One drawback of this approach is the latency between two receive operations per CUDA block. If packet processing takes a long time, the application may not keep up with receiving new packets in high-speed networks.
GPU receive, GPU processing, and GPU send
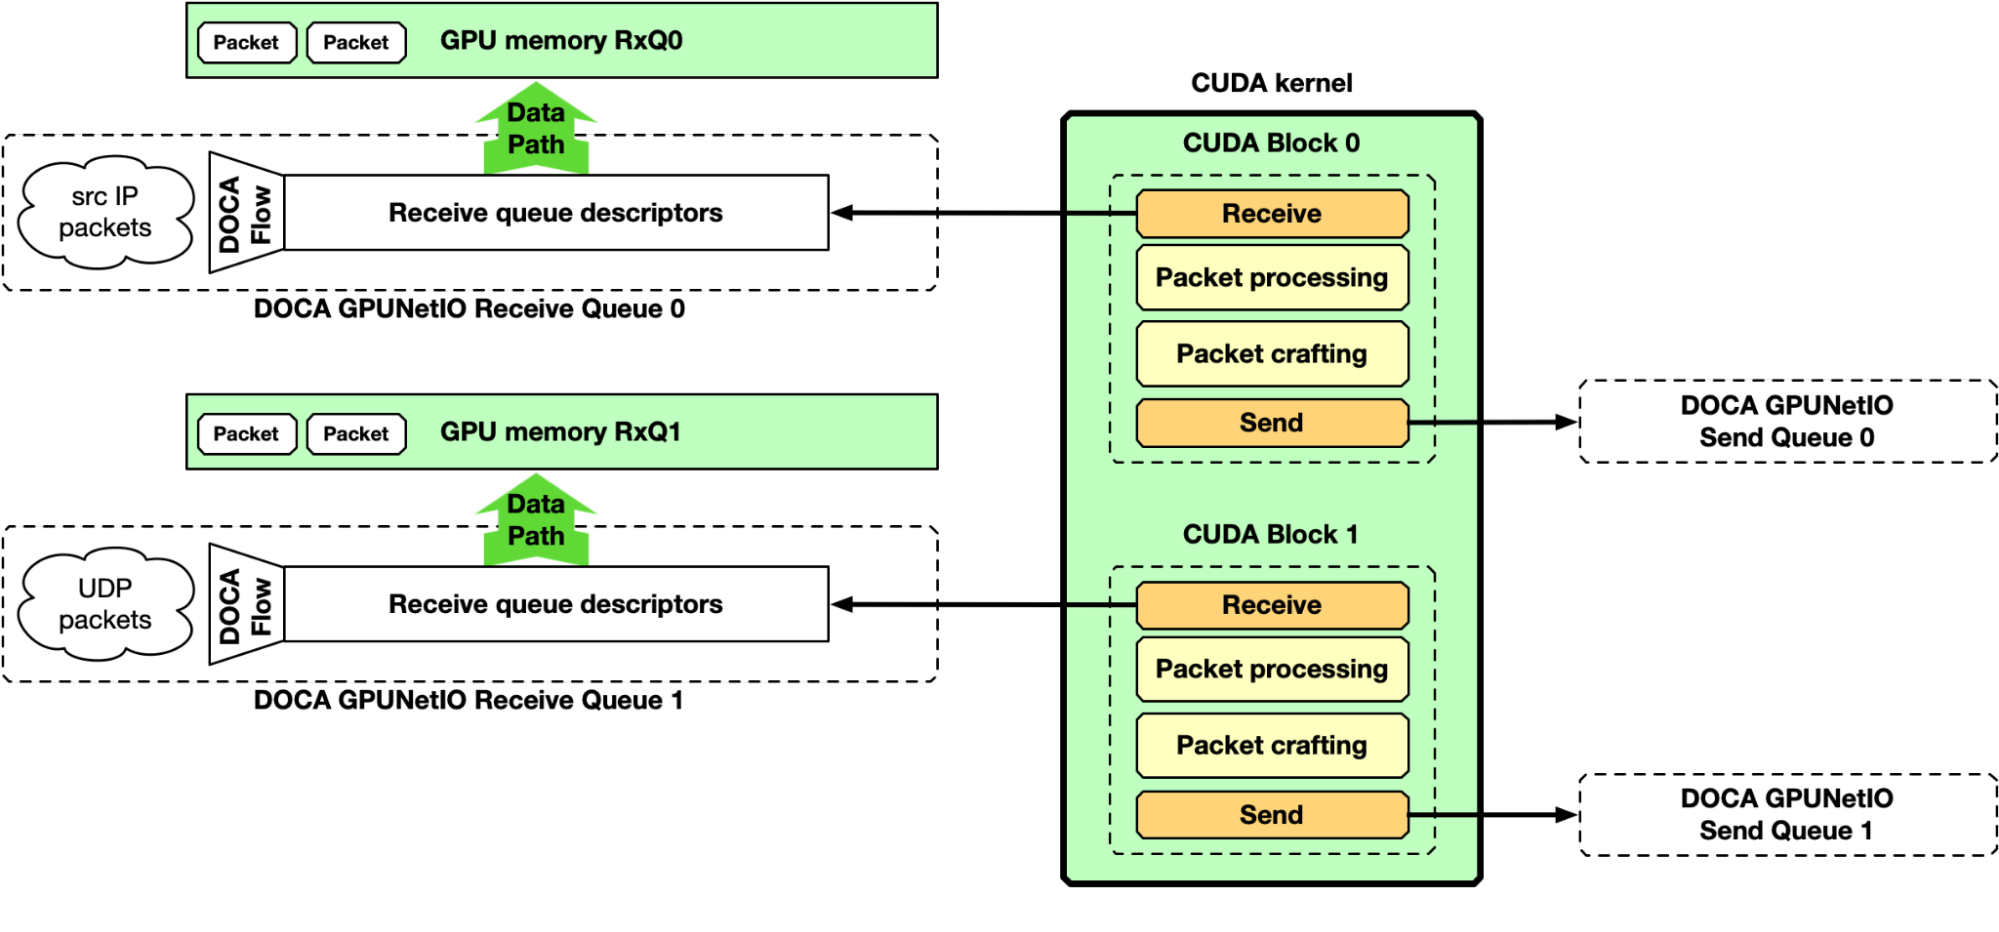
Up to this point, the majority of the focus has been on the “receive and process” part of the pipeline. However, DOCA GPUNetIO also enables the production of some data on the GPU, crafting packets and sending them from a CUDA kernel without CPU intervention. Figure 8 depicts an example of a complete receive, process, and send pipeline.
Figure 8. GPU packet processing pipeline with GPU CUDA kernel receiving packets in GPU memory, doing the packet processing, and finally crafting new packets
NVIDIA DOCA GPUNetIO example application
Like any other NVIDIA DOCA library, DOCA GPUNetIO has a dedicated application for API use reference and to test system configuration and performance. The application implements the pipelines described previously, providing different types of packet processing such as IP checksum, HTTP packet filtering, and traffic forward.
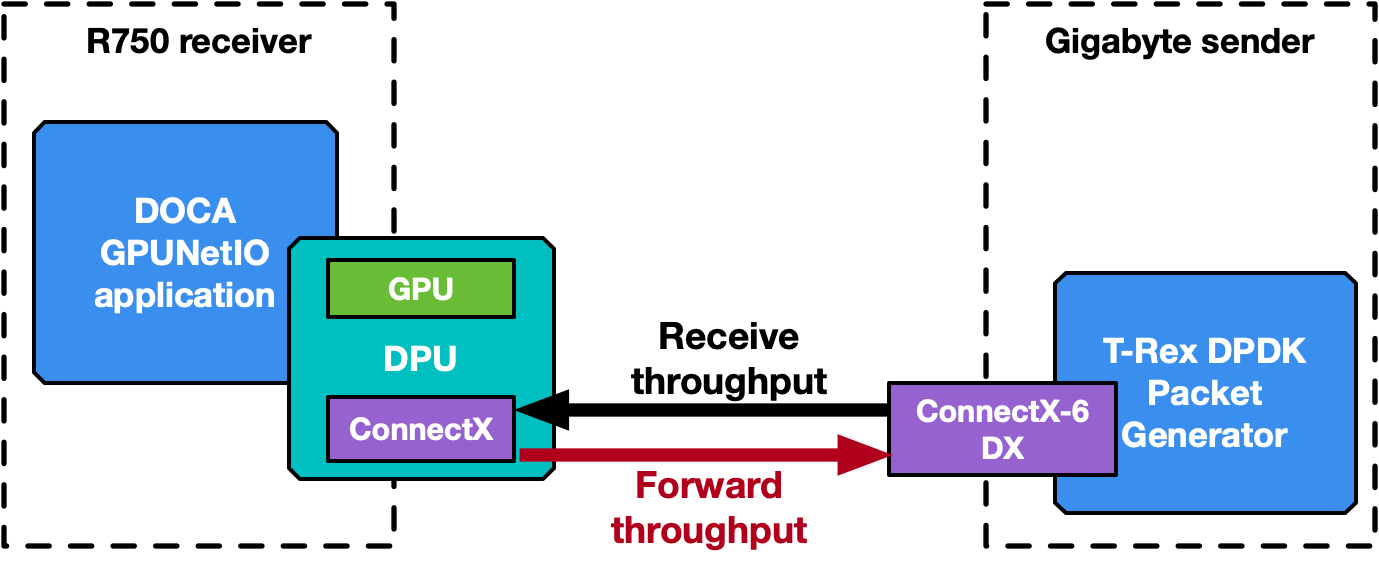
The following section provides an overview of the application’s different modes of operation. Some performance numbers are reported, to be considered as preliminary results that may change and improve in future releases. Two benchmark systems are used, one to receive packets and a second to send packets, connected back-to-back (Figure 9).
The receiver, running the DOCA GPUNetIO application, is a Dell PowerEdge R750 with NVIDIA BlueField-2X DPU converged card. The configuration is embedded CPU mode, so the application runs on the host system CPU using the NIC NVIDIA ConnectX-6 Dx and the GPU A100X from the DPU. Software configuration is Ubuntu 20.04, MOFED 5.8 and CUDA 11.8.
The sender is a Gigabyte Intel Xeon Gold 6240R with a PCIe Gen 3 connection to the NVIDIA ConnectX-6 Dx. This machine does not require any GPU, as it runs the T-Rex DPDK packet generator v2.99. Software configuration is Ubuntu 20.04 with MOFED 5.8.
Figure 9. Receiver (Dell R750) and sender (Gigabyte) systems connected back-to-back to benchmark NVIDIA DOCA GPUNetIO application
The application has been executed also on the DPU Arm cores, leading to the same performance result and proving that a GPU-centric solution is platform-independent with respect to the CPU.
Note that the DOCA GPUNetIO minimum requirements are systems with GPU and NIC with a direct PCIe connection. The DPU is not a strict requirement.
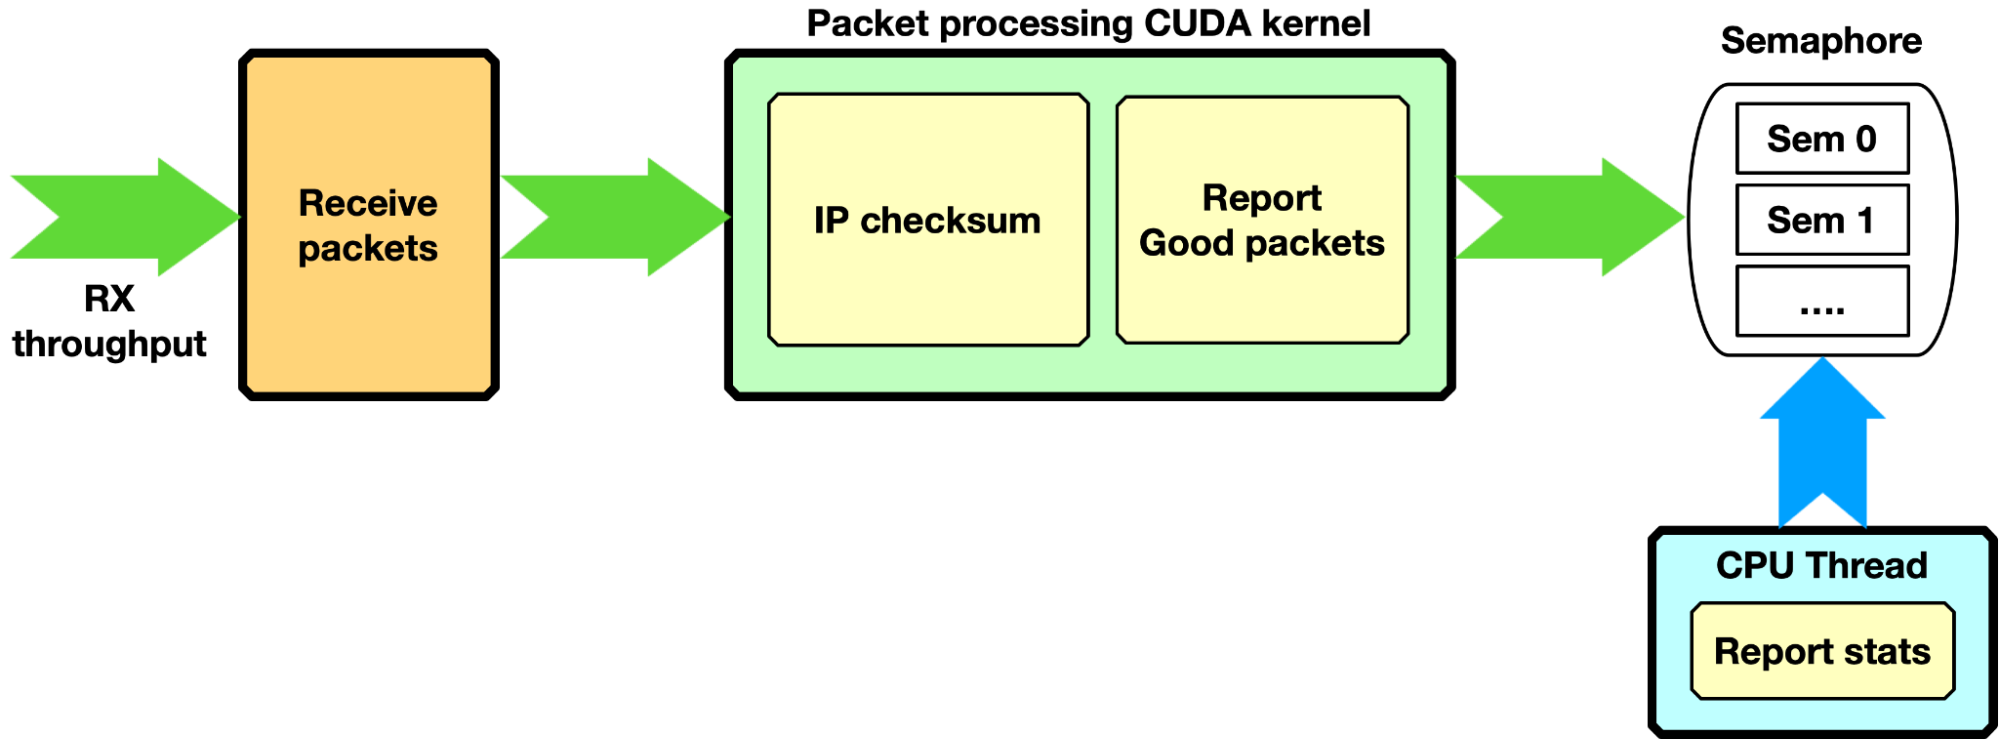
IP checksum, GPU receive only
The application creates one or multiple receive queues using GPU-initiated communications to receive packets. Either the single-CUDA kernel or multi-CUDA kernel mode can be used.
Figure 10. First pipeline mode in the NVIDIA DOCA GPUNetIO application: GPU receives, calculates IP checksum, and reports to the CPU
Each packet is processed with a simple IP checksum verification, and only packets passing this test are counted as “good packets.” Through a semaphore, the number of good packets is reported to the CPU, which can print a report on the console.
Zero-packet loss with single queue was achieved by sending with the T-Rex packet generator 3 billion packets of 1 KB size at ~100 Gbps (~11.97 Mpps) and reporting, on the DOCA GPUNetIO application side, the same number of packets with right IP checksum. The same configuration was tested on a BlueField-2 converged card with the same results, proving that GPU-initiated communication is a platform-independent solution.
With a packet size of 512 bytes, T-Rex packet generator was not able to send more than 86 Gbps (~20.9 Mpps). Even with almost twice the number of packets per second, DOCA GPUNetIO did not report any packet drop.
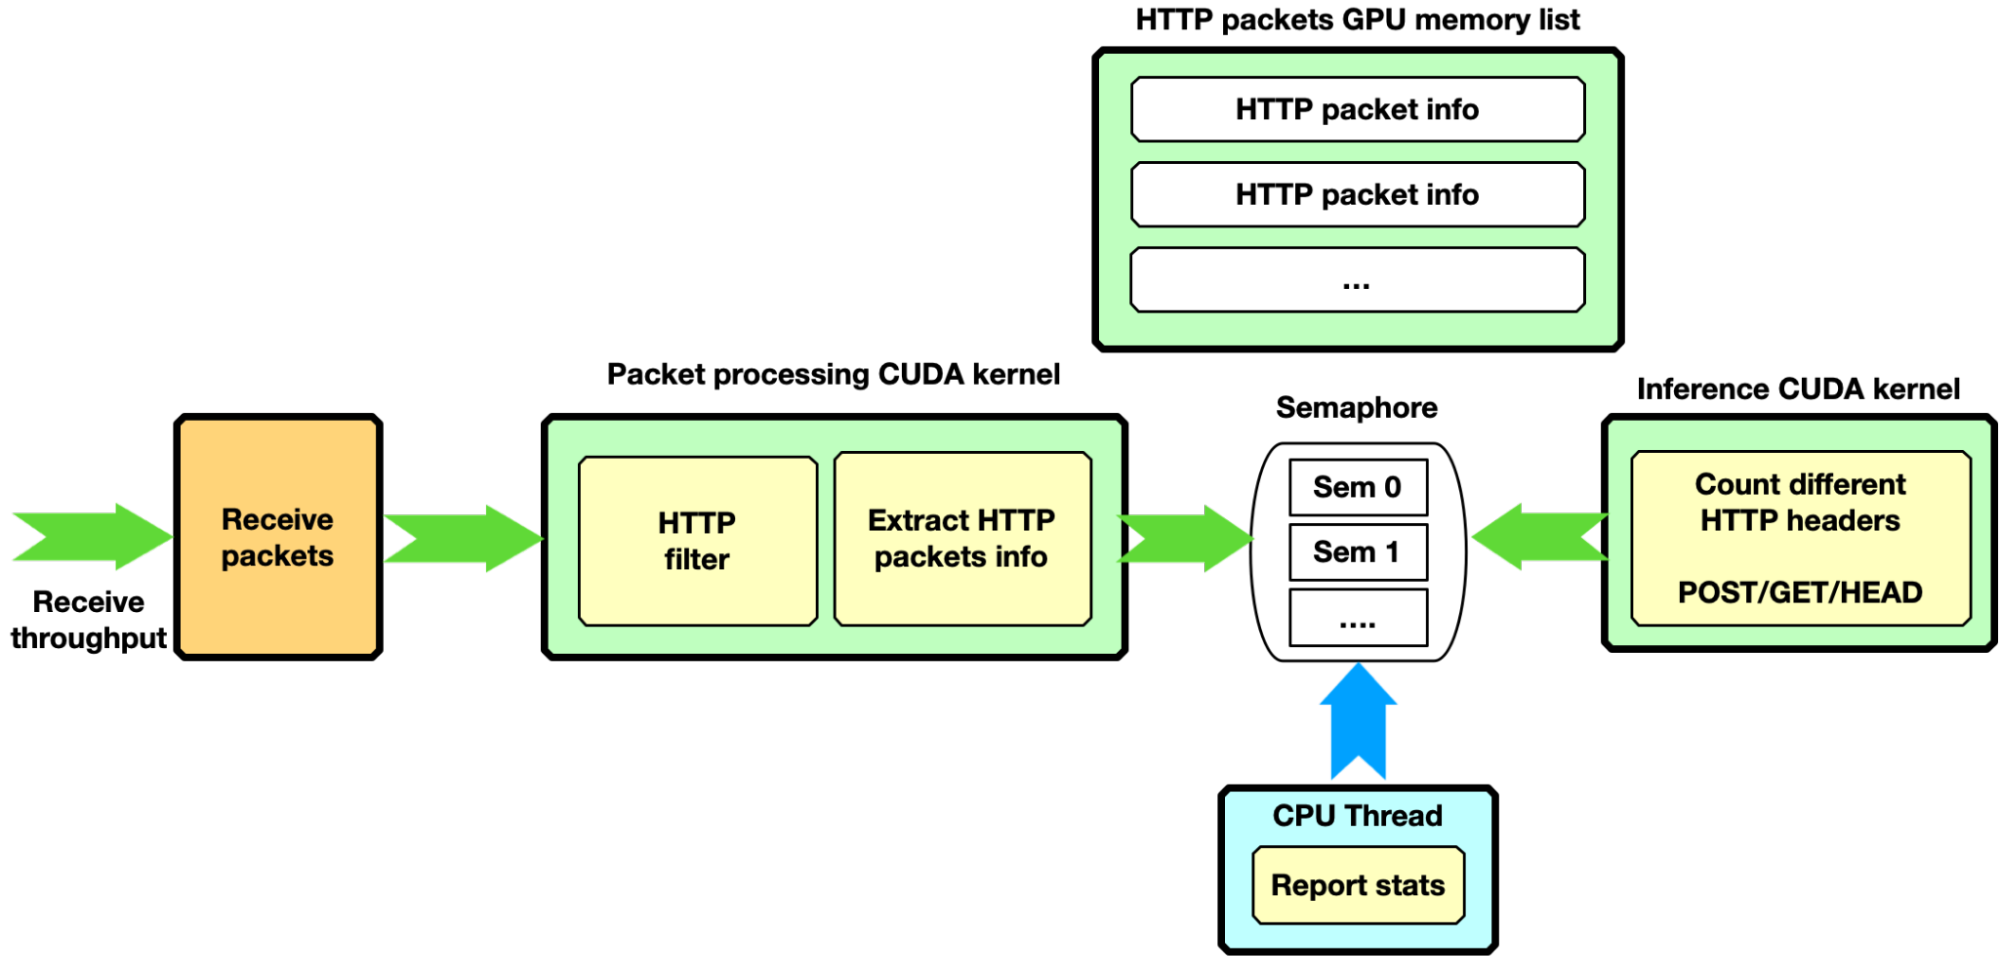
HTTP filtering, GPU receive only
Assuming a more complex scenario, the packet processing CUDA kernel is filtering only HTTP packets with certain characteristics. It copies “good packet” information into a second GPU memory HTTP packets list. As soon as the next item in this HTTP packets list is full of packets, through a dedicated semaphore, the filtering CUDA kernel unblocks a second CUDA kernel to run some inference the HTTP packets accumulated. The semaphore can also be used to report stats to the CPU thread.
Figure 11. Second pipeline mode in the NVIDIA DOCA GPUNetIO application. The GPU receives, filters only HTTP packets, and unblocks, through a dedicated semaphore, a CUDA kernel to run some analysis on those packets.
This pipeline configuration provides an example of a complex pipeline comprising multiple stages of data processing and filtering combined with inference functions, such as an AI pipeline.
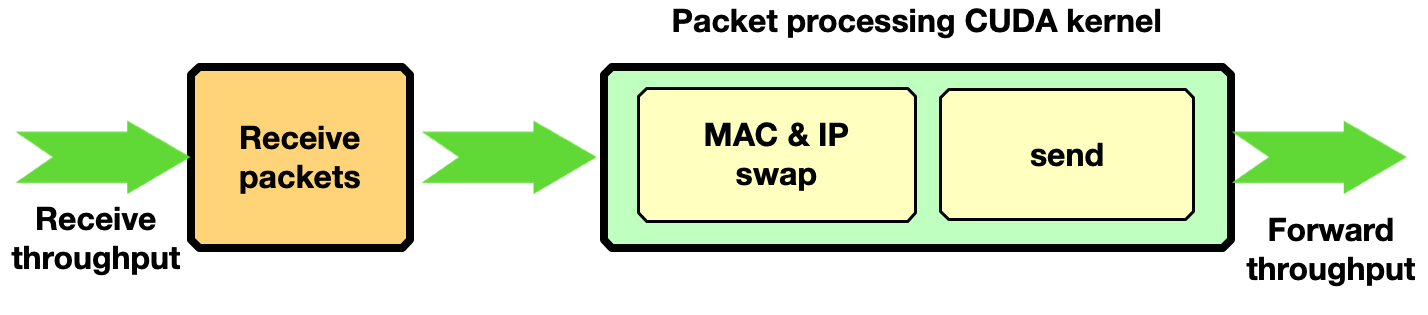
Traffic forward
This section shows how to enable traffic forwarding with DOCA GPUNetIO with GPU-initiated communications. In each received packet, the MAC and IP source and destination addresses are swapped before sending back packets over the network.
Figure 12. Third pipeline mode in the NVIDIA DOCA GPUNetIO application. The GPU receives, swaps MAC and IP addresses for each packet, and sends back the modified packets.
Zero-packet loss with only one receive queue and one send queue was achieved by sending with the T-Rex packet generator 3 billion packets of 1 KB size at ~90 Gbps.
NVIDIA Aerial SDK for 5G
The decision to adopt a GPU-centric solution can be motivated by performance and low-latency requirements, but also to improve system capacity. The CPU may become a bottleneck when dealing with a growing number of peers connecting to the receiver application. The high degree of parallelization offered by the GPU can provide a scalable implementation to handle a great number of peers in parallel without affecting performance.
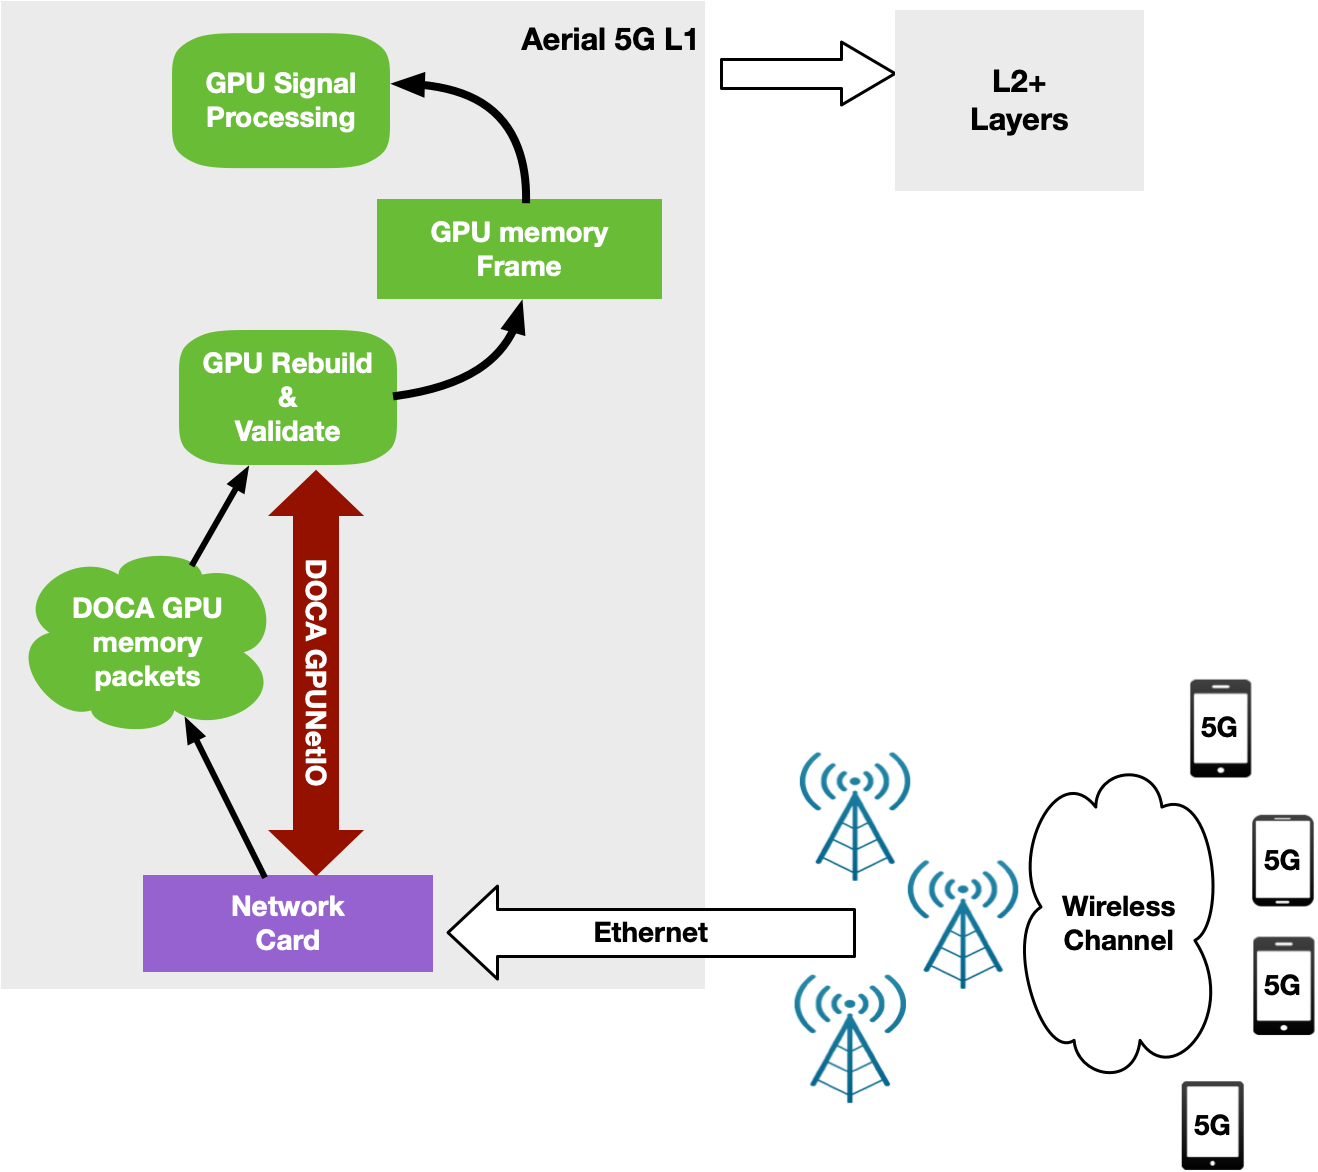
NVIDIA Aerial is an SDK for building a high-performance, software-defined 5G L1 stack optimized with parallel processing on the GPU. Specifically, the NVIDIA Aerial SDK can be used to build the baseband unit (BBU) software responsible to send (Downlink) or receive (Uplink) wireless client data frames split into multiple Ethernet packets through Radio Units (RUs).
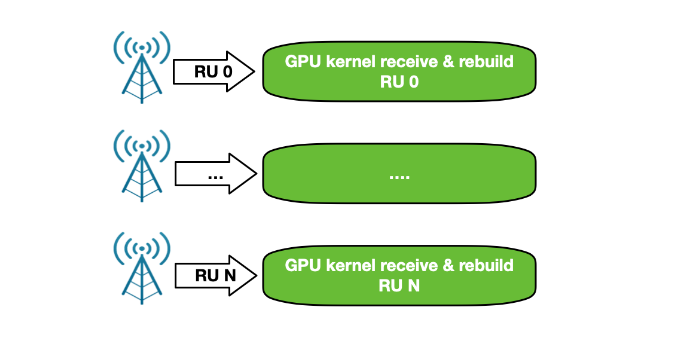
In Uplink, BBU receives packets, validates them, and rebuilds the original data frame per RU before triggering the signal processing. With the NVIDIA Aerial SDK, this happens in the GPU: a CUDA kernel is dedicated to each RU per time slot, to rebuild the frame and trigger a sequence of CUDA kernels for GPU signal processing.
The orchestration of the network card to receive packets and of the GPU to reorder and process packets was implemented through the DPDK gpudev library (Figure 13).
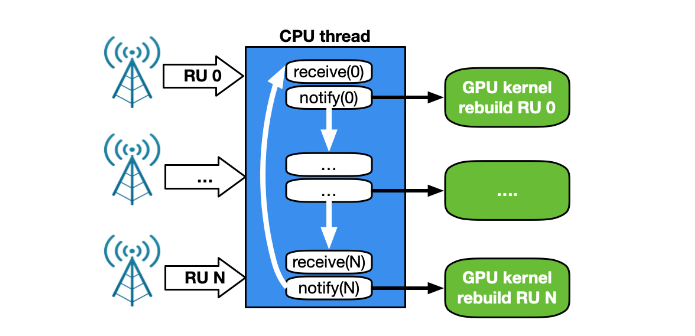
This first implementation was able to keep up with 4 RU working at full 25 Gbps speed using just one CPU core on a modern Intel x86 system. As the number of cells increased, however, the CPU functioning between the network card and the GPU became the bottleneck.
A CPU works in a sequential manner. With a single CPU core to receive and manage traffic for a growing number of RUs, the time between two receives for the same RU depends on the number of RUs. With 2 CPU cores, each working on a subset of RU, the time between two receives for the same RU is halved. However, this approach is not scalable with a growing number of clients. In addition, the magnitude of PCIe transactions increases from NIC to CPU, and then from CPU to GPU (Figure 14).
Figure 14. NVIDIA Aerial 5G application CPU-centric control flow with several RU connected. The CPU core receives and notifies the GPU rebuild kernel for every connected RU sequentially. This is not a scalable approach.
To overcome all of these issues, a new GPU-centric version of the NVIDIA Aerial SDK has been implemented with DOCA GPUNetIO Library. Each CUDA kernel responsible to rebuild, per time slot, the packets coming from a specific RU, has been improved with the receive capability (Figure 15).
At this point, the CPU is not required in the critical path as each CUDA kernel is fully independent, able to process in parallel and in real time a growing number of RUs. This increases system capacity and reduces latency to process packets per slot and number of PCIe transactions. The CPU does not have to communicate with the GPU to provide packet information.
Figure 16. NVIDIA Aerial 5G SDK GPU-centric control flow with several RUs connected. This is a scalable approach, which guarantees equal and fair service to all the connections.
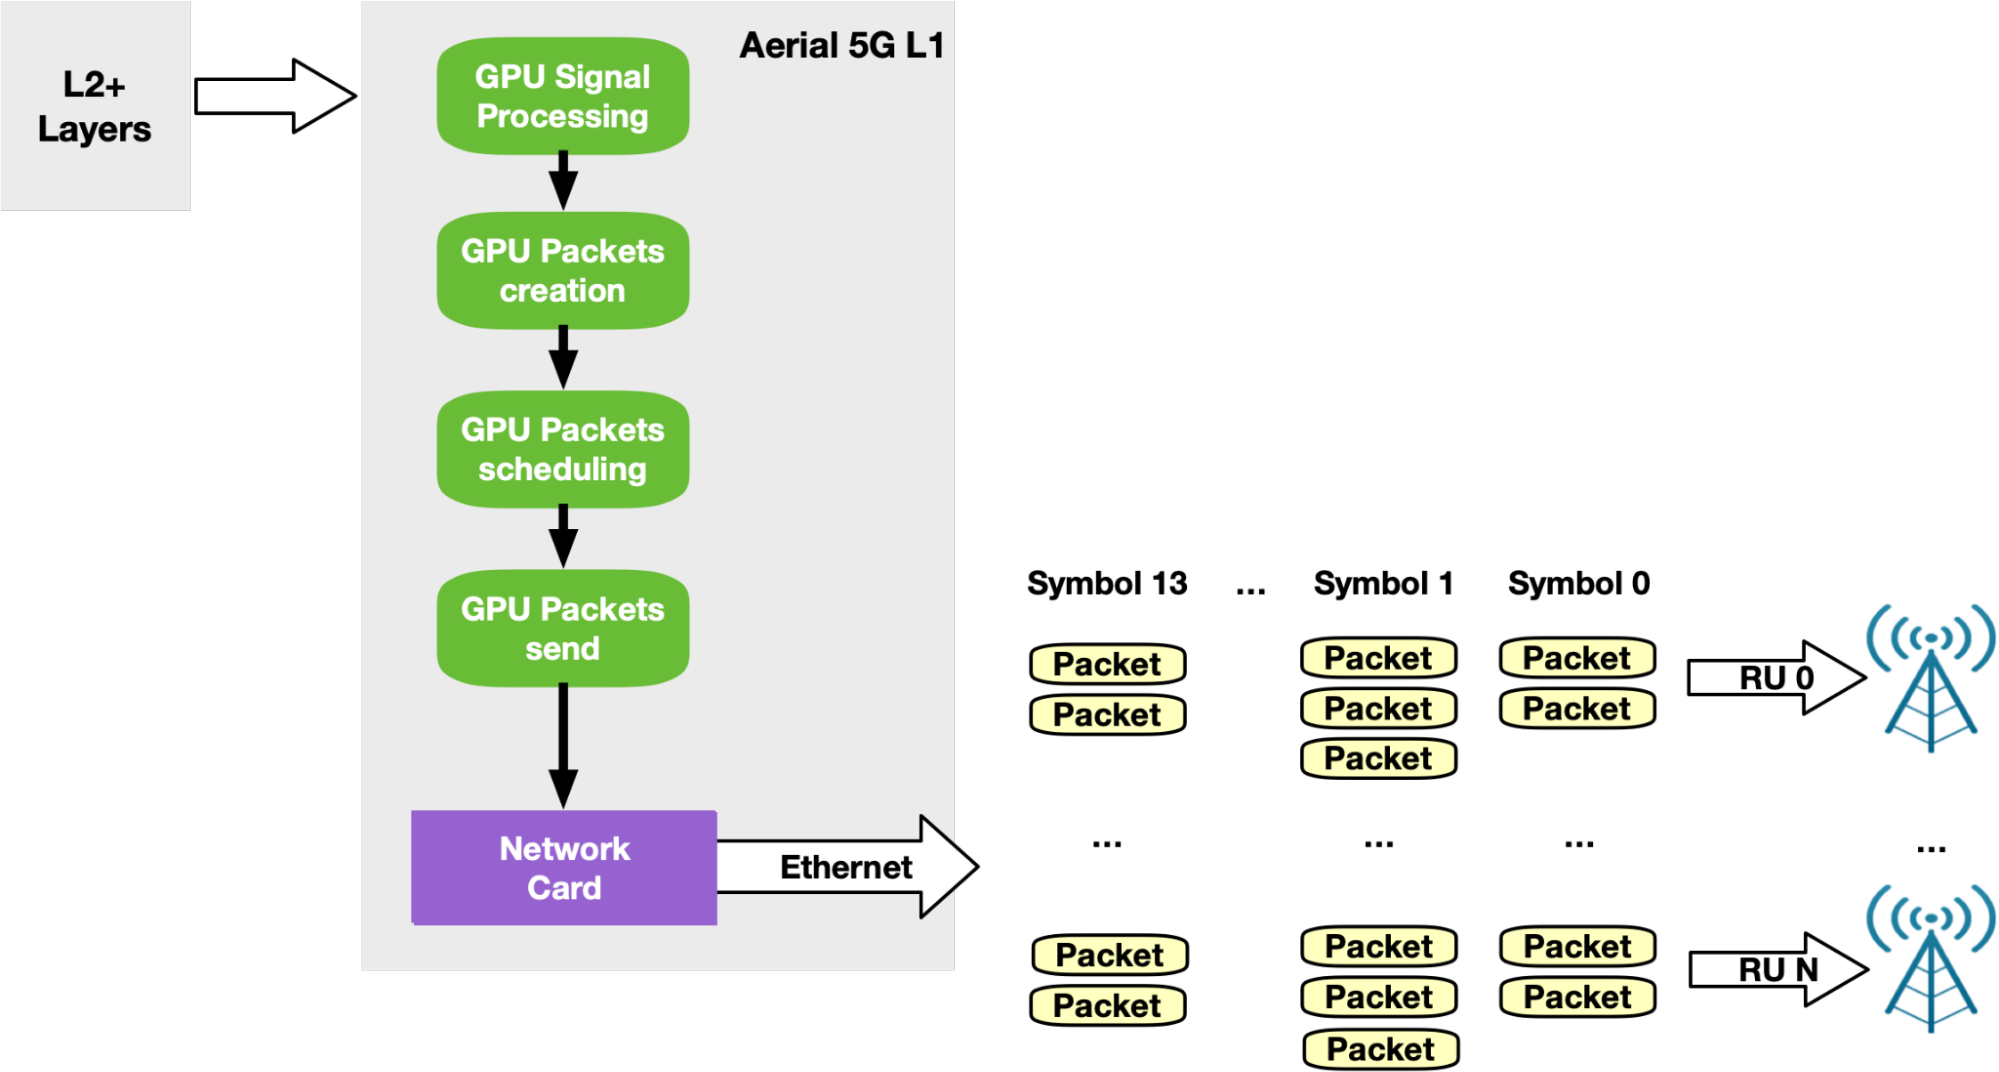
According to the standards, 5G networks must exchange packets according to a specific pattern. Every time slot (500 microseconds, for example), packets should be sent in 14 so-called symbols. Each symbol is composed of a number of packets (depending on the use case) to be sent in a smaller time window (36 microseconds, for example). To support this timed transmission pattern on the Downlink side, the NVIDIA Aerial SDK combines GPU-initiated communications with Accurate Send Scheduling through DOCA GPUNetIO API.
Once GPU signal processing prepares the data to be sent in a future slot, a dedicated CUDA kernel per RU splits this data into Ethernet packets per RU and schedules their future transmission at a specific time in the future. The same CUDA kernel then pushes packets to the NIC that will be responsible for sending each packet at the right time (Figure 17).
Figure 17. NVIDIA Aerial 5G SDK timed transmission pattern implemented with NVIDIA DOCA GPUNetIO using GPU-initiated communications and the Accurate Send Scheduling feature
Get early access to NVIDIA DOCA GPUNetIO
Created as part of a research project, the DOCA GPUNetIO package is in experimental status. It is available in early access and is an extension of the latest DOCA release. It can be installed on a host system or DPU converged card and includes:
A set of CPU functions for the initial setup phase of your application that prepare the environment and create the queues and other objects
A set of GPU-specific functions you can call within your CUDA kernel to send or receive packets and interact with DOCA GPUNetIO semaphores
An application source code you can build and run to test functionalities and learn about how to use the DOCA GPUNetIO API
Hardware requirements are a ConnectX-6 Dx or newer network card and GPU Volta or newer. It is highly recommended to have a dedicated PCIe bridge between the two. Software requirements are Ubuntu 20.04 or newer, CUDA 11.7 or newer, and MOFED 5.8 or newer.
If you are interested in learning more and gaining hands-on experience with NVIDIA DOCA GPUNetIO to help you develop your next critical application, contact NVIDIA Technical Support for early access. Note that the DOCA GPUNetIO Library is currently only available under NDA with NVIDIA.
SANTA CLARA, Calif., Dec. 14, 2022 (GLOBE NEWSWIRE) — NVIDIA will present at the following events for the financial community: J.P. Morgan 21st Annual Tech/Auto Forum (During the 2023 …

 This post is the first in a series about optimizing end-to-end AI for workstations. For more information, see part 2, End-to-End AI for Workstation:…
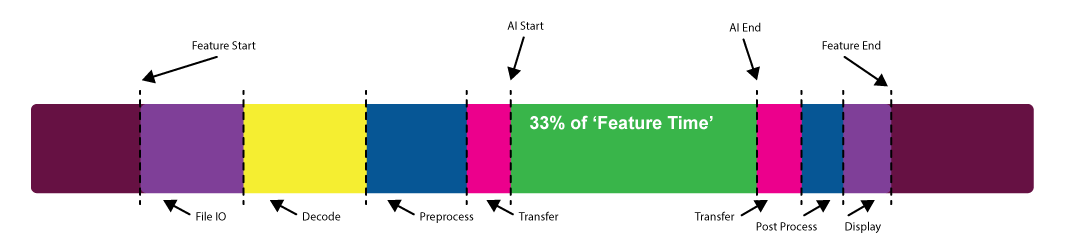

 Quantum algorithm researchers in government, enterprise, and academia are interested in developing and benchmarking novel quantum algorithms on ever-larger…
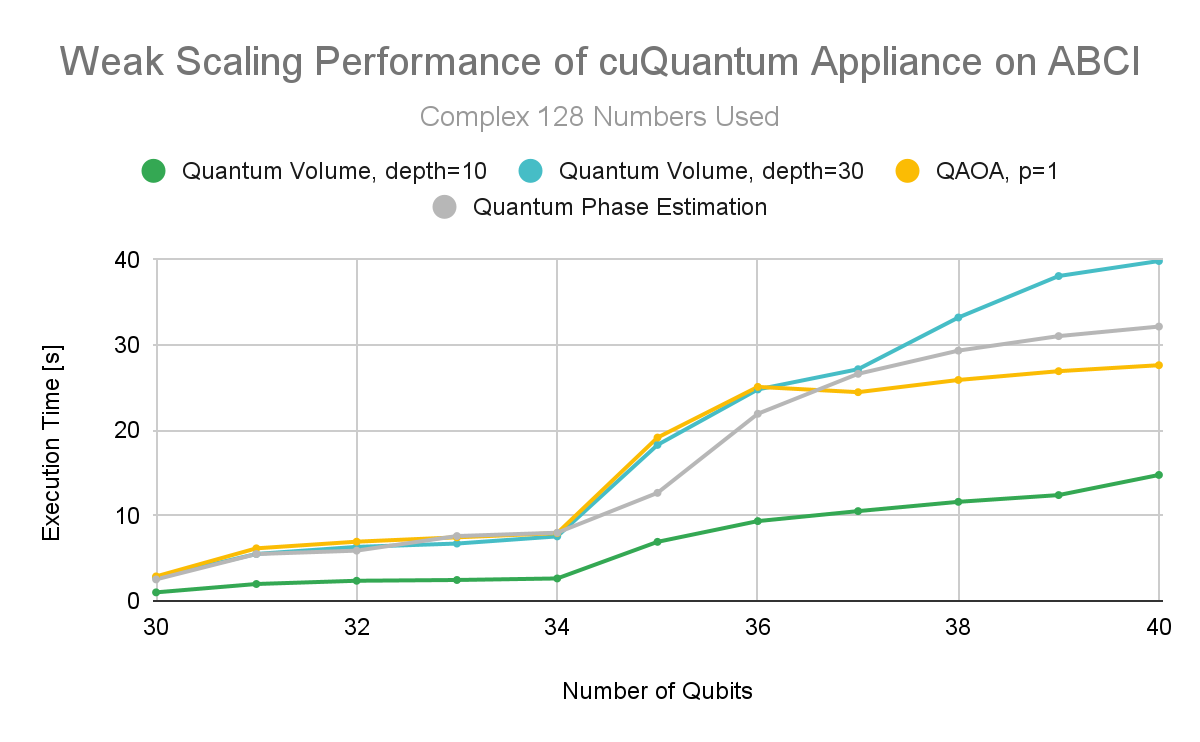
 As the global service economy grows, companies rely increasingly on contact centers to drive better customer experiences, increase customer satisfaction, and…
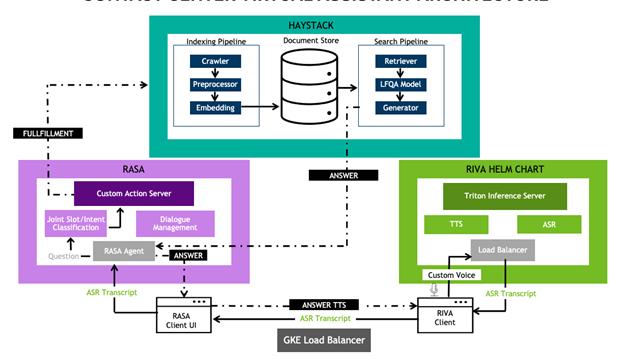
 A growing number of network applications need to exercise GPU real-time packet processing in order to implement high data rate solutions: data filtering, data…