I am trying to develop an application using TensorFlow Lite for Microcontrollers and I was wondering if TensorFlow Lite Micro is compatible with any arduino board? The tensorflow page lists only the Nano BLE Sense board.
Moreover where could I find a detailed list of all the platforms/processors supported by the above framework?
At Omniverse Developer Day, deep-dive into panels and expert-led breakout sessions to learn how to build, sell, and distribute your own 3D tools. Happening at GTC March 21-24.
NVIDIA Omniverse continues to transform workflows for developers, researchers, and creators around the world—and there is still more to come. Experience what else Omniverse has in store at NVIDIA GTC, which kicks off March 21.
We’re introducing exclusive events, sessions, and other resources to showcase how developers can use Omniverse to build next level applications and tools for virtual worlds. There’s a session for anyone interested in learning more about the platform. Dive into technical learning or face-to-face breakout sessions during Omniverse Developer Days. Or connect with the community in Omniverse User Groups.
Register now for free, and join us to see how the Omniverse community is building the future of virtual worlds.
Explore Exciting Sessions on Omniverse Developer Days
Omniverse Developer Days will showcase the many ways users and developers can build extensions and apps on the platform. Hear from Omniverse engineering leaders and industry experts—including featured speakers from Pixar, Ubisoft, Autodesk, Adobe, Unity, Epic Games, and Walt Disney Studios—as they share new insights about 3D virtual world building, simulation, rendering, and more.
Multiple sessions, ranging from technical tutorials to business-focused topics, are available for developers and users. Register now and take an unparalleled deep dive into developing applications for virtual worlds.
Also, don’t miss the keynote by NVIDIA CEO Jensen Huang on March 22 at 8 am PST. The Omniverse Community team will host a special Keynote Community Hangout on Discord, where attendees can watch the keynote live and chat.
Make Virtual Connections in the Omniverse User Group
Join us at the upcoming NVIDIA Omniverse User Group, a special event hosted by lead engineers, designers, and artists. The free, virtual event is open to all developers, researchers, creators, students, and industry professionals interested in learning more about the platform.
Attendees will have a behind-the-scenes look at the latest news and updates about the groundbreaking platform. Get a sneak peek at what’s next on the Omniverse roadmap, learn how NVIDIA is supporting the artist community, and check out the newest resources available to help users build custom extensions and applications.
Can’t wait for GTC to get started? Check out the Omniverse Developer Resource Center, which provides users with all the information they need to familiarize themselves with the platform.
Dive into new features such as Omniverse Code, a new app that serves as an IDE for developers and power users. With Omniverse Code, developers can quickly become familiar with the platform while building extensions, apps, or microservices.
Informative sessions on automated cyberattack prevention, power grid management from the edge, optimizing network storage, edge AI-on-5G, and addressing malware with data science.
Looking for different topic areas? Keep an eye out for our other posts!
Join us at GTC, March 21-24, to explore the latest technology and research across AI, computer vision, data science, robotics, and more!
With over 900 options to choose from, our NVIDIA experts put together some can’t-miss sessions to help get you started:
Join Dorit Dor, one of the leading personas of the global cyber security market, and get the most elaborate and professional introduction for AI use cases in the cyber security arena.
Malware is a significant issue for IT in today’s distributed work environment. Join this session to learn how Mandiant helps the issue of malware using data science.
Hear from Marissa Hummon, author of 11 technical publications on power grid management, winner of the Edison Award and Grid Edge Innovation Award, and Top Women in Energy honoree. Hummon will share how accelerated computing through AI and ML can deliver greater value to utilities and customers while unlocking new opportunities for clean-energy companies and third-party developers.
2021 saw massive growth in the demand for edge computing driven by the pandemic and for the need for more efficient business processes. Justin Boitano will talk about the key advances in the IoT, 5G, and edge AI that are helping enterprises digitally transform their business.
In the decade leading up to 2030, technological developments and commercial use of AI and 5G will transform the enterprise landscape and accelerate economic growth. Mavenir and NVIDIA are partnering to deliver flexible, efficient, reliable, and secure AI applications over 5G networks. This session showcases the vertical blueprint of AI-on-5G for computer vision that will drive digital transformation across industries.
NVIDIA AI Enterprise accelerates the process for creating modern applications driven by deep learning and AI. Our experts will reveal how they simplify and streamline processes to make it easier to build powerful applications. This leads to faster execution of GPU-accelerated data preparation, machine learning training, and inference applications.
With enormous 50TB datasets and complex data engineering tasks, data-driven personalization is an insurmountable challenge for AT&T’s data science team. Chris Vo from AT&T will talk about how their team designed and tested various experiments, which ultimately resulted in improved content recommendation and classification, all while reducing infrastructure costs.
Large-scale Machine Learning with Snowflake and RAPIDS Nick Becker, Engineering Manager, RAPIDS, NVIDIA Miles Adkins, Senior Partner Sales Engineer, AI & ML, Snowflake Subhan Ali, Senior Developer Relations Manager, NVIDIA Moselle Freitas, Technology Alliances Director, Snowflake Ayush Dattagupta, Software Engineer, NVIDIA
The modern machine learning workflow faces two major bottlenecks: 1) moving large amounts of data is difficult, and 2) scaling out with this data is even harder. In this session, you’ll learn from the NVIDIA RAPIDS and Snowflake teams about how the combination of Snowflake and RAPIDS + Dask enables a supercharged workflow, where data can move easily and the models trained on that data can run in a fraction of the time.
Hear from Microsoft Azure cloud computing services backend developer and author of over 25 papers, Jithin Jose. Jose and Gilad Shainer discuss how HPC and AI have evolved to use multitenant, isolation, and congestion control to help improve performance in cloud-native supercomputing.
Project Monterey rearchitects VMware Cloud Foundation from the hardware up to support new requirements for modern applications. In this session learn how to leverage accelerators to improve the performance of offloaded tasks while freeing CPU cycles for core application workloads.
NVMe is more than faster flash storage. It enables vastly more efficient transport of data between storage systems and servers. But how do you achieve the full potential of NVMe? In this session, Rob Davis looks at new and modern approaches to optimizing networked storage solutions while introducing intelligent use cases that improve efficiency and performance.
NVIDIA is accelerating the field of genomics and drug discovery with the help of GPUs. We sit down with the lab lead to learn more about their work.
The following post provides a deep dive into some of the accomplishments and current focus of drug discovery and genomics work by NVIDIA. A leader in innovations within healthcare and life sciences, NVIDIA is looking to add AI, deep learning, simulation, and drug discovery researchers and engineers to the team. If what you read aligns with your career goals please review the current job postings.
NVIDIA is tapping into the latest technology as it pairs high-performance computing (HPC) with genome and drug discovery research. As genomic testing becomes more mainstream, the amount of data that requires analysis has increased. Drug discovery has also entered a new era of research, as AI and deep learning open the door to discovering thousands of new compounds that serve as the base of drug discovery.
NVIDIA researchers and engineers, like group-lead Johnny Israeli, are supercharging genomics and drug discovery research. Developing software like NVIDIA Clara Parabricks, which is a GPU-accelerated computational genomics application framework that delivers end-to-end analysis workflows for whole genomes, exomes, cancer genomes, and RNA sequencing data. Leading NVIDIA Research content marketing, I sat down with Johnny to learn more about what he does with his group.
Nathan Horrocks
Hey Johnny, it’s great to finally connect with you. Let’s jump right in. I wanted to ask, given that NVIDIA is a tech company, how does working in your group here differ from working at a biotech company?
Johnny Israeli
Hey Nate, thank you for reaching out. There are a couple of ways to think about the differences. Oftentimes in biotech, there is a very specific technology goal or problem. You use whichever technology, or combination of technologies, to solve that problem. You may be married to the problem or the goal, but not so married to the type of technology you might use. Here we pursue products that leverage our expertise in accelerated computing and AI technologies and have more flexibility in terms of our goals for our products.
For example, a few years ago we worked on genomics, but we didn’t build any kind of product for drug discovery. Today, we are building a product for that specific area. The reason for that is that drug discovery as a field is changing. We see an opportunity for us to pursue a new goal. So I would say we have a track record of chasing new opportunities as they become available to our unique positioning and our unique skill set.
Nathan Horrocks
Could you give me an example of a unique opportunity that differentiates you from a traditional biotech company?
Johnny Israeli
I would highlight the intensity of our AI-oriented work in drug discovery. Quite a few companies in the drug discovery space work with AI but the level and focus of investment may be different. For biotech companies, AI is one of several technology options in a broader technology arsenal to pursue drug discovery programs.
At NVIDIA, we know that we are uniquely positioned to do a great job with AI and accelerated computing. So we’re incentivized to invest in this work with greater intensity and focus than most other companies can, both because of our positioning and because of our scale. So engineers and scientists interested in the intersection of AI and drug discovery, and parallel computing would find our areas of work interesting.
Nathan Horrocks
You mentioned your work on genomics, could you tell me how your past work in genomics is impacting your current work in drug discovery?
Johnny Israeli
The drug discovery space is multidisciplinary and it’s a long and complicated process. At the very early stage of the drug discovery process is the stage of target identification. Most of the drug discovery work out there is what’s called target-based drug discovery workflows, where you figure out what is the target, the protein target to go after, and then develop a drug.
Figure 1. NVIDIA Clara annotates the data analyzed by a sequencer.
Our genomics work contributes greatly to the target identification problem. You can build these genome-wide data sets across many individuals and then analyze them to figure out which mutations are associated with different kinds of diseases. By identifying these mutations and analyzing them, we can then figure out protein targets that are relevant for a given disease. And then build out the rest of the drug discovery workflow from there.
So we use our software called NVIDIA Clara Parabricks to map data from genomics instruments, identify genomic variants, and annotate them. By simplifying these genomics workflows into push-button software solutions and accelerating that software, we are reducing the time and cost to generate large-scale genomics datasets. These large-scale genomics datasets across many individuals are then used to identify protein targets that can impact disease outcomes, and the structures of those proteins are used with our NVIDIA Clara Discovery software to generate and simulate drug compounds and their interaction with those proteins.
Nathan Horrocks
So you’re using Clara Parabricks to fuel protein identification in genomics and then using Clara Discovery to simulate compounds that could potentially be used as a drug?
Johnny Israeli
Exactly, in the context of drug discovery, we help figure out the most promising compounds for a given drug discovery program, and this is something we are really excited about. We started around a year and a half ago looking into drug discovery. We announced at GTC– in the fall of 2020 I believe– that we were going to build this software called NVIDIA Clara Discovery. That it would be an NVIDIA framework for all things pertaining to computational drug discovery. And that’s where there is all this cutting-edge work happening, and where we are actually looking to hire at the moment.
Nathan Horrocks
Do you want to dive into that? If we’re looking for engineers and researchers in this area, they might find it interesting to know more about what work you are focusing on.
Johnny Israeli
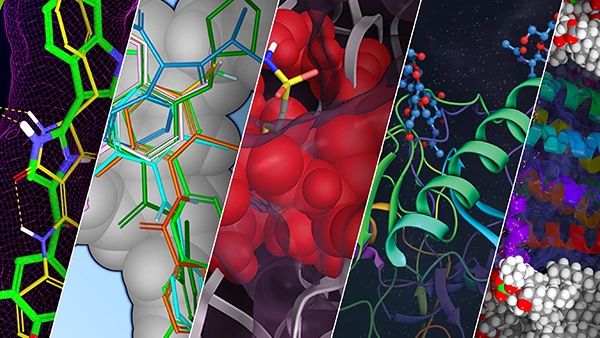
Absolutely, yeah. Drug discovery is a long, complicated process involving multiple disciplines. When you think about computational drug discovery, there are three dynamics taking place that could reshape the industry from a computational standpoint. Those three dynamics are what you are trying to do at the core of the computational drug discovery loop. You have a protein –a target– that you want to impact, you have a compound, which is potentially a drug to be developed. Then given a compound and the protein structure you can do all kinds of simulations. You are trying to predict if it would be a useful interaction.
Figure 2. A user can generate compounds with a simple click using NVIDIA Clara
Traditionally you would have a database of these compounds. All kinds of companies are cataloging and producing these databases, and there are billions of compounds today. Then you have the world of protein structures, which is produced by a whole bunch of groups doing structural biology work.
Now, three things are happening that we think could reshape everything. First is the breakthrough work by DeepMind and other groups in the form of AlphaFold and so on. We’re now using deep learning to predict protein structure. So if that’s true, we’re going to have many more protein structures to work within the coming years than we have had up to this point. That is dynamic number one.
Dynamic number two is through our work here in Clara Discovery, and also others in the industry, we are building the capability to generate compounds. Imagine using deep learning—not so different from StyleGAN and Gaugan—that can generate a seemingly infinite number of generated images. Turns out you can generate all kinds of compounds as well. We have software with a graphical user interface where you click and compounds come out. So that means in the coming years as this capability matures, we’re going to have a million X more compounds than before. Before we had a billion and in another few years, we’ll have a million billion compounds to work with. And that’s still scratching the surface because the number of potential compounds out there in the universe of such compounds could be 10 to the 60.That’s dynamic number two.
So the first dynamic is happening at large within the industry and NVIDIA is enabling it. For dynamic number two, we’re building a product for that. We have Clara Discovery and we have a specific workflow and a technology we are using called MegaMolBART.
MegaMolBART is the adoption of Megatron, which was initially developed for natural language processing (NLP) at scale, and we repurposed Megatron for the language of chemistry because there is a way to represent molecules using a string format. So you can repurpose all this NLP technology, and the same technology that is bringing Megatron to market is the same technology powering this part of our drug discovery work. It’s the same piece of software called NeMoMegatron.
Figure 3. Accelerating Drug Discovery with Clara Discovery’s MegaMolBart
Dynamic number three is if you have a million more compounds than before, and you have tens more protein structures than before, then the combination that you want to simulate is millions more than ever before.
Now, simulation, as we know it computationally, can be a very intensive problem. In fact, one of the early use cases of CUDA was in molecular dynamics and scientific computing in this kind of simulation. But the question is how, how do you enable a million X more of it? We are building a team to figure out that simulation capability and we are hiring experts in molecular dynamics, force field development, high-performance computing, and deep learning applications to simulation. We are also hiring cheminformatics experts, deep learning researchers, and engineers to advance our technologies for compound generation and interaction with proteins using AI.
And I think that captures what we do here. It is a unique group, in that we push products out and also have scope for product-driven research. We work extensively with engineering groups across the company to leverage technologies that can advance these products, and we collaborate with a variety of research groups to leverage AI breakthroughs across the company.
Nathan Horrocks
Would you expand on what you just said? What do you mean it differs from other NVIDIA research areas?
Johnny Israeli
I would say most research labs have more flexibility than we have in terms of the kind of research we’re pursuing. Our organization keeps a healthy balance between engineering and research so that we can ship products but also have the bandwidth to pursue innovative opportunities. But that does mean that our research goals or research agenda may be somewhat constrained by the objectives of the product in a way that the typical research lab might not be constrained. In a typical academic lab or even an industry research group, I would expect more flexibility, but it’s a tradeoff. It’s a tradeoff between flexibility and the intense focus that is needed to ship a software product.
Nathan Horrocks
That’s what I was going to ask. What value is there for a researcher then to want to join your group?
Johnny Israeli
Great question. I would say we tend to attract researchers who are interested in innovative research and are passionate about making sure that their research has a business impact. And for those individuals this tradeoff makes sense. They are willing to constrain and focus the research as needed to have that kind of business impact that they desire.
Nathan Horrocks
So their research is more focused on improving Clara Discovery and Clara Megamolbart?
Johnny Israeli
That’s correct. So we need to align the research activities with the product goals.
Nathan Horrocks
You’ve mentioned that the larger portion of your work involves engineers, how knowledgeable do you think these engineers need to be in biotechnology?
Johnny Israeli
A great question. I find that many up from the engineering background learn this on the job. What’s more important is not so much the knowledge of the industry, but genuine interest. We have multiple examples here of engineers who may be studied some of this stuff in college, or they just read about some of the stuff and they have the right engineering background.
And you know, a year or two years in they know their industry really well because they work with our partners and collaborators. So I would say interest matters most.
Nathan Horrocks
I remember you mentioning at the beginning anyone interested in the intersection of AI, simulation, and drug discovery would find this work interesting.
Johnny Israeli
Exactly. This is exciting and incredibly challenging work, and we are just scratching the surface. I am looking forward to what the next few years will bring as we dive deeper into NVIDIA Clara and its potential to contribute to the biotech community.
Additional Resources
If you are interested in learning more about NVIDIA Genomics, check out our Genomics page.
To stay informed about new research being done at NVIDIA, visit NVIDIA Research.
Join experts from NVIDIA at the Healthcare and Life Sciences Developer Summit at GTC; attend Omniverse sessions at GDC; and get hands-on NVIDIA Deep Learning Institute training at GTC.
Our weekly roundup covers the most recent software updates, learning resources, events, and notable news.
Join developers and AI experts from the NVIDIA healthcare ecosystem for talks, demos, and hands-on workshops at GTC. Get the latest applications and frameworks advancing AI in healthcare, led by experts from NVIDIA and Quantiphi. The Healthcare and Life Sciences Developer Summit at GTC will explore AI advancements across a wide range of domains, including biopharma, medical devices, smart hospitals, and genomics.
Learn about 3D Collaboration and Development at GDC 2022
NVIDIA Omniverse will be at GDC 2022 featuring a variety of world-class engineers and technology leaders in panels, deep-dives, and sessions. Attendees will learn how the future of collaboration will revolutionize their workflow, along with how these changes will transform industries and development altogether.
Each of these sessions will touch on a different aspect of the virtual world-building workflow, and are available online.
Bring It to Life: A Look at Omniverse’s New Runtime Animation System
Opportunities for Universal Scene Description in Game Development
The Importance of Digital Humans for Industries
Deep Dive: One-Click Animation Retargeting in Omniverse
Get Hands-On Training with NVIDIA Deep Learning Institute for $149 at GTC
Get hands-on NVIDIA Deep Learning Institute training at GTC. Choose from 26 full-day workshops at a special GTC rate of $149 available in multiple languages and time zones. Workshop topics include deep learning, cybersecurity, recommender systems, NLP, and more.
Say hello to tomorrow’s smart electric meter, literally. You can ask some next-generation home energy hubs questions, just like you do Alexa or Siri. Some devices, arriving this year, will display real-time simulations — vibrant as a video game — to show how you can lower your energy bill or reduce your carbon footprint. They’ll Read article >
Notable sessions in the making of Green Planet AR, animating realistic digital humans, building a power industry digital twin, and making virtual production more accessible.
Looking for different topic areas? Keep an eye out for our other posts!
Join us at GTC, March 21-24, to explore the latest technology and research across AI, computer vision, data science, robotics, and more!
With over 900 options to choose from, our NVIDIA experts put together some can’t-miss sessions to help get you started:
This session introduces Omniverse XR and is led by the engineer building this solution. Omer Shapira will discuss Omniverse’s real-time ray-traced XR renderer, Omniverse’s Autograph system for visual programming, and show how customers are using Omniverse’s XR tools to do everything together—from design reviews to hangouts.
NVIDIA’s New Tools and SDKs for XR Development Ingo Esser, Principal Developer Technology Engineer, NVIDIA Peter Pang, Senior Product Manager, NVIDIA Jason Mawdsley, Director, AI Gaming and Head of AI Gaming Products, NVIDIA Tion Thomas, RTXGI SDK Producer, NVIDIASirisha Rella, Product Marketing Manager, NVIDIA Stephanie Rubenstein, Product Marketing Manager, NVIDIA
Experts across the NVIDIA SDK teams are presenting the latest updates and best practices for DLSS, RTXGI, and Riva in XR development. They are also introducing the new VR Capture and Replay tool, which is being released at GTC as early access.
This session is a great example of how AR experiences can encourage positive change. Learn how NVIDIA CloudXR helped deliver an innovative mobile AR experience, through a 5G private network, to thousands of people in Piccadilly Circus, London. Deep dive into the challenges of bringing the natural worlds in the Green Planet AR experience—inspired by the BBC’s Green Planet TV series—into the hands of so many people.
Aurelio Reis and Jeff Kiel bring more than 35 years of combined experience building graphics developer tools. This includes real-time ray-tracing solutions such as Nsight Graphics, making this a great session for developers to get their questions answered directly from the team developing the tools.
Mark Schoennegal has lived through the renaissance of the 3D industry, from the first ray-traced animations all the way through to today’s blockbuster AAA game titles. In this session, he will share how Unity’s award-winning demo team pushes the boundaries of graphics and rendering to achieve realistic digital humans in Enemies.
This session is the perfect primer for anyone interested in integrating DLSS to boost game frame rates. Andrew Edelsten, a director with over 20 years of experience in gaming and visual arts, will give a behind-the-scenes look at the underlying technology that powers DLSS and how to get started.
Join this special session with Ian Buck, vice president and general manager of Accelerated Computing at NVIDIA and inventor of CUDA. Buck will dive into the latest news, innovations, and technologies that will help companies, industries, and nations reap the benefits of AI supercomputing.
A Vision of the Metaverse: How We will Build Connected Virtual Worlds Rev Lebaredian, VP Omniverse & Simulation Technology, NVIDIA Dean Takahashi, Lead Writer, Venture Beat Virginie Maillard, Global Head of Simulation and Digital Twin Research, Siemens Amy Bunszel, Executive VP, AEC Design Solutions, Autodesk Timoni West, VP Augmented, Virtual, and Mixed Reality, Unity Lori Hufford, VP Engineering Collaboration, Bentley Systems
The speakers within this panel are from some of the largest and most reputable technology companies in the world. The session itself will dive into the future of these 3D virtual worlds and also look at how these companies’ technologies will work together to make it all happen.
The Importance of Digital Humans for Industries Sarah Bacha, Head of Research and Innovation, Cedrus Digital Markus Gross, Vice President of Research, Walt Disney Studios Vladimir Mastilovic, VP of Digital Humans Technology, Epic Games Matt Workman, Developer, Cine Tracer Simon Yuen, Director of Graphics and AI, NVIDIA John Martin II, VP of Product Marketing, Reallusion Erroll Wood, Principal Scientist, Microsoft
These leaders in research and graphics will talk through the effect that digital humans will have on our professional workloads and how they’ll change our daily lives in the future. These accomplished panelists are technical and business leaders at top software, research, and technology companies.
In this joint talk with Siemens Energy, we’ll cover building a digital twin of a heat-recovery steam generator unit by simulating the corrosive effects of heat, water, and other conditions on metal over time for predictive maintenance. Learn how the NVIDIA Modulus framework was used to create the underlying physics machine language digital twin model that’s connected, simulated, and visualized in Omniverse.
Imagine sitting and looking through a pane of glass and there you see another person, digitally created but also so real, on the other side. This science-fiction scenario has become reality, combining a 3D representation compressed and rendered in real time, giving the sense that you are in fact present in the same place, communicating together. Harris Nover and Jason Lawrence from Google will walk you through this breakthrough technology.
Catch this full feature session from Øystein Larsen to see how this visual effects award-winning creator manipulates what’s possible in a virtual environment with the power of NVIDIA RTX and Maxine.
See just what NVIDIA Maxine brings to the table in video streaming alterations and improvements, while still maintaining real-time accuracy with this breakout session by Stephen Whynot from Avaya.
The GeForce NOW RTX 3080 membership gives gamers unrivaled performance from the cloud – with latency so low that it feels just like playing on a local PC. Today, gamers can experience RTX 3080-class streaming at only $19.99 a month, thanks to GeForce NOW’s new monthly membership plans*. It’s a great chance to experience powerful Read article >
cuStateVec is a library for acceleration of state vector-based quantum circuit simulation. We discuss APIs, integrations, and benchmarks.
Quantum computing aspires to deliver more powerful computation and faster results for certain types of classically intractable problems. Quantum circuit simulation is essential to understanding quantum computation and the development of quantum algorithms. In a quantum circuit, the quantum device is composed of N qubits, and computations are performed by applying a sequence of quantum gates and measurements to the qubits.
Mathematically, the quantum state of the N-qubit system can be described as a complex 2N-dimensional vector. The most intuitive method to simulate a quantum circuit on a classical computer, known as state vector simulation, stores this vector with its 2N complex values directly in memory. The circuit is executed by multiplying the vector by a series of matrices that correspond to the gate sequence that makes up the circuit.
However, as the dimension of the state vector grows exponentially with the number of qubits, the memory requirements for a full description of the state limits this method to circuits with 30–50 qubits. Alternative methods based on tensor networks can simulate significantly more qubits but are generally limited in the depth and complexity of circuits that they can effectively simulate.
The cuStateVec library provides single GPU primitives to accelerate state vector simulations. As the state vector method is fundamental in simulating quantum circuits, most quantum computing frameworks and libraries include their own state vector simulator. To enable easy integration to these existing simulators, cuStateVec provides an API set to cover common use cases:
Measurement
Gate application
Expectation value
Sampler
State vector movement
Measurement
A qubit can exist in a superposition of two states, |0> and |1>. When a measurement is performed, one of the values is probabilistically selected and observed, and another value collapses. The cuStateVec measurement API simulates qubit measurement and supports use cases of the measurement on the Z-basis product and batched single-qubit measurements.
Gate application
Quantum circuits have quantum logic gates to modify and prepare quantum states to observe a desirable result. Quantum logic gates are expressed as unitary matrices. The cuStateVec gate application API provides features to apply quantum logic gates for some matrix types, including the following:
Dense
Diagonal
Generalized permutation
Matrix exponential of Pauli matrices
Expectation value
In quantum mechanics, expectation value is calculated for an operator and a quantum state. For quantum circuits, we also calculate the expectation for given circuit and quantum states. cuStateVec has an API to calculate the expectation value with a small memory footprint.
Sampler
The state vector simulation numerically keeps quantum states in the state vector. By calculating the probability for each state vector element, you can efficiently simulate measurements of multiple qubits for multiple times without collapsing the quantum state. The cuStateVec sampler API executes sampling on GPU with a small memory footprint.
State vector movement
The state vector is placed on a GPU to accelerate simulations by the GPU. To analyze a simulation result on a CPU, copy the resulting state vector to the CPU. cuStateVec provides the accessor API to do this on behalf of users. During the copy, the ordering of state vector elements can be rearranged so that you can reorder qubits into the desired qubit ordering.
The first project to announce integration of the NVIDIA cuStateVec Library was Google’s qsim, an optimized simulator for their quantum computing framework, Cirq. The Google Quantum AI team extended qsim with a new cuStateVec-based GPU simulation backend to complement their CPU and CUDA simulator engines.
Build instructions for Cirq and qsim with cuStateVec
To enable cuStateVec through Cirq, compile qsim from the source and install the bindings for Cirq provided by the qsimcirq Python package.
# Prerequisite:
# Download cuQuantum Beta2 from https://developer.nvidia.com/cuquantum-downloads
# Extract cuQuantum Beta2 archive and set the path to CUQUANTUM_ROOT
$ tar -xf cuquantum-linux-x86_64-0.1.0.30-archive.tar.xz
$ export CUQUANTUM_ROOT=`pwd`/cuquantum-linux-x86_64-0.1.0.30-archive
$ ln -sf $CUQUANTUM_ROOT/lib $CUQUANTUM_ROOT/lib64
# Clone qsim repository from github and checkout v0.11.1 branch
$ git clone https://github.com/quantumlib/qsim.git
$ git checkout v0.11.1
# Build and install qsimcirq with cuStateVec
$ pip install .
# Install cirq
$ pip install cirq
In this example, we run a circuit that creates a Greenberger-Horne-Zeilinger (GHZ) state and samples experimental outcomes. The following Python script gets the amplitudes in |0…00> and |1…11> by calling three different simulators:
Cirq built-in simulator
qsim CPU-based simulator
qsim accelerated with cuStateVec
For the Cirq and qsim CPU-based simulators, we enable two sockets of a 64-core EPYC 7742 CPU. For the cuStateVec-accelerated simulation, we use a single A100 GPU.
import cirq
import qsimcirq
n_qubits = 32
qubits = cirq.LineQubit.range(n_qubits)
circuit = cirq.Circuit()
circuit.append(cirq.H(qubits[0]))
circuit.append(cirq.CNOT(qubits[idx], qubits[idx + 1])
    for idx in range(n_qubits - 1))
# Cirqs = cirq.sim.Simulator()
result = s.compute_amplitudes(circuit, [0, 2**n_qubits-1])
print(f'cirq.sim  : {result}')
# qsim(CPU)
options = qsimcirq.QSimOptions(max_fused_gate_size=4, cpu_threads=512)
s = qsimcirq.QSimSimulator(options)
result = s.compute_amplitudes(circuit, [0, 2**n_qubits-1])
print(f'qsim(CPU) : {result}')
# qsim(cuStateVec)
options = qsimcirq.QSimOptions(use_gpu=True, max_fused_gate_size=4, gpu_mode=1)
s = qsimcirq.QSimSimulator(options)
result = s.compute_amplitudes(circuit, [0, 2**n_qubits-1])
print(f'cuStateVec: {result}')
The following console output shows that the CPU version of qsim was 5.1x faster than Cirq’s simulator by optimizations with CPU SIMD instructions and OpenMP. By using cuStateVec version, the simulation is further accelerated, 30.04x faster than Cirq’s simulator and 5.9x faster than qsim’s CPU version.
cirq.sim  : [0.70710677+0.j 0.70710677+0.j], 87.51 s
qsim(CPU) : [(0.7071067690849304+0j), (0.7071067690849304+0j)], 17.04 s
cuStateVec: [(0.7071067690849304+0j), (0.7071067690849304+0j)], 2.88 s
Performance results
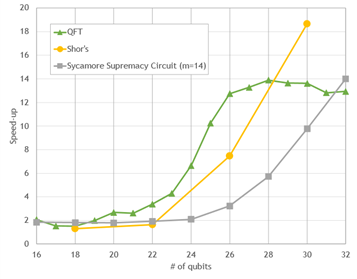
Preliminary performance results on gate applications of some popular circuits are shown in the following figures. Simulations are accelerated for all qubit counts. However, as the number of qubits is increased, the simulation becomes significantly accelerated, by a factor of roughly 10-20x for the largest circuits. This performance opens opportunities to explore development and evaluation of larger quantum circuits.
Cirq/qsim + cuStateVec on the A100 versus 64-core CPU
Figure 1. Simulation performance of popular quantum circuits with cuStateVec on a single NVIDIA A100 GPU, versus Cirq/qsim on a 64-core EPYC 7742 CPU
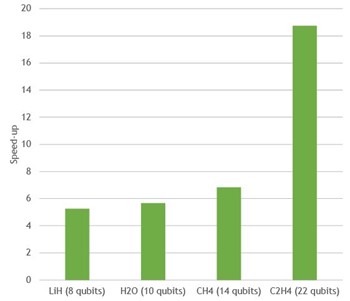
VQE speed-up On One NVIDIA A100 relative to 64 CPU cores in EPYC 7742
Figure 2. Variational Quantum Eigensolver speed-up for several different molecules with cuStateVec on a single NVIDIA A100 GPU, versus Cirq/qsim on a 64-core EPYC 7742 CPU
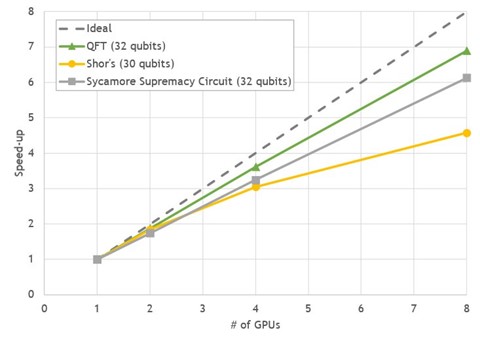
Multi-GPU state vector simulation
State vector simulations are also well suited for execution on multiple GPUs. Most gate applications are a perfectly parallel operation and accelerated by splitting the state vector and distributing it on several GPUs.
Beyond approximately 30 qubits, a multi-GPU simulation is inevitable. This is because a state vector is not able to fit in a single GPU’s memory due to its exponential increase in size with additional qubits.
When multiple GPUs work together on a simulation, each GPU can apply a gate to its part of the state vector in parallel. In most cases, each GPU only needs local data for the update of the state vector and each GPU can apply the gate independently.
However, depending on which of the simulated qubits a gate acts on, the GPUs might sometimes require parts of the state vector stored in a different GPU to perform the update. In this case, the GPUs must exchange large parts of the state vector. These parts are typically hundreds of megabytes or several gigabytes in size. Therefore, multi-GPU state vector simulations are sensitive to the bandwidth of the GPU interconnect.
The DGX A100 is a perfect match for these requirements, with eight NVIDIA A100 GPUs providing a GPU-to-GPU direct bandwidth of 600GB/s using NVLink. We chose three common quantum computing algorithms with 30-32 qubits to benchmark Cirq/qsim with cuStateVec on the DGX A100:
Quantum Fourier Transform (QFT)
Shor’s algorithm
Sycamore Supremacy circuit
All benchmarks show good strong-scaling behavior between 4.5–7x speed-up on eight GPUs, compared to a single GPU run.
Figure 3. Multi-GPU scaling of state vector simulations for popular circuits on DGX A100
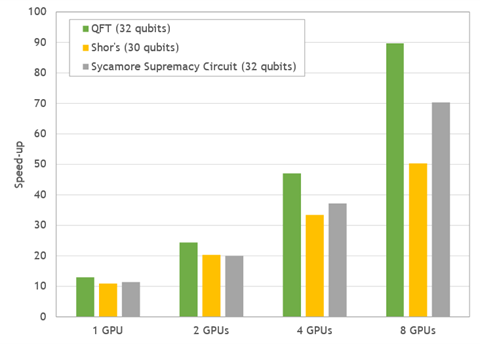
Figure 4. Acceleration ratio of simulations for popular quantum circuits. Performance of GPU simulations was measured on DGX A100 and compared to the performance of two sockets of EPYC 7742.
In comparison to the simulation time on two 64-core CPUs, the DGX-A100 delivers impressive overall speed-ups between 50–90x.
Summary
The cuStateVec library in the NVIDIA cuQuantum SDK aims to accelerate state vector simulators of quantum circuits on GPUs. Google’s simulator for Cirq qsim is one of the first simulators to adopt the library, benefiting Cirq users with the library’s GPU acceleration for their existing programs. Integrations to more quantum circuit frameworks will follow, including IBM’s Qiskit software.
We are also scaling up. Preliminary results for cuStateVec-based multi-GPU simulations show a 50–90x speedup on key quantum algorithms. We hope that cuStateVec becomes a valuable tool for breaking new ground in quantum computing.
Have feedback and suggestions on how we can improve the cuQuantum libraries? Send an email to cuquantum-feedback@nvidia.com.

 At Omniverse Developer Day, deep-dive into panels and expert-led breakout sessions to learn how to build, sell, and distribute your own 3D tools. Happening at GTC March 21-24.
 Informative sessions on automated cyberattack prevention, power grid management from the edge, optimizing network storage, edge AI-on-5G, and addressing malware with data science.
 NVIDIA is accelerating the field of genomics and drug discovery with the help of GPUs. We sit down with the lab lead to learn more about their work.
 Join experts from NVIDIA at the Healthcare and Life Sciences Developer Summit at GTC; attend Omniverse sessions at GDC; and get hands-on NVIDIA Deep Learning Institute training at GTC.
 Notable sessions in the making of Green Planet AR, animating realistic digital humans, building a power industry digital twin, and making virtual production more accessible.

 cuStateVec is a library for acceleration of state vector-based quantum circuit simulation. We discuss APIs, integrations, and benchmarks.