Posted by Subhrajit Roy, Research Scientist and Diana Mincu, Research Software Engineer, Google Research
The intensive care unit (ICU) of a hospital looks after the most medically vulnerable patients, many of whom require organ support, such as mechanical ventilation or dialysis. While always critical, the demand on ICU services during the COVID-19 pandemic has further underscored the importance of data-driven decision-making in healthcare. Furthermore, the ability to accurately predict the clinical outcomes of ICU patients has the potential to guide therapy and may inform decisions about most effective care, including staffing and triage support.
Applying machine learning (ML) to electronic health records (EHRs) has shown promise in predicting clinical outcomes. However, many of these ML models are based on single-task learning (ST), where the models are trained only to predict a specific adverse event, such as an organ dysfunction or the need for a life-support intervention. Of greater benefit would be to train multi-task models, which take into account a variety of competing risks along with the interdependencies between organ systems that factor into patient outcomes in a realistic setting.
In “Multi-task prediction of organ dysfunction in the ICU using sequential sub-network routing”, we propose a multi-task learning (MTL) architecture, called Sequential Sub-Network Routing (SeqSNR), that better captures the complexity of a realistic setting. Inspired by a clinician’s holistic approach to diagnosing problems, SeqSNR is designed to use flexible parameter sharing and routing to find related tasks and encourage cross-learning between them. We successfully applied SeqSNR to the task of continuous adverse event prediction in an ICU setting and showed advantages over single-task and naïve multi-tasking, especially in low training data scenarios.
Data and Labels
In this study, we used the freely available, open access, de-identified MIMIC-III EHR dataset, which includes a patient cohort consisting of 36,498 adults across 52,038 critical care admissions at the Beth Israel Deaconess Medical Center between 2001 and 2012. Similar to our previous studies, we employed a version of the MIMIC-III dataset that was mapped to the Fast Healthcare Interoperability Resource (FHIR) standard and used a comprehensive set of features, including a sequence of vital signs, laboratory results, past medications, procedures, diagnoses, and more.
The MIMIC-III database contains multi-modal recordings from ICU patients. Unlike most datasets in ML, the input and targets are often not explicitly defined and must be inferred from the data. So, using a combination of automated rule-based methods and clinical review, we defined a suite of diverse endpoints, including critical care interventions, specific organ dysfunctions, and overall patient outcomes.
The task given to the model was to predict the onset of a selection of adverse events within 24–48 hours for every hour after a patient’s admission into the ICU. The defined adverse events included acute kidney injury (AKI), continuous renal replacement therapy (CRRT) dialysis, administration of vasopressors and inotropes, mechanical ventilation (MV), mortality, and remaining length of stay (LoS).
The SeqSNR Algorithm
While multi-task learning captures the interdependencies between organ systems and balances competing risks, it can be challenging to implement successfully. In practice, jointly-trained tasks often impair one another, an effect called “negative transfer”. The intuition behind SeqSNR was that modular ‘sub-networks’ would mitigate this issue by automatically optimizing how information is shared across multiple tasks.
SeqSNR is a time series adaptation of the SNR architecture and is a combination of a deep embedding layer followed by stacked recurrent neural network (RNN) layers. Modularisation is achieved by splitting both the embedding layer and the RNN stack into multiple modules connected by routing variables that are learned during the training phase. The routing connections are always created between blocks in one layer and the next. This approach minimizes negative transfer by ensuring that data of low relevance to a particular task layer is filtered out. In essence, this means that each task utilizes a different path through the model.
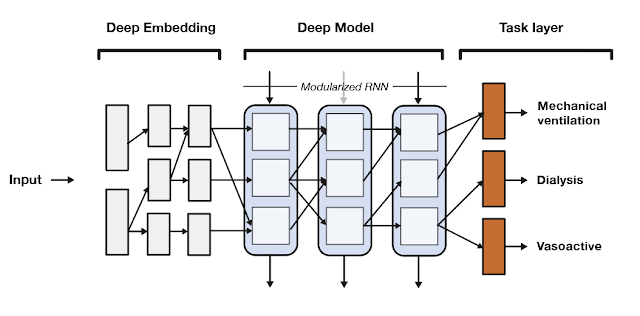 |
| A high-level overview of the SeqSNR architecture. |
Findings
SeqSNR shows a modest improvement in discriminative performance overall relative to single-task and naïve multitasking. However, it’s performance improvement is more significant in scenarios with few training labels.
Because the prevalence of different outcomes varied widely in the dataset (e.g. ~38% of patients had MV, but CRRT dialysis is present for only ~3%), many accuracy metrics are not suitable. Instead, we report the area under the precision recall curve (AU PRC), which is more reliable given imbalanced data. Moreover, we performed the Wilcoxon Signed Rank Tests to draw statistically significant conclusions for pairwise comparisons of ST learning, shared-bottom (SB) multi-task learning (i.e., naïve multi-task learning), and SeqSNR across bootstrapped samples from the held-out test set. The performance differences between the three architectures were modest, but SeqSNR outperformed both ST and SB in four out of six tasks (p-values are reported in the paper).
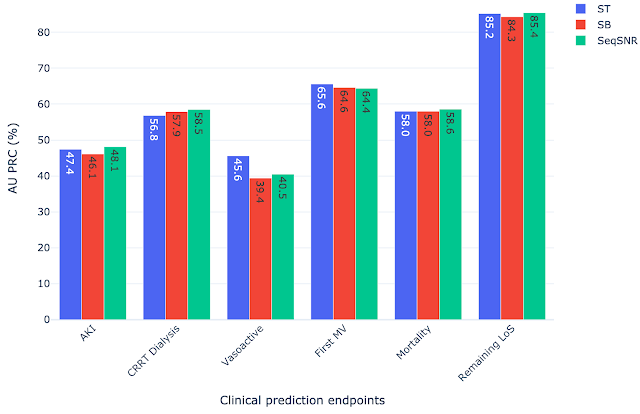 |
| Comparison of single task (ST), shared bottom (SB) and SeqSNR performance on the MIMIC-III dataset. |
Label Efficiency
We hypothesized that multi-task learning could assist in low-data scenarios by using easy-to-label auxiliary tasks to boost the performance of the main tasks. We formulated prediction tasks with only a portion of the training labels available for the primary prediction task, but kept the entire dataset for the “helper tasks”. The latter are chosen because they are reliably encoded in the EHR and are straightforward to timestamp. An example of such a helper task is length of stay, since the start and end of admissions are accurately timestamped in MIMIC-III. On the other hand, the start and end of mechanical ventilation events are not reliably timestamped. So, we defined a set of rules based on expert-defined heuristics to determine the ventilation times using multiple sources of mechanical ventilator–related settings along with physiological measurements in the EHR dataset that are indicative of MV.
The development of these rules for a new clinical endpoint was time-consuming and involved manual review of the dataset by experts. The difficulty in exhaustively labeling the dataset led us to test the model performance with only 1–10% of the data labeled, which resulted in a decline in model performance. The “helper tasks” are useful in this scenario since they are 100% labeled and can be used with the primary tasks (1–10% labeled) to jointly train the multi-task model for improved overall performance.
We chose AKI, mechanical ventilation, CRRT Dialysis, and vasoactive medications as primary endpoints using 1%, 5%, and 10% of the training labels, along with 100% of labels for the helper tasks — labs and vitals, mortality, and LoS. Performance of both ST and SeqSNR decreased as the percentage of labels for the primary endpoint was reduced, but SeqSNR outperformed ST across all tasks and all training data reduction percentages, with a statistically significant boost in performance for all cases.
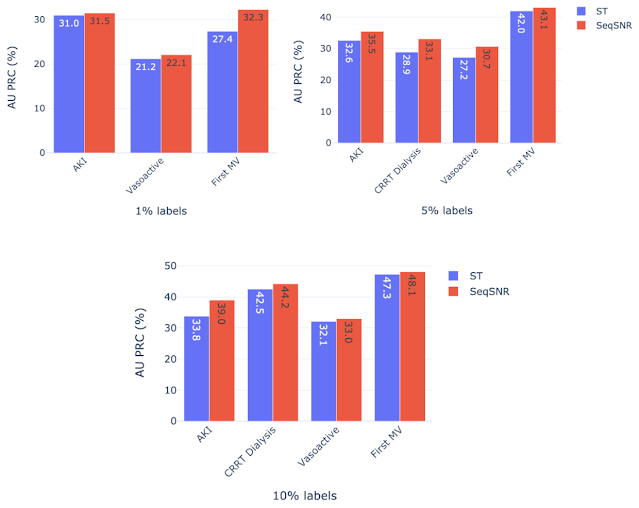 |
| Label efficiency results showing the discriminative performance when the training dataset for the primary endpoint is reduced to 1%, 5% and 10% while the helper tasks have access to all training labels. |
This is a useful finding, given the difficulties of annotating endpoint labels in EHR datasets, which frequently necessitates human evaluation by doctors. The ability to use numerous endpoints, some of which may be easier to label (like duration of stay or mortality), could lessen the need for manual curation on more difficult endpoints that are annotated differently (like mechanical ventilation).
Subgroup Performance
While the version of the MIMIC-III dataset used contained labels for gender and age, it did not contain information on race and the information on ethnicity was limited. We computed the performance of all selected models across age and gender subgroups. We observed that in the scenarios with few instances in the dataset, the MTL models (both SB models and SeqSNR) often outperform ST. Even though there are exceptions, on average all models seem to be relatively balanced across age and gender subgroups. We invite the reader to refer to the supplemental section of our paper for a detailed performance breakdown.
Next Steps
This work is a proof of concept for SeqSNR on a set of canonical EHR prediction tasks. The code for this architecture is publicly available here. And will hopefully stimulate further research in EHR multi-tasking and other deep learning architectures inspired by clinical reasoning.
In future, it will be important to evaluate the performance of SeqSNR on different combinations of tasks, different time horizons and different datasets. One other area of potential growth in this project is to expand subgroup analysis by including datasets with additional population information, race, ethnicity, etc. Another area we are exploring is expanding subgroup analysis by including datasets with additional population information, such as race, ethnicity, etc. We also emphasize that these are prototype models designed to showcase methodologies, and more rigorous evaluation would be needed to bring these tools into deployment.
Acknowledgements
This work involved collaborative efforts from a multidisciplinary team of researchers, software engineers, clinicians, and cross-functional contributors. We thank our co-authors: Eric Loreaux, Anne Mottram, Ivan Protsyuk, Natalie Harris, Sebastien Baur, Yuan Xue, Jessica Schrouff, Ali Connell, Alan Karthikesalingam, Martin Seneviratne from Google, Nenad Tomasev from Deepmind, and Hugh Montgomery from University College London. We also thank Zhe Zhao from Google Research and Kathryn Rough, Cian Hughes, Megumi Morigami and Doris Wong from Google Health for their input and review, and the MIMIC team for curating this open access dataset for the research community.


 An impressive array of NVIDIA GDC announcements elevates game development to the next level. Real-time ray tracing comes to Arm and Linux, DLSS gets an expansive update, the newly announced RTX Memory Utility enables efficient memory allocation, and Omniverse supercharges the development workflow.


 The DevKit is an integrated hardware-software platform for creating, evaluating, and benchmarking HPC, AI, and scientific computing applications for Arm server based accelerated platforms.
 At GDC 2021, NVIDIA introduced a suite of Omniverse apps and tools to simplify and accelerate game development content creation pipelines.


 NVIDIA Operators streamline installing and managing GPUs and NICs on Kubernetes to make the software stack ready to run the most resource-demanding workloads, such as AI, ML, DL, and HPC, in the cloud, data center, and at the edge.