Code Reading은 잘 작성되어 있는 프레임워크, 라이브러리, 툴킷 등의 다양한 프로젝트의 내부를 살펴보는 시리즈 입니다. 프로젝트의 아키텍처, 디자인철학이나 코드 스타일 등을 살펴보며, 구체적으로 하나하나 살펴보는 것이 아닌 전반적이면서 간단하게 살펴봅니다.
Series.
이번에 다뤄보고자 하는 라이브러리는 기본적인 추상화 기능을 제공하는 abc 에 대해서 알아보고자 합니다. Python은 동적 언어로서, 객체 지향과 함수형 등 다양한 패러다임을 지원하고 있습니다. abc 모듈은 여기서 객체 지향 프로그래밍을 위한 것입니다. 그럼 라이브러리의 안을 살펴보기 전에 간단하게 객체 지향에서의 추상화에 대해서 짚고 넘어겠습니다.
객체지향에서의 추상화
추상화에 대해서 «오브젝트»에서는 이렇게 이야기를 하고 있습니다.
추상화란 어떤 양상, 세부사항, 구조를 좀 더 명확하게 이해하기 위해 특정 절차나 물체를 의도적으로 생략하거나 감춤으로써 복잡도를 극복하는 방법이다.[Kramer07]
- 추상화에 의존하라 중에서

위의 다이어그램을 보면, 영화에는 할인정책이 있고 정책에는 조건들이 있다는 것을 이해할 수 있습니다. 이와 같이 추상화된 객체들 간의 협력을 통해서 직관적으로 이해할 수 있게 됩니다.
그리고 새로운 할인 정책 혹은 조건이 추가되어도 기존의 코드를 수정하지 않고 기능을 확장할 수 있게 되는 유연함 또한 추상화의 장점입니다.
Abstract Base Class(ABC)
이러한 추상화의 장점들을 사용하기 위해서 PEP3119 를 통해서, Python 창시자인 귀도 반 로섬이 제안하였습니다.
PEP3119
Rationale 부분을 보면, 다음과 같이 OOP에서 객체와 상호작용하는 방식에는 2가지 종류가 있다고 이야기하고 있습니다. 첫 번째로 Invocation (호출) 그리고 Inspection (검사) 입니다.
호출은 OOP 에서 상속, 합성등의 다형성에 의해서 호출되는 메서드를 의미합니다. Python에서는 mro() 를 통해서 메서드 호출 순서를 확인할 수가 있습니다. 이 호출을 통해서 코드 재사용이 가능해지는 것이죠.
class A:
    pass

class B(A):
    pass

class C(A):
    pass

class D(B, C):
    pass

>>> D.__mro__
(__main__.D, __main__.B, __main__.C, __main__.A, object)
다음으로 검사는 해당 객체가 어떤 클래스의 인스턴스인지 혹은 서브클래스인지, 외부에서 호출하는 속성값을 가지고 있는지, 또는 매서드를 가지고 있는지를 확인하여 해당 객체가 주어진 메시지를 처리할 수 있음을 의미합니다.
Code
abc 모듈이 지원하는 기능은 크게 2가지가 있습니다.
- 구현을 강제하는
@abstractmethod - 상속을 받은 객체를 서브클래스로 판단하는 것
그렇다면 차례대로 2가지 기능이 어떻게 구현되어 있는지 살펴보겠습니다.
@abstractmethod
# https://github.com/python/cpython/blob/3.9/Lib/abc.py#L7

def abstractmethod(funcobj):
    """A decorator indicating abstract methods.
    ...
    Usage:
        class C(metaclass=ABCMeta):
            @abstractmethod
            def my_abstract_method(self, ...):
                ...
    """
    funcobj.__isabstractmethod__ = True
    return funcobj
위와 같이 메서드에 abstract 여부만 체크해주고, 이 플래그를 이용해서 동작하게 되는 로직들은 Usage에 있는 것처럼, ABCMeta 에 구현이 되어있습니다. 이어서 다음 코드도 한 번 살펴보겠습니다.
# https://github.com/python/cpython/blob/3.9/Lib/_py_abc.py#L14

class ABCMeta(type):
   """Metaclass for defining Abstract Base Classes (ABCs).
   ...
   """

    _abc_invalidation_counter = 0

    def __new__(mcls, name, bases, namespace, /, **kwargs):
        cls = super().__new__(mcls, name, bases, namespace, **kwargs)
        # Compute set of abstract method names
        abstracts = {name
                     for name, value in namespace.items()
                     if getattr(value, "__isabstractmethod__", False)}
        for base in bases:
            for name in getattr(base, "__abstractmethods__", set()):
                value = getattr(cls, name, None)
                if getattr(value, "__isabstractmethod__", False):
                    abstracts.add(name)
        cls.__abstractmethods__ = frozenset(abstracts)
        ...
__new__ 는 Python의 built-in function 중에 하나로서, 객체가 생성될 때의 해당 로직들이 실행됩니다. 해당 부분의 코드를 보면 __isabstractmethod__ 여부를 체크해서 abstracts 를 구성하는 것을 알 수가 있습니다. 그렇지만 내부에서 따로 이 abstracts 여부를 확인하지는 않는 것 같아보였는데, 이 부분은 typeobject.c 코드에서 확인이 가능합니다.
// https://github.com/python/cpython/blob/3.9/Objects/typeobject.c#L3863

static PyObject *
object_new(PyTypeObject *type, PyObject *args, PyObject *kwds)
{
    ...
    abstract_methods = type_abstractmethods(type, NULL);
    ...  // 체크 후 조건이 충족되지 않으면
    PyErr_Format(PyExc_TypeError,
                     "Can't instantiate abstract class %s "
                     "with abstract method%s %U",
                     type->tp_name,
                     method_count > 1 ? "s" : "",
                     joined);
# 예시코드

from abc import ABCMeta

class A(metaclass=ABCMeta):

    def __init__(self):
        pass

    @abstractmethod
    def test(self):
        pass

class B(A):

    def __init__(self):
        pass

>>> b = B()
TypeError: Can't instantiate abstract class B with abstract methods test
예를 들면, abstractmethod 인 test 는 구현을 해야하는데, B 클래스 안에서 구현이 되어있지 않기 때문에 에러메시지가 뜨게 되는 것이죠.
subclass
추상 클래스를 상속받아서 구현하게 되는 경우, 이 클래스는 추상 클래스의 서브클래스가 됩니다.
서브클래스 판단 또한 간단하게 되어있습니다. 다시 ABCMeta 의 __new__ 부분으로 돌아가보겠습니다.
# https://github.com/python/cpython/blob/3.9/Lib/_py_abc.py#L48

  _abc_invalidation_counter = 0

  def __new__(...):
      ...
      # Set up inheritance registry
      cls._abc_registry = WeakSet()
      cls._abc_cache = WeakSet()
      cls._abc_negative_cache = WeakSet()
      cls._abc_negative_cache_version = ABCMeta._abc_invalidation_counter
      return cls
cls 즉, 클래스의 속성으로 사용되고 있는 값들은 모두 서브클래스를 관리하기 위함입니다. 간단하게 역할을 살펴보면 다음과 같습니다.
cls._abc_registry:register메서드를 통해서 서브클래스를 등록cls._abc_cache: 서브클래스일 경우 캐싱하는 용도cls._abc_negative_cache: 서브클래스가 아닌 경우를 캐싱하는 용도
추가적으로 살펴볼 것은 자료구조로 사용하고 있는 WeekSet 입니다. 약한 참조를 지원하는 weekref 모듈을 통해서 구성된 Set 자료구조입니다. 약한 참조란 무엇이고, 여기서 약한 참조가 왜 사용되었을까요?
흔히 강한 참조 (Strong Reference)와 약한 참조 (Weak Reference)로 나누어서 볼 수가 있는데, 이는 GC(Garbage Collection)에 의해서 사라지느냐 마느냐의 차이로 볼 수 있습니다. 강한 참조의 경우는 참조수(reference count)가 0이 되거나 메모리에서 해제될 때 제거되고, 약한 참조의 경우에는 참조수를 올리지 않기 때문에 GC에 의해서 매번 제거가 됩니다.
이렇게 쉽게 제거될 수 있는 성질은 Cache에 사용이 됩니다. Cache는 자주 등장하는 경우를 빠르게 처리할 수 있고, 제거가 되더라도 문제가 발생하지 않기 때문입니다. 그리고 메모리 누수를 미리 방지하기 위해서 사용하고 있다고 볼 수 있습니다.
추가적으로 negative cache 의 경우, DNS에서 존재하지 않는 호스트에 대한 요청을 캐싱하여 빠르게 답을 해주는 용도로 사용되는 방식입니다. 서브클래스 체크 또한 다양한 클래스와 비교를 하게 될 것이기 때문에, negative cache까지 구현되어 있는 것으로 이해가 됩니다. 비슷한 상황에서 써먹을 수 있을 것 같네요.
# https://github.com/python/cpython/blob/3.9/Lib/_py_abc.py#L54

def register(cls, subclass):
    """Register a virtual subclass of an ABC."""

# https://github.com/python/cpython/blob/3.9/Lib/_py_abc.py#L108

def __subclasscheck__(cls, subclass):
    """Override for issubclass(subclass, cls)."""
마지막으로 서브클래스 관련해서는 주요 메서드인 등록(register)과 체크정도(__subclasscheck__)가 있습니다. 내부의 코드는 단순한 편이라서 굳이 다루지 않아도 괜찮을 것 같습니다.
collections.abc
흔히 자주 사용되는 collections 에서도 이 abc 이 적용되어 있습니다. 바로 collections.abc 입니다. 여기에는 기본적인 자료구조들에 대한 추상 클래스를 제공하고 있습니다. 문서에 있는 리스트를 한번 살펴보겠습니다.

위 클래스를 상속해서 사용한다면, 해당 클래스에 맞춰서 메서드들을 구현해야 합니다. 굉장히 자주 쓰이는, 기본적인 자료구조형의 추상 베이스 클래스들이므로, 직관적으로 사용할 수 있을 것이라고 기대가 됩니다.
여기에 대한 코드는 여기에서 확인이 가능합니다. 간단히 정리하면 Metaclass가 믹스인으로 사용되고 , 서브클래스 체크용으로 __subclasshook__ 에서 메서드들을 확인하도록 되어있습니다.
끝으로
Python에서 지원하는 추상화 모듈인 abc에 대해서 코드와 함께 알아보았습니다. 조금 더 Pythonic 한 코드를 구현하고 싶다면, 위의 collections.abc 의 기본 추상화 클래스를 상속받아 필요한 기능들을 구현해서 사용해보는 것이 어떨까요?


 Carnegie Mellon University and University of California researchers developed a deep learning model that upgrades cosmological simulations from low to high resolution, allowing scientists to create a complex simulated universe within a day.
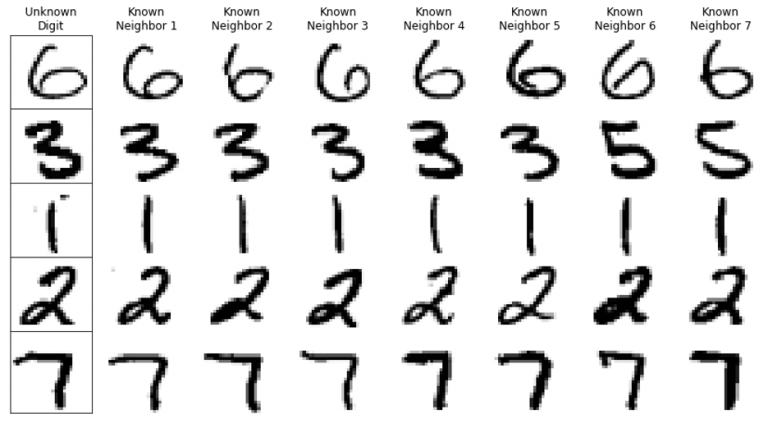
 k-Nearest Neighbors classification is a straightforward machine learning technique that predicts an unknown observation by using the k most similar known observations in the training dataset. In the second row of the example pictured above, we find the seven digits 3, 3, 3, 3, 3, 5, 5 from the training data are most similar to …


