
Code Reading은 잘 작성되어 있는 프레임워크, 라이브러리, 툴킷 등의 다양한 프로젝트의 내부를 살펴보는 시리즈 입니다. 이번 포스트에서는 직관적인 사용이 가능한 PyTorch 에 대해서 다뤄보겠습니다.
Code Reading
글쓰기에는 이러한 말이 아주 널리 퍼져 있습니다. “글쓰기를 잘 하려면 먼저 글을 많이 읽어라.” 코드를 작성하는 것에도 적용될 수 있는 말이라고 생각을 합니다. 사실 우리는 이미 글을 많이 읽고 있습니다. 버그를 고치면서 혹은 다양한 코드 예제를 구글링해서 찾아보기도 하고, 동료가 짠 코드를 이해해야 하는 일 등.. 우리는 수많은 코드들을 읽고 있습니다. 하지만 이런 글들을 많이 본다고 해서 좋은 글을 쓸 수 있을까요? 위 글에 대한 전제에는 이부분이 포함되어 있을 것입니다. “글쓰기를 잘 하려면 먼저 (좋은) 글을 많이 읽어라.”
그래서 더 좋은 코드를 작성하기 위해 널리 사용되고 있고, 잘 작성된 코드들의 내부를 살펴보면서 하나하나 읽어보려고 합니다.
이번 포스트에서 코드를 바라보는 기준은 ‘프레임워크’ 로서 바라보려고 합니다. 즉, 일관된 협력을 위해서 어떻게 설계를 하였는지, 그리고 사용자들이 어떤 식으로 재사용을 할 수 있도록 정의했는지 등을 보려고 합니다. 프레임워크에 대해서, 객체지향 설계 책 ≪오브젝트≫에서는 아래와 같이 정의하고 있습니다.
프레임워크란 ‘추상 클래스나 인터페이스를 정의하고 인스턴스 사이의 상호작용을 통해 시스템 전체 혹은 일부를 구현해 놓은 재사용 가능한 설계’, 또는 ‘애플리케이션 개발자가 현재의 요구사항에 맞게 커스터마이징할 수 있는 애플리케이션의 골격(skeleton)’을 의미한다. 첫 번째 정의가 프레임워크의 구조적인 측면에 초점을 맞추고 있다면 두 번째 정의는 코드와 설계의 재사용이라는 프레임워크의 사용 목적에 초점을 맞춘다.
- 15 Chapter 디자인패턴과 프레임워크 중에서
PyTorch

처음 다뤄보고 하는 프로젝트는 현재 제가 가장 많이 사용하고 있는 프레임워크인 PyTorch 입니다. 딥러닝에서는 TensorFlow 와 같이 가장 널리 쓰이고 있는 프레임워크로서, Dynamic Graph 기반의 명령형 제어흐름과 모듈 구성 그리고 Python으로 손쉽게 사용할 수 있는 특징이 있습니다. 이 특징들로 인해서 직관적인 코드 작성이 가능하고, 디버깅도 편하게 할 수 있으며, 모듈화가 정말 잘 되어 있어서 코드를 사용하는 입장에서 아주 편한 장점이 있습니다. 이런 이유들로 인해서 첫 Code Reading의 사례로 선정하기도 하였습니다.
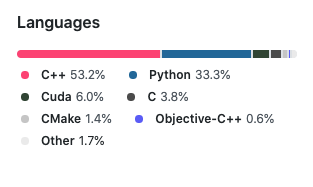
안타깝게도 코어는 C++ 으로 작성 되어있고, PyTorch는 이것을 python으로 사용할 수 있도록 wrapping 한 것입니다. 저의 내공이 부족하여 C++ 내부까지 자세히 살펴보지는 못하고 프레임워크로서 내부 구조와 Python 코드들을 위주로 살펴보려고 합니다. (그래서 살펴보는 코드의 반 이상은 빠져있지 않을까 싶네요..!)
프레임워크로서 살펴보는 것이기 때문에, 전체 코드를 살펴보는 것보다는 중심이 되는 코드들의 구조와 어떤 식으로 협력을 하는지, 또 사용자들이 쉽게 쓰기위한 특징 들은 무엇이 있는지 살펴보겠습니다.
먼저 전반적인 PyTorch의 특징은 다음과 같습니다.
- Tensor computation (like NumPy) with strong GPU acceleration
- Deep neural networks built on a tape-based autograd system
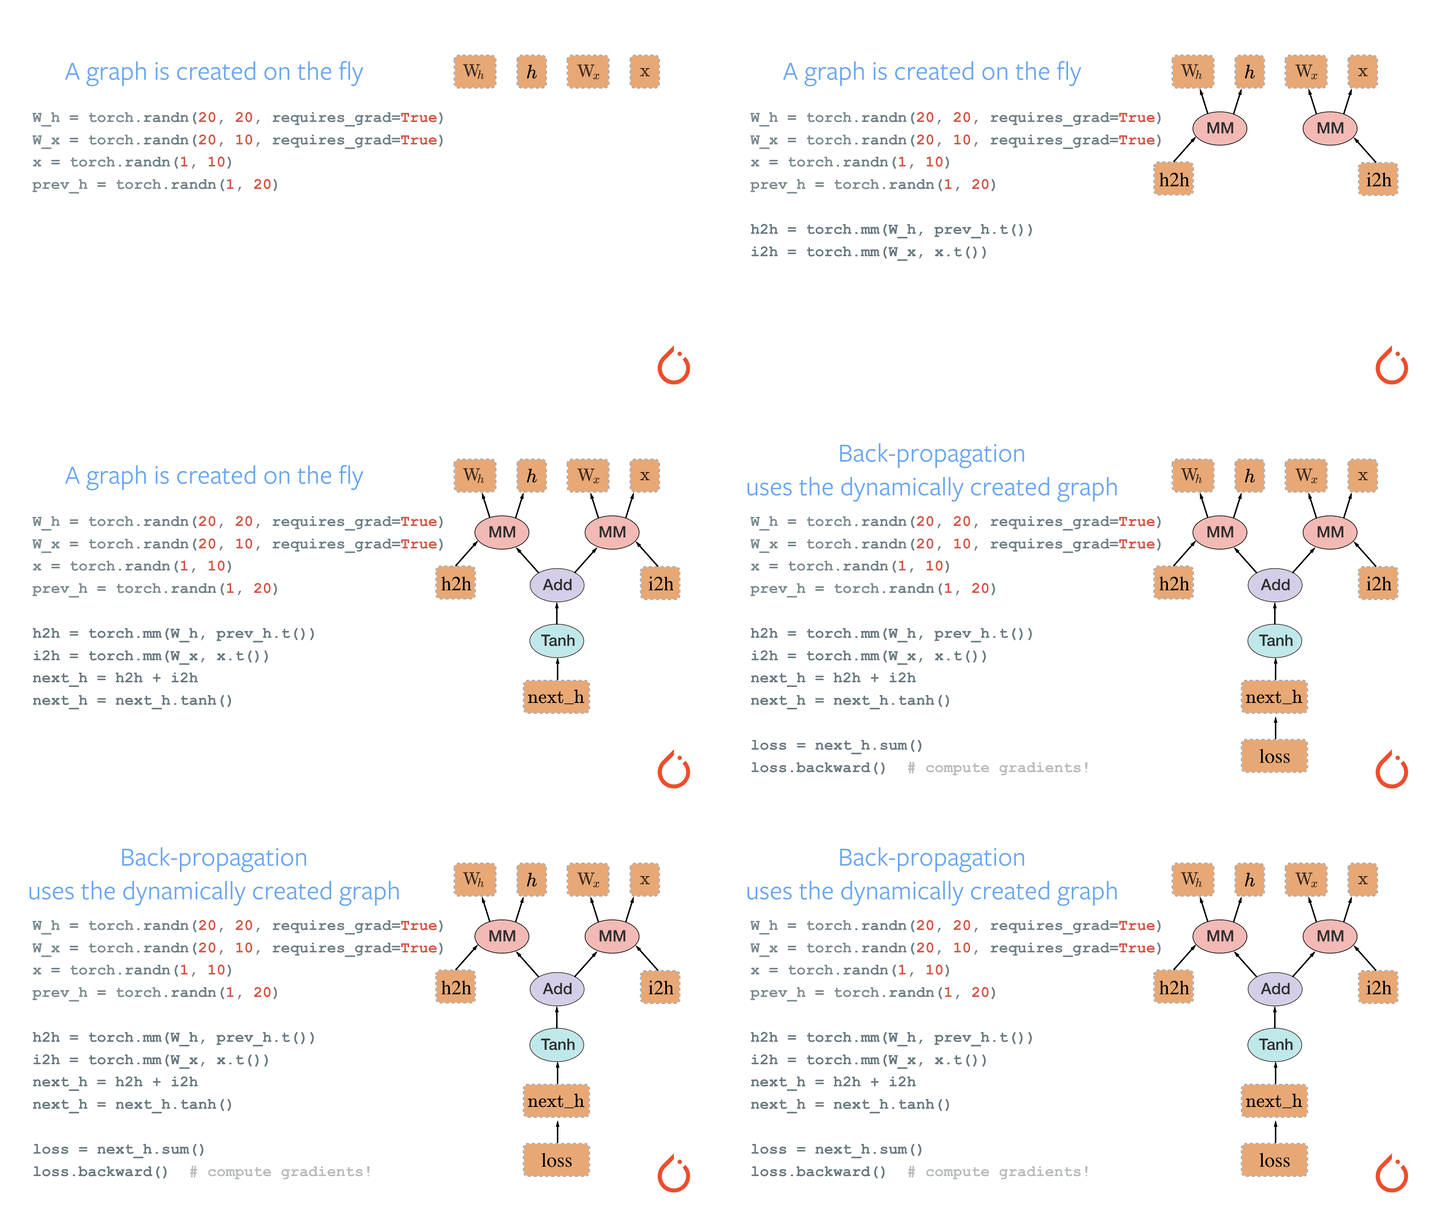
간단하게 직역하면, Numpy 에서 사용하는 방식을 거의 그대로 Tensor 를 다룰 수 있고, 이 Tensor 연산들을 코드로 작성 하면 위에 그림처럼, 자동으로 미분이 가능한 그래프가 그려지면서 backward 호출만 하면 되는 강력한 프레임워크라고 말할 수 있습니다.
다음으로는 Github 에 있는 각 packages 에 대한 간단한 설명입니다.
Packages
torch: numpy 유사한 Tensor, GPU 지원torch.autograd: 자동으로 backprop 이 가능하게 하는 패키지torch.jit: Just-in-time compilationtorch.nn: neural network 용, 유연성을 최대의 목표로 디자인torch.multiprocessing: data_loading, Hogwild training (without any locking)torch.utils: DataSet, DataLoader 등의 유틸들
여러가지 Package 들이 있지만, 이번에 제가 다뤄보고자하는 것은 torch, torch.autograd , torch.nn 입니다. (코드는 v1.6.0 을 기준으로 살펴보았습니다.)
torch.tensor
여기에서는 Tensor에 대해서 간단하게만 살펴보려고 합니다. (대부분이 C++ 이 베이스이기 때문이죠..)
Tensor는 논리적인 View로서 실제 물리적인 저장소인 Storage 와 같이 이루어져 있습니다.
아래의 Tensor 를 복사하는 부분의 코드를 보시면 확인할 수 있습니다. 논리적인 뷰에서의 설정값들인 offset, size, stride 를 넣게 되어 있습니다.
(stride에 대해서는 이 Stride Visualizer에서 조금 더 자세히 이해할 수 있습니다.)
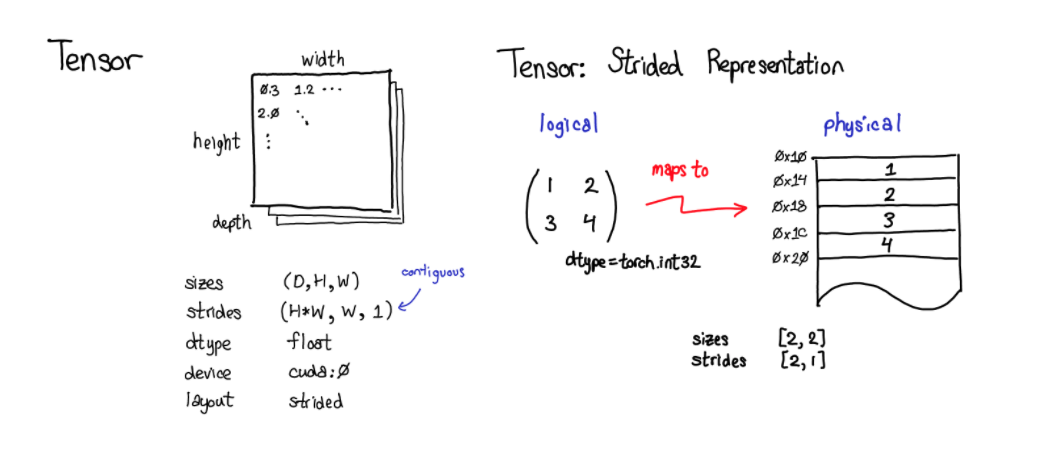
출처: http://blog.ezyang.com/2019/05/pytorch-internals/
# code: https://github.com/pytorch/pytorch/blob/v1.6.0/torch/tensor.py#L66

new_storage = self.storage().__deepcopy__(memo)
...

new_tensor = self.new()
new_tensor.set_(new_storage, self.storage_offset(), self.size(), self.stride())
new_tensor.requires_grad = self.requires_grad
단순하게 말하자면, Storage에는 물리적으로 매핑되는 값들이 관리되고 있고 storage_offset은 물리적인 주소에 대한 offset, strides 는 인덱스에 곱해지는 계수를 의미합니다. 이렇게 논리적 뷰/물리적 저장소가 나뉘어서 관리되고 있기 때문에, Tensor에 대한 단순 Transpose 등의 연산은 계산이 아주 단순하게 됩니다. 논리적인 뷰의 설정만 달라지면 되는 일이기 때문이죠.
Tensor에 대해서 조금 더 자세히 살펴보겠습니다. Tensor는 하나의 데이터 구조 입니다.
# code: https://github.com/pytorch/pytorch/blob/v1.6.0/torch/tensor.py#L35

class Tensor(torch._C._TensorBase):
    ...
# https://github.com/pytorch/pytorch/blob/v1.6.0/torch/_C/__init__.pyi.in

# Defined in torch/csrc/autograd/python_variable.cpp
class _TensorBase(object):
    requires_grad: _bool
    shape: Size
    data: Tensor
    names: List[str]
    device: _device
    dtype: _dtype
    layout: _layout
    real: Tensor
    imag: Tensor
    T: Tensor
    ndim: _int
    _version: _int
    _base: Optional[Tensor]
    grad_fn: Any
    ${tensor_method_hints}
위와 같은 속성들을 가지고 있는 것을 알 수 있습니다. 주요하게는 각 Tensor 마다 requires_grad 을 가지고 있고, grad_fn 또한 가지고 있는데요, PyTorch를 v0.4.0 버전 전부터 사용하시던 분들은 이후에 업데이트 된 내용이 눈에 들어오실 것 입니다. 바로 torch.autograd.Variable 이 Tensor 로 합쳐진 것이죠. 주석의 파일 경로를 보면 그 이전에는 Tensor 대신에 Variable 을 사용했던 것을 짐작할 수 있습니다. (/autograd/)
이렇게 데이터에 대한 속성들을 설정하는 것 외에도 코드 상에는 backward 라는 매서드를 가지고 있습니다. 이 함수는 바로 autograd package 로 연결이 되어 있습니다. 이를 통해서, 각 Tensor는 backward 메서드를 가지고 있지만 실질적으로 해당 로직은 autograd 에서 처리됨을 알 수 있습니다.
# code: https://github.com/pytorch/pytorch/blob/v1.6.0/torch/tensor.py#L155

def backward(self, gradient=None, retain_graph=None, create_graph=False, inputs=None):
    r"""Computes the gradient of current tensor w.r.t. graph leaves.

        The graph is differentiated using the chain rule.
    ...
    torch.autograd.backward(self, gradient, retain_graph, create_graph, inputs=inputs)
backward 메소드에 의해서 각 Tensor 에 누적되는 gradient → grad.
# code: https://github.com/pytorch/pytorch/blob/v1.6.0/torch/tensor.py#L725

    @property
    def grad(self):
        """
        This attribute is ``None`` by default and becomes a Tensor the first time a call to
        :func:`backward` computes gradients for ``self``.
        The attribute will then contain the gradients computed and future calls to
        :func:`backward` will accumulate (add) gradients into it.
        """
        ...
        return self._grad
또 한가지 눈 여겨서 볼 매서드는 register_hook 입니다.
# code: https://github.com/pytorch/pytorch/blob/v1.6.0/torch/tensor.py#L187

def register_hook(self, hook):
    r"""Registers a backward hook.

    The hook will be called every time a gradient with respect to the
    Tensor is computed. The hook should have the following signature::
      hook(grad) -> Tensor or None
    ...

    Example::
      >>> v = torch.tensor([0., 0., 0.], requires_grad=True)
      >>> h = v.register_hook(lambda grad: grad * 2)  # double the gradient
      >>> v.backward(torch.tensor([1., 2., 3.]))
      >>> v.grad
       2
       4
       6
      [torch.FloatTensor of size (3,)]
      >>> h.remove()  # removes the hook
Docstring 에 적혀있는 것처럼, hook 은 backward 가 호출 될때마다, 등록한 hook의 함수가 불러지는 것을 알 수 있습니다. 이는 각각의 상황에 맞춰서 gradient를 조절하는 hook이 등록될 수 있음을 의미합니다.
torch.autograd
다음으로는 이어서 autograd 팩키지를 살펴보겠습니다. 이 부분에 대한 소개는 다음과 같습니다.
Autograd is a hotspot for PyTorch performance, so most of the heavy lifting is implemented in C++. This implies that we have to do some shuffling between Python and C++; and in general, we want data to be in a form that is convenient to manipulate from C++.
성능에 주요한 부분으로서 C++ 으로 구현되어 있다는 것을 아실 수 있을 것 입니다. 여기에서 가장 중요한 컨셉은 Node, Function 이 2가지가 될 것입니다. Node 는 그래프에 대한 로직들, Function 은 forward, backward 에 대한 로직들을 담고 있다고 봐주시면 됩니다.
먼저 위의 Tenosr 의 backward 가 연결되는 autograd.backward 함수를 보시겠습니다.
# code: https://github.com/pytorch/pytorch/blob/v1.6.0/torch/autograd/__init__.py#L57

def backward(
    tensors: _TensorOrTensors,
    grad_tensors: Optional[_TensorOrTensors] = None,
    retain_graph: Optional[bool] = None,
    create_graph: bool = False,
    grad_variables: Optional[_TensorOrTensors] = None,
) -> None:
    r"""Computes the sum of gradients of given tensors w.r.t. graph leaves.
    ...
    """

    ...
    Variable._execution_engine.run_backward(
        tensors, grad_tensors, retain_graph, create_graph,
        allow_unreachable=True)  # allow_unreachable flag
이 부분이 chain rule 에 따라서 계산된 gradient (grad_tensors ) 가 명령형 엔진에 의해서 계산되고, 각 텐서에 grad 값을 누적시키게 됩니다.
다음으로 PyTorch 문서에는 Custom Function을 구현할 수 있는, 확장에 대한 방법이 정리되어 있습니다. autograd 에 정의가 되어 있는 Function 을 상속하면서 필요한 메서드들을 구현하면 되는 것 입니다. 바로 forward와 backward 를 추가하는 것이죠. 아래 코드의 예제를 보면 이해가 갈 것이라 생각이 됩니다.
# Inherit from Function
class LinearFunction(Function):

    # Note that both forward and backward are @staticmethods
    @staticmethod
    # bias is an optional argument
    def forward(ctx, input, weight, bias=None):
        ctx.save_for_backward(input, weight, bias)
        output = input.mm(weight.t())
        if bias is not None:
            output += bias.unsqueeze(0).expand_as(output)
        return output

    # This function has only a single output, so it gets only one gradient
    @staticmethod
    def backward(ctx, grad_output):
        # This is a pattern that is very convenient - at the top of backward
        # unpack saved_tensors and initialize all gradients w.r.t. inputs to
        # None. Thanks to the fact that additional trailing Nones are
        # ignored, the return statement is simple even when the function has
        # optional inputs.
        input, weight, bias = ctx.saved_tensors
        grad_input = grad_weight = grad_bias = None

        # These needs_input_grad checks are optional and there only to
        # improve efficiency. If you want to make your code simpler, you can
        # skip them. Returning gradients for inputs that don't require it is
        # not an error.
        if ctx.needs_input_grad[0]:
            grad_input = grad_output.mm(weight)
        if ctx.needs_input_grad[1]:
            grad_weight = grad_output.t().mm(input)
        if bias is not None and ctx.needs_input_grad[2]:
            grad_bias = grad_output.sum(0)

        return grad_input, grad_weight, grad_bias
위에서 확인하신 것처럼 Function 은 필요한 메서드들을 미리 정의해놓은 추상 클래스라고 말할 수 있습니다. 이제 코드 내부로 가서 이 Function 이 어떻게 구현되어 있는지 살펴보겠습니다.
# code: https://github.com/pytorch/pytorch/blob/v1.6.0/torch/autograd/function.py#L110

class Function(with_metaclass(FunctionMeta, _C._FunctionBase, _ContextMethodMixin, _HookMixin)):
    r"""Records operation history and defines formulas for differentiating ops.
    ...
Function 이라는 객체는 FunctionMeta 라는 Meta Class 로 만들어지며, _FunctionBase 를 상속하고, _ContextMethodMixin 와 _HookMixin 를 통해 인터페이스로 확장이 되어 있다는 것을 알 수 있습니다. 조금 더 자세히 이해를 하려면, Python 이 지원하는 Meta Class와 Mixin에 대해서 간단히 이야기할 필요가 있을 것 같습니다.
Meta Class
메타 클래스에 대해서는 설명이 잘 되어있는 글을 참고해주시면 좋겠습니다. 메타 클래스에 대해서 알고 있다는 가정하에 글을 더 진행해보겠습니다. 메타클래스는 간단하게 아래와 같이 정의가 됩니다.
metaclass ——> (인스턴스) class ——> (인스턴스) object
메타클래스는 대부분 건드릴 일이 없으며, Python의 class를 수정하고 싶을 때 사용할 수 있습니다. 아래와 같이 __init__ , __new__ , __**prepare__** 등 클래스의 빌트인 매서드들을 수정할 수 있습니다.
# https://github.com/pytorch/pytorch/blob/v1.6.0/torch/_six.py#L39

def with_metaclass(meta, *bases):
    """Create a base class with a metaclass."""
    # This requires a bit of explanation: the basic idea is to make a dummy
    # metaclass for one level of class instantiation that replaces itself with
    # the actual metaclass.
    class metaclass(meta):

        def __new__(cls, name, this_bases, d):
            return meta(name, bases, d)
    return type.__new__(metaclass, 'temporary_class', (), {})
그럼 다시 Function 에서 사용되는 with_metaclass 는 어떤 역할을 하는지 살펴보겠습니다. 단순하게 이 코드는 정해진 Meta에 따라서, ‘temporay_class’ 라는 이름으로서 클래스들을 생성 하는 것입니다. Syntactic Sugar에 해당하는 경우라고 볼 수 있을 것 같습니다.
다음으로 넘어가서 여기 meta 에 연결되는 FunctionMeta 를 확인해볼까요?
FunctionMeta 는 생성자(__init__)에서 backward_fn 에 해당 Function 의 backward 메서드를 연결하는 역할을 합니다.
아래의 type 은 코드에 있는 것처럼, 동적으로 클래스를 생성하는 함수로 사용이 됩니다. BackwardCFunction 객체를 만들어서 _forward_cls 와 backward 메소드가 연결되는 것이죠.
# code : https://github.com/pytorch/pytorch/blob/v1.6.0/torch/autograd/function.py

class BackwardCFunction(_C._FunctionBase, _ContextMethodMixin, _HookMixin):
    _is_legacy = False

    def apply(self, *args):
        return self._forward_cls.backward(self, *args)

class FunctionMeta(type):
    """Function metaclass.
    ...
    """

    def __init__(cls, name, bases, attrs):
       ...

       backward_fn = type(name + 'Backward', (BackwardCFunction,), {'_forward_cls': cls})
       cls._backward_cls = backward_fn
여기서 Function 과 BackwardCFunction 은 다중상속이 되어있는 것을 보셨을 것 입니다. 이렇게 구성된 두 클래스가 어떻게 동작하는지 이해하기 위해서는 Python의 상속구조를 이해하는 것이 필요합니다. 아래의 Class.mro() 를 통해서 객체의 매서드 실행 순서를 확인할 수가 있습니다. 호출되는 메서드를 찾을때 왼쪽부터 차례로 오른쪽으로 가는 것이죠.
class BackwardCFunction(_C._FunctionBase, _ContextMethodMixin, _HookMixin):
   ...

# BackwardCFunction.mro() : 해당 객체의 메서드 실행 순서를 표현합니다. (mro -> Method Resolution Order)
# [__main__.BackwardCFunction, __main__._C._FunctionBase, __main__._ContextMethodMixin, __main__._HookMixin, object]
Base가 두개가 되는 것은 흔히 알려져있는 다이아몬드 문제를 야기합니다. 대신 Mixin 이라는 방식을 통해서 다중상속을 하게 됩니다. 그래서 보통 Mixin 에는 attribute 보다는 method 확장이 주로 사용이 됩니다.
실제로 위 코드의 _ContextMethodMixin, _HookMixin 메서드 확장을 위해서 사용이 되고 있습니다.
믹스인에 대해서 보충 설명을 하자면, ≪오브젝트≫ 에서는 이렇게 정의를 하고 있습니다.
믹스인(mixin)은 객체를 생성할 때 코드 일부를 클래스 안에 섞어 넣어 재사용하는 기법을 가리키는 용어다. 합성이 실행 시점에 객체를 조합하는 재사용 방법이라면 믹스인은 컴파일 시점에 필요한 코드 조각을 조합하는 재사용방법이다.
- 04 믹스인 중에서
다시 본론으로 돌아와서, Function 클래스의 내부를 살펴보겠습니다.
class Function(with_metaclass(FunctionMeta, _C._FunctionBase, _ContextMethodMixin, _HookMixin)):
    ...

    # for the tracer
    is_traceable = False

    @staticmethod
    def forward(ctx: Any, *args: Any, **kwargs: Any) -> Any:
        raise NotImplementedError("You must implement the forward function for custom"
                                  " autograd.Function.")

    @staticmethod
    def backward(ctx: Any, *grad_outputs: Any) -> Any:
        raise NotImplementedError("You must implement the backward function for custom"
                                  " autograd.Function.")
위와 같이 forward 그리고 backward 를 정의하도록 가이드하면서, 추상클래스로서의 역할을 하고 있는 것을 확인할 수 있습니다. 코드 내에는 공식적으로 InplaceFuction 그리고 NestedIOFunction 만 작성되어 있기는 하지만, 처음 예시로 봤던 LinearFunction 처럼 수 많은 연산로직들이 이 Function 의 정의된 규격을 따라가면 재사용이 가능함을 알 수 있습니다.
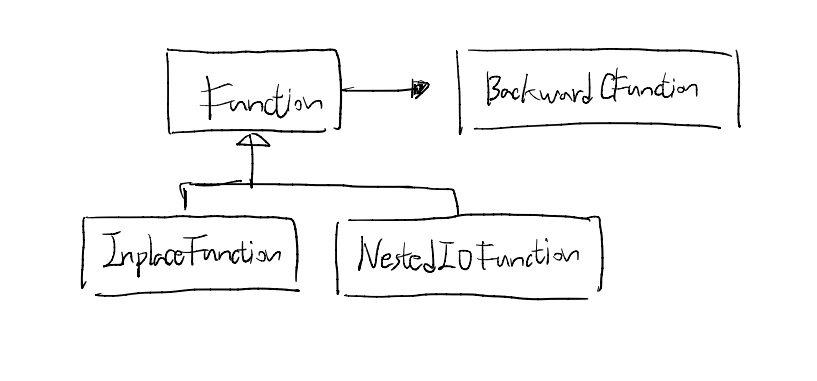
일관된 객체들 간의 협력이 요구되는 프레임워크이기 때문에, 많은 연산의 기본이 되는 Function 클래스를 확인할 수 있었습니다. 다음으로는 PyTorch를 사용하신 분들은 친숙하게 느끼실 torch.nn 입니다.
torch.nn
여기부터는 순수 Python으로 코드가 구성되어 있습니다. 수 많은 코드들 중에서 살펴보려고 하는 것은 가장 기본이 되는 Module 클래스입니다. Python으로 전체가 구성되어 있는 것만큼, 여기에서는 모든 코드들이 typing 을 통해서 자료형이 모두 명시되어 있습니다.
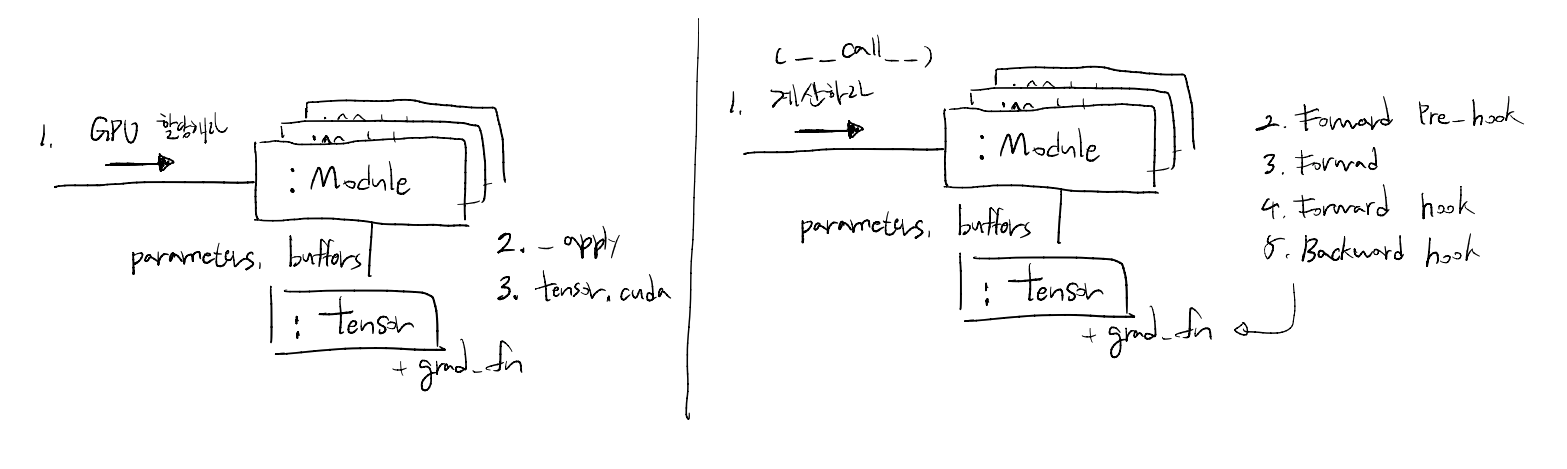
먼저 주어진 책임을 살펴보겠습니다.
- 할당된 Tensor 관리 (Parameters, Buffer)
- GPU 할당, 타입 변환, state_dict 저장 및 로드
- Forward: 주어진 입력을 계산해서 반환
- Forward 연산 및 Backward 등록
위의 책임에 따라서 필요한 속성들은 다음과 같이 확인할 수 있습니다.
(여기에서는 객체지향애 관련된 문법들이 포함되어 있기도 합니다. Python 에서 일반적으로 변수이름 은 public, _변수이름 은 private를 의미하게 되죠.)
training: (bool) 학습 모드 여부_parameters: (OrderedDict) Learnable Parameters_buffers: (OrderedDict) module 에서 사용은 되나, Parameter 는 아닌 경우 (persistent, non-persistent)_non_persistent_buffers_set: (OrderedDict) persistent 의 여부를 관리하는 자료구조_backward_hooks: (OrderedDict) Tensor에도 있었던register_hook과 같은 로직으로, backward 에 사용_forward_hooks: (OrderedDict) Tensor에도 있었던register_hook과 같은 로직으로, forward 에 사용_forward_pre_hooks: (OrderedDict)Tensor에도 있었던register_hook과 같은 로직으로, forward 전에 사용_state_dict_hooks: (OrderedDict) 모듈의 state_dict를 만들 때, hook 로직 사용_load_state_dict_pre_hooks: (OrderedDict) 모듈의 state_dict를 기반으로 load 할때, 로드 전 hook 로직 사용_modules: (OrderedDict) 해당Module의 자식 Module들을 관리하기 위한 자료구조
위의 속성들을 보면 해당 Module 이 다양한 상황들을 커버하기 위해서 열어놓은 부분들이 눈에 보일 것 입니다. 가장 크게는 hook 이 모든 연산과 심지어는 저장(state_dict())과 로드(load_state_dict()) 에도 들어가고 있습니다. 다양한 세부적인 Module 들이 만들어질 수 있고, 무엇이 어떻게 추가될지 모르기 때문에 위와 같이 열어둔 것으로 이해가 되네요.
hook 에 대해서 코드를 자세히 살펴보기 전에, 먼저 Module의 기본 사용법에 대해서 잠시 이야기를 해보겠습니다. 일반적으로 Module을 새로 정의할 때는 아래와 같이 sub-module 들을 정의하고, 그에 따른 forward 메서드를 정의하면 됩니다.
# code: https://github.com/pytorch/pytorch/blob/v1.6.0/torch/nn/modules/module.py#L169

import torch.nn as nn
import torch.nn.functional as F

class Model(nn.Module):
	  def __init__(self):
	      super(Model, self).__init__()
	      self.conv1 = nn.Conv2d(1, 20, 5)
	      self.conv2 = nn.Conv2d(20, 20, 5)

	  def forward(self, x):
	      x = F.relu(self.conv1(x))
	      return F.relu(self.conv2(x)
이렇게 self.conv1 로 정의를 하면 다음의 메서드가 자연스럽게 호출됩니다. 바로 __setattr__ 입니다.
# code: https://github.com/pytorch/pytorch/blob/v1.6.0/torch/nn/modules/module.py#L774

def __setattr__(self, name: str, value: Union[Tensor, 'Module']) -> None:
    if isinstance(value, Parameter):
        ...
    elif params is not None and name in params:
        ...
    else:
        modules = self.__dict__.get('_modules')
        if isinstance(value, Module):
            ...
        elif modules is not None and name in modules:
            ...
        else:
            buffers = self.__dict__.get('_buffers')
위와 같이 Module 안에 정의된 속성이 어떤 객체 인가에 따라서, Parameter 로서 등록이 될 수도 있고, Module 혹은 Buffer 로도 등록이 될 수 있습니다. 이것 역시 Python의 빌트인(__builtlins__)로 미리 정의되어 있는 내장 함수입니다. Class 가 가지는 기본 속성들을 Module 이라는 Class에 맞는 직관적인 사용법으로 변환시킨 것이죠.
다음으로는 모델이 output 을 만드는 코드를 살펴보겠습니다. 바로 hook 이 연결되어 있는 부분이기도 하죠. 위의 Module은 다음과 같은 방식으로 사용하게 됩니다.
model = Model()
ouptuts = model(inputs)  # Model 의 __call__ 로 연결
위와 같이 model 이 넘겨 받는 부분은 __call__ 이라는 빌트인 함수로 연결이 됩니다.
# code: https://github.com/pytorch/pytorch/blob/v1.6.0/torch/nn/modules/module.py#L710

def _call_impl(self, *input, **kwargs):
    # 1. Forward Pre-hook
    for hook in itertools.chain(
            _global_forward_pre_hooks.values(),
            self._forward_pre_hooks.values()):
        result = hook(self, input)
        if result is not None:
            if not isinstance(result, tuple):
                result = (result,)
            input = result

    # 2. Forward
    if torch._C._get_tracing_state():
        result = self._slow_forward(*input, **kwargs)
    else:
        result = self.forward(*input, **kwargs)  # 우리가 정의하는 forward

    # 3. Forward Hook
    for hook in itertools.chain(
            _global_forward_hooks.values(),
            self._forward_hooks.values()):
        hook_result = hook(self, input, result)
        if hook_result is not None:
            result = hook_result

    # 4. Backward Hook 등록
    if (len(self._backward_hooks) > 0) or (len(_global_backward_hooks) > 0):
        var = result
        while not isinstance(var, torch.Tensor):
            if isinstance(var, dict):
                var = next((v for v in var.values() if isinstance(v, torch.Tensor)))
            else:
                var = var[0]
        grad_fn = var.grad_fn
        if grad_fn is not None:
            for hook in itertools.chain(
                    _global_backward_hooks.values(),
                    self._backward_hooks.values()):
                wrapper = functools.partial(hook, self)
                functools.update_wrapper(wrapper, hook)
                grad_fn.register_hook(wrapper)
    return result

__call__ : Callable[..., Any] = _call_impl
위의 코드를 보면 __call__ 에는 우리가 정의하는 forward 외에도 많은 로직들이 있음을 알 수 있습니다. 각 부분을 나누어서 주석을 추가하였습니다. 내부에서는 생각보다 많은 일들을 하고 있었네요!
Forward Pre-hook → Forward → Forward Hook → Backward Hook 등록 (grad_fn)
처음 예제에서 보신 것처럼, Module 안에는 Sub-Module 들이 정의되고 순차적으로 __call__ 이 호출되게 됩니다. 이때마다 위와 같은 로직이 실행되게 되는 것이죠.
그 외에 참고할 만한 직관적인 코드를 하나 더 살펴보고자 합니다.
    @overload
    def to(self: T, device: Optional[Union[int, device]] = ..., dtype: Optional[Union[dtype, str]] = ...,
           non_blocking: bool = ...) -> T:
        ...

    @overload
    def to(self: T, dtype: Union[dtype, str], non_blocking: bool = ...) -> T:
        ...

    @overload
    def to(self: T, tensor: Tensor, non_blocking: bool = ...) -> T:
        ...

    def to(self, *args, **kwargs):

        device, dtype, non_blocking, convert_to_format = torch._C._nn._parse_to(*args, **kwargs)

        if dtype is not None:
            if not dtype.is_floating_point:
                raise TypeError('nn.Module.to only accepts floating point '
                                'dtypes, but got desired dtype={}'.format(dtype))

        def convert(t):
            if convert_to_format is not None and t.dim() == 4:
                return t.to(device, dtype if t.is_floating_point() else None, non_blocking, memory_format=convert_to_format)
            return t.to(device, dtype if t.is_floating_point() else None, non_blocking)

        return self._apply(convert)
Java 혹은 다른 객체지향 언어들을 사용해봤다면, 위와 같은 overload 는 익숙할 것이라고 생각이 됩니다. 같은 메소드의 이름을 가지고 있으나, 요구하고 있는 파라미터가 다른 경우를 의미합니다. 시그니처가 다르다고 표현을 할 수 있죠.
typing 에서는 위와 같은 문법으로서 기능을 지원합니다. (참고로, typing 은 Python 3.5 부터 지원이 되고 있고, 그 이전 버전들을 위해서 [pip](https://pypi.org/project/typing/) 를 통해서 팩키지를 설치할 수 있습니다.)
다시 module.to(...) 라는 매서드로 돌아가서 보면, device(cpu/gpu), dtype 등의 연상장비 지정, 타입 변환 등을 한꺼번에 다룰 수 있는 모습을 보이고 있습니다. 사용을 하는 입장에서는 다른 것들을 신경쓰지 않고 to 라는 메소드에 원하는 것을 넣기만 하면 되는 것이죠.
끝으로
지금까지 이야기한 것을 간단하게 정리해보겠습니다. 가장 기본이 되는 Tensor 와 autograd.Function 그리고 nn.Module 에 대해서 살펴보았습니다. 데이터 클래스로서 필요한 속성들이 명시되어 있고, 그것을 forward , backward 로 큰 틀을 잡아놓고 수 많은 연산들이 여기에 맞춰서 추가되고 있습니다. 그리고 이 연산들을 하나의 Module 로서 마음껏 조합해서 사용할 수 있도록 준비가 되어있죠.
PyTorch 는 객제치향의 여러가지 특징을 잘 살린 프레임워크라고 생각이 됩니다. 그와 동시에 Python 언어가 가지는 특징들 또한 잘 활용하여 사용자들이 직관적으로 코드를 작성할 수 있도록 돕고 있습니다.
References
- Inside 245-5D – PyTorch internals : http://blog.ezyang.com/2019/05/pytorch-internals/
- PyTorch Doc – Extending PyTorch : https://pytorch.org/docs/stable/notes/extending.html#extending-torch-autograd
- tech.ssut – Python의 metaclasses(메타클래스) 이해하기 : https://tech.ssut.me/understanding-python-metaclasses/
- A Tour of PyTorch Internals
- Part 1 : https://pytorch.org/blog/a-tour-of-pytorch-internals-1/
- Part 2 The Build System : https://pytorch.org/blog/a-tour-of-pytorch-internals-2/
- Python Doc – functools : https://docs.python.org/3/library/functools.html
- Python Doc – itertools : https://docs.python.org/3/library/itertools.html
- Python Doc – typing : https://docs.python.org/3/library/typing.html