
 In the field of medicine, advancements in artificial intelligence are constantly evolving. To keep up with the pace of innovation means adapting and providing the best experience to researchers, clinicians, and data scientists. NVIDIA Clara Train, an application framework for training medical imaging models, has undergone significant changes for its upcoming release at the beginning … Continued
In the field of medicine, advancements in artificial intelligence are constantly evolving. To keep up with the pace of innovation means adapting and providing the best experience to researchers, clinicians, and data scientists. NVIDIA Clara Train, an application framework for training medical imaging models, has undergone significant changes for its upcoming release at the beginning of May, with product enhancements for better AI model training.
In this post, I cover three new major features introduced in Clara Train 4.0:
- Upgrade of the underlying infrastructure of Clara Train based on MONAI.
- Expansion into digital pathology, with a training pipeline to help you get started.
- Update of the DeepGrow model to annotate organs effectively in 3D images.
The Clara Train Early Access program gives you access to all features: Sign up today!
First, Clara Train has updated its backend infrastructure to use MONAI, the Medical Open Network for AI. MONAI is an open-source, PyTorch-based framework that provides domain-optimized foundational capabilities for healthcare. This community-led library helps create reproducible experiments by reducing the need for duplication or re-implementation. Figure 2 shows the three layers that make up Clara Train.
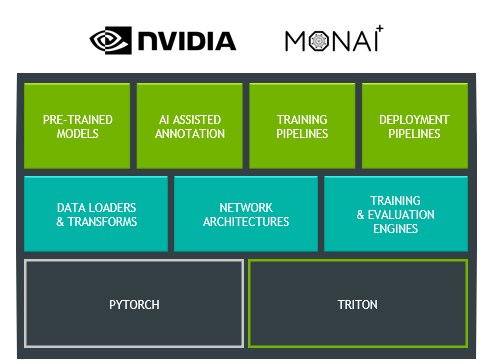
The top layer includes pretrained models that can be downloaded from the NGC catalog and which are now updated to work with MONAI. You can also continue to use all the features already in Clara Train, like AI-assisted annotation, federated learning, and training and deployment pipelines.
Specialized for training medical imaging models, the middle layer showcases MONAI components. These include data loaders and transforms, network architectures, and training and evaluation engines. MONAI aims to provide a comprehensive list of medical image–specific transformations and reference networks that provides flexibility and code readability.
The bottom layer highlights the two base frameworks that make up the foundation of MONAI and Clara Train. By being built on top of PyTorch, you receive all the benefits of using one of the most widely used machine learning frameworks, as well as the community support. For inference, Clara Train uses NVIDIA Triton, which simplifies the deployment of AI models and maximizes GPU utilization.
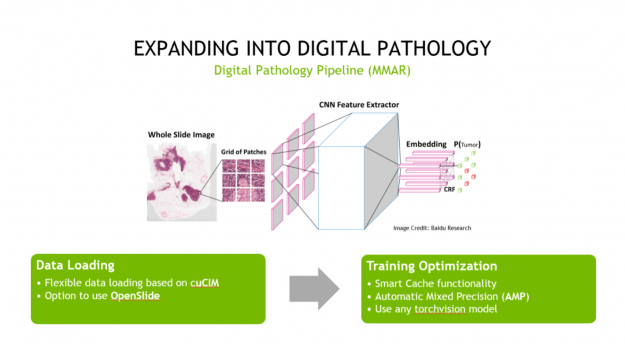
Second, Clara Train is expanding into digital pathology. And although digital pathology is an imaging workload, it differs significantly from radiology in its details and challenges. To help address these challenges, we’ve created a digital pathology pipeline.
This pipeline includes optimized data loading using cuCIM, which can tile large datasets on-demand and process them through a CUDA-enabled pipeline. It also includes training optimizations like Smart Cache, which re-uses a portion of data in memory at each epoch and produces a more efficient training workflow. Last, it includes a fully convolutional classification network that works with whole-slide images. All these features provide you with up to a 10x speedup in training, compared to other pathology pipelines.
To use cuCIM outside Clara Train, you can install it using pip by issuing the following command:
pip install cucim
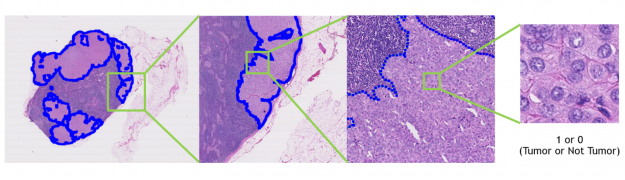
We’ve also included a pretrained model that detects tumors in lymph nodes using whole-slide histopathology images. You can use this model to create your own digital pathology model.
Last, we’ve updated the DeepGrow model to work on 3D CT images. This updated model gives you the ability to segment an organ in 3D with only a few clicks across the organ. If you’re looking to create an organ-specific, DeepGrow 3D model, we’ve provided a pipeline to help you get started quickly.
Federated learning with homomorphic encryption
In Clara Train 4.0, we also added homomorphic encryption tools for federated learning. Homomorphic encryption allows you to compute data while the data is still encrypted.
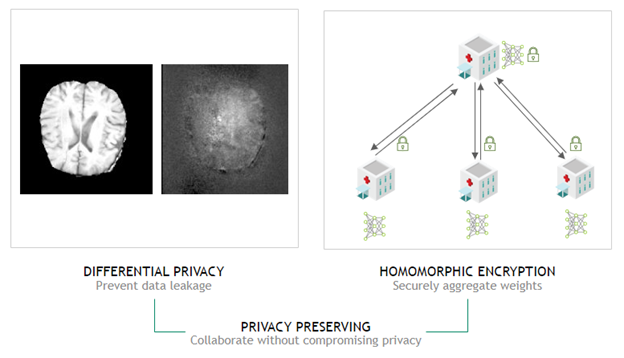
In Clara Train 3.1, all clients used certified SSL channels to communicate their local model updates with the server. The SSL certificates are needed to establish trusted communication channels and are provided through a third party that runs the provisioning tool and securely distributes them to the hospitals. This secures the communication to the server, but the server can still see the raw model (unencrypted) updates to do aggregation.
With Clara Train 4.0, the communication channels are still established using SSL certificates and the provisioning tool. However, each client optionally also receives additional keys to homomorphically encrypt their model updates before sending them to the server. The server doesn’t own a key and only sees the encrypted model updates. With homomorphic encryption, the server can aggregate these encrypted weights and then send the updated model back to the client. The clients can decrypt the model weights because they have the keys and can then continue with the next round of training.
Homomorphic encryption ensures that each client’s changes to the global model stays hidden by preventing the server from reverse-engineering the submitted weights and discovering any training data. This added security comes at a computational cost on the server. However, it can play an important role in healthcare in making sure that patient data stays secure at each hospital while still benefiting from using federated learning with other institutions.
Bring your own components to Clara Train
MONAI provides a lot of domain-specific functionality directly through their transformations, loss, and metric functions. These core components are independent modules and can be integrated into any PyTorch program. However, if you’re a researcher and developing state-of-the-art models, these components might not be sufficient.
When this is the case, you can include your own custom functions directly into Clara Train through the bring your own components (BYOC) functionality. By writing your components modularly and in Python, you can add them to the training configuration file.
Before getting started, you must define the Medical Model Archive (MMAR). In Clara Train, an MMAR defines a standard structure for organizing all artifacts produced during the model development life cycle and defining your training workflow. You modify these configuration files to add in your custom functions.
Here’s an example of how to do this by adding your own custom network architecture and loss function. First, start by defining these functions in their own Python file. For this example, assume that your custom functions are in a BYOC folder to make sure that you keep everything organized. This also allows you to see how the pathing works for calling out to your custom function from within the MMAR config file.
{
  "epochs": 10,
  "use_gpu": true,
  "multi_gpu": false,
  "amp": true,
  "determinism": {    },
  "train": {
    "loss": {

            },
    "optimizer": {    },
    "lr_scheduler": {    },
    "model": {

             },
    "pre_transforms": [    ],
    "dataset": {    },
    "dataloader": {    },
    "inferer": {    },
    "handlers": [    ],
    "post_transforms": [    ],
    "metrics": [    ],
    "trainer": {    }
  },
  "validate": {    }
}
For this post, we’re not including all the functions needed to create this network in the code examples. To see all the code required, see the complete example at NVIDIA/clara-train-examples in the BYOC Jupyter notebook.
The following code example defines your custom MyBasicUNet class, a UNet implementation with 1D, 2D, and 3D support, defined in a file labeled myNetworkArch.py:
from typing import Sequence, Union

import torch
import torch.nn as nn

from monai.networks.blocks import Convolution, UpSample
from monai.networks.layers.factories import Conv, Pool
from monai.utils import ensure_tuple_rep

class MyBasicUNet(nn.Module):
    def __init__(
        self,
        dimensions: int = 3,
        in_channels: int = 1,
        out_channels: int = 2,
        features: Sequence[int] = (32, 32, 64, 128, 256, 32),
        act: Union[str, tuple] = ("LeakyReLU", {"negative_slope": 0.1, "inplace": True}),
        norm: Union[str, tuple] = ("instance", {"affine": True}),
        dropout: Union[float, tuple] = 0.0,
        upsample: str = "deconv",
    ):
        super().__init__()
…
Next, you define the custom loss function that computes the average dice loss between two tensors. The following code example is a section of the MyDiceLoss class defined in a file labeled myLoss.py:
from typing import Callable, Optional, Union

import torch
from torch.nn.modules.loss import _Loss

from monai.networks import one_hot
from monai.utils import LossReduction, Weight

class MyDiceLoss(_Loss):
    def __init__(self,include_background: bool = True,to_onehot_y: bool = False,sigmoid: bool = False,softmax: bool = False,
        other_act: Optional[Callable] = None, squared_pred: bool = False, jaccard: bool = False,
        reduction: Union[LossReduction, str] = LossReduction.MEAN,smooth_nr: float = 1e-5,smooth_dr: float = 1e-5,batch: bool = False,
    ) -> None:
        super().__init__()
…
Now that you’ve defined the custom network and loss functions, here’s how to add them to the MMAR configuration. The configuration file for this run is labeled trn_BYOC_arch_loss.json, and you focus on two different sections of the JSON file.
First, add the custom network to the config by defining a train section and within that section a model field. This is where you add a reference to the custom model. When using an MMAR, you can also define arguments to pass to the function.
The following code example shows the train->model section of the config file:
"model": {
  "path": "BYOC.myNetworkArch.MyBasicUNet",
  "args": {
    "dimensions": 3,
    "in_channels": 1,
    "out_channels": 2,
    "features": [16, 32, 64, 128, 256, 16],
    "norm": "batch"
  }
}
path—Set toBYOC.myNetworkArch.MyBasicUNet.args—Passes parameters to the custom model function.
The path description for the model is defined by the path from the root directory to your custom network file and then the file and class name for the network. The following code example shows how to determine each part of the path parameter.
"path": "BYOC.myNetworkArch.MyBasicUNet"
BYOC = Folder where the myNetworkArch.py file is located
myNetworkArch = The name of the Python file that contains the custom network
MyBasicUNet = The class to instantiate to call the custom network
BYOC—Folder where themyNetworkArch.pyfile is located.myNetworkArch—Nameof the Python file that contains the custom network.MyBasicUNet—Class that you instantiate to call the custom network.
You use a similar structure to add in the custom loss function, but this time you place it in train -> loss within the config file. The following code example shows what the train -> loss section of the config should look like:
 “loss”: {
      “path”: “BYOC.myLoss.MyDiceLoss”,
      “args”: {
                      “to_onehot_y”: true,
                      “softmax”: true
                     }
 }
It has two arguments:
path—Set toBYOC.myLoss.MyDiceLoss.args—Passes parameters to the custom loss function.
This config section follows the same rules as earlier for the path argument.
To start training, I’ve included a bash script called train_W_Config.sh. Pass the config file as the first argument when calling the script. The following code example shows the training script that calls out to the relevant Clara Train module, along with all the parameters.
python3 -u -m medl.apps.train
    -m $MMAR_ROOT
    -c $CONFIG_FILE
    -e $ENVIRONMENT_FILE
    --write_train_stats
    --set
    print_conf=True
    MMAR_CKPT_DIR=$MMAR_CKPT_DIR
Now you’re ready to start training! Run the following command, which calls the training script and passes in the configuration file:
$MMAR_ROOT/commands/train_W_Config.sh trn_BYOC_arch_loss.json
Summary
You’ve now added your own custom functions to an MMAR training pipeline. You can add any other custom function to the MMAR in a similar way as either of the functions walked through earlier. To find the complete example of this BYOC Jupyter notebook, along with additional notebooks on AI-assisted annotation, AutoML, digital pathology, and federated learning, see the NVIDIA/clara-train-examples GitHub repository.
You can also sign up today to get access to the Clara Train 4.0 Early Access program. We’re only a few weeks away from general availability, so check back soon for the full release!