
 Python plays a key role within the science, engineering, data analytics, and deep learning application ecosystem. NVIDIA has long been committed to helping the Python ecosystem leverage the accelerated massively parallel performance of GPUs to deliver standardized libraries, tools, and applications. Today, we’re introducing another step towards simplification of the developer experience with improved Python … Continued
Python plays a key role within the science, engineering, data analytics, and deep learning application ecosystem. NVIDIA has long been committed to helping the Python ecosystem leverage the accelerated massively parallel performance of GPUs to deliver standardized libraries, tools, and applications. Today, we’re introducing another step towards simplification of the developer experience with improved Python code portability and compatibility.
Our goal is to help unify the Python CUDA ecosystem with a single standard set of low-level interfaces, providing full coverage of and access to the CUDA host APIs from Python. We want to provide an ecosystem foundation to allow interoperability among different accelerated libraries. Most importantly, it should be easy for Python developers to use NVIDIA GPUs.
CUDA Python: The long and winding road
To date, access to CUDA and NVIDIA GPUs through Python could only be accomplished by means of third-party software such as Numba, CuPy, Scikit-CUDA, RAPIDS, PyCUDA, PyTorch, or TensorFlow, just to name a few. Each wrote its own interoperability layer between the CUDA API and Python.
By releasing CUDA Python, NVIDIA is enabling these platform providers to focus on their own value-added products and services. NVIDIA also hopes to lower the barrier to entry for other Python developers to use NVIDIA GPUs. The initial release of CUDA Python includes Cython and Python wrappers for the CUDA Driver and runtime APIs.
In future releases, we may offer a Pythonic object model and wrappers for CUDA libraries (cuBLAS, cuFFT, cuDNN, nvJPEG, and so on). Upcoming releases may also be available with source code on GitHub or packaged through PIP and Conda.
CUDA Python workflow
Because Python is an interpreted language, you need a way to compile the device code into PTX and then extract the function to be called at a later point in the application. It’s not important for understanding CUDA Python, but Parallel Thread Execution (PTX) is a low-level virtual machine and instruction set architecture (ISA). You construct your device code in the form of a string and compile it with NVRTC, a runtime compilation library for CUDA C++. Using the NVIDIA Driver API, manually create a CUDA context and all required resources on the GPU, then launch the compiled CUDA C++ code and retrieve the results from the GPU. Now that you have an overview, jump into a commonly used example for parallel programming: SAXPY.
The first thing to do is import the Driver API and NVRTC modules from the CUDA Python package. In this example, you copy data from the host to device. You need NumPy to store data on the host.
import cuda_driver as cuda  # Subject to change before release
import nvrtc  # Subject to change before release
import numpy as np
Error checking is a fundamental best practice in code development and a code example is provided. For brevity, error checking within the example is omitted. In a future release, this may automatically raise exceptions using a Python object model.
def ASSERT_DRV(err):
    if isinstance(err, cuda.CUresult):
       if err != cuda.CUresult.CUDA_SUCCESS:
           raise RuntimeError("Cuda Error: {}".format(err))
   elif isinstance(err, nvrtc.nvrtcResult):
       if err != nvrtc.nvrtcResult.NVRTC_SUCCESS:
           raise RuntimeError("Nvrtc Error: {}".format(err))
   else:
       raise RuntimeError("Unknown error type: {}".format(err))
It’s common practice to write CUDA kernels near the top of a translation unit, so write it next. The entire kernel is wrapped in triple quotes to form a string. The string is compiled later using NVRTC. This is the only part of CUDA Python that requires some understanding of CUDA C++. For more information, see An Even Easier Introduction to CUDA.
saxpy = """
extern "C" __global__
void saxpy(float a, float *x, float *y, float *out, size_t n)
{
 size_t tid = blockIdx.x * blockDim.x + threadIdx.x;
 if (tid


Go ahead and compile the kernel into PTX. Remember that this is executed at runtime using NVRTC. There are three basic steps to NVRTC:
- Create a program from the string.
- Compile the program.
- Extract PTX from the compiled program.
In the following code example, compilation is targeting compute capability 75, or Turing architecture, with FMAD enabled. If compilation fails, use nvrtcGetProgramLog to retrieve a compile log for additional information.
# Create program
err, prog = nvrtc.nvrtcCreateProgram(str.encode(saxpy), b"saxpy.cu", 0, [], [])

# Compile program
opts = [b"--fmad=false", b"--gpu-architecture=compute_75"]
err, = nvrtc.nvrtcCompileProgram(prog, 2, opts)

# Get PTX from compilation
err, ptxSize = nvrtc.nvrtcGetPTXSize(prog)
ptx = b" " * ptxSize
err, = nvrtc.nvrtcGetPTX(prog, ptx)
Before you can use the PTX or do any work on the GPU, you must create a CUDA context. CUDA contexts are analogous to host processes for the device. In the following code example, the Driver API is initialized so that the NVIDIA driver and GPU are accessible. Next, a handle for compute device 0 is passed to cuCtxCreate to designate that GPU for context creation. With the context created, you can proceed in compiling the CUDA kernel using NVRTC.
# Initialize CUDA Driver API
err, = cuda.cuInit(0)

# Retrieve handle for device 0
err, cuDevice = cuda.cuDeviceGet(0)

# Create context
err, context = cuda.cuCtxCreate(0, cuDevice)
With a CUDA context created on device 0, load the PTX generated earlier into a module. A module is analogous to dynamically loaded libraries for the device. After loading into the module, extract a specific kernel with cuModuleGetFunction. It is not uncommon for multiple kernels to reside in PTX.
# Load PTX as module data and retrieve function
ptx = np.char.array(ptx)
err, module = cuda.cuModuleLoadData(ptx.ctypes.get_data())
err, kernel = cuda.cuModuleGetFunction(module, b"saxpy")
Next, get all your data prepared and transferred to the GPU. For increased application performance, you can input data on the device to eliminate data transfers. For completeness, this example shows how you would transfer data to and from the device.
NUM_THREADS = 512  # Threads per block
NUM_BLOCKS = 32768  # Blocks per grid

a = np.array([2.0], dtype=np.float32)
n = np.array(NUM_THREADS * NUM_BLOCKS, dtype=np.uint32)
bufferSize = n * a.itemsize

hX = np.random.rand(n).astype(dtype=np.float32)
hY = np.random.rand(n).astype(dtype=np.float32)
hOut = np.zeros(n).astype(dtype=np.float32)
With the input data a, x, and y created for the SAXPY transform device, resources must be allocated to store the data using cuMemAlloc. To allow for more overlap between compute and data movement, use the asynchronous function cuMemcpyHtoDAsync. It returns control to the CPU immediately following command execution.
Python doesn’t have a natural concept of pointers, yet cuMemcpyHtoDAsync expects void*. Therefore, XX.ctypes.get_data retrieves the pointer value associated with XX.
err, dXclass = cuda.cuMemAlloc(bufferSize)
err, dYclass = cuda.cuMemAlloc(bufferSize)
err, dOutclass = cuda.cuMemAlloc(bufferSize)

err, stream = cuda.cuStreamCreate(0)

err, = cuda.cuMemcpyHtoDAsync(
   dXclass, hX.ctypes.get_data(), bufferSize, stream
)
err, = cuda.cuMemcpyHtoDAsync(
   dYclass, hY.ctypes.get_data(), bufferSize, stream
)
With data prep and resources allocation finished, the kernel is ready to be launched. To pass the location of the data on the device to the kernel execution configuration, you must retrieve the device pointer. In the following code example, int(dXclass) retries the pointer value of dXclass, which is CUdeviceptr, and assigns a memory size to store this value using np.array.
Like cuMemcpyHtoDAsync, cuLaunchKernel expects void** in the argument list. In the earlier code example, it creates void** by grabbing the void* value of each individual argument and placing them into its own contiguous memory.
# The following code example is not intuitive
# Subject to change in a future release
dX = np.array([int(dXclass)], dtype=np.uint64)
dY = np.array([int(dYclass)], dtype=np.uint64)
dOut = np.array([int(dOutclass)], dtype=np.uint64)

args = [a, dX, dY, dOut, n]
args = np.array([arg.ctypes.get_data() for arg in args], dtype=np.uint64)
Now the kernel can be launched:
err, = cuda.cuLaunchKernel(
   kernel,
   NUM_BLOCKS,  # grid x dim
   1,  # grid y dim
   1,  # grid z dim
   NUM_THREADS,  # block x dim
   1,  # block y dim
   1,  # block z dim
   0,  # dynamic shared memory
   stream,  # stream
   args.ctypes.get_data(),  # kernel arguments
   0,  # extra (ignore)
)

err, = cuda.cuMemcpyDtoHAsync(
   hOut.ctypes.get_data(), dOutclass, bufferSize, stream
)
err, = cuda.cuStreamSynchronize(stream)
The cuLaunchKernel function takes the compiled module kernel and execution configuration parameters. The device code is launched in the same stream as the data transfers. That ensures that the kernel’s compute is performed only after the data has finished transfer, as all API calls and kernel launches within a stream are serialized. After the call to transfer data back to the host is executed, cuStreamSynchronize is used to halt CPU execution until all operations in the designated stream are finished.
# Assert values are same after running kernel
hZ = a * hX + hY
if not np.allclose(hOut, hZ):
   raise ValueError("Error outside tolerance for host-device vectors")
Perform verification of the data to ensure correctness and finish the code with memory clean up.
err, = cuda.cuStreamDestroy(stream)
err, = cuda.cuMemFree(dXclass)
err, = cuda.cuMemFree(dYclass)
err, = cuda.cuMemFree(dOutclass)
err, = cuda.cuModuleUnload(module)
err, = cuda.cuCtxDestroy(context)
Performance
Performance is a primary driver in targeting GPUs in your application. So, how does the above code compare to its C++ version? Table 1 shows that the results are nearly identical. NVIDIA NSight Systems was used to retrieve kernel performance and CUDA Events was used for application performance.
The following command was used to profile the applications:
nsys profile -s none -t cuda --stats=true
| C++ | Python | |
| Kernel execution | 352µs | 352µs |
| Application execution | 1076ms | 1080ms |
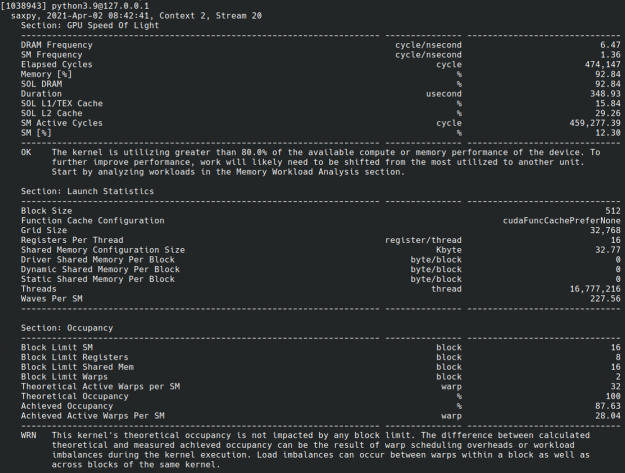
CUDA Python is also compatible with NVIDIA Nsight Compute, which is an interactive kernel profiler for CUDA applications. It allows you to have detailed insights into kernel performance. This is useful when you’re trying to maximize performance (Figure 1).
Get started with CUDA Python
CUDA Python coming soon, along with a detailed description of APIs, installation notes, new features, and examples. For more information, see the following posts:
- Nsight Systems Exposes New GPU Optimization Opportunities
- Using Nsight Compute to Inspect your Kernels
Acknowledgements
Special thanks to Vladislav Zhurba, a CUDA Python developer, for his help on the examples provided in this post.