Build an action recognition app with pretrained models, the TAO Toolkit, and DeepStream without large training data sets or deep AI expertise.
As humans, we are constantly on the move and performing several actions such as walking, running, and sitting every single day. These actions are a natural extension of our daily lives. Building applications that capture these specific actions can be extremely valuable in the field of sports for analytics, in healthcare for patient safety, in retail for a better shopping experience, and more.
However, building and deploying AI applications that can understand the temporal information of human action is challenging and time-consuming, requiring large amounts of training and deep AI expertise.
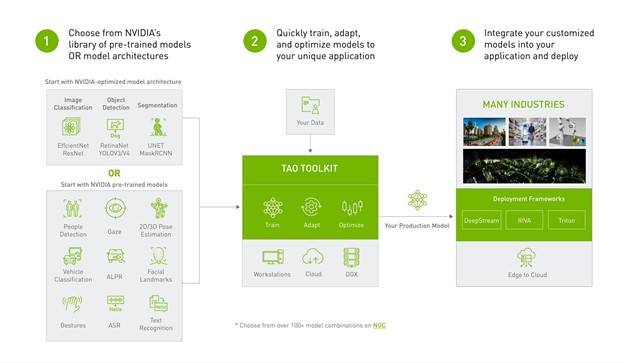
In this post, we show how you can fast-track your AI application development by taking a pretrained action recognition model, fine-tuning it with custom data and classes with the NVIDIA TAO Toolkit and deploying it for inference through NVIDIA DeepStream with no AI expertise whatsoever.
Figure 1. End-to-end workflow starting with a pretrained model, fine-tuning with the TAO Toolkit, and deploying it with DeepStream
Action recognition model
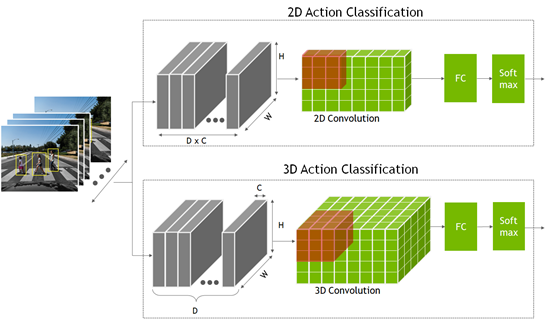
To recognize an action, the network must look at not just a single static frame but several consecutive frames. This provides the temporal context to understand the action. This is the extra temporal dimension compared to a classification or object detection model, where the network only looks at a single static frame.
These models are created using a 2D convolution neural network, where the dimensions are width, height, and number of channels. The 2D action recognition model is like the other 2D computer vision model, but the channel dimension now also contains the temporal information.
In the 2D action recognition model, you multiply the temporal frames D with the channel count C to form the channel dimension input.
For the 3D model, a new dimension, D, is added that represents the temporal information.
The output from both the 2D and 3D convolution networks goes into a fully connected layer, followed by a Softmax layer to predict the action.
Figure 2. Action recognition 2D and 3D convolution network
A pretrained model is one that has been trained on representative datasets and fine-tuned with weights and biases. The action recognition model, available from the NGC catalog, has been trained on five common classes:
Walking
Running
Pushing
Riding a bike
Falling
This is a sample model. More importantly, this model can then be easily retrained with custom data in a fraction of the time and data that it takes to train from scratch.
The pretrained model was trained on a few hundred short video clips from the HMDB51 dataset. For the five classes that the model is trained on, the 2D model achieved accuracy of 83% and the 3D model achieved an accuracy of 86%. Furthermore, the following table shows the expected performance on various GPUs, if you choose to deploy the model as-is.
Inference Performance (FPS)
2DResNet18
3DResNet18
Nano
30
0.6
NVIDIA Xavier NX
250
5
NVIDIA AGX Xavier
490
33
NVIDIA A30
5,809
356
NVIDIA A100
10,457
640
Table 1. Expected inference performance by model
For this experiment, you fine-tune the model with three new classes that consist of simple actions such as pushups, sit-ups, and pull-ups. You use the subset of HMDB51 dataset, which contains 51 different actions.
Prerequisites
Before you start, you must have the following resources for training and deploying:
In this section, you use the TAO Toolkit to fine-tune the model with the new classes.
The TAO Toolkit uses transfer learning, where it uses the learned features from an existing neural network model and applies it to a new one. A CLI and Jupyter notebook–based solution of the NVIDIA TAO framework, the TAO Toolkit abstracts away the AI/DL framework complexity, enabling you to create custom and production-ready models for your use case without any AI expertise.
You can either provide simple directives in the CLI window or use the turnkey Jupyter notebook for training and fine-tuning. You use the action recognition notebook from NGC to train your custom three-class model.
Download the version 1.3 of the TAO Toolkit Computer Vision Sample Workflows and unzip the package. In the /action_recognition_net directory, find the Jupyter notebook (actionrecognitionnet.ipynb) for action recognition training, and the /specs directory, which contains all the spec files for training, evaluation, and model export. You configure these spec files for training.
Start the Jupyter notebook and open the action_recognition_net/actionrecognitionnet.ipynb file:
All the training steps are run inside the Jupyter notebook. After you have started the notebook, run the Set up env variables and map drives and Install TAO launcher steps provided in the notebook.
Step 2: Download the dataset and pretrained model
After you have installed TAO, the next step is to download and prepare the dataset for training. The Jupyter notebook provides the steps to download and preprocess the HMDB51 dataset. If you have your own custom dataset, you can use it in step 2.1.
For this post, you use three classes from the HMDB51 dataset. Modify a few lines to add the push-up, pull-up, and sit-up classes.
$ wget -P $HOST_DATA_DIR http://serre-lab.clps.brown.edu/wp-content/uploads/2013/10/hmdb51_org.rar
$ mkdir -p $HOST_DATA_DIR/videos && unrar x $HOST_DATA_DIR/hmdb51_org.rar $HOST_DATA_DIR/videos
$ mkdir -p $HOST_DATA_DIR/raw_data
$ unrar x $HOST_DATA_DIR/videos/pushup.rar $HOST_DATA_DIR/raw_data
$ unrar x $HOST_DATA_DIR/videos/pullup.rar $HOST_DATA_DIR/raw_data
$ unrar x $HOST_DATA_DIR/videos/situp.rar $HOST_DATA_DIR/raw_data
The video files for each class are stored in their respective directory under $HOST_DATA_DIR/raw_data. These are encoded video files and must be uncompressed to frames to train the model. A script has been provided to help you prepare the data for training.
Download the helper scripts and install the dependency:
$ cd tao_recipes/tao_action_recognition/data_generation/
$ ./preprocess_HMDB_RGB.sh $HOST_DATA_DIR/raw_data  $HOST_DATA_DIR/processed_data
The output for each class is shown in the following code example. f cnt: 82 means that this video clip was uncompressed to 82 frames. This action is performed for all the videos in the directory. Depending on the number of classes and size of the dataset and video clips, this process can take some time.
Preprocess pullup
f cnt: 82.0
f cnt: 82.0
f cnt: 82.0
f cnt: 71.0
...
The format of the processed data looks something like the following code example. If you are training on your own data, make sure that your dataset also follows this directory format.
$HOST_DATA_DIR/processed_data/
|-->
|-->
The next step is to split the data into a training and validation set. The HMDB51 dataset provides a split file for each class, so just download that and divide the dataset into 70% training and 30% validation.
Use the helper script split_dataset.py to split the data. This only works with the split file provided with the HMDB dataset. If you are using your own dataset, then this wouldn’t apply.
$ cd tao_recipes/tao_action_recognition/data_generation/

$ python3 ./split_dataset.py $HOST_DATA_DIR/processed_data       $HOST_DATA_DIR/splits/testTrainMulti_7030_splits $HOST_DATA_DIR/train  $HOST_DATA_DIR/test
Data used for training is under $HOST_DATA_DIR/train and data for test and validation is under $HOST_DATA_DIR/test.
After preparing the dataset, download the pretrained model from NGC. Follow the steps in 2.1 of the Jupyter notebook.
$ ngc registry model download-version "nvidia/tao/actionrecognitionnet:trainable_v1.0" --dest $HOST_RESULTS_DIR/pretrained
Step 3: Configure training parameters
The training parameters are provided in the spec YAML file. In the /specs directory, find all the spec files for training, fine-tuning, evaluation, inference, and export. For training, you use train_rgb_3d_finetune.yaml.
For this experiment, we show you a few hyperparameters that you can modify. For more information about all the different parameters, see ActionRecognitionNet.
You can also overwrite any of the parameters during runtime. Most of the parameters are kept as default. The few that you are changing are highlighted in the following code block.
## Model Configuration
model_config:
   model_type: rgb
   input_type: "3d"
   backbone: resnet18
   rgb_seq_length: 32  ## Change from 3 to 32 frame sequence
   rgb_pretrained_num_classes: 5
   sample_strategy: consecutive
   sample_rate: 1

# Training Hyperparameter configuration
train_config:
   optim:
      lr: 0.001
      momentum: 0.9
      weight_decay: 0.0001
      lr_scheduler: MultiStep
      lr_steps: [5, 15, 25]
      lr_decay: 0.1
   epochs: 20  ## Number of Epochs to train
   checkpoint_interval: 1  ## Saves model checkpoint interval

## Dataset configuration
dataset_config:
   train_dataset_dir: /data/train  ## Modify to use your train dataset
   val_dataset_dir: /data/test     ## Modify to use your test dataset
   ## Label maps for new classes. Modify this for your custom classes
   label_map:
      pushup: 0
      pullup: 1
      situp: 2
For training, follow step 4 in the Jupyter notebook. Set your environment variables.
The TAO Toolkit task to train action recognition is called action_recognition. To train, use the tao action_recognition train command. Specify the training spec file and provide the output directory and pretrained model. Alternatively, you can also set the pretrained model in the model_config specs.
Depending on your GPU, sequence length or epochs, this can take anywhere from minutes to hours. Because you are saving every epoch, you see as many model checkpoints as the number of epochs.
The model checkpoints are saved as ar_model_epoch=-val_loss=.tlt. Pick the last epoch for model evaluation and export but you can use any that has the lowest validation loss.
Step 5: Evaluate the trained model
There are two different sampling strategies to evaluate the trained model on video clips:
Center mode: Picks up the middle frames of a sequence to do inference. For example, if the model requires 32 frames as input and a video clip has 128 frames, then you choose the frames from index 48 to index 79 to do the inference.
Conv mode: Convolutionally sample 10 sequences out of a single video and do inference. The results are averaged.
For evaluation, use the evaluation spec file (evaluate_rgb.yaml) provided in the /specs directory. This is like the training config. Modify the dataset_config parameter to use the three classes that you are training for.
dataset_config:
   ## Label maps for new classes. Modify this for your custom classes
   label_map:
      pushup: 0
      pullup: 1
      situp: 2
Evaluate using the tao action_recognition evaluate command. For video_eval_mode, you can choose between center mode or conv mode, as explained earlier. Use the last saved model checkpoint from the training run.
This was evaluated on a 90-video dataset, which had clips of all three actions. The overall accuracy is about 82%, which is decent for the size of the dataset. The larger the dataset, the better the model can generalize. You can try to test with your own clips for accuracy.
Step 6: Export for DeepStream deployment
The last step is exporting the model for deployment. To export, run the tao action_recognition export command. You must provide the export specs file, which is included in the /specs directory as export_rgb.yaml. Modify the dataset_config value in the export_rgb.yaml to use the three classes that you trained for. This is like dataset_config in evaluate_rgb.yaml.
$ tao action_recognition export
-e $SPECS_DIR/export_rgb.yaml
-k $KEY
model=$RESULTS_DIR/rgb_3d_ptm/ar_model_epoch=-val_loss=.tlt
/export/rgb_resnet18_3.etlt
Congratulations, you have successfully trained a custom 3D action recognition model. Now, deploy this model using DeepStream.
Deploying with DeepStream
In this section, we show how you can deploy the fine-tuned model using NVIDIA DeepStream.
The DeepStream SDK helps you quickly build efficient, high-performance video AI applications. DeepStream applications can run on edge devices powered by NVIDIA Jetson, on-premises servers, or in the cloud.
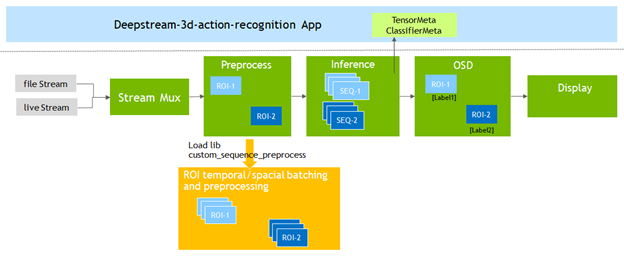
To support action recognition models, DeepStream 6.0 adds the Gst-nvdspreprocess plug-in. This plug-in loads a custom library (custom_sequence_preprocess.so) to perform temporal sequence catching and region of interest (ROI) partial batching and then forward the batched tensor buffers to the downstream inference plug-in.
You modify the deepstream-3d-action-recognition application included in the DeepStream SDK to test the model that you fine-tuned with TAO.
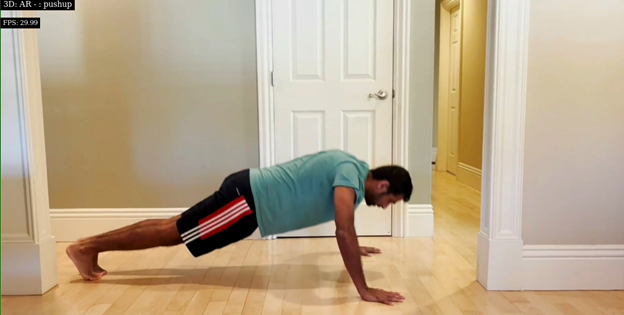
Figure 4. 3D action recognition application pipeline
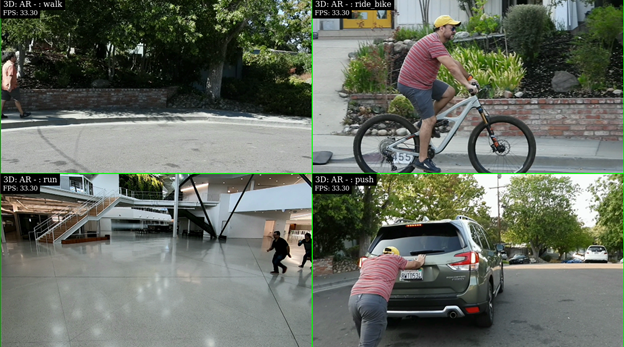
The sample application runs inference on four video files simultaneously and presents the results with a 2×2 tiled display.
Run the standard application first before you do your modifications. First, start the DeepStream 6.0 development container:
For more information about the DeepStream containers available from NVIDIA, see the NGC catalog.
From within the container, navigate to the 3D action recognition application directory and download and install the standard 3D and 2D models from NGC.
Before modifying the application, familiarize yourself with the key configuration parameters of the preprocessor plug-in required to run the application.
From the /app/sample_apps/deepstream-3d-action-recognition folder, open the config_preprocess_3d_custom.txt file and review the preprocessor configuration for the 3D model.
Line 13 defines the 5-dimension input shape required by the 3D model:
network-input-shape = 4;3;32;224;224
For this application, you are using four inputs each with one ROI:
Your batch number is 4 (# of inputs * # of ROIs per input).
Your input is RGB so the number of channels is 3.
The sequence length is 32 and the input resolution is 224×224 (HxW).
Line 18 tells the preprocessor library that you are using a CUSTOM sequence:
network-input-order = 2
Lines 51 and 52 define how the frames are passed to the inference engine:
stride=1
subsample=0
A subsample value of 0 means that you pass on the frames sequentially (Frame 1, Frame 2, …) to the inference step.
A stride value of 1 means that there is a difference of a single frame between the sequences. For example:
Sequence A: Frame 1, 2, 3, 4, …
Sequence B: Frame 2, 3, 4, 5, …
Finally, lines 55 – 60 define the number of inputs and ROIs:
For more information about all the application and preprocessor parameters, see the Action Recognition section of the DeepStream documentation.
Running the new model
You are now ready to modify your application configuration and test the exercise action recognition model.
Because you’re using a Docker image, the best way to transfer files between the host filesystem and the container is to use the -v mount flag when starting the container to set up a shareable location. For example, use -v /home:/home to mount the host’s /home directory to the /home directory of the container.
Copy the new model, label file, and text video into the /app/sample_apps/deepstream-3d-action-recognition folder.
# back up the original labels file
$ cp ./labels.txt ./labels_bk.txt
$ cp /home/labels.txt ./
$ cp /home/Exercise_demo.mp4 ./
$ cp /home/rgb_resnet18_3d_exercises.etlt ./
Open deepstream_action_recognition_config.txt and change line 30 to point to the exercise test video.
Open config_infer_primary_3d_action.txt and change the model used for inference on line 63 and the batch size on line 68 from 4 to 1 because you are going from four inputs to a single input:
Finally, open config_preprocess_3d_custom.txt. Change the network-input-shape value to reflect the single input and configuration of the exercise recognition model on line 35:
network-input-shape= 1;3;3;224;224
Modify the source settings on lines 77 – 82 for a single input and ROI:
The action recognition sample application gives you the flexibility to change the input source, number of inputs, and model used without having to modify the application source code.
To review how the application was implemented, see the source code for the application, as well as the custom sequence library used by the preprocessor plug-in, in the /sources/apps/sample_apps/deepstream-3d-action-recognition folder.
Summary
In this post, we showed you an end-to-end workflow of fine-tuning and deploying an action recognition model using the TAO Toolkit and DeepStream, respectively. Both the TAO Toolkit and DeepStream are solutions that abstract away the AI framework complexity, enabling you to build and deploy AI applications in production without the need for any AI expertise.
Get started with your action recognition model by downloading the model from the NGC catalog.
For more information, see the following resources:

 Build an action recognition app with pretrained models, the TAO Toolkit, and DeepStream without large training data sets or deep AI expertise.