Categories
Misc

Build Mainstream Servers for AI Training and 5G with the NVIDIA H100 CNX

Learn about the H100 CNX, an innovative new hardware accelerator for GPU-accelerated I/O intensive workloads.

There is an ongoing demand for servers with the ability to transfer data from the network to a GPU at ever faster speeds. As AI models keep getting bigger, the sheer volume of data needed for training requires techniques such as multinode training to achieve results in a reasonable timeframe. Signal processing for 5G is more sophisticated than previous generations, and GPUs can help increase the speed at which this happens. Devices such as robots or sensors, are also starting to use 5G to communicate with edge servers for AI-based decisions and actions.

Purpose-built AI systems, such as the recently announced NVIDIA DGX H100, are specifically designed from the ground up to support these requirements for data center use cases. Now, another new product can help enterprises also looking to gain faster data transfer and increased edge device performance, but without the need for high-end or custom-built systems.

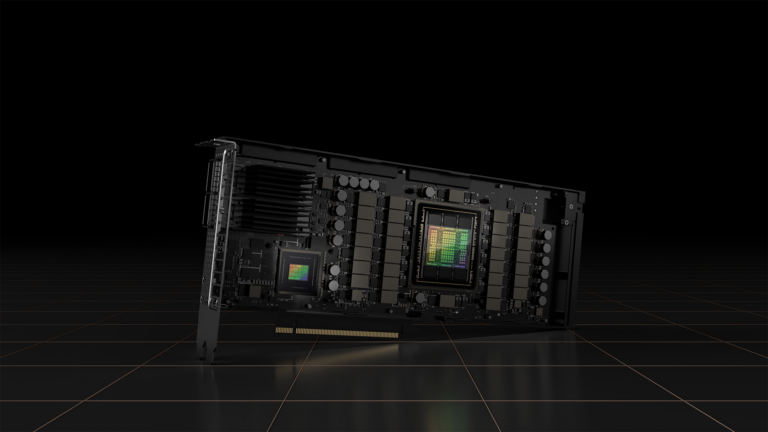
Announced by NVIDIA CEO Jensen Huang at NVIDIA GTC last week the NVIDIA H100 CNX is a high-performance package for enterprises. It combines the power of the NVIDIA H100 with the advanced networking capabilities of the NVIDIA ConnectX-7 SmartNIC. Available in a PCIe board, this advanced architecture delivers unprecedented performance for GPU-powered and I/O intensive workloads for mainstream data center and edge systems.

Design benefits of the H100 CNX 

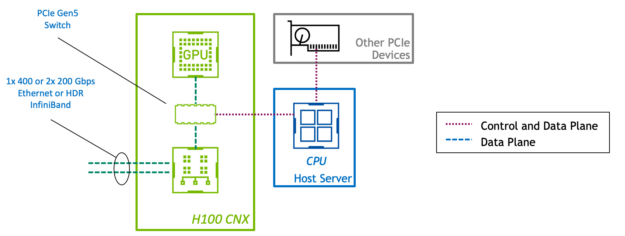
In standard PCIe devices, the control plane and data plane share the same physical connection. However, in the H100 CNX, the GPU and the network adapter connect through a direct PCIe Gen5 channel. This provides a dedicated high-speed path for data transfer between the GPU and the network using GPUDirect RDMA and eliminates bottlenecks of data going through the host. 

The diagram shows the H100 CNX consisting of a GPU and a SmartNIC, connected via a PCIe Gen5 switch. There are two connections to the network from the H100 CNX, indicating either two 200 gigabit per second or one 400 gigabit per second links. A CPU is connected to the H100 CNX via a connection to the same PCIe switch. A PCIe NVMe drive is connected directly to the CPU. The data plane path is shown going from the network, to the SmartNIC, through the PCIe switch, to the GPU. A combined data and control pane path goes from the CPU to the PCIe switch, and also from the CPU to the NVMe drive.
Figure 1. High-level architecture of H100 CNX.

With the GPU and SmartNIC combined on a single board, customers can leverage servers at PCIe Gen4 or even Gen3. Achieving a level of performance once only possible with high-end or purpose-built systems saves on hardware costs. Having these components on one physical board also improves space and energy efficiency.

Integrating a GPU and a SmartNIC into a single device creates a balanced architecture by design. In systems with multiple GPUs and NICs, a converged accelerator card enforces a 1:1 ratio of GPU to NIC. This avoids contention on the server’s PCIe bus, so the performance scales linearly with additional devices. 

Core acceleration software libraries from NVIDIA such as NCCL and UCX automatically make use of the best-performing path for data transfer to GPUs. Existing accelerated multinode applications can take advantage of the H100 CNX without any modification, so customers immediately can benefit from the high performance and scalability.  

H100 CNX use cases

The H100 CNX delivers GPU acceleration along with low-latency and high-speed networking. This is done at lower power, with a smaller footprint and higher performance than two discrete cards. Many use cases can benefit from this combination, but the following are particularly notable. 

5G signal processing

5G signal processing with GPUs requires data to move from the network to the GPU as quickly as possible, and having predictable latency is critical too. NVIDIA converged accelerators combined with the NVIDIA Aerial SDK provide the highest-performing platform for running 5G applications. Because data doesn’t go through the host PCIe system, processing latency is greatly reduced. This increased performance is even seen when using commodity servers with slower PCIe systems.

Accelerating edge AI over 5G

NVIDIA AI-on-5G is made up of the NVIDIA EGX enterprise platform, the NVIDIA Aerial SDK for software-defined 5G virtual radio area networks, and enterprise AI frameworks. This includes SDKs, such as NVIDIA Isaac and NVIDIA Metropolis. Edge devices such as video cameras, industrial sensors, and robots can use AI and communicate with the server over 5G. 

The H100 CNX makes it possible to provide this functionality in a single enterprise server, without deploying costly purpose-built systems. The same accelerator applied to 5G signal processing can be used for edge AI with the NVIDIA Multi-Instance GPU technology. This makes it possible to share a GPU for several different purposes.  

Multinode AI training

Multinode training involves data transfer between GPUs on different hosts. In a typical data center network, servers often run into various limits around performance, scale, and density.  Most enterprise servers don’t include a PCIe switch, so the CPU becomes a bottleneck for this traffic. Data transfer is bound by the speed of the host PCIe backplane. Although a 1:1 ratio of GPU:NIC is ideal, the number of PCIe lanes and slots in the server can limit the total number of devices.

The design of H100 CNX alleviates these problems. There is a dedicated path from the network to the GPU for GPUDirect RDMA to operate at near line speeds. ​The data transfer also occurs at PCIe Gen5 speeds regardless of host PCIe backplane. Scaling up of GPU power within a host can be done in a balanced manner, since the 1:1 ratio of GPU:NIC is inherently achieved.  A server can also be equipped with more acceleration power, since fewer PCIe lanes and device slots are required for converged accelerators than discrete cards.

The NVIDIA H100 CNX is expected to be available for purchase in the second half of this year.  If you have a use case that could benefit from this unique and innovative product, contact your favorite system vendor and ask when they plan to offer it with their servers. 

Learn more about the NVIDIA H100 CNX.

Categories
Misc

Add bounds to output from network

I basically have a simple CNN that outputs a single integer value at the end. This number is corresponding to a certain angle, so i know that the bounds have to be between 0 and 359. My intuition tells me that if i were to somehow limit the final value to this range instead of being unbounded like in most activation functions, i would reach any form of convergence sooner.

To try this, I changed the last layer and applied the sigmoid activation function, then added an additional lambda layer where i just multiplied the value by 359. However, this model still has a very high loss (using MSE, at times it’s actually greater than 3592 which is leading me to believe i’m not actually bounding the output between 0 and 359).

Is it a good idea to bound my output like this, and what would be the best way to implement it?

submitted by /u/NSCShadow
[visit reddit] [comments]

Categories
Misc

(Image Classification )High training accuracy and low validation accuracy

(Image Classification )High training accuracy and low validation accuracy

I have 15 classes, each one has around 90 training images and 7 validation images. Am I doing something wrong or are my images just really bad? It’s supposed to identify between 15 different fish species, and some of them do look pretty similar. Any help is appreciated

https://preview.redd.it/8pujy5nglfq81.png?width=616&format=png&auto=webp&s=d312eb69116499c6f3ab48891dcc937cabcedbda

https://preview.redd.it/56xx5pgllfq81.png?width=920&format=png&auto=webp&s=49be6d38b34df73be0de196aab9b477a44eaabfd

https://preview.redd.it/f9eejttnlfq81.png?width=1114&format=png&auto=webp&s=fc80852cf39a62bfa22417cdd3c95188898b3a1c

submitted by /u/IraqiGawad
[visit reddit] [comments]

Categories
Misc

Error: No gradients provided for any variable:

Code:

current = model(np.append(np.ndarray.flatten(old_field),next_number).reshape(1,-1))
next = target(np.append(np.ndarray.flatten(game.field),action).reshape(1,-1))
nextState = game.field
target_q_values = (next * 0.9) + reward # bu yong max? shi lilunshangdeb bushi quzuida
# loss = tf.convert_to_tensor((target_q_values – current)**2)
loss = mse(target_q_values, current)
train_step(loss)

Train_step:

@tf.function
def train_step(loss):
with tf.GradientTape(persistent=True) as tape:
gradient = tape.gradient(loss, model.trainable_variables)
optimizer.apply_gradients(zip(gradient,model.trainable_variables))

submitted by /u/Striking-Warning9533
[visit reddit] [comments]

Categories
Misc

Metropolis Spotlight: MarshallAI Optimizes Traffic Management while Reducing Carbon Emissions

MarshallAI is using NVIDIA GPU accelerated technologies to help cities improve their traffic management, reduce carbon emissions, and save drivers time.

A major contributor to CO2 emissions in cities is traffic. City planners are always looking to reduce their carbon footprint and design efficient and sustainable infrastructure. NVIDIA Metropolis partner, MarshallAI, is helping cities improve their traffic management and reduce CO2 emissions with vision AI applications.

MarshallAI’s computer vision and AI solution helps cities get closer to carbon neutrality by making traffic management more efficient. They apply deep-learning-based artificial intelligence to video sensors to understand roadway usage, and inform and optimize traffic planning. When a city’s traffic light management system is able to adjust to real-time situations and optimize traffic flow, its increased efficiency can reduce emission-causing activities, such as frequent idling of vehicles. 

As one of Finland’s fastest growing metropolitan areas, the City of Vantaa faces the challenge of quickly and safely transporting people on aging and constrained infrastructure. The city is deploying MarshallAI’s vision AI applications to optimize traffic management of intersections in real time. 

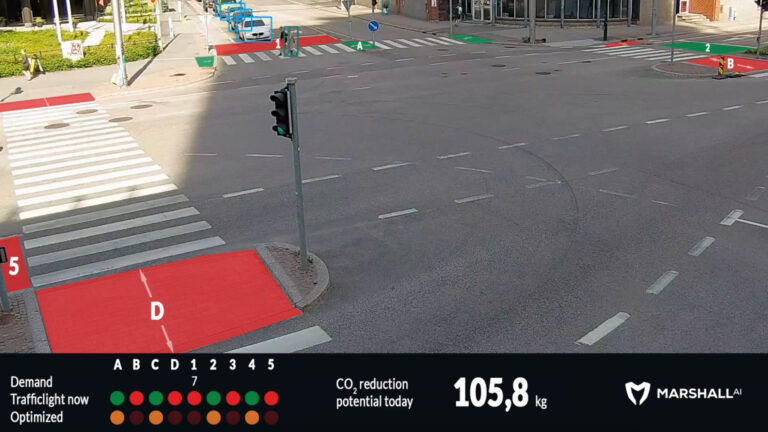
The vision AI solution analyzes traffic camera streams and uses the information to adjust traffic lights according to the situation dynamically. These inputs are much richer than those from traditional sensors, capturing metrics on the amount and type of traffic users and the direction they’re driving.

Image of MarshallAI application at a traffic intersection in a snowy town.
Figure 1. MarshallAI application at a traffic intersection.

MarshallAI leverages the powerful capabilities of NVIDIA Metropolis and NVIDIA GPUs. This includes the embedded NVIDIA Jetson edge AI platform—which provides GPU-accelerated computing in a compact and energy-efficient module to fuel their solution. The MarshallAI platform runs on NVIDIA EGX hardware, which brings compute to the edge by processing data from numerous cameras and providing real-time, actionable insights. MarshallAI’s traffic safety solution for the City of Vantaa automatically detects, counts, and measures the speed of vehicles, bicycles, and passerby.

“NVIDIA has made it possible for us to offer edge to cloud solutions depending on the client’s need; ranging from small, portable edge computing units to large-scale server setups. No matter the hardware constraints, the NVIDIA ecosystem enables us to run the same software stack with very little configuration changes providing optimal performance,” says Tomi Niittumäki, CTO of MarshallAI.

MarshallAI’s solution uses GPU-accelerated vision AI to process video data captured by camera sensors at traffic intersections. The system provides real-time and high-accuracy vehicle, pedestrian, and bicycle classifications, and speeds. It also tracks vehicle occupancy, paths, flows, and turning movements. These insights allow cities to react quickly to real-time situations and manage traffic effectively even during the most congested scenarios. 

MarshallAI traffic management use cases

Understands traffic flow: Identifies and quantifies pedestrians, vehicles, and bicycles and detects the routes of all traffic users.

Data collection: Determines how much time traffic users spend waiting at red lights and taking unnecessary stops.

Optimizing traffic: Dynamically detects and responds to real-time traffic scenarios, eliminating unnecessary stops and idling caused by traditional time-based traffic light cycles. 

Prioritizing traffic: Understands the quantity, wait time and directional velocity of vehicles on the road and can prioritize certain traffic users such as emergency vehicles.

MarshallAI’s machine vision and object detection solutions are extremely reliable. During their collaboration with the city of Vantaa, their average object detection rate was over 98% in all object classes. Different vehicle classes (car, van, bus, truck, articulated truck, and motorcycle) were treated distinctly and calculated separately. 

By applying automatic traffic optimization solutions to an intersection, cities can save drivers up to every sixth traffic light stop and over a month’s worth of cumulative waiting time annually. This saves time and also reduces emissions. 

MarshallAI solutions are working towards deploying across several cities such as Paris, Amsterdam, Helsinki and Tallinn, which are prioritizing the reduction of CO2 emissions and traffic congestion. The proof-of-concept installations in the Paris region and Helsinki have shown an emission reduction potential between 3% and 8% depending on the intersection, based only on optimization without any negative impact for traffic users.

Categories
Misc

Latest ‘I AM AI’ Video Features Four-Legged Robots, Smart Cell Analysis, Tumor-Tracking Tech and More

“I am a visionary,” says an AI, kicking off the latest installment of NVIDIA’s I AM AI video series. Launched in 2017, I AM AI has become the iconic opening for GTC keynote addresses by NVIDIA founder and CEO Jensen Huang. Each video, with its AI-created narration and soundtrack, documents the newest advances in artificial Read article >

The post Latest ‘I AM AI’ Video Features Four-Legged Robots, Smart Cell Analysis, Tumor-Tracking Tech and More appeared first on NVIDIA Blog.

Categories
Misc

TinyML Gearbox Fault Prediction on a $4 MCU

TinyML Gearbox Fault Prediction on a $4 MCU

Is it possible to make an AI-driven system that predicts gearbox failure on a simple $4 MCU? How to automatically build a compact model that does not require any additional compression? Can a non-data scientist implement such projects successfully?

I will answer all these questions in my new project.
In industry (e.g., wind power, automotive), gearboxes often operate under random speed variations. A condition monitoring system is expected to detect faults, broken tooth conditions and assess their severity using vibration signals collected under different speed profiles.

Modern cars have hundreds of thousands of details and systems where it is necessary to predict breakdowns, control the state of temperature, pressure, etc.As such, in the automotive industry, it is critically important to create and embed TinyML models that can perform right on the sensors and open up a set of technological advantages, such as:

  • Internet independence
  • No waste of energy and money on data transfer
  • Advanced privacy and security

In my experiment I want to show how to easily create such a technology prototype to popularize the TinyML approach and use its incredible capabilities for the automotive industry.

I used Neuton TinyML. I selected this solution since it is free to use and automatically creates tiny machine learning models deployable even on 8-bit MCUs. According to Neuton developers, you can create a compact model in one iteration without compression and Raspberry Pi Pico: The chip employs two ARM Cortex-M0 + cores, 133 megahertz, which are also paired with 256 kilobytes of RAM when mounted on the chip. The device supports up to 16 megabytes of off-chip flash storage, has a DMA controller, and includes two UARTs and two SPIs, as well as two I2C and one USB 1.1 controller. The device received 16 PWM channels and 30 GPIO needles, four of which are suitable for analog data input. And with a net $4 price tag.

https://preview.redd.it/vgsmg5wybcq81.png?width=740&format=png&auto=webp&s=4aea393b4286c63884ada3ce6085b7ce33f22afb

The goal of this tutorial is to demonstrate how you can easily build a compact ML model to solve a multi-class classification task to detect broken tooth conditions in the gearbox.

Gearbox Fault Diagnosis Dataset includes the vibration dataset recorded by using SpectraQuest’s Gearbox Fault Diagnostics Simulator.

Dataset has been recorded using 4 vibration sensors placed in four different directions and under variation of load from ‘0’ to ’90’ percent. Two different scenarios are included:1) Healthy condition 2) Broken tooth condition

There are 20 files in total, 10 for a healthy gearbox and 10 for a broken one. Each file corresponds to a given load from 0% to 90% in steps of 10%. You can find this dataset via the link in the comments!

https://preview.redd.it/hwvhote1ccq81.png?width=899&format=png&auto=webp&s=a6d96585131a51650f8df566367e535949f4b4e3

The experiment will be conducted on a $4 MCU, with no cloud computing carbon footprints 🙂

Step 1: Model training

For model training, I’ll use the free of charge platform, Neuton TinyML. Once the solution is created, proceed to the dataset uploading (keep in mind that the currently supported format is CSV only).

https://preview.redd.it/cmv3gnz3ccq81.png?width=740&format=png&auto=webp&s=66bb1d5de48702840a14061b882b7daa4e08de67

It’s time to select the target variable or the output you want for each prediction. In this case, we have class as Output Variable: ‘target’

https://preview.redd.it/sr98p5t6ccq81.png?width=740&format=png&auto=webp&s=682e9bcdc5a20a81ebc2981121b25ec183e415fd

Since the dataset is a vibration, we need to prepare the data before training the model. To do this, I select the setting Digital Signal Processing (DSP).
Digital Signal Processing (DSP) option enables automatic preprocessing and feature extraction for data from gyroscopes, accelerometers, magnetometers, electromyography (EMG), etc. Neuton will automatically transform raw data and extract additional features to create precise models for signal classification.

For this model, we use Accuracy as a metric (but you can experiment with all available metrics).

https://preview.redd.it/35c3kjwbccq81.png?width=740&format=png&auto=webp&s=6b23996a3b0ff9e8622516e0f7d91a5e6cc90d3f

While the model is being trained, you can check out Exploratory Data Analysis generated once the data processing is complete, you will get the full information with all the data!

The target metric for me was: Accuracy 0.921372 and the trained model had the following characteristics:

https://preview.redd.it/d49yakkeccq81.png?width=740&format=png&auto=webp&s=ef74542e06803ed6e930861a0acbdd659628b018

Number of coefficients = 397, File Size for Embedding = 2.52 Kb. That’s super cool! It is a really small model!Upon the model training completion, click on the Prediction tab, and then click on the Download button next to Model for Embedding to download the model library file that we are going to use for our device.

Step 2: Embedding on Raspberry Pico

Once you have downloaded the model files, it’s time to add our custom functions and actions. I am using Arduino IDE to program Raspberry Pico.

https://preview.redd.it/ojyzy6chccq81.png?width=1280&format=png&auto=webp&s=d0448c3900d41fb82d87a5088dc0d3d6a17e2eac

I used Ubuntu for this tutorial, but the same instructions should work for other Debian-based distributions such as Raspberry Pi OS.

  1. Open a terminal and use wget to download the official Pico setup script.
    $ wget https://raw.githubusercontent.com/raspberrypi/pico-setup/master/pico_setup.sh
  2. In the same terminal modify the downloaded file so that it is executable.
    $ chmod +x pico_setup.sh
  3. Run pico_setup.sh to start the installation process. Enter your sudo password if prompted.
    $ ./pico_setup.sh
  4. Download the Arduino IDEand install it on your machine.
  5. Open a terminal and add your user to the group “dialout” and Log out or reboot your computer for the changes to take effect.
    $ sudo usermod -a -G dialout “$USER”
  6. Open the Arduino application and go to File >> Preferences. In the additional boards’ manager add this line and click OK.
    https://github.com/earlephilhower/arduino-pico/releases/download/global/package_rp2040_index.json

https://preview.redd.it/abcx2u6kccq81.png?width=740&format=png&auto=webp&s=ef176b3d9dbfdde234cd3b3570edd45e39578c8f

  1. Go to Tools >> Board >> Boards Manager. Type “pico” in the search boxand then install the Raspberry Pi Pico / RP2040 board. This will trigger another large download, approximately 300MB in size.

https://preview.redd.it/fccf3m1nccq81.png?width=740&format=png&auto=webp&s=ea795e0477be02c0035f7e1b1ae1191863f288d5

Note: Since we are going to make classification on the test dataset, we will use the CSV utility provided by Neuton to run inference on the data sent to the MCU via USB.

Here is our project directory,

user@desktop:~/Documents/Gearbox$ tree 

. ├── application.c ├── application.h ├── checksum.c ├── checksum.h ├── Gearbox.ino ├── model │ └── model.h ├── neuton.c ├── neuton.h ├── parser.c ├── parser.h ├── protocol.h ├── StatFunctions.c ├── StatFunctions.h

3 directories, 14 files 1 directory, 13 files

Checksum, parser program files are for generating handshake with the CSV serial utility tool and sending column data to the Raspberry Pico for inference.

Understanding the code part in Gearbox.ino file, we set different callbacks for monitoring CPU, time, and memory usage used while inferencing.

void setup() { 

Serial.begin(230400); while (!Serial);

pinMode(LED_RED, OUTPUT); pinMode(LED_BLUE, OUTPUT); pinMode(LED_GREEN, OUTPUT); digitalWrite(LED_RED, LOW); digitalWrite(LED_BLUE, LOW); digitalWrite(LED_GREEN, LOW);

callbacks.send_data = send_data; callbacks.on_dataset_sample = on_dataset_sample; callbacks.get_cpu_freq = get_cpu_freq; callbacks.get_time_report = get_time_report;

init_failed = app_init(&callbacks); }

The real magic happens here callbacks.on_dataset_sample=on_dataset_sample

static float* on_dataset_sample(float* inputs) 

{ if (neuton_model_set_inputs(inputs) == 0) { uint16_t index; float* outputs; uint64_t start = micros(); if (neuton_model_run_inference(&index, &outputs) == 0) { uint64_t stop = micros(); uint64_t inference_time = stop – start; if (inference_time > max_time) max_time = inference_time; if (inference_time < min_time) min_time = inference_time; static uint64_t nInferences = 0; if (nInferences++ == 0) { avg_time = inference_time; } else { avg_time = (avg_time * nInferences + inference_time) / (nInferences + 1); } digitalWrite(LED_RED, LOW); digitalWrite(LED_BLUE, LOW); digitalWrite(LED_GREEN, LOW); switch (index) { /** Green Light means Gearbox Broken (10% load), Blue Light means Gearbox Broken (40% load), and Red Light means Gearbox Broken (90% load) based upon the CSV test dataset received via Serial. **/ case 0: //Serial.println(“0: Healthy 10% load”); break; case 1: //Serial.println(“1: Broken 10% load”); digitalWrite(LED_GREEN, HIGH); break; case 2: //Serial.println(“2: Healthy 40% load”); break; case 3: //Serial.println(“3: Broken 40% load”); digitalWrite(LED_BLUE, HIGH); break; case 4: //Serial.println(“4: Healthy 90% load”); break; case 5: //Serial.println(“5: Broken 90% load”); digitalWrite(LED_RED, HIGH); break; default: break; } return outputs; } } return NULL; }

Once the input variables are ready, neuton_model_run_inference(&index, &outputs) is called which runs inference and returns outputs.

Installing CSV dataset Uploading Utility (Currently works on Linux and macOS only)

  • Install dependencies,

# For Ubuntu 

$ sudo apt install libuv1-dev gengetopt

For macOS

$ brew install libuv gengetopt

  • Clone this repo,

$ git clone https://github.com/Neuton-tinyML/dataset-uploader.git 

$ cd dataset-uploader

  • Run make to build the binaries,

$ make 

Once it’s done, you can try running the help command, it’s should be similar to shown below

user@desktop:~/dataset-uploader$ ./uploader -h 

Usage: uploader [OPTION]… Tool for upload CSV file MCU -h, –help Print help and exit -V, –version Print version and exit -i, –interface=STRING interface (possible values=”udp”, “serial” default=serial’) -d, –dataset=STRING Dataset file (default=
./dataset.csv’) -l, –listen-port=INT Listen port (default=50000′) -p, –send-port=INT Send port (default=
50005′) -s, –serial-port=STRING Serial port device (default=/dev/ttyACM0′) -b, –baud-rate=INT Baud rate (possible values=”9600″, “115200”, “230400” default=
230400′) –pause=INT Pause before start (default=`0′)

Step 3: Running inference on Raspberry Pico

Upload the program on the Raspberry Pico,

https://preview.redd.it/rib4jtg3dcq81.png?width=740&format=png&auto=webp&s=2bf5d32b6865c52f297cd160da305fc09df49a38

Once uploaded and running, open a new terminal and run this command:

$ ./uploader -s /dev/ttyACM0 -b 230400 -d /home/vil/Desktop/Gearbox_10_40_90_test.csv 

https://preview.redd.it/pq2zsyl6dcq81.png?width=740&format=png&auto=webp&s=225f05ab4420f52b4f546f6596e8c85963aa8942

The inference has started running, once it is completed for the whole CSV dataset it will print a full summary.

>> Request performace report 

Resource report: CPU freq: 125000000 Flash usage: 2884 RAM usage total: 2715 RAM usage: 2715 UART buffer: 42

Performance report: Sample calc time, avg: 44172.0 us Sample calc time, min: 43721.0 us Sample calc time, max: 44571.0 us

I tried to build the same model with TensorFlow and TensorFlow Lite as well. My model built with Neuton TinyML turned out to be 4.3% better in terms of Accuracy and 15.3 times smaller in terms of model size than the one built with TF Lite. Speaking of the number of coefficients, TensorFlow’s model has,9, 330 coefficients, while Neuton’s model has only 397 coefficients (which is 23.5 times smallerthan TF!).

The resultant model footprint and inference time are as follows:

https://preview.redd.it/i1yyxl5mdcq81.png?width=740&format=png&auto=webp&s=53996adaa83ca6a1d243a88ebba5cc145ee5e7ae

This tutorial vividly demonstrates the huge impact that TinyML technologies can provide on the automotive industry. You can have literally zero data science knowledge but still rapidly build super compact ML models to effectively solve practical challenges. And the best part, it’s all possible by using an absolutely free solution and a super cheap MCU!
submitted by /u/literallair
[visit reddit] [comments]

Categories
Misc

Where to hire help with TensorFlow for beginner?

After spending a month learning TensorFlow working through many 5-8 hour youtube videos, articles, and documentation I have a model that somewhat works for image classification. It’s been fun but I’m at a point now where experimenting to get improvements is very slow and sparse and I feel that outside 1 on 1 remote connect/help would give me a really good push to improvements. Is there any site where I can hire someone for an hour or two to just review my model, my results, my dataset and get advice on how to improve (within my capability)? Reddit forums are helpful but I feel that I have too many small questions and need more of a holistic oversight.

I looked at mentorcruise which might work but it seems to be more for students. I’m skeptical about upwork based on past results.

submitted by /u/m1g33
[visit reddit] [comments]

Categories
Misc

Teens Develop Handwriting-Recognition AI for Detecting Parkinson’s Disease

When Tanish Tyagi published his first research paper a year ago on deep learning to detect dementia, it started a family-driven pursuit. Great-grandparents in his family had suffered from Parkinson’s, a genetic disease that affects more than 10 million people worldwide. So the now 16-year-old turned to that next, together with his sister, Riya, 14. Read article >

The post Teens Develop Handwriting-Recognition AI for Detecting Parkinson’s Disease appeared first on NVIDIA Blog.

Categories
Misc

Build Speech AI in Multiple Languages and Train Large Language Models with the Latest from Riva and NeMo Megatron

Graphical representation of automatic speech recognition for transcription, controllable text-to-speech, and natural language processing in a chatbot.Read a recap of conversational AI announcements from NVIDIA GTC.Graphical representation of automatic speech recognition for transcription, controllable text-to-speech, and natural language processing in a chatbot.
Major updates to Riva, an SDK for building speech AI applications, and a paid Riva Enterprise offering were announced at NVIDIA GTC 2022 last week. Several key updates to NeMo Megatron, a framework for training Large Language Models, were also announced. 

Riva 2.0 general availability

Riva offers world-class accuracy for real-time automatic speech recognition (ASR) and text-to-speech (TTS) skills across multiple languages and can be deployed on-prem, in any cloud. Industry leaders such as Snap, T-Mobile, RingCentral, and Kore.ai use Riva in customer care center applications, transcription, and virtual assistants.

The latest Riva version includes:

  • ASR in multiple languages: English, Spanish, German, Russian, and Mandarin.
  • High-quality TTS voices customizable for unique voice fonts.
  • Domain-specific customization with TAO Toolkit or NVIDIA NeMo for unparalleled accuracy in accent, domain, and country-specific jargon.
  • Support to run in cloud, on-prem, and on embedded platforms.
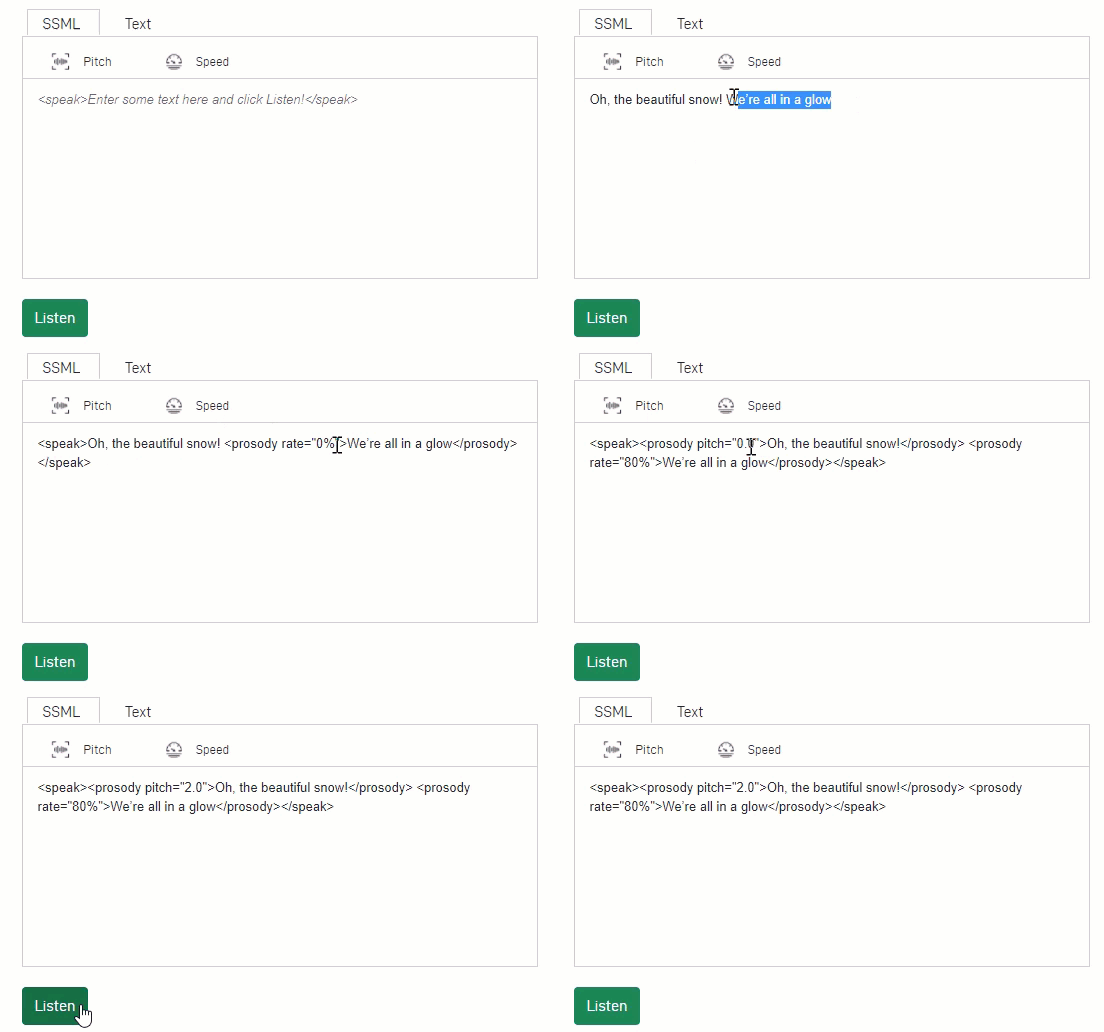
A GIF showing how to control Riva text-to-speech pitch and speed using SSML tags.
Figure 1: NVIDIA Riva controllable text-to-speech makes it easy to adjust pitch and speed using SSML tags.

Try Riva automatic speech recognition on the Riva product page.

Defined.ai has collaborated with NVIDIA to provide a smooth workflow for enterprises looking to purchase speech training and validation data across languages, domains, and recording types. A sample of the DefinedCrowd dataset for NVIDIA developers can be found here.

Download Riva, which is available free for members of the NVIDIA Developer program from NGC.

Riva Enterprise

NVIDIA also introduced Riva Enterprise, a paid offering for enterprises deploying Riva at scale with business-standard support from NVIDIA experts. 

Benefits include:

  • Unlimited use of ASR and TTS services on any cloud and on-prem platforms.
  • Access to NVIDIA AI experts during local business hours for guidance on configurations and performance.
  • Long-term support for maintenance control and upgrade schedule.
  • Priority access to new releases and features.

Riva Enterprise is available as a free trial on NVIDIA Launchpad for enterprises to evaluate and prototype their applications.

Riva Enterprise on launchpad includes guided labs to:

  • Interact with Real-Time Speech AI APIs.
  • Add Speech AI Capabilities to a Conversational AI Application. 
  • Fine-Tune a Speech AI Pipeline on Custom Data for Higher Accuracy.

Apply for your Riva Enterprise trial.

Learn more about how to build, optimize, and deploy speech AI applications from the Conversational AI Demystified GTC session.


NeMo Megatron

NVIDIA announced new updates to NVIDIA NeMo Megatron, a framework for training large language models (LLM) up to trillions of parameters. Built on innovations from the Megatron paper, with NeMo Megatron research institutions and enterprises can train any LLM to convergence. NeMo Megatron provides data preprocessing, parallelism (data, tensor, and pipeline), orchestration and scheduling, and auto-precision adaptation.

It consists of thoroughly tested recipes, popular LLM architecture implementations, and necessary tools for organizations to quickly start their LLM journey.

AI Sweden, JD.com, Naver, and the University of Florida are early adopters of NVIDIA technologies for building large language models.

The latest version includes:

  • Hyperparameter tuning tool—automatically creates recipes based on customers’ needs and infrastructure limitations. 
  • Reference recipes for T5 and mT5 models.
  • Support to train LLM on cloud, starting with Azure.
  • Distributed data preprocessing scripts to shorten end-to-end training time.

Apply for NeMo Megatron early access.

Learn more about interesting applications of LLMs and best practices to deploy them in the Natural Language Understanding in Practice: Lessons Learned from Successful Enterprise Deployments GTC session.