
 Here’s how to build efficient multi-camera pipelines taking advantage of the hardware accelerators on NVIDIA Jetson platform in just a few lines of Python.
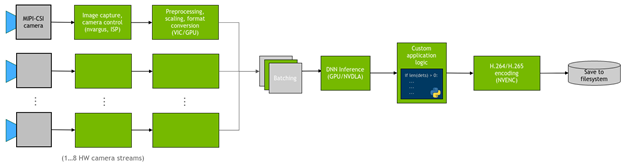
Multi-camera applications are becoming increasingly popular; they are essential for enabling autonomous robots, intelligent video analytics (IVA), and AR/VR applications. Regardless of the specific use case, there are common tasks that must always be implemented:
- Capture
- Preprocessing
- Encoding
- Display
In many cases, you also want to deploy a DNN on the camera streams and run custom logic on the detections. Figure 1 shows the general flow of the application.
In this post, I showcase how to realize these common tasks efficiently on NVIDIA Jetson platform. Specifically, I present jetmulticam, an easy-to-use Python package for creating multi-camera pipelines. I demonstrate a specific use case on a robot with a surround camera system. Finally, I add custom logic (person following) based on the DNN object detections to obtain the results shown in the following video:
Multi-camera hardware
There are many parameters to consider when choosing a camera: resolution, frame rate, optics, global/rolling shutter, interface, pixel size, and so on. For more information about compatible cameras from NVIDIA partners, see the comprehensive list.
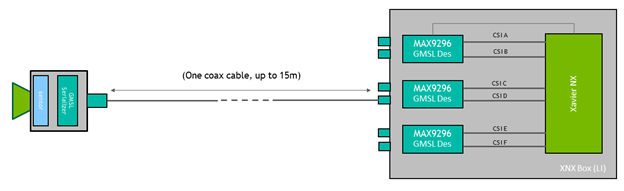
In this specific multi-camera setup, you use the following hardware:
- NVIDIA Jetson Xavier NX module
- GMSL2 capable carrier board from Leopard Imaging
- 3 × IMX185 GMSL2 cameras from Leopard Imaging
The IMX185 cameras each have a field of view of approximately 90°. Mount them orthogonally to one another for a total FOV of 270°, as shown in Figure 2.
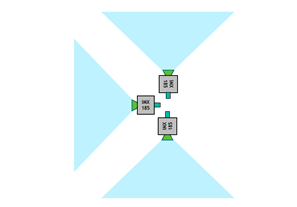
The cameras use the GMSL interface, which offers a lot of flexibility in positioning the cameras even meters away from the Jetson module. In this case, you can raise the cameras by ~0.5m to achieve a greater vertical FOV.
Getting started with Jetmulticam
First, download and install the NVIDIA Jetpack SDK on your Jetson board. Then, install the jetmulticam package:
$ git clone https://github.com/NVIDIA-AI-IOT/jetson-multicamera-pipelines.git
$ cd jetson-multicamera-pipelines
$ bash scripts/install_dependencies.sh
$ pip3 install Cython
$ pip3 install .
Basic multi-camera pipeline
After the setup, you can create a basic pipeline using the CameraPipeline class. Pass a list of cameras to include in the pipeline with the initializer argument. In the following example, the elements [0, 1, 2] correspond to device nodes /dev/video0, /dev/video1, and /dev/video2.
from jetmulticam import CameraPipeline
p = CameraPipeline([0, 1, 2])
And that’s it—the pipeline has been initialized and started. You can now read images from each camera in the pipeline and access them as numpy arrays.
img0 = p.read(0) # img0 is a np.array
img1 = p.read(1)
img2 = p.read(2)
Often, it is convenient to read from the camera in a loop, as in the following code example. The pipeline runs asynchronously from the main thread and read always gets the most recent buffer.
while True:
    img0 = p.read(0)
    print(img0.shape) # >> (1920, 1080, 3)
    time.sleep(1/10)
More complex AI pipeline
Now you can build a more complex pipeline. This time, use the CameraPipelineDNN class to compose a more complex pipeline, as well as two pretrained models from the NGC catalog: PeopleNet and DashCamNet.
import time
from jetmulticam import CameraPipelineDNN
from jetmulticam.models import PeopleNet, DashCamNet

if __name__ == "__main__":

    pipeline = CameraPipelineDNN(
        cameras=[2, 5, 8],
        models=[
            PeopleNet.DLA1,
            DashCamNet.DLA0,
            # PeopleNet.GPU
        ],
        save_video=True,
        save_video_folder="/home/nx/logs/videos",
        display=True,
    )

    while pipeline.running():
        arr = pipeline.images[0] # np.array with shape (1080, 1920, 3)
        dets = pipeline.detections[0] # Detections from the DNNs
        time.sleep(1/30)
Here’s the breakdown of the pipeline initialization:
- Cameras
- Models
- Hardware acceleration
- Saving video
- Displaying video
- Main loop
Cameras
Firstly, similarly to the previous example, the cameras argument is a list of sensors. In this case, you use cameras associated with device nodes:
/dev/video2/dev/video5/dev/video8
cameras=[2, 5, 8]
Models
The second argument, models, enables you to define pretrained models to run in the pipeline.
  models=[
           PeopleNet.DLA1,
           DashCamNet.DLA0,
           # PeopleNet.GPU
      ],
Here, you deploy two pretrained models from NGC:
- PeopleNet: an object detection model capable of identifying people, faces, and bags.
- DashCamNet: model capable of identifying objects in four classes: car, person, road sign, and bicycle.
For more information, see the model cards in NGC.
Hardware acceleration
The models run in real time using NVIDIA Deep Learning Accelerator (DLA). Specifically, you deploy PeopleNet on DLA0 (DLA Core 0) and DashCamNet on DLA1.
Distributing models between two accelerators helps increase the total throughput of the pipeline. Furthermore, DLA is even more power-efficient than GPU. As a result, the system consumes as little as ~10W under full load with the highest clock settings. Finally, in this configuration, the Jetson GPU remains free to accelerate more tasks with the 384 CUDA cores available on Jetson NX.
The following code example shows the list of currently supported model/accelerator combinations.
pipeline = CameraPipelineDNN(
    # ...
    models=[
        models.PeopleNet.DLA0,
        models.PeopleNet.DLA1,
        models.PeopleNet.GPU,
        models.DashCamNet.DLA0,
        models.DashCamNet.DLA1,
        models.DashCamNet.GPU
        ]
    # ...
)
Saving video
The next two arguments specify whether to store the encoded video and define the folder used for storage.
save_video=True,
save_video_folder="/home/nx/logs/videos",
Displaying video
As a final initialization step, configure the pipeline to display the video output on the screen for debugging purposes.
display=True
Main loop
Lastly, define the main loop. During runtime, the images are available under pipeline.images, and detection results under pipeline.detections.
while pipeline.running():
    arr = pipeline.images[0] # np.array with shape (1080, 1920, 3)
    dets = pipeline.detections[0] # Detections from the DNNs
    time.sleep(1/30)
The following code example shows the resulting detections. For each detection, you get a dictionary containing the following:
- Object class
- Object position defined as [left, width, top, height] in pixel coordinates
- Detection confidence
>>> pipeline.detections[0]
[
    # ...
    {
        "class": "person",
        "position": [1092.72 93.68 248.01 106.38], # L-W-T-H
        "confidence": 0.91
    },
    #...
]
Extending AI pipeline with custom logic
As the last step, you can extend the main loop to build custom logic using the DNN output. Specifically, you use the detection outputs from your cameras to implement basic person-following logic in the robot. The source code is available in the NVIDIA-AI-IOT/jetson-multicamera-pipelines GitHub repo.
- To find the human to follow, parse the pipeline.detections output. This logic is implemented in the find_closest_human function.
- Calculate the robot’s steering angle based on where the bounding box is located in dets2steer.
- If the human is in the left image, turn maximally left.
- If the human is in right image, turn maximally right.
- If the human is in the center image, turn proportionately to the X coordinate of the center of the bounding box.
The resulting video is saved to /home/nx/logs/videos, as you defined it during initialization.
Solution overview
Here’s a brief look at how jetmulticam works. The package dynamically creates and launches a GStreamer pipeline with the number of cameras that your application requires. Figure 4 shows how the underlying GStreamer pipeline looks when configured as in the person-following example. As you can see, all critical operations in the system, represented by green boxes, benefit from hardware acceleration.
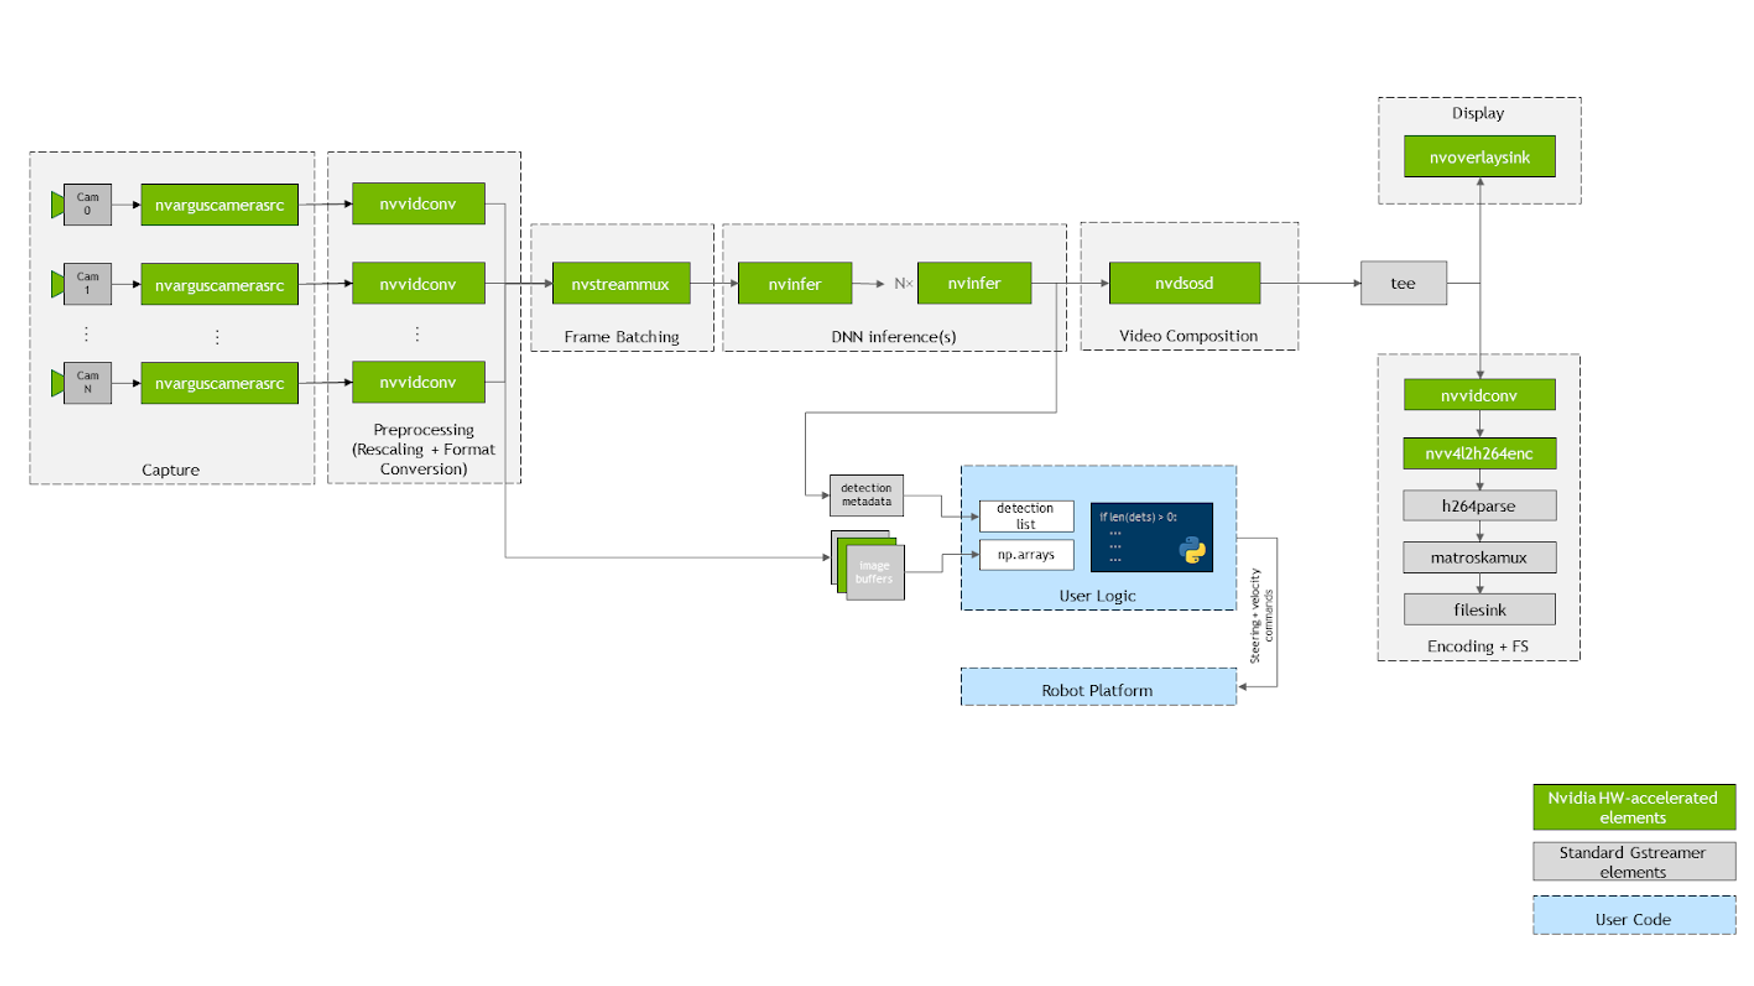
First, the video is captured using multiple CSI cameras, using nvarguscamerasrc elements on the diagram. Each individual buffer is rescaled and converted to RGBA format with either nvvidconv or nvvideoconvert. Next, the frames are batched using the component provided by the DeepStream SDK. By default, the batch size is equal to the number of cameras in the system.
To deploy the DNN models, take advantage of the nvinfer elements. In the demo, I deployed two models, PeopleNet and DashCamNet, on two different accelerators, DLA core 1 and DLA core 2, both available on the Jetson Xavier NX. However, it is possible to stack even more models on top of each other, if needed.
After the resulting bounding boxes are overlaid by the nvosd element, you then display them on an HDMI display, using nvoverlaysink, as well as encoding the video stream with the hardware-accelerated H264 encoder. Save to a .mkv file.
The images available in the Python code (for example, pipeline.images[0]) are parsed to numpy arrays by a callback function, or probe, registered on each of the video converter elements. Similarly, another callback function is registered on the sinkpad of the last nvinfer element that parses the metadata into a user-friendly list of detections. For more information about the source code or individual component configuration, see the create_pipeline function.
Conclusion
The hardware acceleration available on the NVIDIA Jetson platform combined with NVIDIA SDKs enables you to achieve outstanding real-time performance. For example, the person-following example runs two object-detection neural networks in real time on three camera streams, all while maintaining CPU utilization under 20%.
The Jetmulticam package, showcased in this post, enables you to build your own hardware-accelerated pipelines in Python, and to include custom logic on top of the detections.