
 In this post, I introduce new features of NVIDIA FLARE v2.1 and walk through proof-of-concept and production deployments of the NVIDIA FLARE platform.
NVIDIA FLARE (NVIDIA Federated Learning Application Runtime Environment) is an open-source Python SDK for collaborative computation. FLARE is designed with a componentized architecture that allows researchers and data scientists to adapt machine learning, deep learning, or general compute workflows to a federated paradigm to enable secure, privacy-preserving multi-party collaboration.
This architecture provides components for securely provisioning a federation, establishing secure communication, and defining and orchestrating distributed computational workflows. FLARE provides these components within an extensible API that allows customization to adapt existing workflows or easily experiment with novel distributed applications.
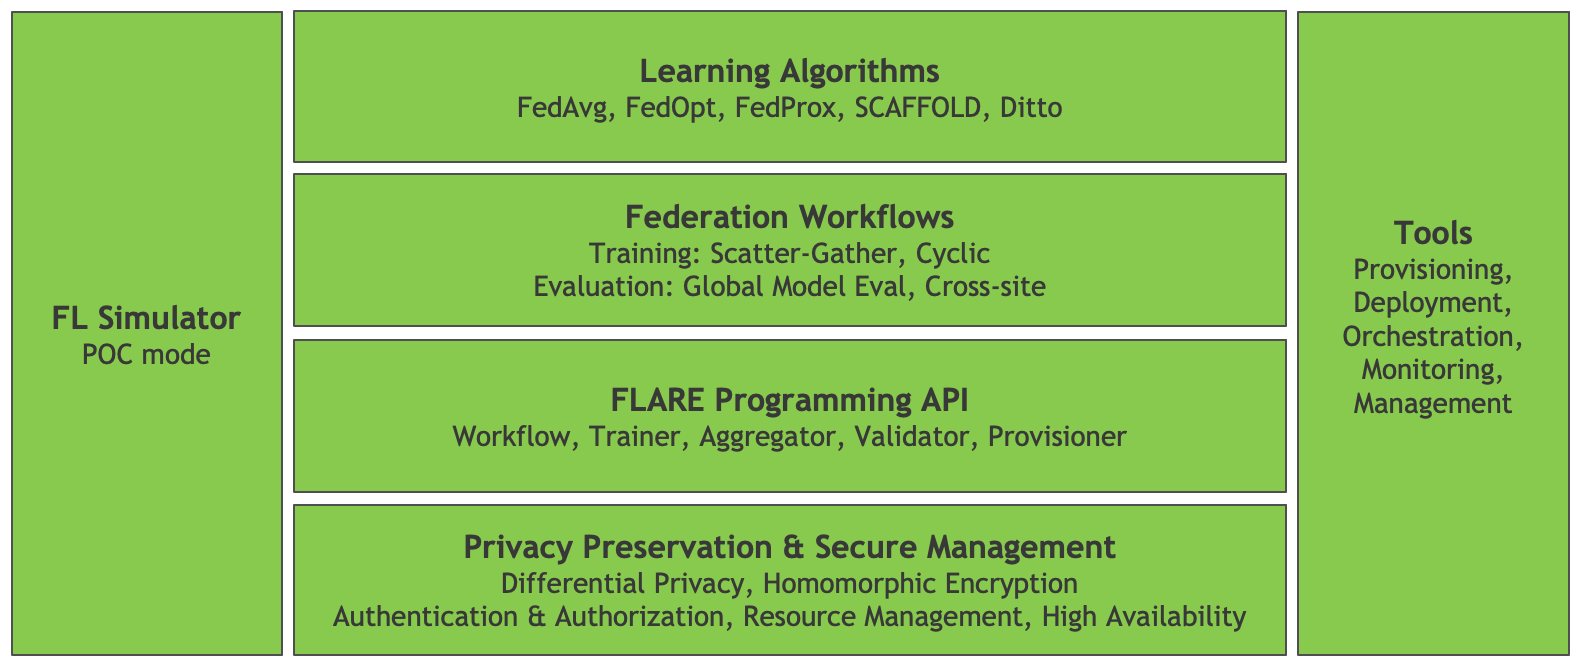
Figure 1 shows the high-level FLARE architecture with the foundational API components, including tools for privacy preservation and secure management of the platform. On top of this foundation are the building blocks for federated learning applications, with a set of federation workflows and learning algorithms.
Alongside the core FLARE stack are tools that allow experimentation and proof-of-concept (POC) development with the FL Simulator, coupled with a set of tools used to deploy and manage production workflows.
In this post, I focus on getting started with a simple POC and outline the process of moving from POC to a secure, production deployment. I also highlight some of the considerations when moving from a local POC to a distributed deployment.
Getting started with NVIDIA FLARE
To help you get started with NVIDIA FLARE, I walk through the basics of the platform and highlight some of the features in version 2.1 that help you bring a proof-of-concept into a production federated learning workflow.
Installation
The simplest way to get started with NVIDIA FLARE is in a Python virtual environment as described in Quickstart.
With just a few simple commands, you can prepare a FLARE workspace that supports a local deployment of independent server and clients. This local deployment can be used to run FLARE applications just as they would run on a secure, distributed deployment, without the overhead of configuration and deployment.
$ sudo apt update
$ sudo apt install python3-venv
$ python3 -m venv nvflare-env
$ source nvflare-env/bin/activate
(nvflare-env) $ python3 -m pip install -U pip setuptools
(nvflare-env) $ python3 -m pip install nvflare
Preparing the POC workspace
With the nvflare pip package installed, you now have access to the poc command. The only argument required when executing this command is the desired number of clients.
(nvflare-env) $ poc -h
usage: poc [-h] [-n NUM_CLIENTS]

optional arguments:
  -h, --help            show this help message and exit
  -n NUM_CLIENTS, --num_clients NUM_CLIENTS
                        number of client folders to create
After executing this command, for example poc -n 2 for two clients, you will have a POC workspace with folders for each of the participants: admin client, server, and site clients.
(nvflare-env) $ tree -d poc
poc
├── admin
│   └── startup
├── server
│   └── startup
├── site-1
│   └── startup
└── site-2
    └── startup
Each of these folders contains the configuration and scripts required to launch and connect the federation. By default, the server is configured to run on localhost, with site clients and the admin client connecting on ports 8002 and 8003, respectively. You can launch the server and clients in the background by running, for example:
(nvflare-env) $ for i in poc/{server,site-1,site-2}; do
    ./$i/startup/start.sh;
done
The server and client processes emit status messages to standard output and also log to their own poc/{server,site-?}/log.txt file. When launched as shown earlier, this standard output is interleaved. You may launch each in a separate terminal to prevent this interleaved output.
Deploying a FLARE application
After connecting the server and site clients, the entire federation can be managed with the admin client. Before you dive into the admin client, set up one of the examples from the NVIDIA FLARE GitHub repository.
(nvflare-env) $ git clone https://github.com/NVIDIA/NVFlare.git
(nvflare-env) $ mkdir -p poc/admin/transfer
(nvflare-env) $ cp -r NVFlare/examples/hello-pt-tb poc/admin/transfer/
This copies the Hello PyTorch with Tensorboard Streaming example into the admin client’s transfer directory, staging it for deployment to the server and site clients. For more information, see Quickstart (PyTorch with TensorBoard).
Before you deploy, you also install a few prerequisites.
(nvflare-env) $ python3 -m pip install torch torchvision tensorboard
Now that you’ve staged the application, you can launch the admin client.
(nvflare-env) $ ./poc/admin/startup/fl_admin.sh
Waiting for token from successful login...
Got primary SP localhost:8002:8003 from overseer. Host: localhost Admin_port: 8003 SSID: ebc6125d-0a
56-4688-9b08-355fe9e4d61a
login_result: OK token: d50b9006-ec21-11ec-bc73-ad74be5b77a4
Type ? to list commands; type "? cmdName" to show usage of a command.
>
After connecting, the admin client can be used to check the status of the server and clients, manage applications, and submit jobs. For more information about the capabilities of the admin client, see Operating NVFLARE – Admin Client, Commands, FLAdminAPI.
For this example, submit the hello-pt-tb application for execution.
> submit_job hello-pt-tb
Submitted job: 303ffa9c-54ae-4ed6-bfe3-2712bc5eba40
At this point, you see confirmation of job submission with the job ID, along with status updates on the server and client terminals showing the progress of the server controller and client executors as training is executed.
You can use the list_jobs command to check the status of the job. When the job has finished, use the download_job command to download the results of the job from the server.
> download_job 303ffa9c-54ae-4ed6-bfe3-2712bc5eba40
Download to dir poc/admin/startup/../transfer
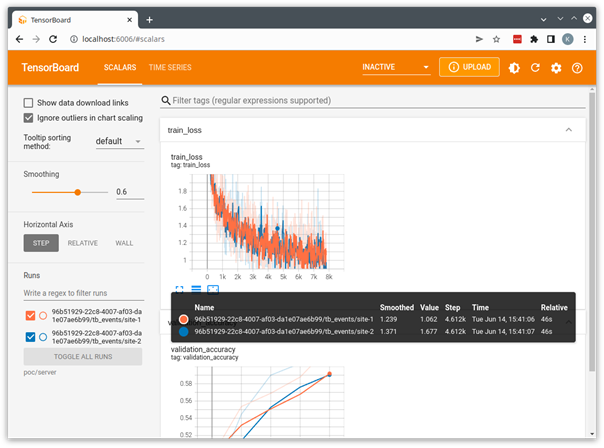
You can then start TensorBoard using the downloaded job directory as the TensorBoard log directory.
(nvflare-env) $ tensorboard
    --logdir=poc/admin/transfer
This starts a local TensorBoard server using the logs that were streamed from the clients to the server and saved in the server’s run directory. You can open a browser to http://localhost:6006 to visualize the run.
The example applications provided with NVIDIA FLARE are all designed to use this POC mode and can be used as a starting point for the development of your own custom applications.
Some examples, like the CIFAR10 example, define end-to-end workflows that highlight the different features and algorithms available in NVIDIA FLARE and use the POC mode, as well as secure provisioning discussed in the next section.
Moving from proof-of-concept to production
NVIDIA FLARE v2.1 introduces some new concepts and features aimed at enabling robust production federated learning, two of the most visible being high availability and support for multi-job execution.
- High availability (HA) supports multiple FL servers and automatically activates a backup server when the currently active server becomes unavailable. This is managed by a new entity in the federation, the overseer, that’s responsible for monitoring the state of all participants and orchestrating the cutover to a backup server when needed.
- Multi-job execution supports resource-based multi-job execution by allowing for concurrent runs, provided that the resources required by the jobs are satisfied.
Secure deployment with high availability
The previous section covered FLARE’s POC mode in which security features are disabled to simplify local testing and experimentation.
To demonstrate high availability for a production deployment, start again with a single-system deployment like that used in POC mode and introduce the concept of provisioning with the OpenProvision API.
Similar to the poc command, NVIDIA FLARE provides the provision command to drive the OpenProvision API. The provision command reads a project.yml file that configures the participants and components used in a secure deployment. This command can be used without arguments to create a copy of sample project.yml as a starting point.
For this post, continue to use the same nvflare-venv Python virtual environment as configured in the previous section.
(nvflare-env) $ provision
No project.yml found in current folder.  Is it OK to generate one for you? (y/N) y
project.yml was created.  Please edit it to fit your FL configuration.
For a secure deployment, you must first configure the participants in the federation. You can modify the participants section of the sample project.yml file to create a simple local deployment as follows. The changes from the default project.yml file are shown in bold text.
participants:
  # change overseer.example.com to the FQDN of the overseer
  - name: overseer
    type: overseer
    org: nvidia
    protocol: https
    api_root: /api/v1
    port: 8443
  # change example.com to the FQDN of the server
  - name: server1
    type: server
    org: nvidia
    fed_learn_port: 8002
    admin_port: 8003
    # enable_byoc loads python codes in app.  Default is false.
    enable_byoc: true
    components:


There are a few important points in defining the participants:
- The name for each participant must be unique. In the case of the overseer and servers, these names must be resolvable by all servers and clients, either as fully qualified domain names or as hostnames using
/etc/hosts(more on that to come). - For a local deployment, servers must use unique ports for FL and admin. This is not required for a distributed deployment where the servers run on separate systems.
- Participants should set
enable_byoc: trueto allow the deployment of apps with code in a/customfolder, as in the example applications.
The remaining sections of the project.yml file configure the builder modules that define the FLARE workspace. These can be left in the default configuration for now but require some consideration when moving from a secure local deployment to a true distributed deployment.
With the modified project.yml, you can now provision the secure startup kits for the participants.
(nvflare-env) $ provision -p project.yml
Project yaml file: project.yml.
Generated results can be found under workspace/example_project/prod_00.  Builder's wip folder removed.
$ tree -d workspace/
workspace/
└── example_project
    ├── prod_00
    │   ├── admin@nvidia.com
    │   │   └── startup
    │   ├── overseer
    │   │   └── startup
    │   ├── server1
    │   │   └── startup
    │   ├── server2
    │   │   └── startup
    │   ├── site-1
    │   │   └── startup
    │   └── site-2
    │       └── startup
    ├── resources
    └── state
As in POC mode, provisioning generates a workspace with a folder containing the startup kit for each participant, in addition to a zip file for each. The zip files can be used to easily distribute the startup kits in a distributed deployment. Each kit contains the configuration and startup scripts as in POC mode, with the addition of a set of shared certificates used to establish the identity and secure communication among participants.
In secure provisioning, these startup kits are signed to ensure that they have not been modified. Looking at the startup kit for server1, you can see these additional components.
(nvflare-env) $ tree workspace/example_project/prod_00/server1
workspace/example_project/prod_00/server1
└── startup
    ├── authorization.json
    ├── fed_server.json
    ├── log.config
    ├── readme.txt
    ├── rootCA.pem
    ├── server.crt
    ├── server.key
    ├── server.pfx
    ├── signature.json
    ├── start.sh
    ├── stop_fl.sh
    └── sub_start.sh
To connect the participants, all servers and clients must be able to resolve the servers and overseer at the name defined in project.yml. For a distributed deployment, this could be a fully qualified domain name.
You can also use /etc/hosts on each of the server and client systems to map the server and overseer name to its IP address. For this local deployment, use /etc/hosts to overload the loop-back interface. For example, the following code example adds entries for the overseer and both servers:
(nvflare-env) $ cat /etc/hosts
127.0.0.1 localhost
127.0.0.1 overseer
127.0.0.1 server1
127.0.0.1 server2
Because the overseer and servers all use unique ports, you can safely run all on the local 127.0.0.1 interface.
As in the previous section, you can loop over the set of participants to execute the start.sh scripts included in the startup kits to connect the overseer, servers, and site clients.
(nvflare-env) $ export WORKSPACE=workspace/example_project/prod_00/
(nvflare-env) $ for i in $WORKSPACE/{overseer,server1,server2,site-1,site-2}; do
    ./$i/startup/start.sh &
done
From here, the process of deploying an app using the admin client is the same as in POC mode with one important change. In secure provisioning, the admin client prompts for a username. In this example, the username is admin@nvidia.com, as configured in project.yml.
Considerations for secure, distributed deployment
In the previous sections, I discussed POC mode and secure deployment on a single system. This single-system deployment factors out a lot of the complexity of a true secure, distributed deployment. On a single system, you have the benefit of a shared environment, shared filesystem, and local networking. A production FLARE workflow on distributed systems must address these issues.
Consistent environment
Every participant in the federation requires the NVIDIA FLARE runtime, along with any dependencies implemented in the server and client workflow. This is easily accommodated in a local deployment with a Python virtual environment.
When running distributed, the environment is not as easy to constrain. One way to address this is running in a container. For the examples earlier, you could create a simple Dockerfile to capture dependencies.
ARG PYTORCH_IMAGE=nvcr.io/nvidia/pytorch:22.04-py3
FROM ${PYTORCH_IMAGE}

RUN python3 -m pip install -U pip
RUN python3 -m pip install -U setuptools
RUN python3 -m pip install torch torchvision tensorboard nvflare

WORKDIR /workspace/
RUN git clone https://github.com/NVIDIA/NVFlare.git
The WorkspaceBuilder referenced in the sample project.yml file includes a variable to define a Docker image:
# when docker_image is set to a Docker image name,
# docker.sh is generated on server/client/admin
docker_image: nvflare-pyt:latest
When docker_image is defined in the WorkspaceBuilder config, provisioning generates a docker.sh script in each startup kit.
Assuming this example Dockerfile has been built on each of the server, client, and admin systems with tag nvflare-pyt:latest, the container can be launched using the docker.sh script. This launches the container with startup kits mapped in and ready to run. This of course requires Docker and the appropriate permissions and network configuration on the server and client host systems.
An alternative would be to provide a requirements.txt file, as shown in many of the online examples, that can be pip installed in your nvflare-venv virtual environment before running the distributed startup kit.
Distributed systems
In the POC and secure deployment environments discussed so far, we’ve assumed a single system where you could leverage a local, shared filesystem, and where communication was confined to local network interfaces.
When running on distributed systems, you must address these simplifications to establish the federated system. Figure 3 shows the components required for a distributed deployment with high availability, including the relationship between the admin client, overseer, servers, and client systems.
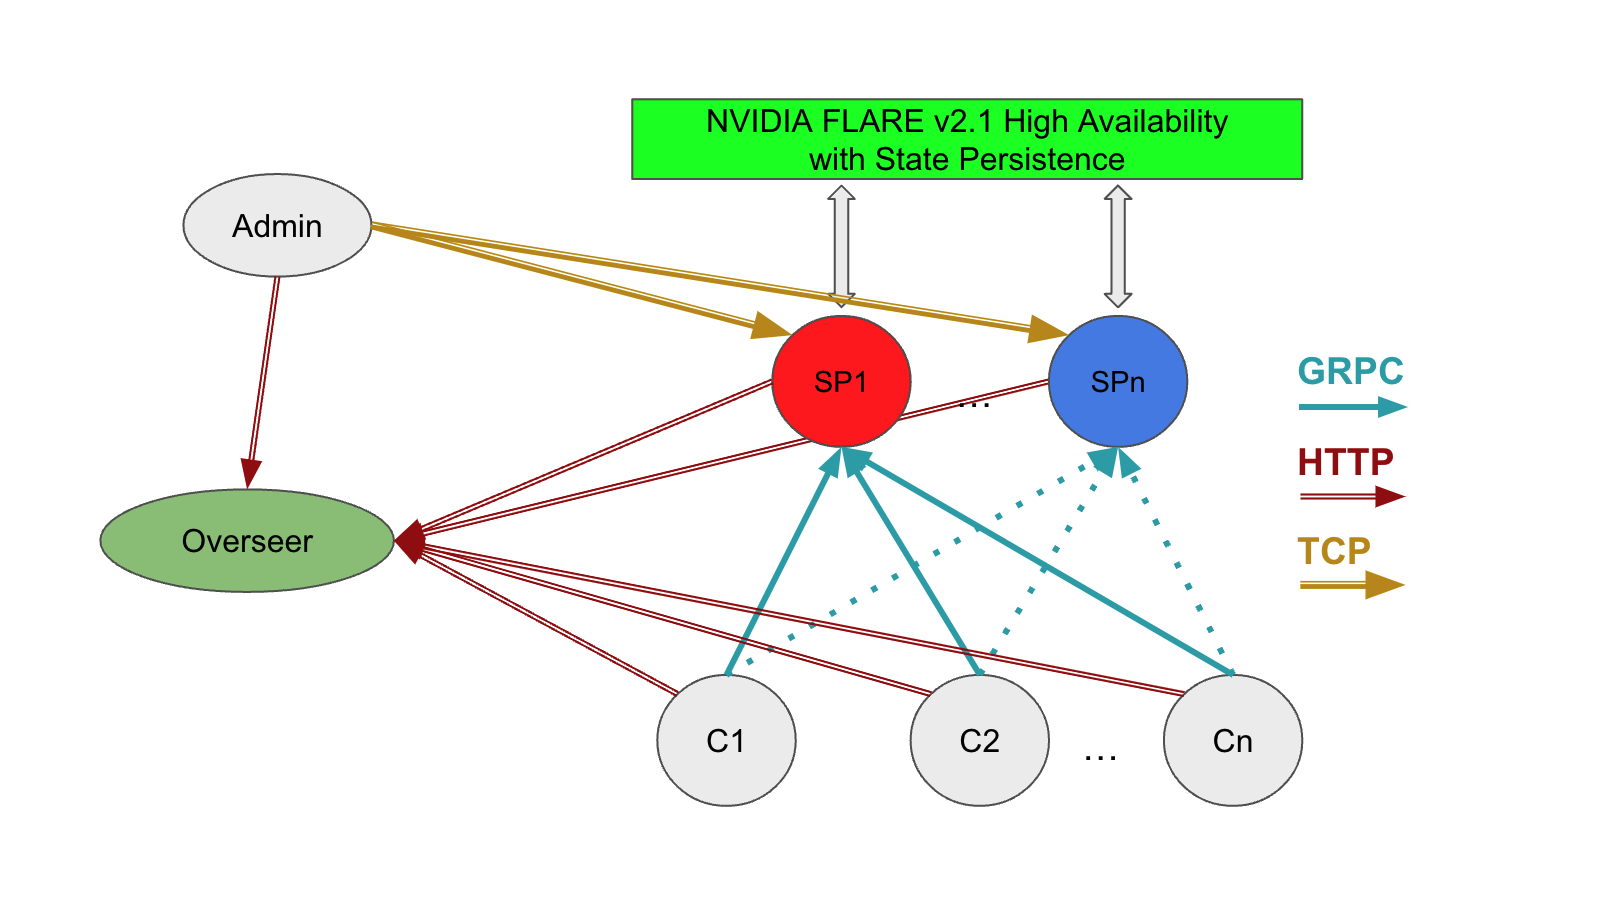
In this model, you must consider the following:
- Network: Client systems must be able to resolve the overseer and service providers at their fully qualified domain names or by mapping IP addresses to hostnames.
- Storage: Server systems must be able to access shared storage to facilitate cutover from the active (hot) service provider, as defined in the
project.ymlfilesnapshot_persistor. - Distribution of configurations or startup kits to each of the participants
- Application configuration and the location of client datasets
Some of these considerations can be addressed by running in a containerized environment as discussed in the previous section, where startup kits and datasets can be mounted on a consistent path on each system.
Other aspects of a distributed deployment depend on the local environment of the host systems and networks and must be addressed individually.
Summary
NVIDIA FLARE v2.1 provides a robust set of tools that enable a researcher or developer to bring a federated learning concept to a real-world production workflow.
The deployment scenarios discussed here are based on our own experience building the FLARE platform, and on the experience of our early adopters bringing federated learning workflows to production. Hopefully, these can serve as a starting point for the development of your own federated applications.
We are actively developing the FLARE platform to meet the needs of researchers, data scientists, and platform developers, and welcome any suggestions and feedback in the NVIDIA FLARE GitHub community!