
 Imagine that you have trained your model with PyTorch, TensorFlow, or the framework of your choice, are satisfied with its accuracy, and are considering deploying it as a service….
Imagine that you have trained your model with PyTorch, TensorFlow, or the framework of your choice, are satisfied with its accuracy, and are considering deploying it as a service. There are two important objectives to consider: maximizing model performance and building the infrastructure needed to deploy it as a service. This post discusses both objectives.
You can squeeze better performance out of a model by accelerating it across three stack levels:
- Hardware acceleration
- Software acceleration
- Algorithmic or network acceleration.
NVIDIA GPUs are the leading choice for hardware acceleration among deep learning practitioners, and their merit is widely discussed in the industry.
The conversation about GPU software acceleration typically revolves around libraries like cuDNN, NCCL, TensorRT, and other CUDA-X libraries.
Algorithmic or network acceleration revolves around the use of techniques like quantization and knowledge distillation that essentially make modifications to the network itself, applications of which are highly dependent on your models.
This need for acceleration is driven primarily by business concerns like reducing costs or improving the end-user experience by reducing latency and tactical considerations like deploying on models on edge devices having fewer compute resources.
Serving deep learning models
After the models are accelerated, the next step is to build a serving service to deploy your model, which comes with its own unique set of challenges. This is a nonexhaustive list:
- Will the service work on different hardware platforms?
- Will it handle other models that I have to deploy simultaneously?
- Will the service be robust?
- How do I reduce latency?
- Models are trained with different frameworks and tech stacks; how do I cater to this?
- How do I scale?
These are all valid questions and addressing each of them presents a challenge.
Solution overview
This post discusses using NVIDIA TensorRT, its framework integrations for PyTorch and TensorFlow, NVIDIA Triton Inference Server, and NVIDIA GPUs to accelerate and deploy your models.
NVIDIA TensorRT
NVIDIA TensorRT is an SDK for high-performance deep learning inference. It includes a deep learning inference optimizer and runtime that delivers low latency and high throughput for deep learning inference applications.
With its framework integrations with PyTorch and TensorFlow, you can speed up inference up to 6x faster with just one line of code.
NVIDIA Triton Inference Server
NVIDIA Triton Inference Server is an open-source inference-serving software that provides a single standardized inference platform. It can support running inference on models from multiple frameworks on any GPU or CPU-based infrastructure in the data center, cloud, embedded devices, or virtualized environments.
For more information, see the following videos:
- Introduction to NVIDIA TensorRT for High Performance Deep Learning Inference
- Getting Started with NVIDIA Torch-TensorRT
- Getting Started with TensorFlow-TensorRT
- Top 5 Reasons Why Triton is Simplifying Inference
Workflow overview
Before we dive into the details, here’s the overall workflow. To follow along, see the following resources:
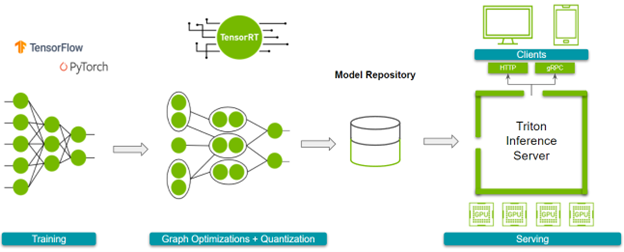
Figure 1 shows the steps that you must go through.
Before you start following along, be ready with your trained model.
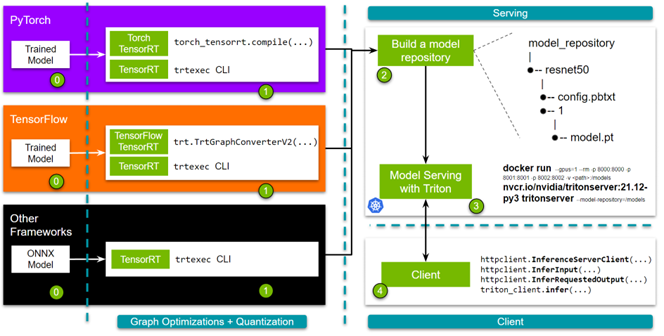
- Step 1: Optimize the models. You can do this with either TensorRT or its framework integrations. If you choose TensorRT, you can use the trtexec command line interface. For the framework integrations with TensorFlow or PyTorch, you can use the one-line API.
- Step 2: Build a model repository. Spinning up an NVIDIA Triton Inference Server requires a model repository. This repository contains the models to serve, a configuration file that specifies the details, and any required metadata.
- Step 3: Spin up the server.
- Step 4: Finally, we provide simple and robust HTTP and gRPC APIs that you can use to query the server!
Throughout this post, use the Docker containers from NGC. You may need to create an account and get the API key to access these containers. Now, here are the details!
Accelerating models with TensorRT
TensorRT accelerates models through graph optimization and quantization. You can access these benefits in any of the following ways:
- trtexec CLI tool
- TensorRT Python/C++ API
- Torch-TensorRT (integration with PyTorch)
- TensorFlow-TensorRT (integration with TensorFlow)

While TensorRT natively enables greater customization in graph optimizations, the framework integration provides ease of use for developers new to the ecosystem. As choosing the route a user might adopt is subject to the specific needs of their network, we would like to lay out all the options. For more information, see Speeding Up Deep Learning Inference Using NVIDIA TensorRT (Updated).
For TensorRT, there are several ways to build a TensorRT engine. For this post, use the trtexec CLI tool. If you want a script to export a pretrained model to follow along, use the export_resnet_to_onnx.py example. For more information, see the TensorRT documentation.
docker run -it --gpus all -v /path/to/this/folder:/trt_optimize nvcr.io/nvidia/tensorrt:-py3

trtexec --onnx=resnet50.onnx
        --saveEngine=resnet50.engine
        --explicitBatch
        --useCudaGraph
To use FP16, add --fp16 in the command. Before proceeding to the next step, you must know the names of your network’s input and output layers, which is required while defining the config for the NVIDIA Triton model repository. One easy way is to use polygraphy, which comes packaged with the TensorRT container.
polygraphy inspect model resnet50.engine --mode=basic
ForTorch-TensorRT, pull the NVIDIA PyTorch container, which has both TensorRT and Torch TensorRT installed. To follow along, use the sample. For more examples, visit the Torch-TensorRT GitHub repo.
#  is the yy:mm for the publishing tag for NVIDIA's Pytorch
# container; eg. 21.12

docker run -it --gpus all -v /path/to/this/folder:/resnet50_eg nvcr.io/nvidia/pytorch:-py3

python torch_trt_resnet50.py
To expand on the specifics, you are essentially using Torch-TensorRT to compile your PyTorch model with TensorRT. Behind the scenes, your model gets converted to a TorchScript module, and then TensorRT-supported ops undergo optimizations. For more information, see the Torch-TensorRT documentation.
model = torch.hub.load('pytorch/vision:v0.10.0', 'resnet50', pretrained=True).eval().to("cuda")

# Compile with Torch TensorRT;
trt_model = torch_tensorrt.compile(model,
    inputs= [torch_tensorrt.Input((1, 3, 224, 224))],
    enabled_precisions= { torch_tensorrt.dtype.float32} # Runs with FP32; can use FP16
)

# Save the model
torch.jit.save(trt_model, "model.pt")
For TensorFlow-TensorRT, the process is pretty much the same. First, pull the NVIDIA TensorFlow container, which comes with TensorRT and TensorFlow-TensorRT. We made a short script tf_trt_resnet50.py as an example. For more examples, see the TensorFlow TensorRT GitHub repo.
#  is the yy:mm for the publishing tag for the NVIDIA Tensorflow
# container; eg. 21.12

docker run -it --gpus all -v /path/to/this/folder:/resnet50_eg nvcr.io/nvidia/tensorflow:-tf2-py3

python tf_trt_resnet50.py
Again, you are essentially using TensorFlow-TensorRT to compile your TensorFlow model with TensorRT. Behind the scenes, your model gets segmented into subgraphs containing operations supported by TensorRT, which then undergo optimizations. For more information, see the TensorFlow-TensorRT documentation.
# Load model
model = ResNet50(weights='imagenet')
model.save('resnet50_saved_model')

# Optimize with tftrt

converter = trt.TrtGraphConverterV2(input_saved_model_dir='resnet50_saved_model')
converter.convert()

# Save the model
converter.save(output_saved_model_dir='resnet50_saved_model_TFTRT_FP32')
Now that you have optimized your model with TensorRT, you can proceed to the next step, setting up NVIDIA Triton.
Setting up NVIDIA Triton Inference Server
NVIDIA Triton Inference Server is built to simplify the deployment of a model or a collection of models at scale in a production environment. To achieve ease of use and provide flexibility, using NVIDIA Triton revolves around building a model repository that houses the models, configuration files for deploying those models, and other necessary metadata.
Look at the simplest case. Figure 4 has four key points. The config.pbtxt file (a) is the previously mentioned configuration file that contains, well, configuration information for the model.
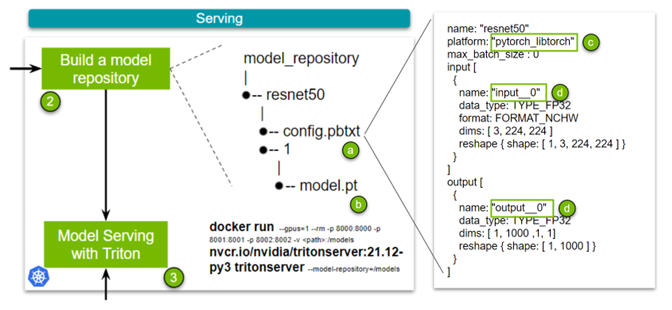
There are several key points to note in this configuration file:
- Name: This field defines the model’s name and must be unique within the model repository.
- Platform: (c)This field is used to define the type of the model: is it a TensorRT engine, PyTorch model, or something else.
- Input and Output: (d)These fields are required as NVIDIA Triton needs metadata about the model. Essentially, it requires the names of your network’s input and output layers and the shape of said inputs and outputs. In the case of TorchScript, as the name of input and output layers are absent, use
input__0. Datatype is set to FP32, and the input format is specified as (Channel, Height, Width) of 3, 224, 224.
There are minor differences between TensorRT, Torch-TensorRT, and TensorFlow-TensorRT workflows in this set, which boils down to specifying the platform and changing the name for the input and output layers. We made sample config files for all three (TensorRT, Torch-TensorRT, or TensorFlow-TensorRT). Lastly, you add the trained model (b).
Now that the model repository has been built, you spin up the server. For this, all you must do is pull the container and specify the location of your model repository. For more Information about scaling this solution with Kubernetes, see Deploying NVIDIA Triton at Scale with MIG and Kubernetes.
docker run --gpus=1 --rm -p 8000:8000 -p 8001:8001 -p 8002:8002 -v /full/path/to/docs/examples/model_repository:/models nvcr.io/nvidia/tritonserver:-py3 tritonserver --model-repository=/models
With your server up and running, you can finally build a client to fulfill inference requests!
Setting up NVIDIA Triton Client
The final step in the pipeline is to query the NVIDIA Triton Inference Server. You can send inference requests to the server through an HTTP or a gRPC request. Before diving into the specifics, install the required dependencies and download a sample image.
pip install torchvision
pip install attrdict
pip install nvidia-pyindex
pip install tritonclient[all]

wget  -O img1.jpg "https://bit.ly/3phN2jy"
In this post, use Torchvision to transform a raw image into a format that would suit the ResNet-50 model. It isn’t necessarily needed for a client. We have a much more comprehensive image client and a plethora of varied clients premade for standard use cases available in the triton-inference-server/client GitHub repo. However, for this explanation, we are going over a much simpler and skinny client to demonstrate the core of the API.
Okay, now you are ready to look at an HTTP client (Figure 5). Download the client script:
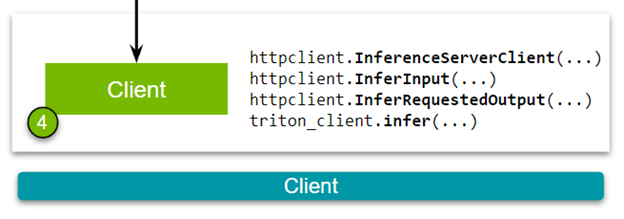
Building the client has the following steps. First, establish a connection between the NVIDIA Triton Inference Server and the client.
triton_client = httpclient.InferenceServerClient(url="localhost:8000")
Second, pass the image and specify the names of the input and output layers of the model. These names should be consistent with the specifications defined in the config file that you built while making the model repository.
test_input = httpclient.InferInput("input__0", transformed_img.shape, datatype="FP32")
test_input.set_data_from_numpy(transformed_img, binary_data=True)

test_output = httpclient.InferRequestedOutput("output__0", binary_data=True, class_count=1000)
Finally, send an inference request to the NVIDIA Triton Inference Server.
results = triton_client.infer(model_name="resnet50", inputs=[test_input], outputs=[test_output])
These code examples discuss the specifics of the Torch-TensorRT models. The only differences among different models (when building a client) would be the input and output layer names. We have built NVIDIA Triton clients with Python, C++, Go, Java, and JavaScript. For more examples, see the triton-inference-server/client GitHub repo.
Conclusion
This post covered an end-to-end pipeline for inference where you first optimized trained models to maximize inference performance using TensorRT, Torch-TensorRT, and TensorFlow-TensorRT. You then proceeded to model serving by setting up and querying an NVIDIA Triton Inference Server. All the software, including TensorRT, Torch-TensorRT, TensorFlow-TensorRT, and Triton discussed in this tutorial, are available today to download as a Docker container from NGC.