
 This tutorial shares how to apply inference over a predefined area of the incoming video frames.
Detecting objects in high-resolution input is a well-known problem in computer vision. When a certain area of the frame is of interest, inference over the complete frame is unnecessary. There are two ways to solve this issue:
- Use a large model with a high input resolution.
- Divide the large image into tiles and apply the smaller model to each one.
In many ways, the first approach is difficult. Training a model with large input often requires larger backbones, making the overall model bulkier. Training or deploying such a model also requires more computing resources. Larger models are deemed unfit for edge deployment on smaller devices.
The second method, dividing the entire image into tiles and applying smaller models to each tile has obvious advantages. Smaller models are used so lesser computation power is required in training and inference. No retraining is required to apply the model to the high-resolution input. Smaller models are also considered edge-deployment-friendly.
In this post, we discuss at how NVIDIA DeepStream can help in applying smaller models onto high-resolution input to detect a specific frame region.
Overview of video surveillance systems
Video surveillance systems are used to solve various problems such as the identification of pedestrians, vehicles, and cars. Nowadays, 4K and 8K cameras are used to capture details of the scene. The military uses aerial photography for various purposes and that also has a large area covered.
With the increase in resolution, the number of pixels increases exponentially. It takes a huge amount of computing power to process such a huge number of pixels, especially with a deep neural network.
Based on the input dimension selected during model building, deep neural networks operate on the fixed shape input. This fixed-size input is also known as the receptive field of the model. Typically, receptive fields vary from 256×256 to 1280×1280 and beyond in the detection and segmentation networks.
You might find that the region of interest is a small area and not the entire frame. In this case, if the detection is applied over the entire frame, it is an unnecessary use of compute resources. The DeepStream NvDsPreprocess plugin enables you to invest compute over a specific area of the frame.
DeepStream NvDsPreprocessing plugin
However, when tiling is applied to images or frames, especially over the video feeds, you require an additional element in the inference pipeline. Such an element is expected to perform a tiling mechanism that can be configured per stream, batched inference over the tile, and combining inference from multiple tiles onto single frames.
Interestingly, all these functionalities are provided in DeepStream with the Gst-NvDsPreprocess customizable plugin. It provides a custom library interface for preprocessing input streams. Each stream can have its own preprocessing requirements.
The default plugin implementation provides the following functionality:
- Streams with predefined regions of interest (ROIs) or tiles are scaled and format converted as per the network requirements for inference. Per-stream ROIs are specified in the config file.
- It prepares a raw tensor from the scaled and converted ROIs and is passed to the downstream plugins through user metadata. Downstream plugins can access this tensor for inference.
DeepStream pipeline with tiling
Modifying the existing code to support tiling is next.
Using the NvdsPreprocessing plugin
Define the preprocess element inside the pipeline:
preprocess = Gst.ElementFactory.make("nvdspreprocess", "preprocess-plugin")
NvDsPreprocess requires a config file as input:
preprocess.set_property("config-file", "config_preprocess.txt")
Add the preprocess element to the pipeline:
pipeline.add(preprocess)
Link the element to the pipeline:
streammux.link(preprocess)
preprocess.link(pgie)
Let the NvdsPreprocess plugin do preprocessing
The inference is done with the NvDsInfer plugin, which has frame preprocessing capabilities.
When you use the NvdsPreprocess plugin before NvDsInfer, you want the preprocessing (scaling or format conversion) to be done by NvdsPreprocess and not NvDsInfer. To do this, set the input-tensor-meta property of NvDsInfer to true. This let NvdsPreprocess do preprocessing and use preprocessed input tensors attached as metadata instead of preprocessing inside NvDsInfer itself.
The following steps are required to incorporate Gst-nvdspreprocess functionality into your existing pipeline.
Define and add the nvdspreprocess plugin to the pipeline:
preprocess = Gst.ElementFactory.make("nvdspreprocess", "preprocess-plugin")
pipeline.add(preprocess)
Set the input-tensor-meta property of NvDsInfer to true:
pgie.set_property("input-tensor-meta", True)
Define the config file property for the nvdspreprocess plugin:
preprocess.set_property("config-file", "config_preprocess.txt")
Link the preprocess plugin before the primary inference engine (pgie):
streammux.link(preprocess)
preprocess.link(pgie)
Creating the config file
The Gst-nvdspreprocess configuration file uses a key file format. For more information, see the config_preprocess.txt in the Python and C source code.
- The
[property]group configures the general behavior of the plugin.- The
[group-]group configures ROIs, tiles, and ull-frames for a group of streams withsrc-idvalues andcustom-input-transformation-functionfrom custom lib.
- The
[user-configs]group configures parameters required by the custom library, which is passed on to the custom lib through a map ofas a key-value pair. Then, custom lib must parse the values accordingly.
- The
The minimum required config_preprocess.txt looks like the following code example:
[property]
enable=1
target-unique-ids=1
    # 0=NCHW, 1=NHWC, 2=CUSTOM
network-input-order=0

network-input-order=0
processing-width=960
processing-height=544
scaling-buf-pool-size=6
tensor-buf-pool-size=6
    # tensor shape based on network-input-order
network-input-shape=12;3;544;960
    # 0=RGB, 1=BGR, 2=GRAY

network-color-format=0
    # 0=FP32, 1=UINT8, 2=INT8, 3=UINT32, 4=INT32, 5=FP16
tensor-data-type=0
tensor-name=input_1
    # 0=NVBUF_MEM_DEFAULT 1=NVBUF_MEM_CUDA_PINNED 2=NVBUF_MEM_CUDA_DEVICE 3=NVBUF_MEM_CUDA_UNIFIED
scaling-pool-memory-type=0
    # 0=NvBufSurfTransformCompute_Default 1=NvBufSurfTransformCompute_GPU 2=NvBufSurfTransformCompute_VIC
scaling-pool-compute-hw=0
    # Scaling Interpolation method
    # 0=NvBufSurfTransformInter_Nearest 1=NvBufSurfTransformInter_Bilinear 2=NvBufSurfTransformInter_Algo1
    # 3=NvBufSurfTransformInter_Algo2 4=NvBufSurfTransformInter_Algo3 5=NvBufSurfTransformInter_Algo4
    # 6=NvBufSurfTransformInter_Default
scaling-filter=0
custom-lib-path=/opt/nvidia/deepstream/deepstream/lib/gst-plugins/libcustom2d_preprocess.so
custom-tensor-preparation-function=CustomTensorPreparation

[user-configs]
pixel-normalization-factor=0.003921568
#mean-file=
#offsets=

[group-0]
src-ids=0;1;2;3
custom-input-transformation-function=CustomAsyncTransformation
process-on-roi=1
roi-params-src-0=0;540;900;500;960;0;900;500;0;0;540;900;
roi-params-src-1=0;540;900;500;960;0;900;500;0;0;540;900;
roi-params-src-2=0;540;900;500;960;0;900;500;0;0;540;900;
roi-params-src-3=0;540;900;500;960;0;900;500;0;0;540;900;
Processing-width and processing-height refer to the width and height of the slice onto the entire frame.
For network-input-shape, the current config file is configured to run 12 ROI at the most. To increase the ROI count, increase the first dimension to the required number, for example, network-input-shape=12;3;544;960.
In the current config file config-preprocess.txt, there are three ROIs per source and a total of 12 ROI for all four sources. The total ROIs from all the sources must not exceed the first dimension specified in the network-input-shape parameter.
Roi-params-src- Indicates III coordinates for source-. For each ROI specify left;top;width;height defining the ROI if process-on-roi is enabled. Gst-nvdspreprocess does not combine detection and count of objects in the overlapping tiles.
Code
The C code is downloadable from /opt/nvidia/deepstream/deepstream-6.0/source/app/sample_app/deepstream-preprocess-test.
The Python code is downloadable from the NVIDIA-AI-IOT/deepstream_python_apps GitHub repo.
Results
Figure 1 shows that you can specify one or more tiles. An object within the tile is detected and detection is not applied to the remaining area of the frame.
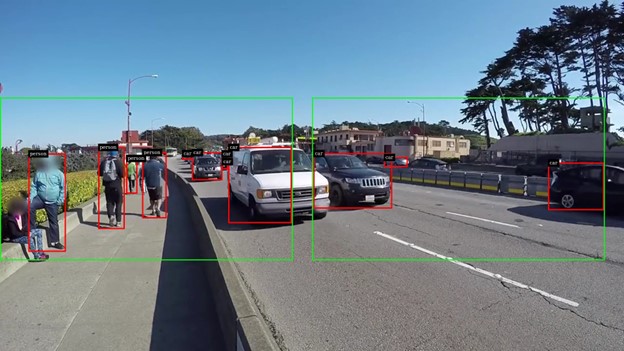
Gst-nvdspreprocess enables applying inference on a specific portion of the video (tile or region of interest). With Gst-nvdspreprocess, you can specify one or more tiles on a single frame.
Here are the performance metrics when yolov4 is applied over the entire frame compared to over the tile. Perf metrics are collected by increasing the number of streams up to the point either decoder or compute saturates and increasing the stream any further shows no gain in performance.
The video resolution of 1080p was used for performance benchmarks over the NVIDIA V100 GPU. Consider the tradeoff between performance and the number of tiles, as placing too many tiles increases the compute requirement.
Tiling with NvDsPreprocess helps in the selective inference over the portion of the video where it is required. In Figure 1, for instance, the inference can only be used on the sidewalk and not the entire frame.
Gst-nvdsanalytics performs analytics on metadata attached by nvinfer (primary detector) and nvtracker. Gst-nvdsanalytics can be applied to the tiles for ROI Filtering, Overcrowding Detection, Direction Detection, and Line Crossing.