Categories
Misc

Tensorflow Lite Segmentation Fault

I am running Tensorflow Lite on my Raspberry Pi 3b+ with a custom object detection mode. I have tested it on a Google COCO dataset and it works wonderfully but when I test it on my custom trained model it does not work despite the model passing TfLite Model Maker evaluation. When I run it the only error I get in my message is “Segmentation fault”. How can I fix this?

I am not able to upload my model to Stackoverflow but just some info about it. It is only detecting one object, It is Not quantized, it is trained based off the efficientdet_lite1 mode, and I trained it using the official Tensorflow Lite Model Maker Google Colab.

Here is the code used to interpret the model on my Pi.

https://pastebin.com/1at3ZAJd

I added a few print statements aswell to troubleshoot and it stops executing at around line 115.

Does anyone know how to fix this?

submitted by /u/MattDlr4
[visit reddit] [comments]

Categories
Misc

Advent of Code 2021 in pure TensorFlow – day 1

Advent of Code 2021 in pure TensorFlow - day 1 submitted by /u/pgaleone
[visit reddit] [comments]
Categories
Misc

The half_pixel_centers keyword seems to not exist in tf.image.resize in tf2.0 or tf.27

With the robotics set up we use opencv for the images. However in the cnn I use tf.io.decode_jpg to open the images. These two methods slighty alter the image and makes it such that the same image, but opened in the different methods can’t be classified on the cnn.

I found the differences in this blog: https://towardsdatascience.com/image-read-and-resize-with-opencv-tensorflow-and-pil-3e0f29b992be

which states that two things needs to be changed to ensure that the two files are the same

  1. dct_method=’INTEGER_ACCURATE’ needs to be added to the decode
  2. half_pixel_centers=True to the resize method and also force it to be bilinear.

However the half_pixel_centers keyword is not found

https://stackoverflow.com/questions/50591669/tf-image-resize-bilinear-vs-cv2-resize

This stackoverflow states that it is added in tf2.0 with a link to their github showing it has indeed been added: https://github.com/tensorflow/tensorflow/commit/3ae2c6691b7c6e0986d97b150c9283e5cc52c15f

About my code I map the dataset to a function that reads the file path

img = tf.io.read_file(file_path)

img = tf.io.decode_jpeg(img, channels=3, dct_method=’INTEGER_ACCURATE’)

resized img = tf.image.resize(img, (28,28), method=tf.image.ResizeMethod.BILINEAR, preserve_aspect_ratio=False, antialias=False, name=None, half_pixel_center=True)

I also tried it on an other machine with tf2.7 and it gives the same error.Could someone point out what I am doing wrong or perhaps there is a better way in general?

submitted by /u/Calond
[visit reddit] [comments]

Categories
Misc

Why am I not able to train 1,859 75×75 RGB images on my M1 Pro 10-core CPU, 16-core GPU 16-core Neural Engine with 16 GB RAM?

I’ve followed the same steps provided by Apple (https://developer.apple.com/metal/tensorflow-plugin/) to install the deep learning development environment on TensorFlow (based on tensorflow-metal plugin) on my MacBook Pro. My model employs the VGG19 through transfer-learning as its summary can be seen below. While I train this model on 1,859 75×75 RGB images, getting the error tensorflow.python.framework.errors_impl.InternalError: Failed copying input tensor from /job:localhost/replica:0/task:0/device:CPU:0 to /job:localhost/replica:0/task:0/device:GPU:0 in order to run _EagerConst: Dst tensor is not initialized. Isn’t this task an easy one for such a powerful SoC like M1 Pro 10-core CPU, 16-core GPU 16-core Neural Engine with 16 GB RAM? What is the issue here? Is this a bug or do I need to do some configuration to overcome this situation?

Here is the stack trace:

Metal device set to: Apple M1 Pro

systemMemory: 16.00 GB

maxCacheSize: 5.33 GB

Model: “sequential”

_________________________________________________________________

Layer (type) Output Shape Param #

=================================================================

vgg19 (Functional) (None, 512) 20024384

_________________________________________________________________

flatten (Flatten) (None, 512) 0

_________________________________________________________________

dense (Dense) (None, 1859) 953667

=================================================================

Total params: 20,978,051

Trainable params: 953,667

Non-trainable params: 20,024,384

_________________________________________________________________

Traceback (most recent call last):

File “/Users/talhakabakus/PycharmProjects/keras-matlab-comp-metal/run.py”, line 528, in <module>

run_all_stanford_dogs()

File “/Users/talhakabakus/PycharmProjects/keras-matlab-comp-metal/run.py”, line 481, in run_all_stanford_dogs

H = model.fit(X_train, y_train_cat, validation_split=n_val_split, epochs=n_epochs,

File “/Users/talhakabakus/miniforge3/envs/keras-matlab-comp-metal/lib/python3.9/site-packages/keras/engine/training.py”, line 1134, in fit

data_handler = data_adapter.get_data_handler(

File “/Users/talhakabakus/miniforge3/envs/keras-matlab-comp-metal/lib/python3.9/site-packages/keras/engine/data_adapter.py”, line 1383, in get_data_handler

return DataHandler(*args, **kwargs)

File “/Users/talhakabakus/miniforge3/envs/keras-matlab-comp-metal/lib/python3.9/site-packages/keras/engine/data_adapter.py”, line 1138, in __init__

self._adapter = adapter_cls(

File “/Users/talhakabakus/miniforge3/envs/keras-matlab-comp-metal/lib/python3.9/site-packages/keras/engine/data_adapter.py”, line 230, in __init__

x, y, sample_weights = _process_tensorlike((x, y, sample_weights))

File “/Users/talhakabakus/miniforge3/envs/keras-matlab-comp-metal/lib/python3.9/site-packages/keras/engine/data_adapter.py”, line 1031, in _process_tensorlike

inputs = tf.nest.map_structure(_convert_numpy_and_scipy, inputs)

File “/Users/talhakabakus/miniforge3/envs/keras-matlab-comp-metal/lib/python3.9/site-packages/tensorflow/python/util/nest.py”, line 869, in map_structure

structure[0], [func(*x) for x in entries],

File “/Users/talhakabakus/miniforge3/envs/keras-matlab-comp-metal/lib/python3.9/site-packages/tensorflow/python/util/nest.py”, line 869, in <listcomp>

structure[0], [func(*x) for x in entries],

File “/Users/talhakabakus/miniforge3/envs/keras-matlab-comp-metal/lib/python3.9/site-packages/keras/engine/data_adapter.py”, line 1026, in _convert_numpy_and_scipy

return tf.convert_to_tensor(x, dtype=dtype)

File “/Users/talhakabakus/miniforge3/envs/keras-matlab-comp-metal/lib/python3.9/site-packages/tensorflow/python/util/dispatch.py”, line 206, in wrapper

return target(*args, **kwargs)

File “/Users/talhakabakus/miniforge3/envs/keras-matlab-comp-metal/lib/python3.9/site-packages/tensorflow/python/framework/ops.py”, line 1430, in convert_to_tensor_v2_with_dispatch

return convert_to_tensor_v2(

File “/Users/talhakabakus/miniforge3/envs/keras-matlab-comp-metal/lib/python3.9/site-packages/tensorflow/python/framework/ops.py”, line 1436, in convert_to_tensor_v2

return convert_to_tensor(

File “/Users/talhakabakus/miniforge3/envs/keras-matlab-comp-metal/lib/python3.9/site-packages/tensorflow/python/profiler/trace.py”, line 163, in wrapped

return func(*args, **kwargs)

File “/Users/talhakabakus/miniforge3/envs/keras-matlab-comp-metal/lib/python3.9/site-packages/tensorflow/python/framework/ops.py”, line 1566, in convert_to_tensor

ret = conversion_func(value, dtype=dtype, name=name, as_ref=as_ref)

File “/Users/talhakabakus/miniforge3/envs/keras-matlab-comp-metal/lib/python3.9/site-packages/tensorflow/python/framework/tensor_conversion_registry.py”, line 52, in _default_conversion_function

return constant_op.constant(value, dtype, name=name)

File “/Users/talhakabakus/miniforge3/envs/keras-matlab-comp-metal/lib/python3.9/site-packages/tensorflow/python/framework/constant_op.py”, line 271, in constant

return _constant_impl(value, dtype, shape, name, verify_shape=False,

File “/Users/talhakabakus/miniforge3/envs/keras-matlab-comp-metal/lib/python3.9/site-packages/tensorflow/python/framework/constant_op.py”, line 283, in _constant_impl

return _constant_eager_impl(ctx, value, dtype, shape, verify_shape)

File “/Users/talhakabakus/miniforge3/envs/keras-matlab-comp-metal/lib/python3.9/site-packages/tensorflow/python/framework/constant_op.py”, line 308, in _constant_eager_impl

t = convert_to_eager_tensor(value, ctx, dtype)

File “/Users/talhakabakus/miniforge3/envs/keras-matlab-comp-metal/lib/python3.9/site-packages/tensorflow/python/framework/constant_op.py”, line 106, in convert_to_eager_tensor

return ops.EagerTensor(value, ctx.device_name, dtype)

tensorflow.python.framework.errors_impl.InternalError: Failed copying input tensor from /job:localhost/replica:0/task:0/device:CPU:0 to /job:localhost/replica:0/task:0/device:GPU:0 in order to run _EagerConst: Dst tensor is not initialized.

Process finished with exit code 1

submitted by /u/talhak
[visit reddit] [comments]

Categories
Misc

Using Neural Nano-Optics Researchers Create a Camera the Size of a Salt Grain

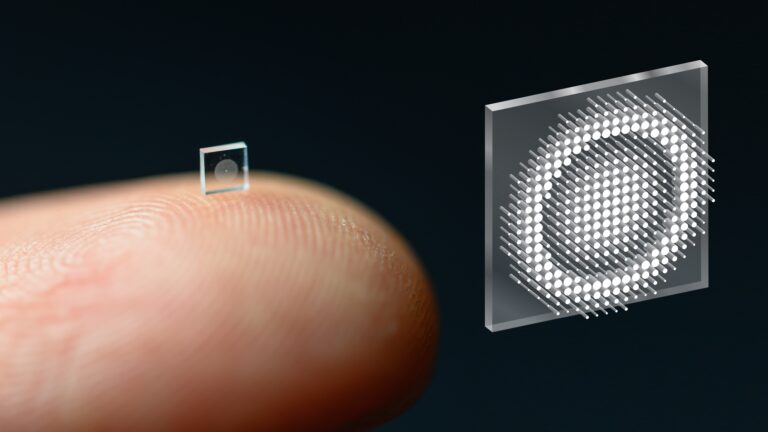
A picture of a finger with a half milimeter metasurface next to a blown-up version of the metasurface showing the optical cylinders spread out in a circular pattern.The groundbreaking technology uses an optical metasurface and machine-learning algorithms to produce high-quality color images with a wide field of view.A picture of a finger with a half milimeter metasurface next to a blown-up version of the metasurface showing the optical cylinders spread out in a circular pattern.
A team of researchers from Princeton and the University of Washington created a new camera that captures stunning images and measures in at only a half-millimeter—the size of a coarse grain of salt. 

The new study, published in Nature Communications, outlines the use of optical metasurfaces with machine learning to produce high-quality color imagery, with a wide field of view. The device could be used across industries ranging from robotics to most notably the medical field, to help with disease diagnosis.

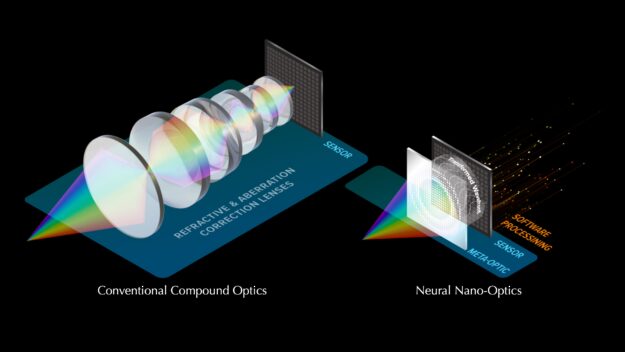
Optical metasurfaces rely on a new method of light manipulation, using cylindrical posts set on a small, square surface. The posts, which vary in geometry, work like antennas that can capture incoming photons (waves of electromagnetic radiation). These waves are then sent as signals from the metasurface to a computer to interpret and produce an image.

A graphic showing how a traditional camera with 6 lenses and a sensor works versus neural non-optics that illustrates a metasurface, sensor area, and software processing phase to create an image.
Figure 1. Comparison of a conventional lens versus neural nano-optics.

Tiny cameras offer vast potential for medical use, from brain imaging to minimally invasive endoscopies. But, up to this point, the technology has captured blurry, distorted images, with a limited field of view. 

The researchers employed neural nano-optics—which combines optical metasurfaces with neural feature-based image reconstruction—to interpret the data and produce higher-quality images.

“To recover images from the measured data, we propose a feature-based deconvolution method that employs a differentiable inverse filter together with neural networks for feature extraction and refinement,” said senior author Felix Heide, an assistant professor of computer science at Princeton.

The team tested machine-learning algorithms with a simulator, comparing different configurations of the antennas. With 1.6 million cylinders on the optical surface and complex light interactions, the simulations demand massive amounts of memory. 

The algorithm was tested and trained using the cuDNN-accelerated TensorFlow deep learning framework with an NVIDIA P100 GPU. The result is a new system capable of producing images comparable to a modern camera lens, from a device 500,000 times smaller. According to the study, the new camera is also 10 times better at filtering out errors than previous techniques.

Figure 2. A video comparing an image taken by the nano-camera (right) and the previous best (left). Courtesy of Princeton Computational Imaging Lab.

“It’s been a challenge to design and configure these little microstructures to do what you want,” Ethan Tseng, a computer science Ph.D. student at Princeton and study co-lead said in a press release. “For this specific task of capturing large field of view RGB images, it’s challenging because there are millions of these little microstructures, and it’s not clear how to design them in an optimal way.”

The team is now working to add more computational abilities to the camera and envisions features such as object detection and sensors for medicine or robotics in future iterations. Beyond that, they see a use case where ultra-compact imagers turn surfaces into sensors. 

“We could turn individual surfaces into cameras that have ultra-high resolution. So you wouldn’t need three cameras on the back of your phone anymore, but the whole back of your phone would become one giant camera. We can think of completely different ways to build devices in the future,” said Heide.

The raw capture data and code used to design and evaluate the neural nano-optic is publicly accessible. More information is also available on the Neural Nano-Optics for High-quality Thin Lens Imaging webpage.


Read the published research in Nature Communications. >>
Read the press release. >>

Feature image courtesy of Princeton/Ethan Tseng, et al.

Categories
Misc

Pre-processing layers in keras: What they are and how to use them

For keras, the last two releases have brought important new functionality, in terms of both low-level infrastructure and workflow enhancements. This post focuses on an outstanding example of the latter category: a new family of layers designed to help with pre-processing, data-augmentation, and feature-engineering tasks.

Categories
Misc

NVIDIA Partners with iD Tech on New AI and Machine Learning Course

NVIDIA has partnered with iD Tech to create the Artificial Intelligence and Machine Learning certification program, a boot-camp style course for teens.

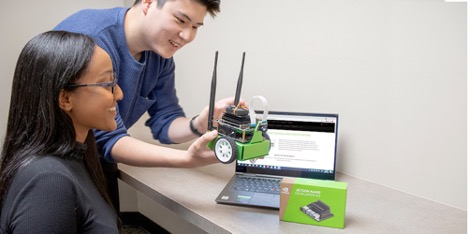
NVIDIA has partnered with iD Tech, a leading STEM educator for kids and teens, to create a brand new certification program based on the NVIDIA Jetson NanoTM. The Artificial Intelligence and Machine Learning certification program is a 10-week long, bootcamp-style virtual course for students ages 13-19 who are looking to boost their Python skills and dive into AI. 

NVIDIA instructor stands next to student who is working on laptop.
Image 1. Students working with NVIDIA instructors.

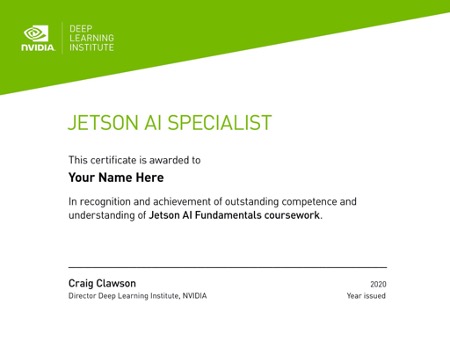
Drawing from iD Tech’s in-house Python curriculum and the NVIDIA Jetson AI Fundamentals course, students will learn key concepts in machine learning, computer vision and neural networks. Throughout the program, participants will create projects and build their personal portfolio to demonstrate their mastery of the topics. Upon successful completion of the course, students will submit their work for evaluation and a chance to earn a Jetson AI Specialist certificate from NVIDIA’s Deep Learning Institute.

Image 2. This image shows an example of the NVIDIA DLI Certificate for Jetson AI Specialist Designation.
Image 2. Students who complete the course will be eligible for a “Jetson AI Specialist” certificate.

The NVIDIA Foundation is providing scholarships for 30 female students to attend the course.  Plus, for every 10 students who participate, an additional student will attend on full scholarship.

The inaugural class will kick off in February 2022. Learn more about the course syllabus, enrollment and scholarship opportunities.

Categories
Misc

Insertion Sort Explained–A Data Scientists Algorithm Guide

Learn a step-by-step breakdown of sorting algorithms. A fundamental tools used in data science.
Algorithms are commonplace in the world of data science and machine learning. Algorithms power social media applications, Google search results, banking systems and plenty more. Therefore, it’s paramount that Data Scientists and machine-learning practitioners have an intuition for analyzing, designing, and implementing algorithms.

Efficient algorithms have saved companies millions of dollars and reduced memory and energy consumption when applied to large-scale computational tasks. This article introduces a straightforward algorithm, Insertion Sort.

Although knowing how to implement algorithms is essential, this article also includes details of the insertion algorithm that Data Scientists should consider when selecting for utilization.Therefore, this article mentions factors such as algorithm complexity, performance, analysis, explanation, and utilization.

Why?

It’s important to remember why Data Scientists should study data structures and algorithms before going into explanation and implementation.

Data Science and ML libraries and packages abstract the complexity of commonly used algorithms. Furthermore, algorithms that take 100s of lines to code and some logical deduction are reduced to simple method invocations due to abstraction. This doesn’t relinquish the requirement for Data Scientists to study algorithm development and data structures.

When given a collection of pre-built algorithms to use, determining which algorithm is best for the situation requires understanding the fundamental algorithms in terms of parameters, performances, restrictions, and robustness. Data Scientists can learn all of this information after analyzing and, in some cases, re-implementing algorithms.

The selection of correct problem-specific algorithms and the capacity to troubleshoot algorithms are two of the most significant advantages of algorithm understanding.

K-Means, BIRCH and Mean Shift are all commonly used clustering algorithms, and by no means are Data Scientists possessing the knowledge to implement these algorithms from scratch. Still, there is a necessity that Data Scientists understand the properties of each algorithm and their suitability to specific datasets.

For example, centroid based algorithms are favorable for high-density datasets where clusters can be clearly defined. In contrast, density-based algorithms such as DBSCAN(Density-based spatial clustering of application with Noise) are preferred when dealing with a noisy dataset.

In the context of sorting algorithms, Data Scientists come across data lakes and databases where traversing through elements to identify relationships is more efficient if the containing data is sorted.

Identifying library subroutines suitable for the dataset requires an understanding of various sorting algorithms preferred data structure types. Quicksort algorithms are favorable when working with arrays, but if data is presented as linked-list, then merge sort is more performant, especially in the case of a large dataset. Still, both use the divide and conquer strategy to sort data.

Background

What’s a sorting algorithm?

The Sorting Problem is a well-known programming problem faced by Data Scientists and other software engineers. The primary purpose of the sorting problem is to arrange a set of objects in ascending or descending order. Sorting algorithms are sequential instructions executed to reorder elements within a list efficiently or array into the desired ordering.

What’s the purpose of sorting?

In the data realm, the structured organization of elements within a dataset enables the efficient traversing and quick lookup of specific elements or groups. At a macro level, applications built with efficient algorithms translate to simplicity introduced into our lives, such as navigation systems and search engines.

What’s insertion sort?

Insertion sort algorithm involves the sorted list created based on an iterative comparison of each element in the list with its adjacent element.

An index pointing at the current element indicates the position of the sort. At the beginning of the sort (index=0), the current value is compared to the adjacent value to the left. If the value is greater than the current value, no modifications are made to the list; this is also the case if the adjacent value and the current value are the same numbers. 

However, if the adjacent value to the left of the current value is lesser, then the adjacent value position is moved to the left, and only stops moving to the left if the value to the left of it is lesser.

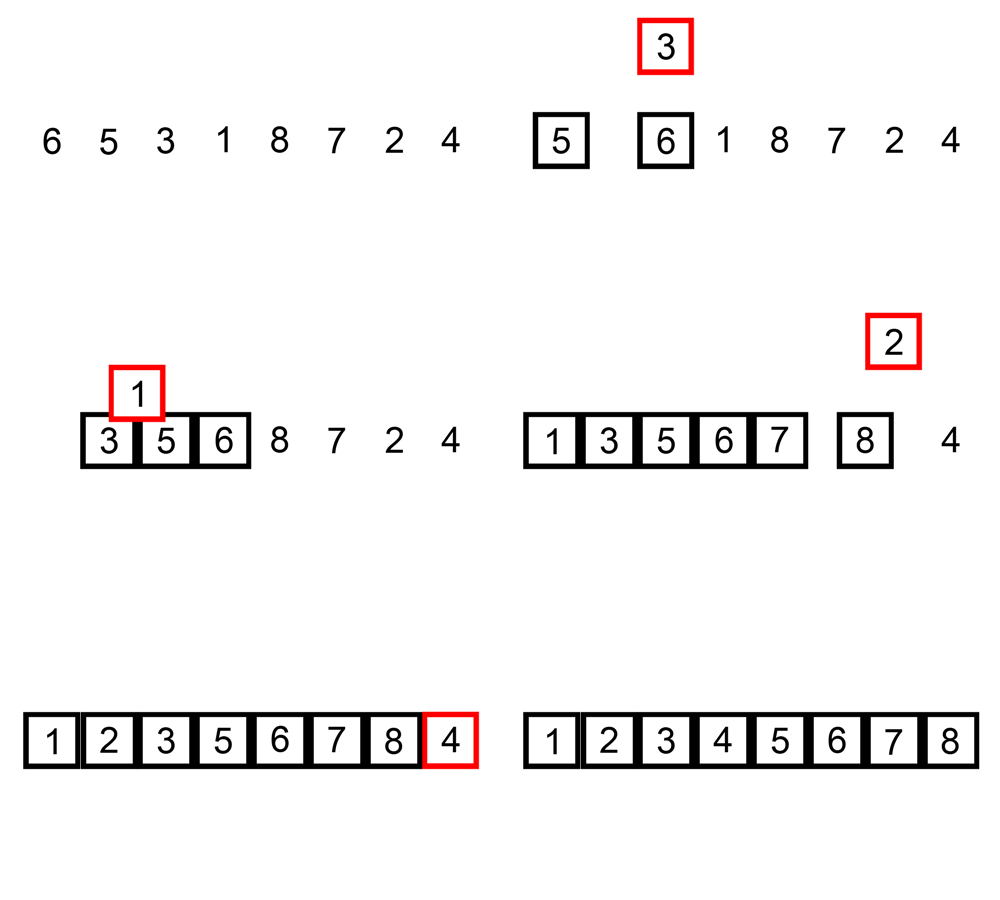
The diagram illustrates the procedures taken in the insertion algorithm on an unsorted list. The list in the diagram below is sorted in ascending order (lowest to highest).

An image depicting the step by step process of the insertion sort algorithm.
Figure 1: Insertion Sort in Action GIF (This file is licensed under the Creative Commons).

Algorithm Steps and Implementation (Python and JavaScript)

Steps

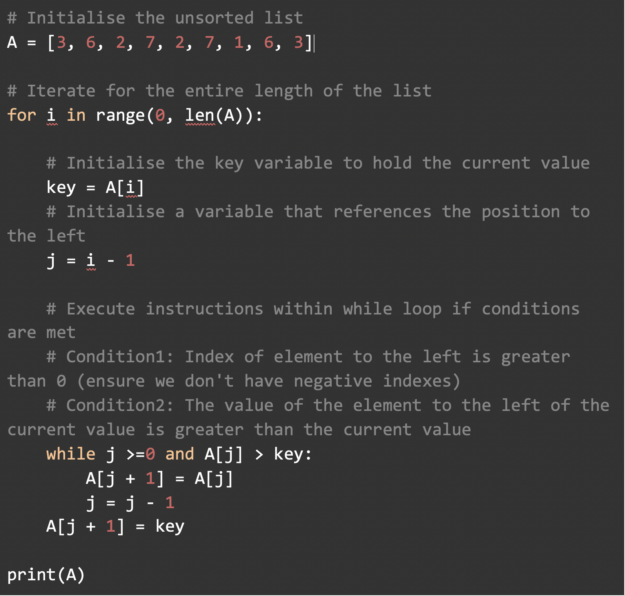
To order a list of elements in ascending order, the Insertion Sort algorithm requires the following operations:

  1. Begin with a list of unsorted elements.
  2. Iterate through the list of unsorted elements, from the first item to last.
  3. The current element is compared to the elements in all preceding positions to the left in each step.
  4. If the current element is less than any of the previously listed elements, it is moved one position to the left.

Implementation in Python

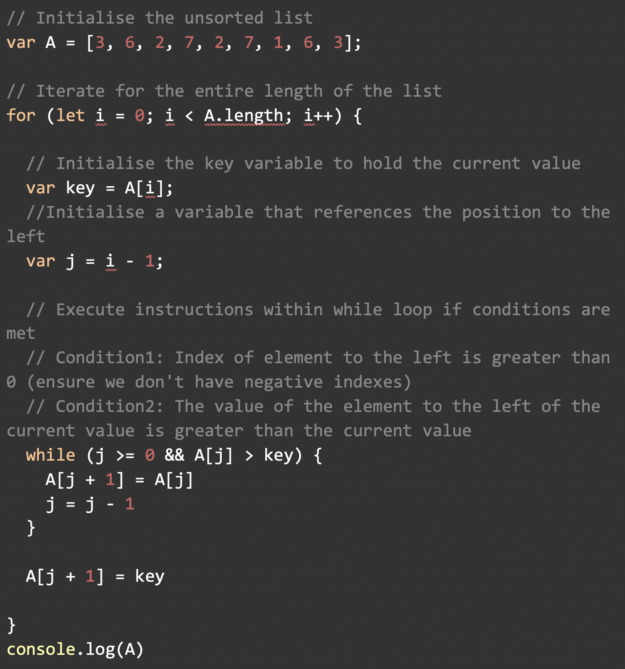
Implementation in JavaScript

Performance and Complexity

In the realm of computer science, ‘Big O notation is a strategy for measuring algorithm complexity. We won’t get too technical with Big O notation here. Still, it’s worth noting that computer scientists use this mathematical symbol to quantify algorithms according to their time and space requirements.

The Big O notation is a function that is defined in terms of the input. The letter ‘n’ often represents the size of the input to the function. Simply kept, n represents the number of elements in a list. In different scenarios, practitioners care about the worst-case, best-case, or average complexity of a function.

The worst-case (and average-case) complexity of the insertion sort algorithm is O(n²). Meaning that, in the worst case, the time taken to sort a list is proportional to the square of the number of elements in the list.

The best-case time complexity of insertion sort algorithm is O(n) time complexity. Meaning that the time taken to sort a list is proportional to the number of elements in the list; this is the case when the list is already in the correct order. There’s only one iteration in this case since the inner loop operation is trivial when the list is already in order.

Insertion sort is frequently used to arrange small lists. On the other hand, Insertion sort isn’t the most efficient method for handling large lists with numerous elements. Notably, the insertion sort algorithm is preferred when working with a linked list. And although the algorithm can be applied to data structured in an array, other sorting algorithms such as quicksort.

Summary

One of the simplest sorting methods is insertion sort, which involves building up a sorted list one element at a time. By inserting each unexamined element into the sorted list between elements that are less than it and greater than it. As demonstrated in this article, it’s a simple algorithm to grasp and apply in many languages.

By clearly describing the insertion sort algorithm, accompanied by a step-by-step breakdown of the algorithmic procedures involved. Data Scientists are better equipped to implement the insertion sort algorithm and explore other comparable sorting algorithms such as quicksort and bubble sort, and so on.

Algorithms may be a touchy subject for many Data Scientists. It may be due to the complexity of the topic. The word “algorithm” is sometimes associated with complexity. With the appropriate tools, training, and time, even the most complicated algorithms are simple to understand when you have enough time, information, and resources. Algorithms are fundamental tools used in data science and cannot be ignored.

Categories
Misc

Forging New Pathways: Boys & Girls Clubs Teens Take AI From Idea to Application

Building AI projects to aid Alzheimer’s patients and monitor pedestrian safety might not be the typical way teens spend their summer. But that’s what a dozen teens with the Boys & Girls Clubs of Hudson County, in densely packed northeastern New Jersey, did as part of the AI Pathways Institute program. They spent three weeks Read article >

The post Forging New Pathways: Boys & Girls Clubs Teens Take AI From Idea to Application appeared first on The Official NVIDIA Blog.

Categories
Misc

Jetson Project of the Month: Automate Your Household Duties with NVIDIA Jetson and DeepStack

The Jetson Project of the Month simplifies home automation projects using a combination of DeepStack and Home Assistant along with the NVIDIA Jetson.

The holidays should be a time for relaxation, and with NVIDIA Jetson technology, you can do just that. The latest Jetson Project of the Month comes from a developer who has created ways to simplify home automation projects, using a combination of DeepStack, Home Assistant, and NVIDIA Jetson

Robin Cole, a senior data scientist at Satellite Vu with a background in physics, developed this project. He has a passion for problem solving using data and Python. Cole’s main activities on GitHub involve the practical application of machine learning. 

As he notes on his GitHub profile: “I have a number of personal projects around training and deploying neural networks on edge devices such as the Raspberry Pi and Jetson Nano.”

In his spare time, he is actively involved in two community projects: Home Assistant and DeepStack AI, and is exploring ways to combine the two technologies. Cole’s Jetson project integrates DeepStack object and face detection and recognition services into the popular home automation platform Home Assistant.

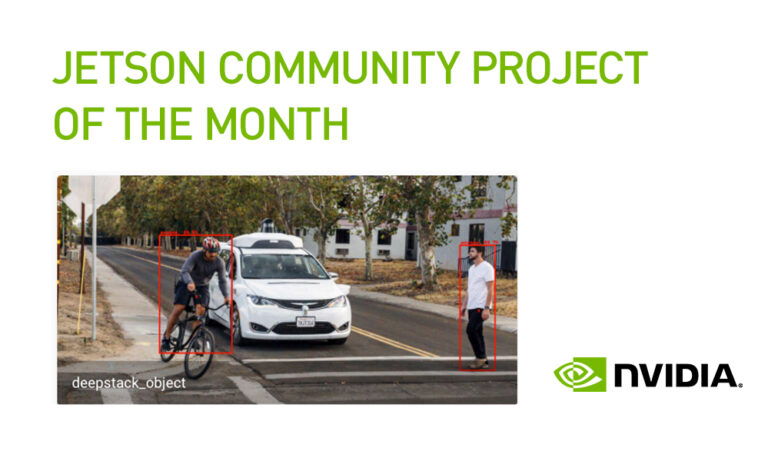
DeepStack runs in a Docker container and exposes various computer vision models through a REST API. DeepStack object detection can identify 80 different kinds of objects, including people, vehicles, and animals. The current list does not include sleighs or reindeer, but you can use a custom object detection model. DeepStack is free to use and it is fully open source. You will need a machine with 8GB RAM or an NVIDIA Jetson to run DeepStack.

Home Assistant is an open-source and extensible platform for home automation that can run on local embedded devices or servers while maintaining local control and privacy. It can help automate tasks such as home energy management, intelligently turning on or off the lights, or sending alerts based on entrances being open. Home Assistant can be integrated with more than 1,000 different devices.

This project uses trained models in the DeepStack REST API to send responses to Home Assistant, which can then perform tasks around the home based on this and other input. DeepStack can run on a Jetson device and it achieves good inference times on its YOLOv5-based trained models, which are run with PyTorch. The DeepStack and Home Assistant mediate their communication through a Go server and a Redis layer.

“I hope this project inspires readers to think about novel applications in and around the home and business that could benefit from AI, and enables rapid prototyping and experimentation,” Cole wrote in a forum post describing his work.

These home automation processes could be applied to tasks like monitoring the Christmas tree lights, issuing alerts when special packages are delivered to the front door, or keeping an eye on the chimney to see if a big guy in a red suit tries to sneak inside the house late at night and eat all of your cookies.

Think of it as a spin on the old holiday classic: You can keep a lookout when you’re sleeping; there’s no need to be awake. Your home automation setup can do the work, which is certainly good for goodness’ sake

The folks at Everything Smart Home put together demos of each part of this project:

Person and face recognition


Object detection


By combining DeepStack with Home Assistant, Cole has shown developers how to create their own home security or automation systems and the ability to integrate Jetson into larger projects. For those who want to dig deeper, this project opens further possibilities to integrate other NVIDIA technologies such as DeepStream, Metropolis, or even NVIDIA Isaac with Home Assistant.

As Cole points out in his forum post about this project, the developer community is all in and finding smart ways to use this DeepStack-Home Assistant combo, including:

  • Monitoring activity in a brick factory in Latin America.
  • Watching for intruding snakes in Thailand.
  • Monitoring parcel deliveries.
  • Checking that a motorcycle is locked.
  • Checking when a chicken lays an egg.
  • Greeting people when they return home and playing a theme tune.
  • Counting visitor numbers at a shop.
  • Checking when a parking spot has become available.

The possibilities are only limited by your imagination. We still think a setup to keep tabs on Santa could be very handy. Share your ideas for how to combine DeepStack and Home Assistant with NVIDIA Jetson in the developer forums

Cole has also been developing a custom model to detect fires using camera feeds.

Details about Cole’s projects featured in this post are available on GitHub: object detection and face recognition.

You can see a more detailed demo of Cole’s integration of DeepStack with Home Assistant in this presentation he made at IceVision earlier this year.

Learn more about using DeepStack with NVIDIA Jetson.