The NVIDIA Merlin and KGMON team earned 1st place in the RecSys Challenge 2021 by effectively predicting the probability of user engagement within a dynamic environment and providing fair recommendations on a multi-million point dataset.
The NVIDIA Merlin and KGMON team earned 1st place in the RecSys Challenge 2021 by effectively predicting the probability of user engagement within a dynamic environment and providing fair recommendations on a multi-million point dataset. Twitter sponsored the RecSys Challenge 2021, curated the challenge’s multi-goal optimization requirements to mirror the real world, and provided multi-million data points each day over the course of the challenge for the teams to work with. NVIDIA’s win for a second year in a row reaffirms NVIDIA’s continued commitment to democratize and streamline recommender workflows.
NVIDIA Merlin Team Weaves Industry Engagement and Learnings Into Software Product
Billions of people are online. Each moment online represents an opportunity for a person to engage with a recommender while reading news, streaming entertainment, shopping, or engaging with social media. Twitter, as a single social media platform, reports an average of 199 million monetizable daily active users that engage within its dynamic environment. The RecSys Challenge 2021 reflects how providing quality recommendations that span millions of data points is extremely challenging. The Merlin team builds open source software designed to help machine learning engineers and data scientists tackle these problems and more. The team also leveraged their skills and experience building Merlin software to win the RecSys Challenge 2021. The challenge also provided insights and opportunities that feed back into Merlin, helping to continuously improve the product. For example, operators used to win last year’s RecSys Challenge 2020 were woven into a product release. This is particularly impactful when working with the Kaggle Grandmasters Of NVIDIA (KGMON) team who are regular collaborators with the Merlin team on recommendation competitions and who bring insight from hundreds of kaggle competition wins. The Merlin team’s hands-on engagement coupled with feedback from Merlin’s early adopters, is vital for reaffirming NVIDIA’s commitment of democratizing the building and accelerating of recommenders.
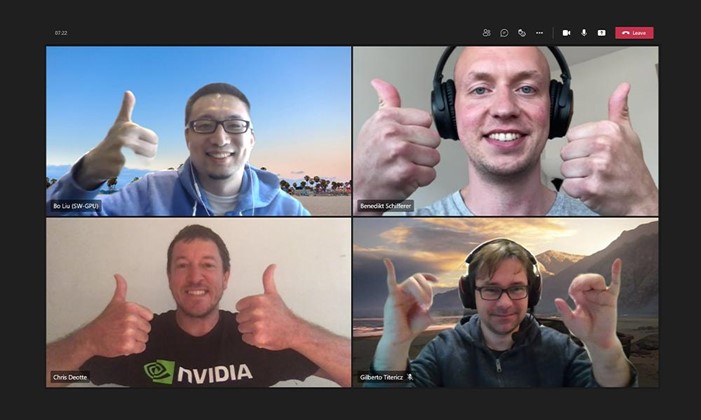
Editor’s note: Feature image includes just a few of NVIDIA team members that participated in the challenge (clockwise from upper left): Bo Liu, Benedikt Schifferer, Gilberto Titericz and Chris Deotte.
Today, NVIDIA is releasing TensorRT 8.0, which introduces many transformer optimizations. With this post update, we present the latest TensorRT optimized BERT sample and its inference latency benchmark on A30 GPUs. Using the optimized sample, you can execute different batch sizes for BERT-base or BERT-large within the 10 ms latency budget for conversational AI applications.
This post was originally published in August 2019 and has been updated for NVIDIA TensorRT 8.0.
Large-scale language models (LSLMs) such as BERT, GPT-2, and XL-Net have brought exciting leaps in accuracy for many natural language processing (NLP) tasks. Since its release in October 2018, BERT (Bidirectional Encoder Representations from Transformers), with all its many variants, remains one of the most popular language models and still delivers state-of-the-art accuracy.
BERT provided a leap in accuracy for NLP tasks that brought high-quality, language-based services within the reach of companies across many industries. To use the model in production, you must consider factors such as latency and accuracy, which influences end-user satisfaction with a service. BERT requires significant compute during inference due to its 12/24-layer stacked, multihead attention network. This has posed a challenge for companies to deploy BERT as part of real-time applications.
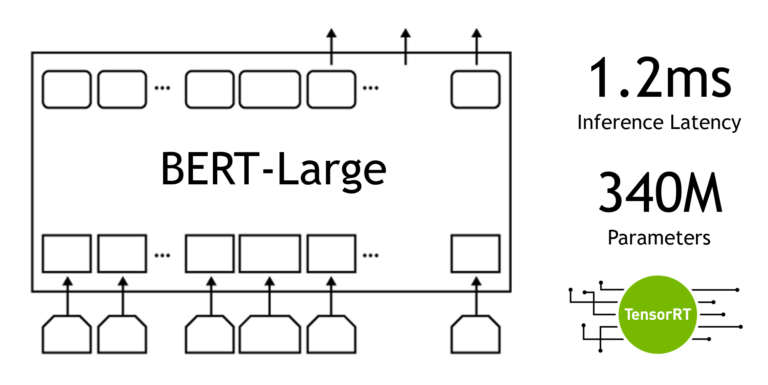
Today, NVIDIA is releasing version 8 of TensorRT, which brings the inference latency of BERT-Large down to 1.2 ms on NVIDIA A100 GPUs with new optimizations on transformer-based networks. New generalized optimizations in TensorRT can accelerate all such models, reducing inference time to half the time compared to TensorRT 7.
TensorRT
TensorRT is a platform for high-performance, deep learning inference, which includes an optimizer and runtime that minimizes latency and maximizes throughput in production. With TensorRT, you can optimize models trained in all major frameworks, calibrate for lower precision with high accuracy, and finally deploy in production.
All the code for achieving this performance with BERT is being released as open source in this NVIDIA/TensorRT GitHub repo. We have optimized the Transformer layer, which is a fundamental building block of the BERT encoder so that you can adapt these optimizations to any BERT-based NLP task. BERT is applied to an expanding set of speech and NLP applications beyond conversational AI, all of which can take advantage of these optimizations.
Question answering (QA) or reading comprehension is a popular way to test the ability of models to understand the context. The SQuAD leaderboard tracks the top performers for this task, for a dataset and test set that they provide. There has been rapid progress in QA ability in the last few years, with global contributions from academia and companies.
In this post, we demonstrate how to create a simple QA application using Python, powered by TensorRT-optimized BERT code that NVIDIA released today. The example provides an API to input passages and questions, and it returns responses generated by the BERT model.
Here’s a brief review of the steps to perform training and inference using TensorRT for BERT.
BERT training and inference pipeline
A major problem faced by NLP researchers and developers is scarcity of high-quality labeled training data for their specific NLP task. To overcome the problem of learning a model for the task from scratch, breakthroughs in NLP use the vast amounts of unlabeled text and break the NLP task into two parts:
Learning to represent the meaning of words, the relationship between them, that is, building up a language model using auxiliary tasks and a large corpus of text
Specializing the language model to the actual task by augmenting the language model with a relatively small, task-specific network that is trained in a supervised manner.
These two stages are typically referred to as pretraining and fine-tuning. This paradigm enables the use of the pretrained language model to a wide range of tasks without any task-specific change to the model architecture. In this example, BERT provides a high-quality language model that is fine-tuned for QA but suitable for other tasks such as sentence classification and sentiment analysis.
You can either start with the pretrained checkpoints available online or pretrain BERT on your own custom corpus (Figure 1). You can also initialize pretraining from a checkpoint and then continue training on custom data.
Figure 1. Generating BERT TensorRT engine from pretrained checkpoints
Pretraining with custom or domain-specific data may yield interesting results, for example BioBert. However, it is computationally intensive and requires a massively parallel compute infrastructure to complete within a reasonable amount of time. GPU-enabled, multinode training is an ideal solution for such scenarios. For more information about how NVIDIA developers were able to train BERT in less than an hour, see Training BERT with GPUs.
In the fine-tuning step, the task-specific network based on the pretrained BERT language model is trained using the task-specific training data. For QA, this is (paragraph, question, answer) triples. Compared to pretraining, fine-tuning is generally far less computationally demanding.
To perform inference using a QA neural network:
Create a TensorRT engine by passing the fine-tuned weights and network definition to the TensorRT builder.
Start the TensorRT runtime with this engine.
Feed a passage and a question to the TensorRT runtime and receive as output the answer predicted by the network.
Figure 2 shows the entire workflow.
Figure 2. Workflow to perform inference with TensorRT runtime engine for BERT QA task
Run the sample!
Set up your environment to perform BERT inference with the following steps:
Create a Docker image with the prerequisites.
Build the TensorRT engine from the fine-tuned weights.
Perform inference given a passage and query.
We use scripts to perform these steps, which you can find in the TensorRT BERT sample repo. While we describe several options that you can pass to each script, to get started quickly, you could also run the following code example:
 # Clone the TensorRT repository and navigate to BERT demo directory
 git clone --recursive https://github.com/NVIDIA/TensorRT && cd TensorRT

 # Create and launch the Docker image
 # Here we assume the following:
 #  - the os being ubuntu-18.04 (see below for other supported versions)
 #  - cuda version is 11.3.1
 bash docker/build.sh --file docker/ubuntu-18.04.Dockerfile --tag tensorrt-ubuntu18.04-cuda11.3 --cuda 11.3.1

 # Run the Docker container just created
 bash docker/launch.sh --tag tensorrt-ubuntu18.04-cuda11.3 --gpus all

 # cd into the BERT demo folder
 cd $TRT_OSSPATH/demo/BERT

 # Download the BERT model fine-tuned checkpoint
 bash scripts/download_model.sh

 # Build the TensorRT runtime engine.
 # To build an engine, use the builder.py script.
 mkdir -p engines && python3 builder.py -m models/fine-tuned/bert_tf_ckpt_large_qa_squad2_amp_128_v19.03.1/model.ckpt -o engines/bert_large_128.engine -b 1 -s 128 --fp16 -c models/fine-tuned/bert_tf_ckpt_large_qa_squad2_amp_128_v19.03.1
This last command builds an engine with a maximum batch size of 1 (-b 1), and sequence length of 128 (-s 128) using mixed precision (--fp16) and the BERT Large SQuAD v2 FP16 Sequence Length 128 checkpoint (-c models/fine-tuned/bert_tf_ckpt_large_qa_squad2_amp_128_v19.03.1).
Now, give it a passage and see how much information it can decipher by asking a few questions.
python3 inference.py -e engines/bert_large_128.engine -p "TensorRT is a high performance deep learning inference platform that delivers low latency and high throughput for apps such as recommenders, speech and image/video on NVIDIA GPUs. It includes parsers to import models, and plugins to support novel ops and layers before applying optimizations for inference. Today NVIDIA is open-sourcing parsers and plugins in TensorRT so that the deep learning community can customize and extend these components to take advantage of powerful TensorRT optimizations for your apps." -q "What is TensorRT?" -v models/fine-tuned/bert_tf_ckpt_large_qa_squad2_amp_128_v19.03.1/vocab.txt
The result of this command should be something similar to the following:
Passage: TensorRT is a high performance deep learning inference platform that delivers low latency and high throughput for apps such as recommenders, speech and image/video on NVIDIA GPUs. It includes parsers to import models, and plugins to support novel ops and layers before applying optimizations for inference. Today NVIDIA is open-sourcing parsers and plugins in TensorRT so that the deep learning community can customize and extend these components to take advantage of powerful TensorRT optimizations for your apps.
Question: What is TensorRT?
Answer: 'a high performance deep learning inference platform'
Given the same passage with a different question, you should get the following result:
Question: What is included in TensorRT?
Answer: 'parsers to import models, and plugins to support novel ops and layers before applying optimizations for inference'
The answers provided by the model are accurate based on the text of the passage that was provided. The sample uses FP16 precision for performing inference with TensorRT. This helps achieve the highest performance possible on Tensor Cores in NVIDIA GPUs. In our tests, we measured the accuracy of TensorRT to be comparable to in-framework inference with FP16 precision.
Script options
Here are the options available with the scripts. The docker/build.sh script builds the docker image using the Dockerfile supplied in the docker folder. It installs all necessary packages, depending on the OS you are selecting as Dockerfile. For this post, we used ubuntu-18.04 but dockerfiles for ubuntu-16.04 and ubuntu-20.04 are also provided.
After creating and running the environment, download fine-tuned weights for BERT. Note that you do not need the pretrained weights to create the TensorRT engine (just the fine-tuned weights). Along with the fine-tuned weights, use the associated configuration file, which specifies parameters such as number of attention heads, number of layers, and the vocab.txt file, which contains the learned vocabulary from the training process. These are packaged with the fine-tuned model downloaded from NGC; download them using the download_model.sh script. As part of this script, you can specify the set of fine-tuned weights for the BERT model to download. The command-line parameters control the exact BERT model to be used later for model building and inference:
sh download_model.sh [tf|pyt] [base|large|megatron-large] [128|384] [v2|v1_1] [sparse] [int8-qat]
 tf | pyt tensorflow or pytorch version
 base | large | megatron-large - determine whether to download a BERT-base or BERT-large or megatron model to optimize
 128 | 384 - determine whether to download a BERT model for sequence length 128 or 384
 v2 | v1_1, fine-tuned on squad2 or squad1.1
 sparse, download sparse version
 int8-qat, download int8 weights
Examples:
# Running with default parametersbash download_model.sh# Running with custom parameters (BERT-large, FP32 fine-tuned weights, 128 sequence length)sh download_model.sh large tf fp32 128
This script by default downloads fine-tuned TensorFlow BERT-large, with FP16 precision and a sequence length of 128. In addition to the fine-tuned model, you use the configuration file, enumerating model parameters and the vocabulary file used to convert BERT model output to a textual answer.
Next, you can build the TensorRT engine and use it for a QA example, that is, inference. The script builder.py builds the TensorRT engine for inference based on the downloaded BERT fine-tuned model.
Make sure that the sequence length provided to the following script matches the sequence length of the model that was downloaded.
   -h, --help    show this help message and exit
   -m CKPT, --ckpt CKPT  The checkpoint file basename, e.g.:
 basename(model.ckpt-766908.data-00000-of-00001) is model.ckpt-766908 (default: None)
   -x ONNX, --onnx ONNX  The ONNX model file path. (default: None)
   -pt PYTORCH, --pytorch PYTORCH
             The PyTorch checkpoint file path. (default: None)
   -o OUTPUT, --output OUTPUT
             The bert engine file, ex bert.engine (default: bert_base_384.engine)
   -b BATCH_SIZE, --batch-size BATCH_SIZE
 Batch size(s) to optimize for.
 The engine will be usable with any batch size below this, but may not be optimal for smaller sizes. Can be specified multiple times to optimize for more than one batch size.(default: [])
   -s SEQUENCE_LENGTH, --sequence-length SEQUENCE_LENGTH
             Sequence length of the BERT model (default: [])
   -c CONFIG_DIR, --config-dir CONFIG_DIR
 The folder containing the bert_config.json,
 which can be downloaded e.g. from https://github.com/google-research/bert#pre-trained-models (default: None)
   -f, --fp16    Indicates that inference should be run in FP16 precision
             (default: False)
   -i, --int8    Indicates that inference should be run in INT8 precision
             (default: False)
   -t, --strict  Indicates that inference should be run in strict precision mode
             (default: False)
   -w WORKSPACE_SIZE, --workspace-size WORKSPACE_SIZE Workspace size in MiB for
             building the BERT engine (default: 1000)
   -j SQUAD_JSON, --squad-json SQUAD_JSON
 squad json dataset used for int8 calibration (default: squad/dev-v1.1.json)
   -v VOCAB_FILE, --vocab-file VOCAB_FILE
 Path to file containing entire understandable vocab (default: ./pre-trained_model/uncased_L-24_H-1024_A-16/vocab.txt)
   -n CALIB_NUM, --calib-num CALIB_NUM
             calibration batch numbers (default: 100)
   -p CALIB_PATH, --calib-path CALIB_PATH
             calibration cache path (default: None)
   -g, --force-fc2-gemm
             Force use gemm to implement FC2 layer (default: False)
   -iln, --force-int8-skipln
 Run skip layernorm with INT8 (FP32 or FP16 by default) inputs and output (default: False)
   -imh, --force-int8-multihead
 Run multi-head attention with INT8 (FP32 or FP16 by default) input and output (default: False)
   -sp, --sparse         Indicates that model is sparse (default: False)
   -tcf TIMING_CACHE_FILE, --timing-cache-file TIMING_CACHE_FILE
 Path to tensorrt build timeing cache file, only available for tensorrt 8.0 and later (default: None)
You should now have a TensorRT engine, engines/bert_large_128.engine, to use in the inference.py script for QA.
Later in this post, we describe the process to build the TensorRT engine. You can now provide a passage and a query to inference.py and see if the model is able to answer your queries correctly.
There are few ways to interact with the inference script:
The passage and question can be provided as command-line arguments using the –passage and –question flags.
They can be passed in from a given file using the –passage_file and –question_file flags.
If neither of these flags are given during execution, you are prompted to enter the passage and question after the execution has begun.
Here are the parameters for the inference.py script:
This script uses a prebuilt TensorRT BERT QA engine to answer a question based on the provided passage.
Here are the optional arguments:
   -h, --help            show this help message and exit
   -e ENGINE, --engine ENGINE
                         Path to BERT TensorRT engine
   -b BATCH_SIZE, --batch-size BATCH_SIZE
                         Batch size for inference.
   -p [PASSAGE [PASSAGE ...]], --passage [PASSAGE [PASSAGE ...]]
                         Text for paragraph/passage for BERT QA
   -pf PASSAGE_FILE, --passage-file PASSAGE_FILE
                         File containing input passage
   -q [QUESTION [QUESTION ...]], --question [QUESTION [QUESTION ...]]
                         Text for query/question for BERT QA
   -qf QUESTION_FILE, --question-file QUESTION_FILE
                         File containing input question
   -sq SQUAD_JSON, --squad-json SQUAD_JSON
                         SQuAD json file
   -o OUTPUT_PREDICTION_FILE, --output-prediction-file OUTPUT_PREDICTION_FILE
                         Output prediction file for SQuAD evaluation
   -v VOCAB_FILE, --vocab-file VOCAB_FILE
                         Path to file containing entire understandable vocab
   -s SEQUENCE_LENGTH, --sequence-length SEQUENCE_LENGTH
                         The sequence length to use. Defaults to 128
   --max-query-length MAX_QUERY_LENGTH
                         The maximum length of a query in number of tokens.
                         Queries longer than this will be truncated
   --max-answer-length MAX_ANSWER_LENGTH
                         The maximum length of an answer that can be generated
   --n-best-size N_BEST_SIZE
                         Total number of n-best predictions to generate in the
                         nbest_predictions.json output file
   --doc-stride DOC_STRIDE
                         When splitting up a long document into chunks, what
                         stride to take between chunks
BERT inference with TensorRT
For a step-by-step description and walkthrough of the inference process, see the Python script inference.py and the detailed Jupyter notebook inference.ipynb in the sample folder. Here are a few key parameters and concepts for performing inference with TensorRT.
BERT, or more specifically, the encoder layer, uses the following parameters to govern its operation:
Batch size
Sequence Length
Number of attention heads
The value of these parameters, which depend on the BERT model chosen, are used to set the configuration parameters for the TensorRT plan file (execution engine).
For each encoder, also specify the number of hidden layers and the attention head size. You can also read all the earlier parameters from the TensorFlow checkpoint file.
As the BERT model we are using has been fine-tuned for a downstream task of QA on the SQuAD dataset, the output for the network (that is, the output fully connected layer) is a span of text where the answer appears in the passage, referred to as h_output in the sample. After you generate the TensorRT engine, you can serialize it and use it later with TensorRT runtime.
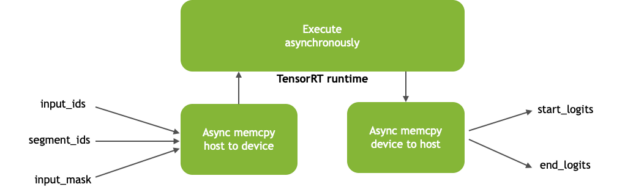
During inference, you perform memory copies from CPU to GPU and the reverse asynchronously to get tensors into and out of the GPU memory, respectively. Asynchronous memory copy operation hides the latency of memory transfer by overlapping computations with memory copy operation between device and host. Figure 3 shows the asynchronous memory copies and kernel execution.
Figure 3. TensorRT Runtime process
The inputs to the BERT model (Figure 3) include the following:
input_ids: tensor with token ids of paragraph concatenated along with question that is used as input for inference
segment_ids: distinguishes between passage and question
input_mask: indicates which elements in the sequence are tokens, and which ones are padding elements
The outputs (start_logits and end_logits) represent the span of the answer, which the network predicts inside the passage based on the question.
Benchmarking BERT inference performance
BERT can be applied both for online and offline use cases. Online NLP applications, such as conversational AI, place tight latency budgets during inference. Several models need to execute in a sequence in response to a single user query. When used as a service, the total time a customer experiences includes compute time as well as input and output network latency. Longer times lead to a sluggish performance and a poor customer experience.
While the exact latency available for a single model can vary by application, several real-time applications need the language model to execute in under 10 ms.
Using an NVIDIA Ampere Architecture A100 GPU, BERT-Large optimized with TensorRT 8 can perform inference in 1.2ms for a QA task similar to that available in SQuAD with batch size = 1 and sequence length = 128.
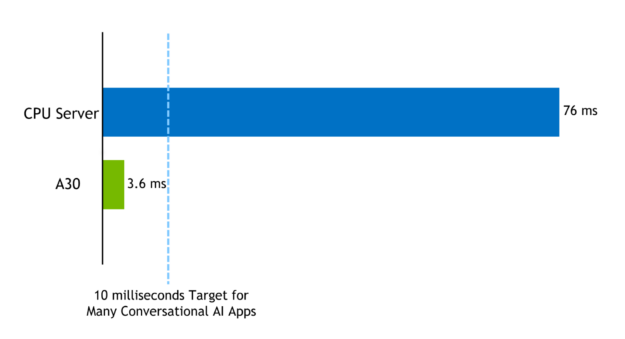
Using the TensorRT optimized sample, you can execute different batch sizes for BERT-base or BERT-large within the 10 ms latency budget. For example, the latency for inference on a BERT-Large model with sequence length = 384 batch size = 1 on A30 with TensorRT8 was 3.62ms. The same model, sequence length =384 with highly optimized code on a CPU-only platform (**) for batch size = 1 was 76ms.
Figure 4. Compute latency in milliseconds for executing BERT-large on an NVIDIA A30 GPU vs. a CPU-only server
The performance measures the compute-only latency time for executing the network on a QA task between passing tensors as input and gathering logits as output. You can find the code used to benchmark the sample in the script scripts/inference_benchmark.sh in the repo.
Summary
NVIDIA is releasing TensorRT 8.0, which makes it possible to perform BERT inference in 0.74ms on A30 GPUs. The code for benchmarking inference on BERT is available as a sample in the TensorRT open-source repo.
This post gives an overview of how to use the TensorRT sample and performance results. We further describe a workflow of how to use the BERT sample as part of a simple application and Jupyter notebook where you can pass a paragraph and ask questions related to it. The new optimizations and performance achievable makes it practical to use BERT in production for applications with tight latency budgets, such as conversational AI.
We are always looking for new ideas for new examples and applications to share. What NLP applications do you use BERT for and what examples would you like to see from us in the future?
CPU-only specifications: Gold 6240@2.60GHz 3.9GHz Turbo (Cascade Lake) HT Off, Single node, Single Socket, Number of CPU Threads = 18, Data=Real, Batch Size=1; Sequence Length=128; nireq=1; Precision=FP32; Data=Real; OpenVINO 2019 R2
GPU-server specification: Gold 6140@2GHz 3.7GHz Turbo (Skylake) HT On, Single node, Dual Socket, Number of CPU Threads = 72, T4 16GB, Driver Version 418.67 (r418_00), BERT-base, Batch Size=1; Number of heads = 12, Size per head = 64; 12 layers; Sequence Length=128; Precision=FP16; XLA=Yes; Data=Real; TensorRT 5.1
(**)
CPU-only specifications: Platinum 8380H@2.90GHz to 4.3 GHz Turbo (Cooper Lake) HT Off, Single node, Single Socket, Number of CPU Threads = 28, BERT-Large, Data=Real, Batch Size=1; Sequence Length=384; nireq=1; Precision=INT8; Data=Real; OpenVINO 2021 R3
GPU-server specification: AMD EPYC 7742@2.25GHz 3.4GHz Turbo (Rome) HT Off, Single node, Number of CPU Threads = 64, A30(GA100) 1*24258 MiB 1*56 SM, Driver Version 470.29 (r470_00), BERT-Large, Batch Size=1; Sequence Length=384; Precision=INT8; TensorRT 8.0
I’m working on a project where I aim to give an image on the night sky to my neural network, and it should tell me how many satellites are in the frame.
I’ve trained my network to learn what a satellite looks like by giving it 10×10 pxl cropped images, and so my model takes 100 input. I’m doing it as a classification problem, and so it gives me the probability of the 10×10 pxl image to contain a satellite.
I’ve trained the network with no issue, I’ve done the testing with no issue, but when it comes to actually giving it a single 10x10pxl image to give me an answer, I get this error message:
ValueError: Input 0 of layer sequential is incompatible with the layer: expected axis -1 of input shape to have value 100 but received input with shape (None, 1)
This is what my code looks like for the model training and testing:
I have written a little code that crops full size frames (480×640) into a multitude of 10×10 crops, and I want to feed each crop to the network to then tell me which crops contain a satellite.
# image size is 480*640 height = 480 length = 640 X_Try = [] for a in range(0, height, 10): for b in range(0, length, 10): img = image.crop((a, b, a+10, b+10)) img = np.array(img)/255.0 #to normalize my values img = img.flatten() #to make the matrix into a single array X_Try.append(img) print(len(X_Try)) >3072 print(len(X_Try[0])) >100
My X_Try is populated with arrays of shape (100,1), and my logic is that I should just give each of those arrays to my model to predict, and that should output a y_pred of shape (3072,1) containing the probability of each crop to contain a satellite.
However, my problem appears here:
y_pred=[] for f in range(0,len(X_Try)): y_p = model.predict(X_Try[f]) y_pred.append(y_p)
This is then where the error message appears: it seems to be of the opinion that I’m giving something of shape (None, 1), and it only takes input of shape (None,100), however I’ve checked before and all of my arrays in X_Try are indeed of size 100.
I’ve also tried with a single crop, in case it is the for loop that’s causing issue:
y_pred = model.predict(X_Try[0])
but that gives me the same error.
I’ve looked online for similar issue but most people seem to have that problem during the training or the testing, not at the prediction.
Could someone guide me in the right direction?
EDIT: I forgot to add that, but I find that doing
y_pred = model.predict(x_test)
does work, where x_test has a shape of (4481,100,1) but for some reason doing
y_pred = model.predict(X_Try)
doesn’t work, where X_Try has a shape of (3072,100,1) doesn’t work and gives me the error message:
ValueError: Layer model_2 expects 1 input(s), but it received 3072 input tensors.
I want to learn TensorFlow, for use in my Java projects. I have not found any official TensorFlow tutorials and introductions that use Java as the language. I can use one of the Python tutorials, and translate into Java as I go, but I would appreciate if anyone can point me in the direction of an official Java tutorial.
Then I try to display the images for reference, running:
import matplotlib.pyplot as plt
class_names = val_ds.class_names
plt.figure(figsize=(10, 10)) for images, labels in val_ds.take(1): for i in range(30): ax = plt.subplot(5, 7, i + 1) plt.imshow(images[i].numpy().astype(“uint8”)) plt.title(class_names[labels[i]]) plt.axis(“off”)
But with val_ds, I get the error “Input is empty”, while with train_ds it actually shows the images. Anyone knows a possible reason why behind it? The dataset I am using is here – https://github.com/xuequanlu/I-Nema – and I have converted all the .tif images to .jpg.
New research out of the University of California, San Francisco has given a paralyzed man the ability to communicate by translating his brain signals into computer generated writing. The study, published in The New England Journal of Medicine, marks a significant milestone toward restoring communication for people who have lost the ability to speak. “To … Continued
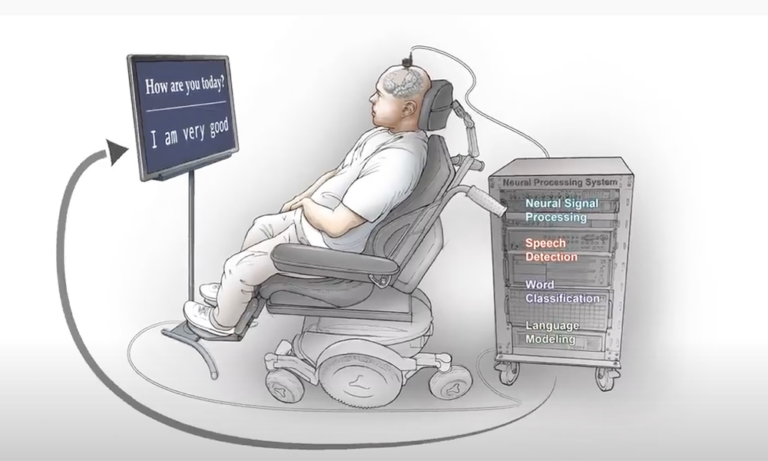
New research out of the University of California, San Francisco has given a paralyzed man the ability to communicate by translating his brain signals into computer generated writing. The study, published in The New England Journal of Medicine, marks a significant milestone toward restoring communication for people who have lost the ability to speak.
“To our knowledge, this is the first successful demonstration of direct decoding of full words from the brain activity of someone who is paralyzed and cannot speak,” senior author and the Joan and Sanford Weill Chair of Neurological Surgery at UCSF, Edward Chang said in a press release. “It shows strong promise to restore communication by tapping into the brain’s natural speech machinery.”
Some with speech limitations use assistive devices–such as touchscreens, keyboards, or speech-generating computers to communicate. However, every year thousands lose their speech ability from paralysis or brain damage, leaving them unable to use assistive technologies.
The participant lost his ability to speak in 2003, paralyzed by a brain stroke following a car accident. The researchers were not sure if his brain retained neural activity linked to speech. To track his brain signals, a neuroprosthetic device consisting of electrodes was positioned on the left side of the brain, across several regions known for speech processing.
Over about four months the team embarked on 50 training sessions, where the participant was prompted to say individual words, form sentences, or respond to questions on a display screen. While responding to the prompts, the electrode device captured neural activity and transmitted the information to a computer with custom software.
“Our models needed to learn the mapping between complex brain activity patterns and intended speech. That poses a major challenge when the participant can’t speak,” David Moses, a postdoctoral engineer in the Chang lab and one of the lead authors of the study, said in a press release.
To decode the responses from his brain activity, the team created speech-detection and word classification models. Using the cuDNN-accelerated TensorFlow framework and 32 NVIDIA V100 Tensor Core GPUs the researchers trained, fine-tuned, and evaluated the models.
“Utilizing neural networks was essential to getting the classification and detection performance we did, and our final product was the result of lots of experimentation,’ said study co-lead Sean Metzger. “Because our dataset was constantly evolving and growing, being able to adapt the models we were using was critical. The GPUs helped us make changes, monitor progress, and understand our dataset.”
With up to 93% accuracy, and a median rate of 75%, the model decoded the participants word’s at a rate of up to 18 per minute.
“We want to get to 1,000 words, and eventually all words. This is just the starting point,” Chang said.
The study builds off previous work by Chang and his colleagues, which developed a deep learning method for decoding and converting brain signals. Unlike the current work, participants in the previous study were able to speak.
Deep learning models have been successfully used in medical image analysis problems but they require a large, curated amount of labeled images to obtain good performance. Creating such annotations are tedious, time-consuming and typically require clinical expertise. To address this gap, Project MONAI has released MONAI Label v0.1 – an intelligent open source image labeling … Continued
Deep learning models have been successfully used in medical image analysis problems but they require a large, curated amount of labeled images to obtain good performance. Creating such annotations are tedious, time-consuming and typically require clinical expertise.
To address this gap, Project MONAI has released MONAI Label v0.1 – an intelligent open source image labeling and learning tool that helps researchers and clinicians collaborate, create annotated datasets easily and quickly, and build AI models in a standardized MONAI paradigm.
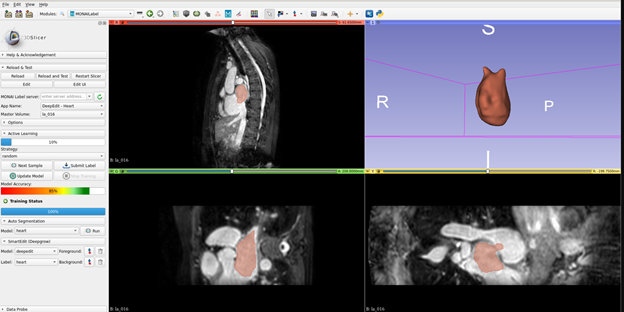
MONAI Label enables the adaptation of AI models to the clinical task at hand by continuously learning from the user’s interactions and new labels. It powers an AI Assisted annotation experience, allowing researchers and developers to make continuous improvements to their applications with iterative feedback from clinicians who are typically the end users of the medical imaging AI models.
At the Children’s Hospital of Philadelphia (CHOP), Dr. Matthew Jolley explains how they are innovating and driving clinical impact with machine learning algorithms.
“Children with congenital heart disease demonstrate a broad range of anatomy, and there are few readily available tools to facilitate image-based structural phenotyping and patient specific planning of complex cardiac interventions. However, currently 3D image-based heart model creation is slow, even in the hands of experienced modelers. As such, we have been working to develop machine learning algorithms to create models of heart valves in children with congenital heart disease, such as the tricuspid valve in hypoplastic left heart syndrome. Ongoing development of automation based on machine learning will allow rapid modeling and precise quantification of how a dysfunctional valve differs from normal valves across multiple parameters. That “structural valve profile” for an individual can then be contextualized within the spectrum of anatomy and function we see in the population, which may eventually inform improved medical decision making and interventions for children.”
With MONAI Label we envision creating a community of researchers and clinicians like Dr. Jolley and his team who can build upon a well maintained software foundation that will accelerate collaboration through continuous learning. The MONAI Label team and CHOP collaborated through a Slicer week project, and successfully developed a MONAI Label application for leaflet segmentation of heart valves in 3D echocardiographic (3DE) images. The team is now working to deploy this model as a MONAI Label application on a public facing server at CHOP where clinicians can directly interface with the model and trigger a training loop for adaptation – learn more.
It is incredibly important for an open source initiative like Project MONAI to have clinicians in the loop as we converge to develop a common set of best practices for AI lifecycle management in healthcare imaging. To quote Dr. Jolley:
“Open-source frameworks like Project MONAI provide a standardized, transparent, and reproducible template for the creation of, and deployment of medical imaged-focused machine learning models, potentiating efforts such as ours. They allow us to focus on investigating novel algorithms and their application, rather than developing and maintaining software infrastructure. This in turn has accelerated research progress which we are actively translating into tools of practical relevance to the pediatric community we serve.”
WHAT IS INCLUDED IN MONAI LABEL V0.1
MONAI Label is an open-source server-client system that is easy to set up and can run locally on a machine with one or two GPUs. The initial release does not yet support multiple user sessions, therefore both server and client operate on the same machine.
MONAI Label delivers on MONAI’s core promise of being modular, Pythonic, extensible, easy to debug, user friendly, and portable.
Figure 1. MONAI Label provides interfaces which can be implemented by the label app developer for custom functionality as well as utilities which are readily usable in the labeling app
MONAI v0.1 includes:
MONAI Label server: REST API server that facilitates communication with the viewer clients i.e. (Slicer, OHIF, etc).
MONAI Label sample applications that can be adapted to a given clinical task for MR/CT modality including DeepGrow and DeepEdit which are developed by MONAI researchers.
With v0.1, we have released a 3DSlicer plugin for MONAI Label to kick start users in the MONAI Label experience
Future releases of NVIDIA Clara AIAA will also leverage the MONAI Label framework. We continue to bring together development efforts for NVIDIA Clara medical imaging tools and MONAI to deliver domain-optimized, robust software tools for researchers and developers in healthcare imaging.
With contributions from an engaged community, MONAI Label aims to reduce the cost of labeling and maximize the collaboration between researchers & clinicians. Get started today with sample applications available on the MONAI Label GitHub and follow along with our step-by-step getting started guide available in the MONAI Label Documentation.
A new session from GTC shares how to use synthetic data and Fleet Command to deploy highly accurate and scalable models.
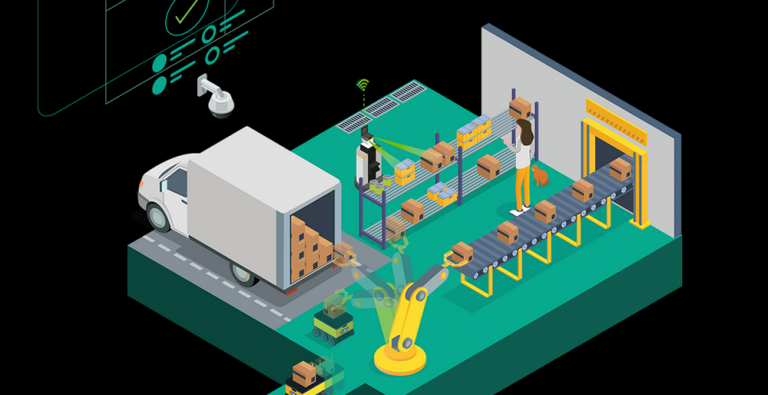
The retail supply chain is complex and includes everything from creating a product, distributing it, putting it on shelves in stores, to getting it into customer hands. Retailers and Consumer Packaged Goods (CPG) companies must look at the entire supply chain for critical gaps and problems that can be solved with technology and automation. Computer vision has been implemented by many of these companies for years, with cameras distributed in their stores, warehouses, and on assembly lines. This is where edge computing comes in, AI applications can be run in remote locations that allow companies to turn these cameras from sources of information to sources of intelligence. With AI, these cameras can turn from sources of information to sources of intelligence. Whether providing in-store analytics to help evaluate traffic patterns and optimize product placement, to improving packaging detection and analysis, and overall health and safety within warehouses.
The challenge with computer vision applications in the retail space is the heavy data requirement that is needed to ensure AI models are accurate and safe. Once trained, these models then need to be deployed to many locations at the edge, often without the IT resources onsite. Kinetic Vision has partnered with NVIDIA to develop a new solution to this problem that allows retailers and CPG companies to generate accurate models, and scale them out at the edge.
Solving the challenge of data is key to enabling the training of AI models using NVIDIA tools like the DeepStream SDK and Transfer Learning Toolkit (TLT). With a Synthetic Data Generator, Kinetic Vision not only produces data volume, but also with the required variances to ensure the model will perform in any environment. Numerous angles, lighting, backgrounds, and product types can be generated quickly and easily using different methods including GANs, simulated sensor data (LIDAR, RADAR, IMU), photorealistic 3D environment, synthetic x-rays, and physics simulations.
Figure 1.Synthetic data generation models
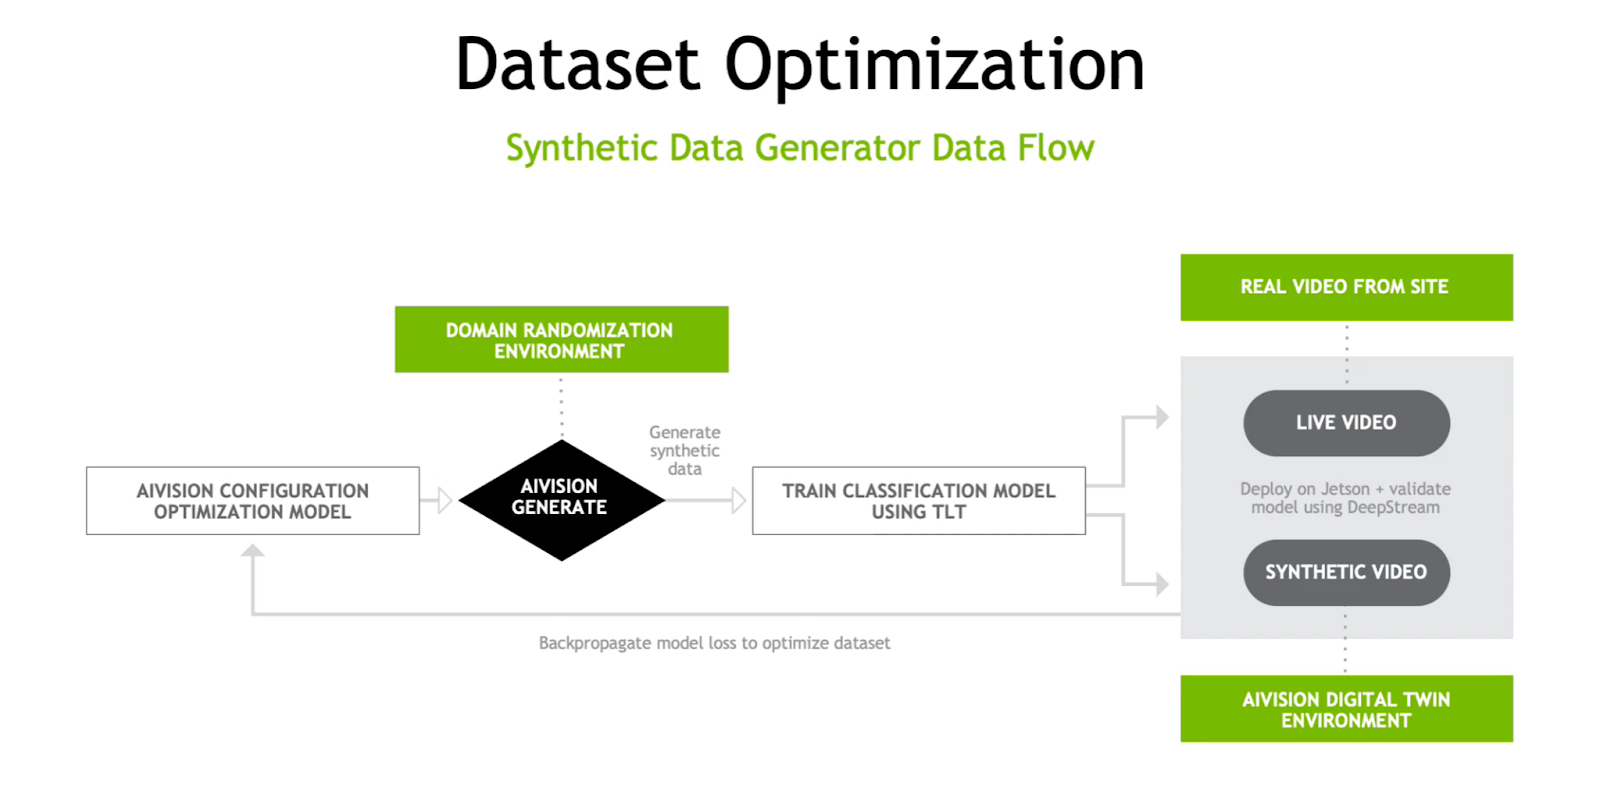
The synthetic data is then used to train a model that can be tested in a digital twin, a virtual representation of the warehouse, supply line, store, or whatever environment the model will be deployed. Using the synthetic data and the digital twin, Kinetic Vision can train, simulate, and re-train the model to achieve the required level of accuracy.
Figure 2. Dataset optimization using synthetic data and digital twin environment
Once the AI model has achieved the desired level of performance, it must be tested in the real world. This is where NVIDIA Fleet Command comes in. Fleet Command is a hybrid-cloud platform for deploying and managing AI models at the edge. The pre-trained model is simply loaded into the NGC catalog and then deployed on the edge system using the Fleet Command UI in just a few clicks. Once deployed at the edge, the model can continue to be optimized with real world data sent back from the store or warehouse. These updates are once again easily deployed and managed using Fleet Command.
The advantages of this new approach to creating retail computer vision applications include both ROI and technological benefits. The cost of developing an AI model with a digital twin is easily 10 percent the time and cost required to do the same thing in a physical environment. With the digital twin, testing can be done without physical infrastructure or requiring production interruptions. Additionally, new products and product variations can be easily accommodated without requiring inventory photography that must be manually annotated. Finally, the digital twin results in a generalized and scalable model that still provides the accuracy required for production deployment.
‘Meet the Researcher’ is a series in which we spotlight different researchers in academia who use NVIDIA technologies to accelerate their work. This month we spotlight Dr. Emanuel Gull, Associate Professor of Physics at University of Michigan, whose research focuses on the development of theoretical and computational methods for strongly correlated quantum systems. Gull is … Continued
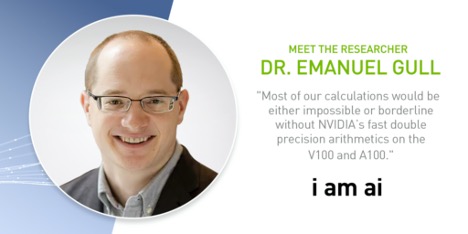
‘Meet the Researcher’ is a series in which we spotlight different researchers in academia who use NVIDIA technologies to accelerate their work.
This month we spotlight Dr. Emanuel Gull, Associate Professor of Physics at University of Michigan, whose research focuses on the development of theoretical and computational methods for strongly correlated quantum systems.
Gull is the recipient of a Sloan Research Fellow, Ralph E. Powe Junior Faculty Enhancement Award, DOE Early Career Research Award, SCES early career Nevill F. Mott Prize, and APS Outstanding Referee Program.
What are your research areas?
The physics of materials in which many quantum particles strongly interact with each other. These are the systems out of which we build our newest generation of magnets, superconductors, solar cells, and systems for standard approximative methods.
When did you know that you wanted to be a researcher and pursue this field?
I was always open to having a career in the software/computing side of industry/finance — but, when I had to decide whether to go for a postdoc, the financial crisis hit. Instead, I did a postdoc in the U.S. and managed to get hired into an academic position afterwards.
What motivated you to pursue your recent research area of focus? ‘Quantum’ theory is the reason why many of our recent technological breakthroughs work. After all, NVIDIA chips are just an application of quantum theory. However, taking just theory and predicting and improving material properties without further input is incredibly difficult, even though we believe we understand the theory very well. I have always been fascinated by the challenge of combining computers and theoretical methods to bring calculations closer to reality. This started with an internship I did at a high performance computer center back when I was a high school student.
What problems or challenges does your research address?
While we know the equations that govern the physics of systems with many interacting quantum particles well, they are impossibly difficult to solve. This is why we need to find approximations that are both numerically tractable and accurate. My research spans the entire gamut from theoretical derivations, to implementation of new algorithms, to HPC, to comparisons with experiments. All of my research aims to make quantum theories more predictive and more accurate.
What challenges did you face during the research process, and how did you overcome them? Time management is probably the most crucial. It’s easy to have many ideas, but testing them, improving upon them, and revising them takes time. In research, you’re constantly juggling finding resources, training people, having and revising ideas, publishing, going to conferences, etc. Finding quiet intervals to work deeply on a problem is essential, but difficult. I don’t believe I’ve overcome that limitation.
What is the impact of your work on the field/community/world?
Stronger magnets, higher temperature superconductors, and better materials for sensors and chips.
How have you used NVIDIA technology either in your current or previous research?
Yes! In fact, our home-written ab-initio simulation toolkit uses NVIDIA codes to simulate the physics of real materials and their excitations. Most of our calculations would be either impossible or borderline without the NVIDIA fast and double-precision arithmetics on the V100 and A100. Our codes run at just about 50% of theoretical peak flop, and are parallelized with streams within each GPU and with MPI between different GPUs and nodes. What research breakthroughs or interesting results can you share?
We did, and we’re just now writing a paper on a new high-temperature superconductor.
What’s next for your research?
We’re currently doing a big push for driving systems out of equilibrium. We’re exciting them with a laser, ‘quenching’ them with a short current pulse, or probing them in other nonequilibrium conditions. The nonequilibriumphysics of quantum materials is very different from the equilibrium conditions, and many exciting new phenomena appear. Besides, most sensors work out of equilibrium. How to generalize our computational toolkit to these situations is currently an open question that we’re working on.
Any advice for new researchers, especially to those who are inspired and motivated by your work? Ask the big questions. Why is this interesting? Why will it work or how will it not work? What have we learned if it does work? But, don’t lose sight of the small details. Pounce at the details that don’t quite make sense, that’s where there’s something that needs to be understood. When something turns into a dead end, learn to let it go (even if you’ve invested a lot of resources into it).
Also, know the established ways of thinking about a problem, but question them always. Know the limitations of your tools and theories, and invest in your toolkit. New tools (computer codes, theoretical methods, experimental setups) lead to new discoveries, so make sure you have the best ones available for your application.

 The NVIDIA Merlin and KGMON team earned 1st place in the RecSys Challenge 2021 by effectively predicting the probability of user engagement within a dynamic environment and providing fair recommendations on a multi-million point dataset.
 Today, NVIDIA is releasing TensorRT 8.0, which introduces many transformer optimizations. With this post update, we present the latest TensorRT optimized BERT sample and its inference latency benchmark on A30 GPUs. Using the optimized sample, you can execute different batch sizes for BERT-base or BERT-large within the 10 ms latency budget for conversational AI applications.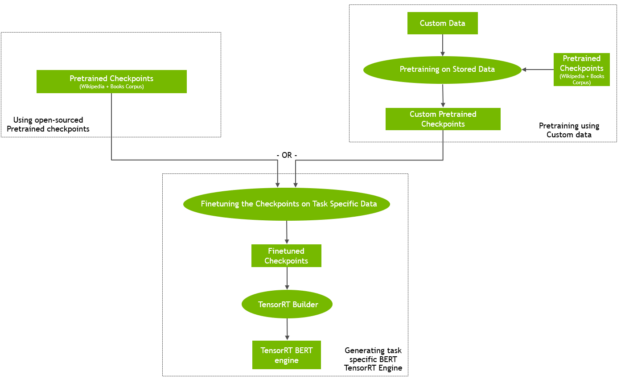



 New research out of the University of California, San Francisco has given a paralyzed man the ability to communicate by translating his brain signals into computer generated writing. The study, published in The New England Journal of Medicine, marks a significant milestone toward restoring communication for people who have lost the ability to speak. “To …
  Deep learning models have been successfully used in medical image analysis problems but they require a large, curated amount of labeled images to obtain good performance. Creating such annotations are tedious, time-consuming and typically require clinical expertise. To address this gap, Project MONAI has released MONAI Label v0.1 – an intelligent open source image labeling …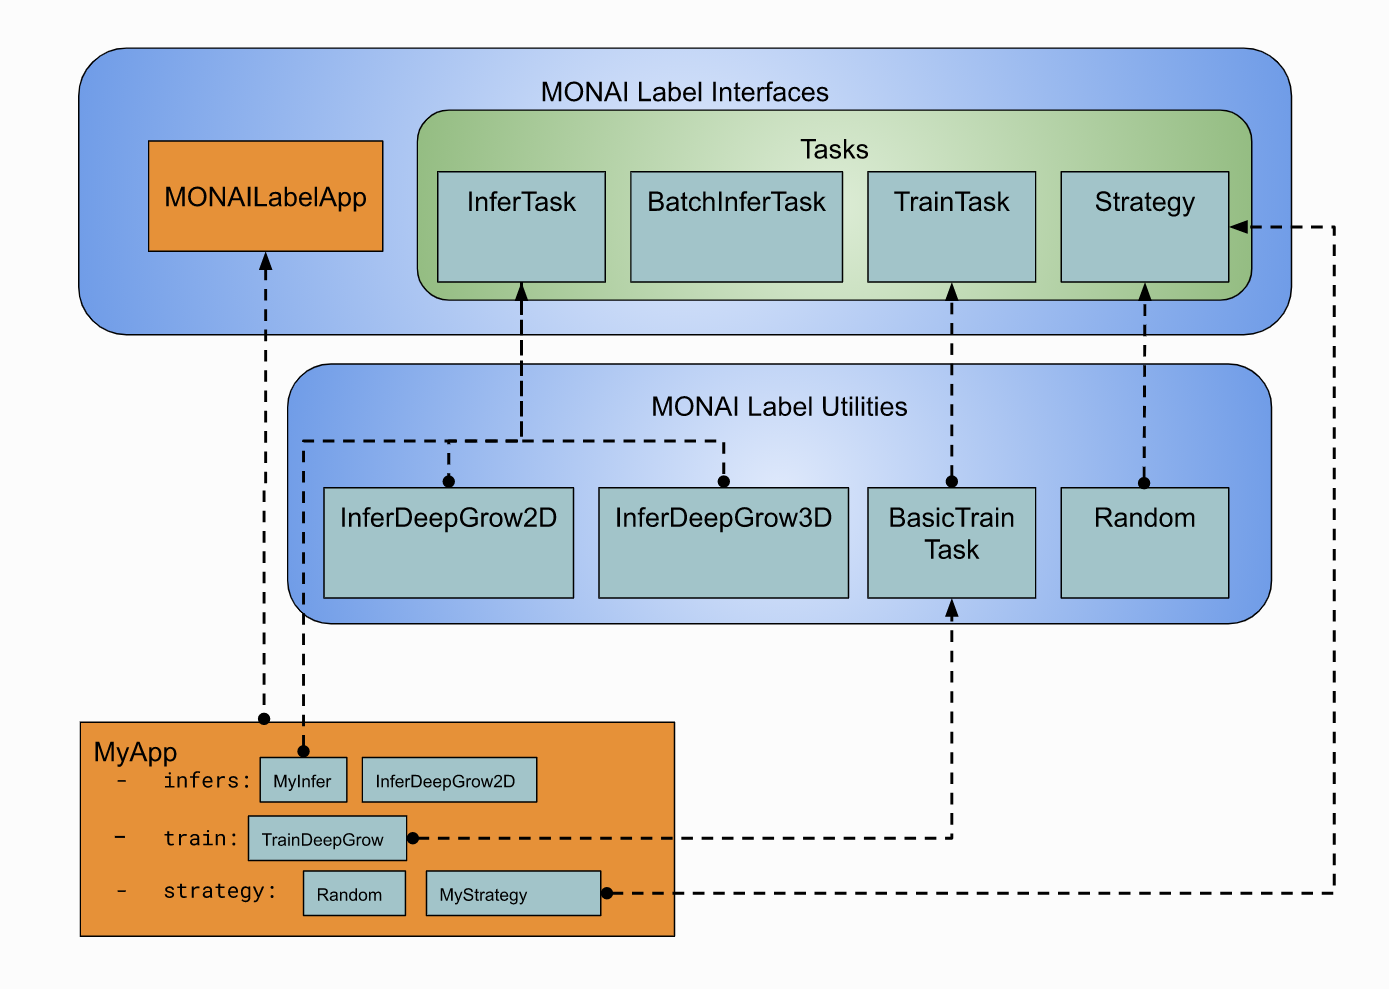
 A new session from GTC shares how to use synthetic data and Fleet Command to deploy highly accurate and scalable models.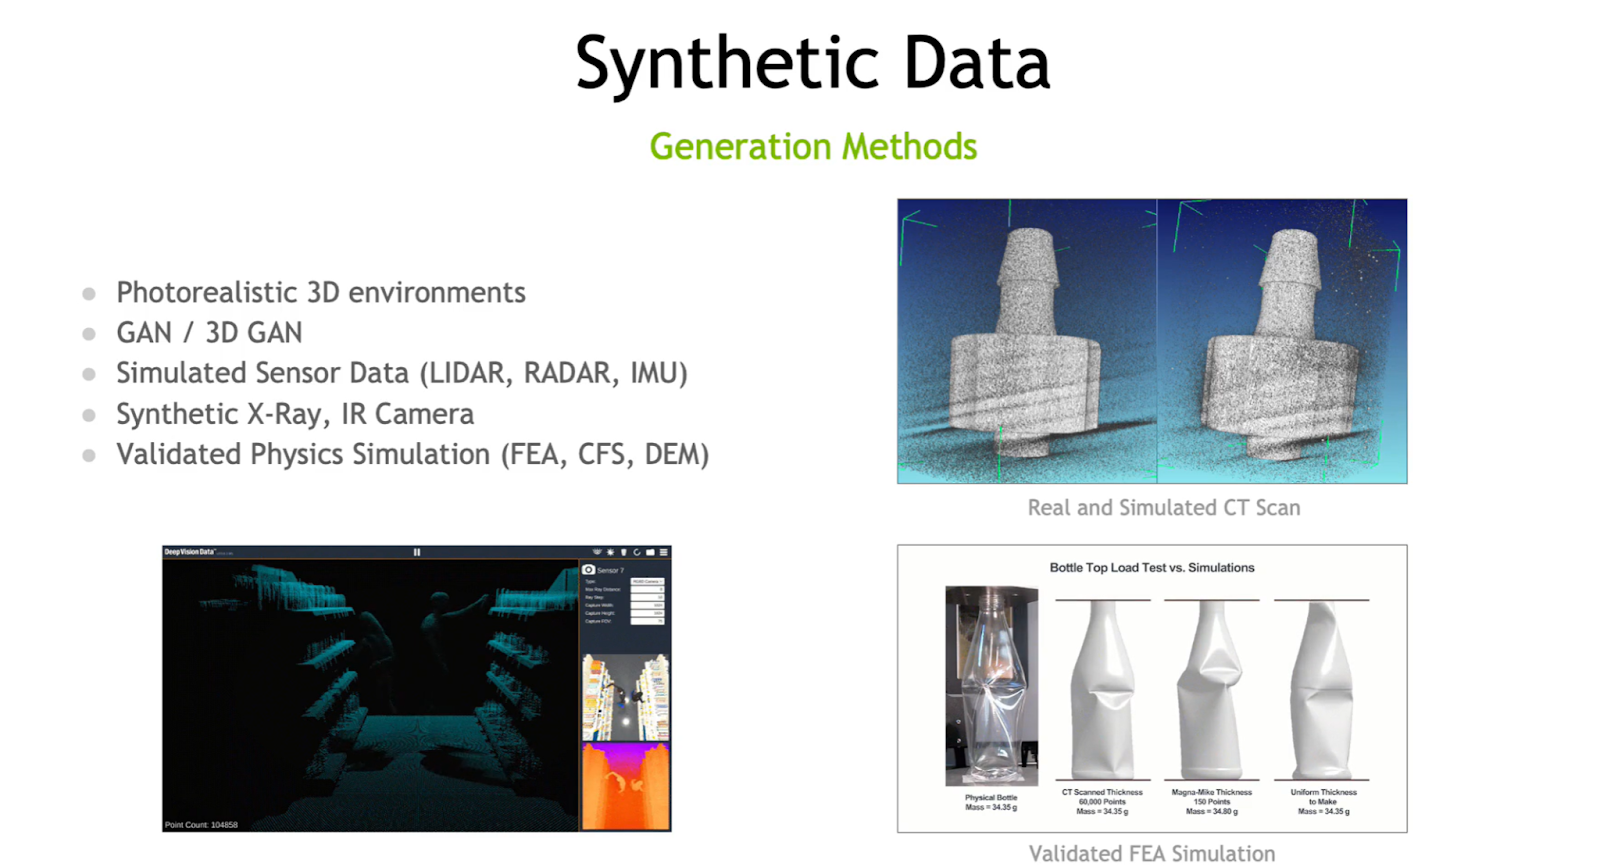
 ‘Meet the Researcher’ is a series in which we spotlight different researchers in academia who use NVIDIA technologies to accelerate their work. This month we spotlight Dr. Emanuel Gull, Associate Professor of Physics at University of Michigan, whose research focuses on the development of theoretical and computational methods for strongly correlated quantum systems. Gull is …