NVIDIA AI platform makes LLMs accessible. Announcing new parallelism techniques and a hyperparameter tool to speed-up training by 30% on any number of GPUs.
As the size and complexity of large language models (LLMs) continue to grow, NVIDIA is today announcing updates to the NeMo Megatron framework that provide training speed-ups of up to 30%.
These updates–which include two trailblazing techniques and a hyperparameter tool to optimize and scale training of LLMs on any number of GPUs–offer new capabilities to train and deploy models using the NVIDIA AI platform.
BLOOM, the world’s largest open-science, open-access multilingual language model, with 176 billion parameters, was recently trained on the NVIDIA AI platform, enabling text generation in 46 languages and 13 programming languages. The NVIDIA AI platform has also powered one of the most powerful transformer language models, with 530 billion parameters, Megatron-Turing NLG model (MT-NLG).
Recent advances in LLMs
LLMs are one of today’s most important advanced technologies, involving up to trillions of parameters that learn from text. Developing them, however, is an expensive, time-consuming process that demands deep technical expertise, distributed infrastructure, and a full-stack approach.
Yet their benefit is enormous in advancing real-time content generation, text summarization, customer service chatbots, and question-answering for conversational AI interfaces.
These new optimizations to the NVIDIA AI platform help solve many of the existing pain points across the entire stack. NVIDIA looks forward to working with the AI community to continue making the power of LLMs accessible to everyone.
Build LLMs faster
The latest updates to NeMo Megatron offer 30% speed-ups for training GPT-3 models ranging in size from 22 billion to 1 trillion parameters. Training can now be done on 175 billion-parameter models using 1,024 NVIDIA A100 GPUs in just 24 days–reducing time to results by 10 days, or some 250,000 hours of GPU computing, prior to these new releases.
NeMo Megatron is a quick, efficient, and easy-to-use end-to-end containerized framework for collecting data, training large-scale models, evaluating models against industry-standard benchmarks, and for inference with state-of-the-art latency and throughput performance.
It makes LLM training and inference easy and reproducible on a wide range of GPU cluster configurations. Currently, these capabilities are available to early access customers to run on NVIDIA DGX SuperPODs, and NVIDIA DGX Foundry as well as in Microsoft Azure cloud. Support for other cloud platforms will be available soon.
You can try the features on NVIDIA LaunchPad, a free program that provides short-term access to a catalog of hands-on labs on NVIDIA-accelerated infrastructure.
Two new techniques to speed-up LLM training
Two new techniques included in the updates that optimize and scale the training of LLMs are sequence parallelism (SP) and selective activation recomputation (SAR).
Sequence parallelism expands tensor-level model parallelism by noticing that the regions of a transformer layer that haven’t previously been parallelized are independent along the sequence dimension.
Splitting these layers along the sequence dimension enables distribution of the compute and, most importantly, the activation memory for these regions across the tensor parallel devices. Since the activations are distributed, more activations can be saved for the backward pass instead of recomputing them.
Figure 1. Parallelism modes within a transformer layer.
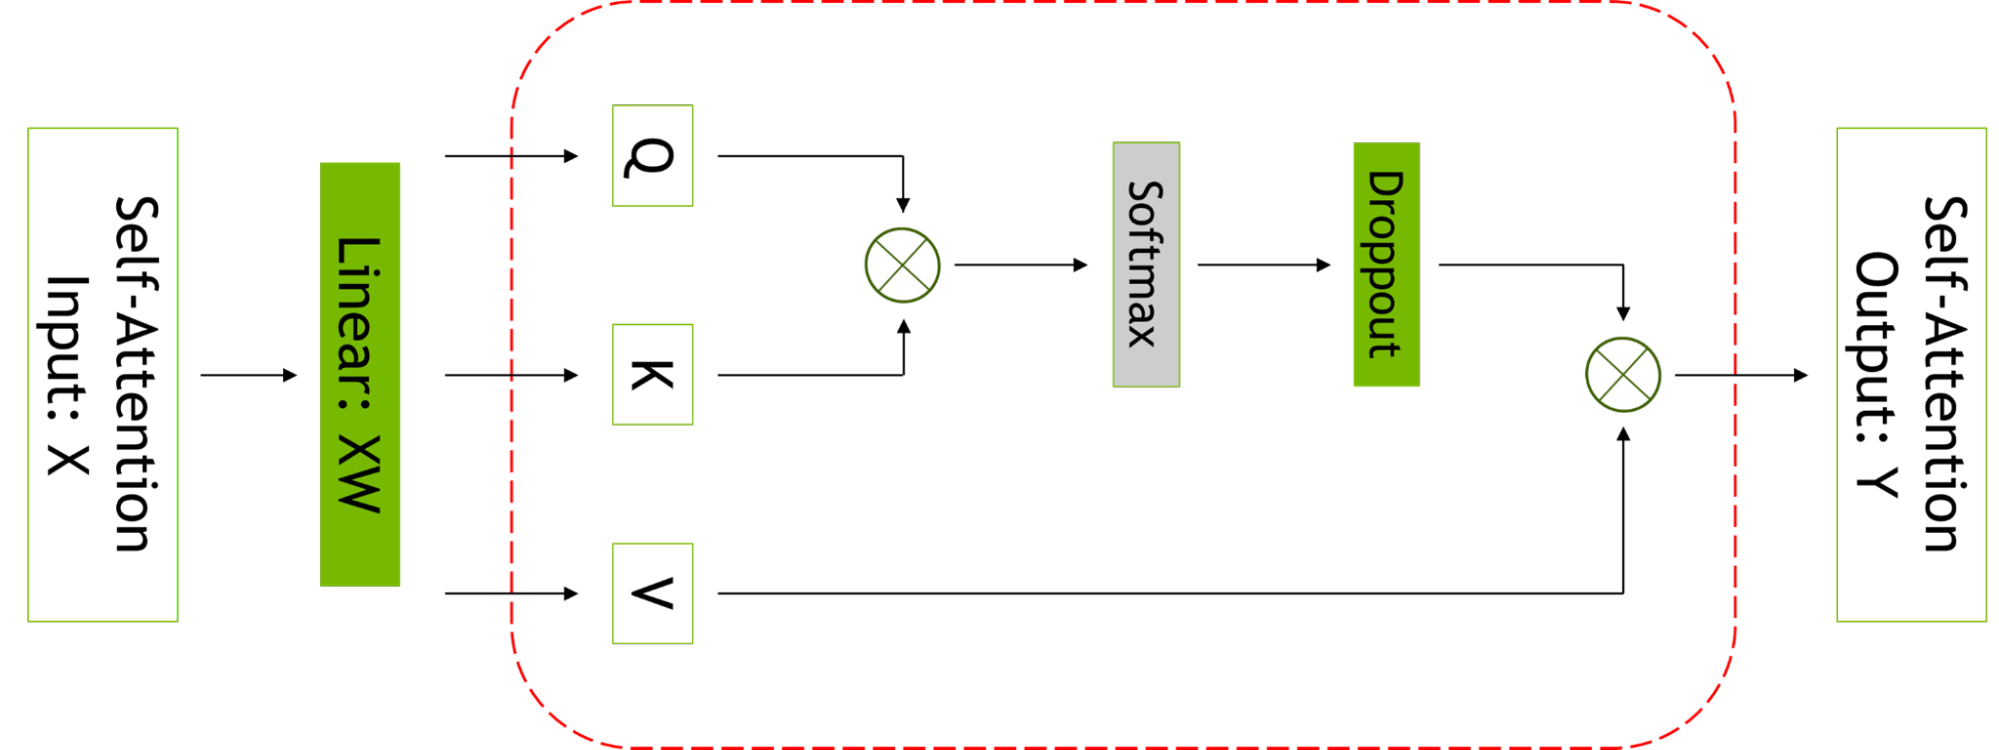
Selective activation recomputation improves cases where memory constraints force the recomputation of some, but not all, of the activations, by noticing that different activations require different numbers of operations to recompute.
Instead of checkpointing and recomputing full transformer layers, it’s possible to checkpoint and recompute only parts of each transformer layer that take up a considerable amount of memory but aren’t computationally expensive to recompute.
Figure 2. Self-attention block. The red dashed line shows the regions to which selective activation recomputation is applied.
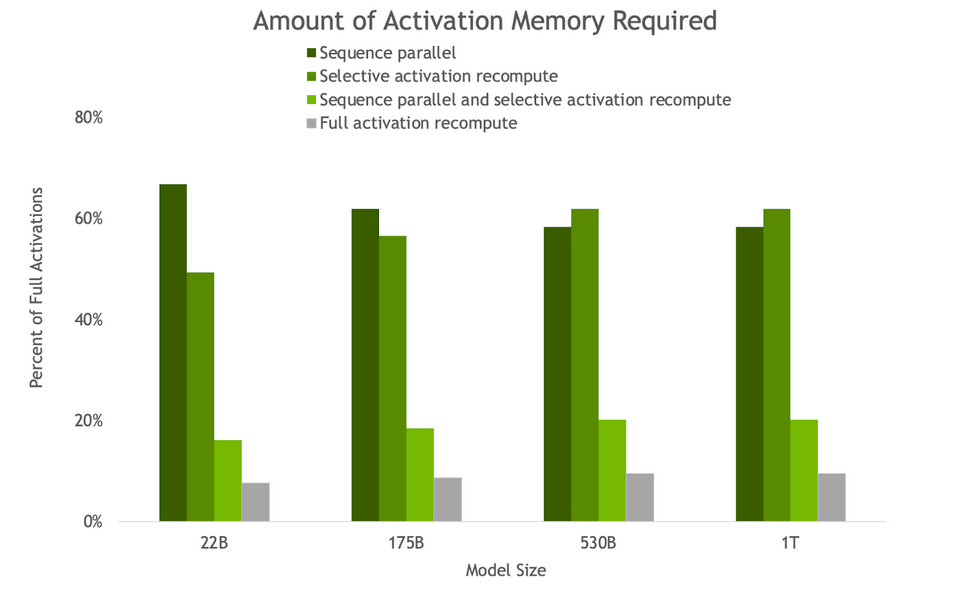
Figure 3. Amount of activation memory required in backward pass thanks to SP and SAR. As model size increases, both SP and SAR have similar memory savings, reducing the memory required by ~5x.
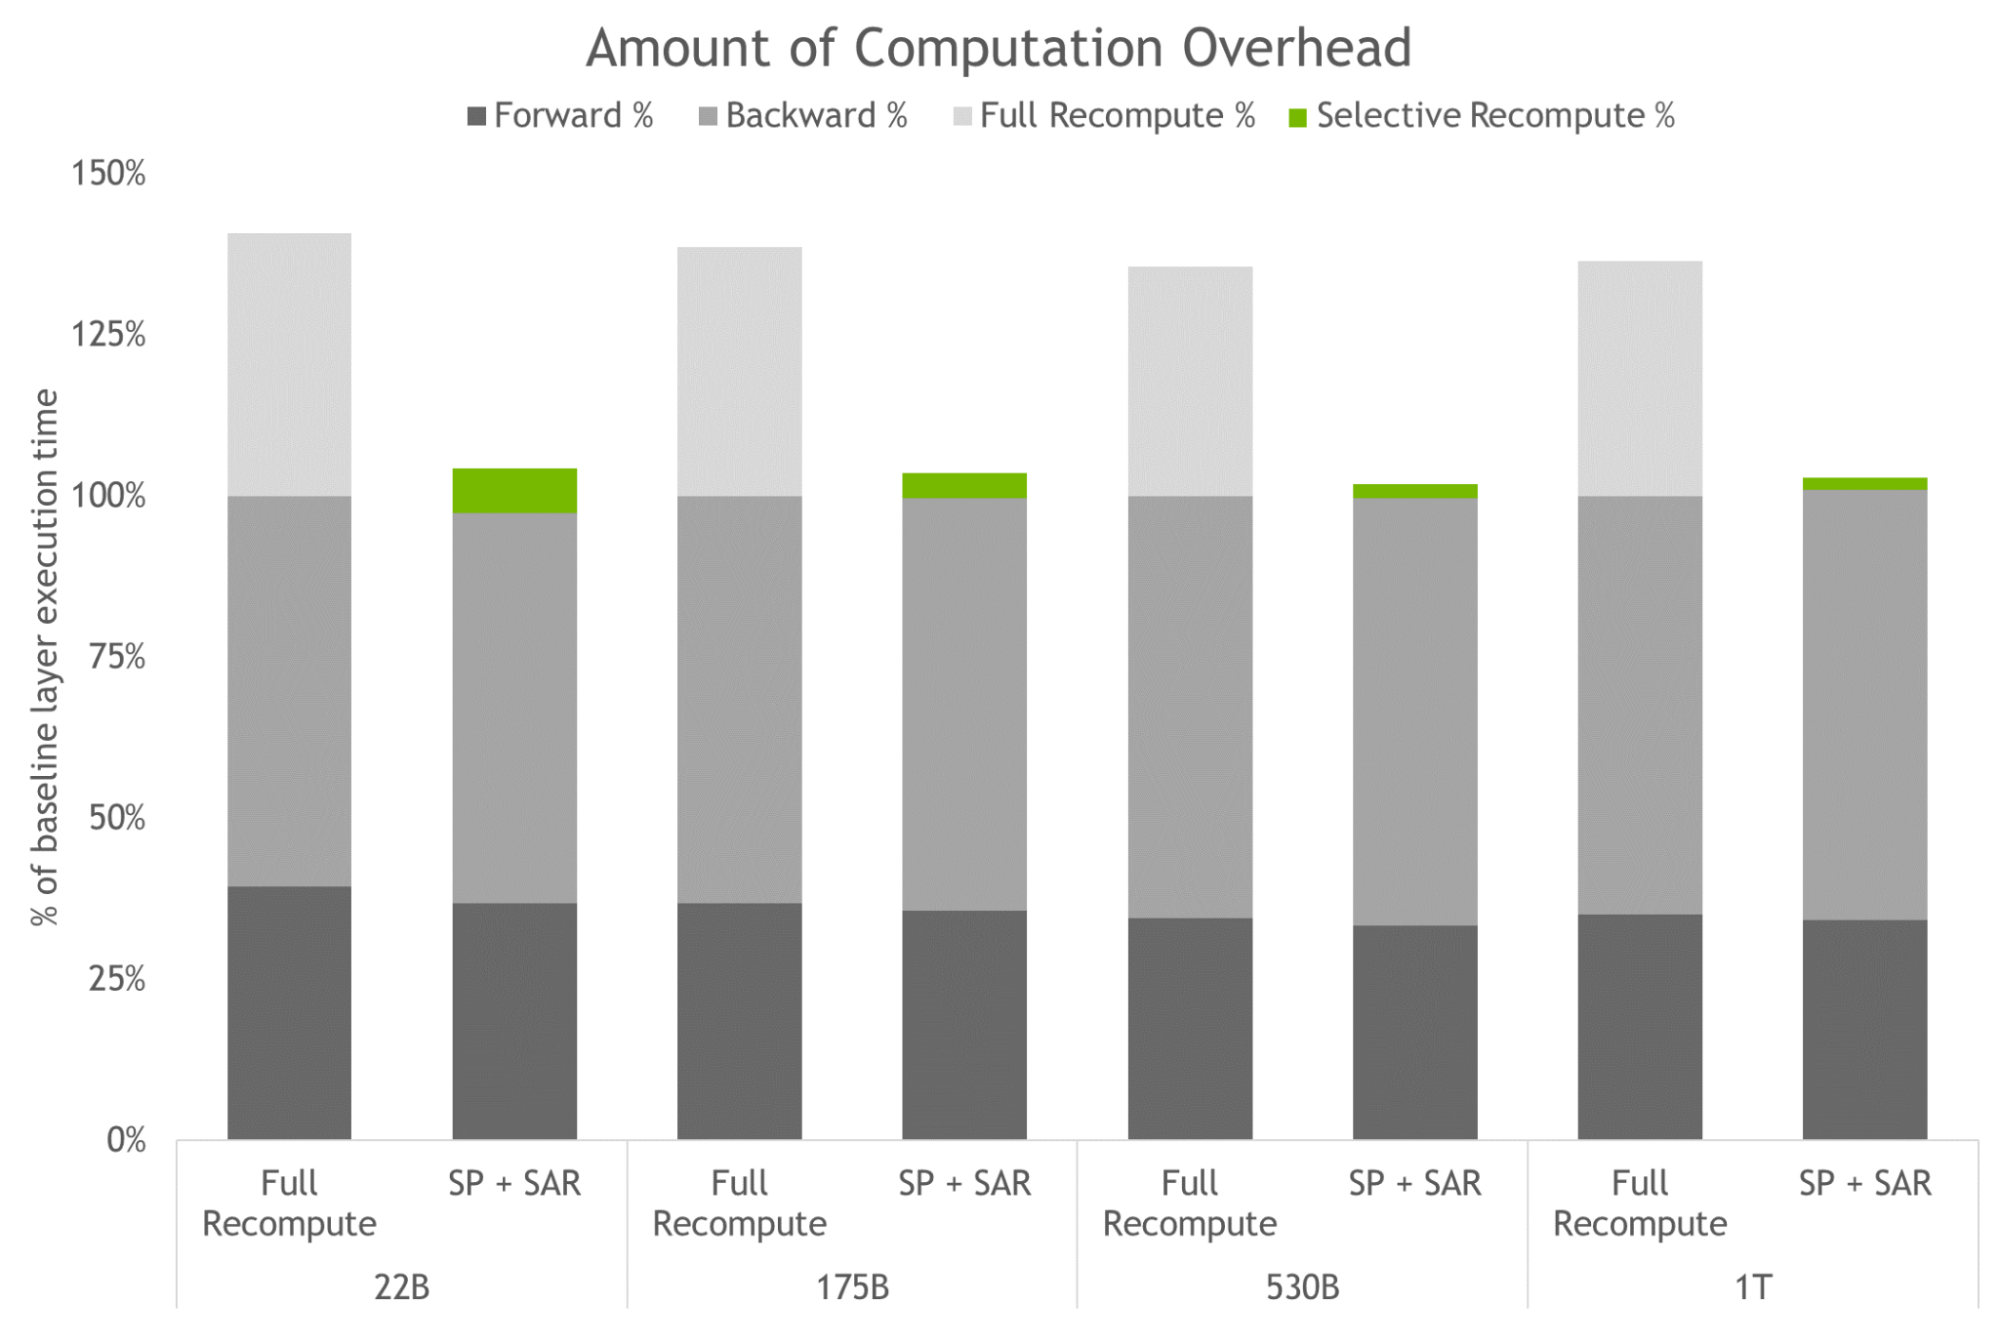
Figure 4. Amount of computation overhead for full activation recomputation, and SP plus SAR. Bars represent per-layer breakdown of forward, backward, and recompute times. Baseline is the case with no recomputation and no sequence parallelism. These techniques are effective at reducing the overhead incurred when all activations are recomputed instead of saved. For the largest models, overhead drops from 36% to just 2%.
Accessing the power of LLMs also requires a highly optimized inference strategy. Users can easily use the trained models for inference, and optimize for different use cases using p-tuning and prompt tuning capabilities.
These capabilities are parameter-efficient alternatives to fine-tuning and allow LLMs to adapt to new use cases without the heavy-handed approach of fine-tuning the full pretrained models. In this technique, the parameters of the original model are not altered. As such, catastrophic ‘forgetting’ issues associated with fine-tuning models are avoided.
New hyperparameter tool for training and inference
Finding model configurations for LLMs across distributed infrastructure is a time consuming process. NeMo Megatron introduces a hyperparameter tool to automatically find optimal training and inference configurations, with no code changes required. This enables LLMs to be trained to convergence for inference from day one, eliminating time wasted searching for efficient model configurations.
It uses heuristics and empirical grid search across distinct parameters to find configurations with best throughputs: data parallelism, tensor parallelism, pipeline parallelism, sequence parallelism, micro batch size, and number of activation checkpointing layers (including selective activation recomputation).
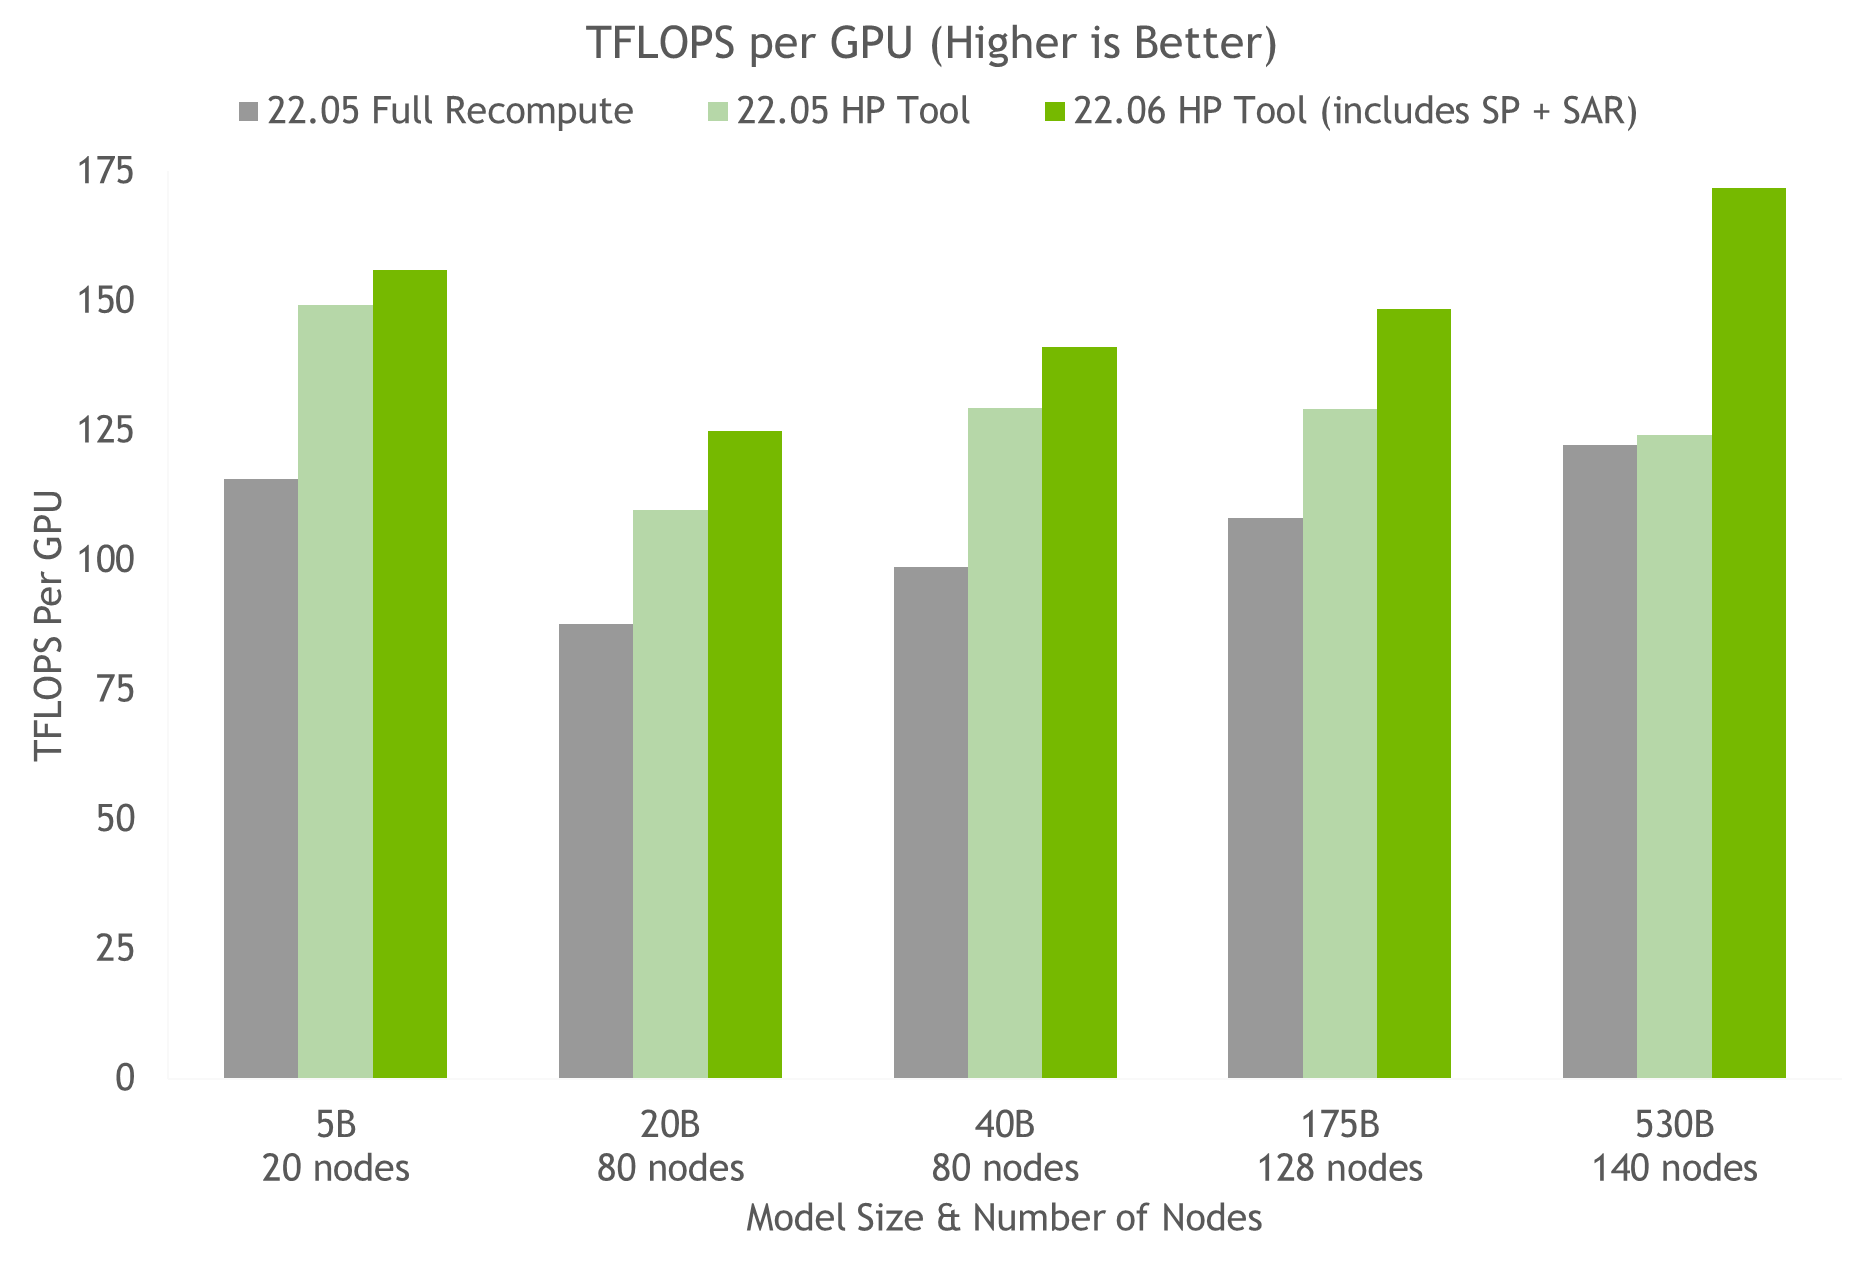
Using the hyperparameter tool and NVIDIA testing on containers on NGC, we arrived at the optimal training configuration for a 175B GPT-3 model in under 24 hours (see Figure 5). When compared with a common configuration that uses full activation recomputation, we achieve a 20%-30% throughput speed-up. Using the latest techniques, we achieve an additional 10%-20% speed-up in throughput for models with more than 20B parameters.
Figure 5. Results of the HP tool on several containers indicating speed-up with sequence parallelism and selective activation recomputation, wherein each node is a NVIDIA DGX A100.
The hyperparameter tool also allows finding model configurations that achieve highest throughput or lowest latency during inference. Latency and throughput constraints can be provided to serve the model, and the tool will recommend suitable configurations.
Figure 6. HP tool results for inference, showing the throughput per GPU and the latency of different configurations. Optimal configurations include high throughput and low latency.
Learn how to get started with NVIDIA Riva, a fully accelerated speech AI SDK, on AWS EC2 using Jupyter Notebooks and a sample virtual assistant application.
Speech AI can assist human agents in contact centers, power virtual assistants and digital avatars, generate live captioning in video conferencing, and much more. Under the hood, these voice-based technologies orchestrate a network of automatic speech recognition (ASR) and text-to-speech (TTS) pipelines to deliver intelligent, real-time responses.
Building these real-time speech AI applications from scratch is no easy task. From setting up GPU-optimized development environments to deploying speech AI inferences using customized large transformer-based language models in under 300ms, speech AI pipelines require dedicated time, expertise, and investment.
In this post, we walk through how you can simplify the speech AI development process by using NVIDIA Riva to run GPU-optimized applications. With no prior knowledge or experience, you learn how to quickly configure a GPU-optimized development environment and run NVIDIA Riva ASR and TTS examples using Jupyter notebooks. After following along, this virtual assistant demo could be running on your web browser powered by NVIDIA GPUs on Amazon EC2.
Along with the step-by-step guide, we also provide you with resources to help expand your knowledge so you can go on to build and deploy powerful speech AI applications with NVIDIA support.
But first, here is how the Riva SDK works.
How does Riva simplify speech AI?
Riva is a GPU-accelerated SDK for building real-time speech AI applications. It helps you quickly build intelligent speech applications, such as AI virtual assistants.
By using powerful optimizations with NVIDIA TensorRT and NVIDIA Triton, Riva can build and deploy customizable, pretrained, out-of-the-box models that can deliver interactive client responses in less than 300ms, with 7x higher throughput on NVIDIA GPUs compared to CPUs.
The state-of-the-art Riva speech models have been trained for millions of hours on thousands of hours of audio data. When you deploy Riva on your platform, these models are ready for immediate use.
Riva can also be used to develop and deploy speech AI applications on NVIDIA GPUs anywhere: on premises, embedded devices, any public cloud, or the edge.
Here are the steps to follow for getting started with Riva on AWS.
Running Riva ASR and TTS examples to launch a virtual assistant
If AWS is where you develop and deploy workloads, you already have access to all the requirements needed for building speech AI applications. With a broad portfolio of NVIDIA GPU-powered Amazon EC2 instances combined with GPU-optimized software like Riva, you can accelerate every step of the speech AI pipeline.
There are four simple steps to get started with Riva on an NVIDIA GPU-powered Amazon EC2 instance:
Launch an Amazon EC2 instance with NVIDIA GPU-optimized AMI.
Step 1: Launch an EC2 instance with the NVIDIA GPU-optimized AMI
In this post, you use the NVIDIA GPU-optimized AMI available on the AWS Marketplace. It is preconfigured with NVIDIA GPU drivers, CUDA, Docker toolkit, runtime, and other dependencies. It also provides a standardized stack for you to build speech AI applications. This AMI is validated and updated quarterly by NVIDIA with the newest drivers, security patches, and support for the latest GPUs to maximize performance.
We recommend using NVIDIA A100 GPUs (P4d instances) for best performance at scale but for this guide, an A10G single-GPU instance (g5.xlarge instances) powered by the NVIDIA Ampere Architecture is fine.
For a greater number of pre- or postprocessing steps, consider larger sizes with the same single GPU, more vCPUs, and higher system memory, or consider the P4d instances that take advantage of 8x NVIDIA A100 GPUs.
For Private key file format, select ppk for use with PuTTY, depending on how you plan to connect to the instance.
After the key pair is created, a file is downloaded to your local machine. You need this file in future steps for connecting to the EC2 instance.
Network settings enable you to control the traffic into and out of your instance. Select Create Security Group and check the rule Allow SSH traffic from: Anywhere. At any point in the future, this can customized based on individual security preferences.
Finally, configure the storage. For this example, 100 GiB on a general purpose SSD should be plenty.
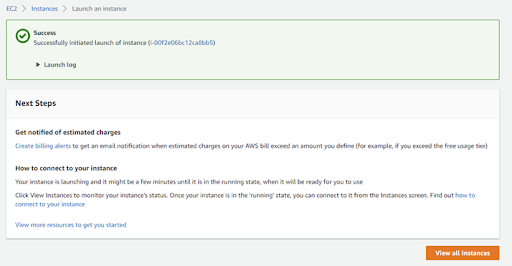
Now you are ready to launch the instance. If successful, your screen should look like Figure 1.
Figure 1. Success message after launching an instance
Connect to the instance
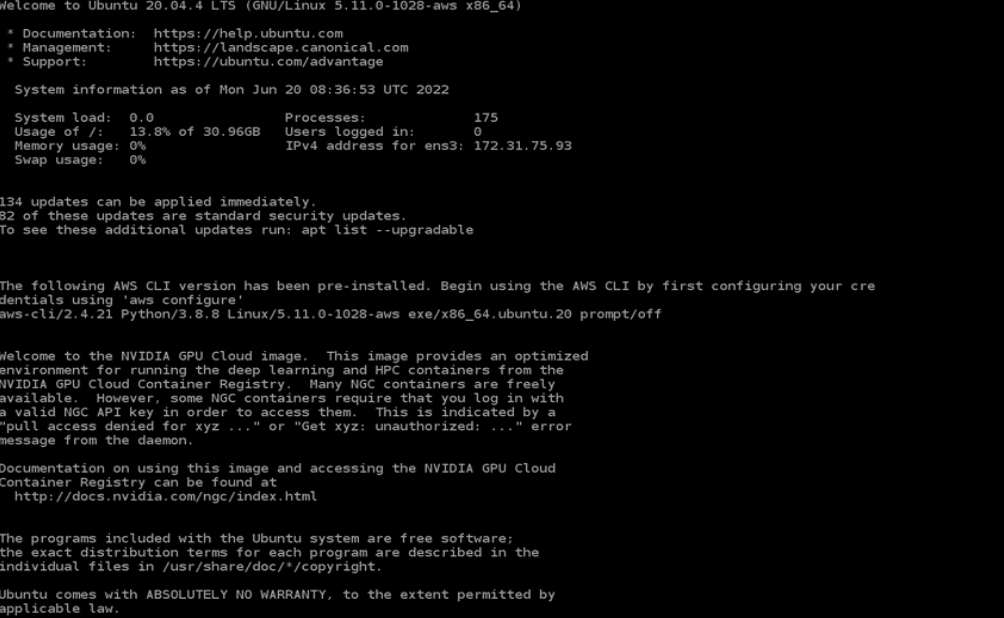
After a few minutes under Instances on the sidebar, you will see your running instance with a public IPv4 DNS. Keep this address handy as it is used to connect to the instance using SSH. This address will change every time you start and stop your EC2 instance.
You may begin working with your NVIDIA GPU-powered Amazon EC2 instance.
Figure 2. Starting screen of the NVIDIA GPU-Optimized AMI on an EC2 instance
Log in with username ubuntu, and make sure that you have the right NVIDIA GPUs running:
nvidia-smi
Step 2: Pull the Riva container from the NGC catalog
To access Riva from your terminal, first create a free NGC account. The NGC catalog is a one-stop-shop for all GPU optimized software, containers, pretrained AI models, SDKs, Helm charts and other helpful AI tools. By signing up, you get access to the complete NVIDIA suite of monthly updated GPU optimized frameworks and training tools so that you can build your AI application in no time.
Now you can configure the NGC CLI (preinstalled with the NVIDIA GPU-Optimized AMI), by executing the following command:
ngc config set
Enter your NGC API Key from earlier, make sure that the CLI output is ASCIIor JSON, and follow the instructions using the Choicessection of the command line.
After configuration, on the Riva Skills Quick Start page, copy the download command by choosing Download at the top right side. Run the command in your PuTTY terminal. This initiates the Riva Quick Start resource to download onto your EC2 Linux instance.
Initialize Riva
After the download is completed, you are ready to initialize and start Riva.
The default settings will prepare all of the underlying pretrained models during the Riva start-up process, which can take up to a couple of hours depending on your Internet speed. However, you can modify the config.sh file within the /quickstart directory with your preferred configuration around which subset of models to retrieve from NGC to speed up this process.
Within this file, you can also adjust storage location and specify which GPU to use, if more than one is installed on your system. This post uses the default configuration settings. The version (vX.Y.Z) number of Riva Quick Start that you downloaded is used to run the following commands (v2.3.0 is the version number used in this post).
cd riva_quickstart_v2.3.0
bash riva_init.sh
bash riva_start.sh
Riva is now running on your virtual machine. To familiarize yourself with Riva, run the Hello Worldexamples next.
Step 3: Run the Riva ASR and TTS Hello Worldexamples
There are plenty of tutorials available in the /nvidia-riva GitHub repo. The TTS and ASR Python basics notebooks explore how you can use the Riva API.
Before getting started, you must clone the GitHub repo, set up your Python virtual environment, and install Jupyter on your machine by running the following commands in the /riva_quickstart_v2.3.0 directory:
To run some simpleHello Worldexamples, open the /tutorialsdirectory and launch the Jupyter notebook with the following commands:
cd tutorials
jupyter notebook --generate-config
jupyter notebook --ip=0.0.0.0 --allow-root
The GPU-powered Jupyter notebook is now running and is accessible through the web. Copy and paste one of the URLs shown on your terminal to start interacting with the GitHub tutorials.
Open the tts-python-basics.ipynb and asr-python-basics.ipynb scripts on your browser and trust the notebook by selecting Not-Trusted at the top-right of your screen. To choose the venv-riva-tutorials kernel, choose Kernel, Change kernel.
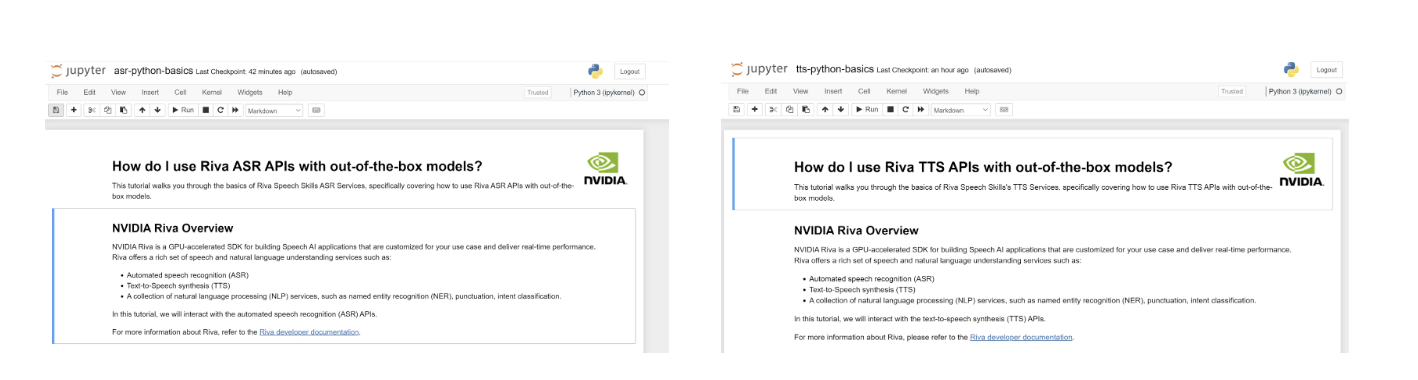
You are now ready to work through the notebook to run your first Hello WorldRiva API calls using out-of-the-box models (Figure 3).
Figure 3. Example Hello World Riva API notebooks
Explore the other notebooks to take advantage of the more advanced Riva customization features, such as word boosting, updating vocabulary, TAO fine-tuning, and more. You can exit Jupyter by pressing Ctrl+Cwhile on the PuTTY terminal, and exit the virtual environment with the deactivate command.
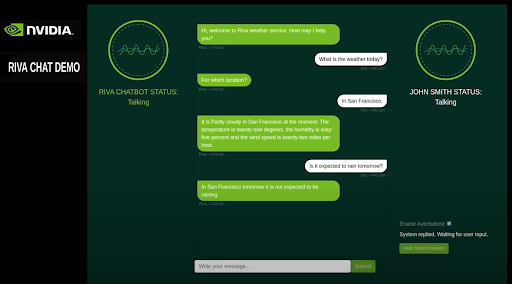
Step 4: Launch an intelligent virtual assistant
Now that you are familiar with how Riva operates, you can explore how it can be applied with an intelligent virtual assistant found in /nvidia-riva/sample-apps GitHub repo.
To launch this application on your browser, run the following command in the /riva_quickstart_v2.3.0 directory:
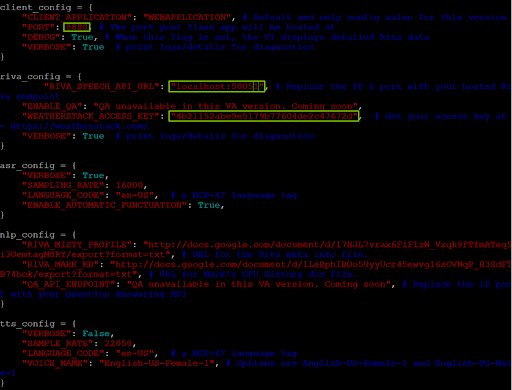
Before you run the demo, you must update the config.py file in the Virtual Assistant directory. Vim is one text editor that you can use to modify the file:
vim config.py
Figure 4. Editing the virtual assistant application’s config.py file
Make sure that the PORTvariable in client_configis set to 8888 and the RIVA_SPEECH_API_URLvalue is set to localhost:50051.
To allow the virtual assistant to access real-time weather data, sign up for the free tier of weatherstack, obtain your API access key, and insert the key value under WEATHERSTACK ACCESS KEYin riva_config.
Now you are ready to deploy the application!
Deploy the assistant
Run python3 main.pyand go to the following URL: https://localhost:8888/rivaWeather. This webpage opens the weather chatbot.
You’ve launched an NVIDIA GPU-powered Amazon EC2 instance with the NVIDIA GPU-Optimized AMI, downloaded Riva from NGC, executed basic Riva API commands for ASR and TTS services, and launched an intelligent virtual assistant!
You can stop Riva at any time by executing the following command in the riva_quickstart_v2.3.0directory:
bash riva_stop.sh.
Resources for exploring speech AI tools
You have access to several resources designed to help you learn how to build and deploy speech AI applications:
The /nvidia-riva/tutorials GitHub repo contains beginner to advanced scripts to walk you through ASR and TTS augmentations such as ASR word boosting and adjusting TTS pitch, rate, and pronunciation settings.
To build and customize your speech AI pipeline, you can use the NVIDIA low-code AI model development TAO toolkit and the NeMo application framework for those who like more visibility under the hood for fine-tuning the fully customizable Riva ASR and TTS pipelines.
Interested in learning about how customers deploy Riva in production? Minerva CQ, an AI platform for agent assist in contact centers, has deployed Riva on AWS alongside their own natural language and intent models to deliver a unique and elevated customer support experience in the electric mobility market.
“Using NVIDIA Riva to process the automatic speech recognition (ASR) on the Minerva CQ platform has been great. Performance benchmarks are superb, and the SDK is easy to use and highly customizable to our needs.” Cosimo Spera, CEO of Minerva CQ
Selecting the right laptop is a lot like trying to pick the right major. Both can be challenging tasks where choosing wrongly costs countless hours. But pick the right one, and graduation is just around the corner. The tips below can help the next generation of artists select the ideal NVIDIA Studio laptop to maximize performance for the critical workload demands of their unique creative fields — all within budget.
Take a trip down memory lane this week with an instantly recognizable classic, Command & Conquer Remastered Collection, joining the nearly 20 Electronic Arts games streaming from the GeForce NOW library. Speaking of remastered, GeForce NOW members can enhance their gameplay further with improved resolution scaling in the 2.0.43 app update. When the feature is Read article >
Sports produce a slew of data. In a game of cricket, for example, each play generates millions of video-frame data points for a sports analyst to scrutinize, according to Masoumeh Izadi, managing director of deep-tech startup TVConal. The Singapore-based company uses NVIDIA AI and computer vision to power its sports video analytics platform, which enables Read article >
Enhancements, fixes, and new support for AWS Graviton3 C7g instances, Arm SVE, Rocky Linux OS, OpenMP Tools visibility in Nsight Developer Tools, and more.
Many times two dimensions are insufficient for analyzing image data. cuCIM is an open-source, accelerated, computer vision and image-processing software library for multidimensional images.
Image data can generally be described through two dimensions (rows and columns), with a possible additional dimension for the colors red, green, blue (RGB). However, sometimes further dimensions are required for more accurate and detailed image analysis in specific applications and domains.
For example, you may want to study a three-dimensional (3D) volume, measuring the distance between two parts or modeling how that 3D volume changes over time (the fourth dimension). In these instances, you need more than two dimensions to make sense of what you are seeing.
Multidimensional image processing, or n-dimensional image processing, is the broad term for analyzing, extracting, and enhancing useful information from image data with two or more dimensions. It is particularly helpful and needed for medical imaging, remote sensing, material science, and microscopy applications.
Some methods in these applications may involve data from more channels than traditional grayscale, RGB, or red, green, blue, alpha (RGBA) images. N-dimensional image processing helps you study and make informed decisions using devices enabled with identification, filtering, and segmentation capabilities.
Multidimensional image processing gives you the flexibility to perform functions for traditional two-dimensional filtering in scientific applications. Within medical imaging specifically, computed tomography (CT) and magnetic resonance imaging (MRI) scans require multidimensional image processing to form images of the body and its functions. For example, multidimensional dimensional image processing is used in medical imaging to detect cancer or estimate tumor size (Figure 1).
Figure 1. Tissue can be rendered and examined quickly in multidimensional digital pathology use cases
Outside of identifying, acquiring, and storing the image data itself, working with multidimensional image data comes with its own set of challenges.
First, multidimensional images are larger in size than their 2D counterparts and typically of high resolution, so loading them to memory and accessing them is time-consuming.
Second, processing each additional dimension of image data requires additional time and processing power. Analyzing more dimensions enlarges the scope of consideration.
Third, the computer-vision and image-processing algorithms take longer for analyzing each additional dimension, including the low-level operations and primitives. Multidimensional filters, gradients, and histogram complexity grow with each additional dimension.
Finally, when the data is manipulated, dataset visualization for multidimensional image processing is further complicated by the additional dimensions under consideration and quality to which it must be rendered. In biomedical imaging, the level of detail required can make the difference in identifying cancerous cells and damaged organ tissue.
Multidimensional input/output
If you’re a data scientist or researcher working in multidimensional image processing, you need software that can make data loading and handling for large image files efficient. Popular multidimensional file formats include the following:
NumPy binary format(.npy)
Tag Image File Format (TIFF)
TFRecord (.tfrecord)
Zarr
Variants of the formats listed above
Because every pixel counts, you have to process image data accurately with all the available processing power available. Graphics processing units (GPU) hardware gives you the processing power and efficiency needed to handle and balance the workload of analyzing complex, multidimensional image data in real time.
cuCIM
Compute Unified Device Architecture Clara IMage (cuCIM) is an open-source, accelerated, computer-vision and image-processing software library that uses the processing power of GPUs to address the needs and pain points of developers working with multidimensional images.
Data scientists and researchers need software that is fast, easy to use, and reliable for an increasing workload. While specifically tuned for biomedical applications, cuCIM can be used for geospatial, material and life sciences, and remote sensing use cases.
cuCIM offers 200+ computer-vision and image-processing functions for color conversion, exposure, feature extraction, measuring, segmentation, restoration, and transforms.
cuCIM is capable and fast image-processing software, requiring minimal changes to your existing pipeline. cuCIM equips you with enhanced digital image-processing capabilities that can be integrated into existing pipelines:
You can integrate using either a C++ or Python application programming interface (API) that matches OpenSlide for I/O and scikit-image for processing in Python.
The cuCIM Python bindings offer many commonly used, computer-vision, image-processing functions that are easily integratable and compilable into the developer workflow.
You don’t have to learn a new interface or programming language to use cuCIM. In most instances, only one line of code is added for transferring images to the GPU. The cuCIM coding structure is nearly identical to that used for the CPU, so there’s little change needed to take advantage of the GPU-enabled capabilities.
Because cuCIM is also enabled for GPUDirect Storage (GDS), you can efficiently transfer and write data directly from storage to the GPU without making an intermediate copy in host (CPU) memory. That saves time on I/O tasks.
With its quick set-up, cuCIM provides the benefit of GPU-accelerated image processing and efficient I/O with minimal developer effort and with no low-level compute unified device architecture (CUDA) programming required.
Free downloads and resources
cuCIM can be downloaded for free through Conda or PyPi. For more information, see the cuCIM developer page. You’ll learn about developer challenges, primitives, and use cases and get links to references and resources.
Posted by Tuan Anh Nguyen, Google Assistant and Sourish Chaudhuri, Google Research
In natural conversations, we don’t say people’s names every time we speak to each other. Instead, we rely on contextual signaling mechanisms to initiate conversations, and eye contact is often all it takes. Google Assistant, now available in more than 95 countries and over 29 languages, has primarily relied on a hotword mechanism (“Hey Google” or “OK Google”) to help more than 700 million people every month get things done across Assistant devices. As virtual assistants become an integral part of our everyday lives, we’re developing ways to initiate conversations more naturally.
At Google I/O 2022, we announced Look and Talk, a major development in our journey to create natural and intuitive ways to interact with Google Assistant-powered home devices. This is the first multimodal, on-device Assistant feature that simultaneously analyzes audio, video, and text to determine when you are speaking to your Nest Hub Max. Using eight machine learning models together, the algorithm can differentiate intentional interactions from passing glances in order to accurately identify a user’s intent to engage with Assistant. Once within 5ft of the device, the user may simply look at the screen and talk to start interacting with the Assistant.
Google Assistant relies on a number of signals to accurately determine when the user is speaking to it. On the right is a list of signals used with indicators showing when each signal is triggered based on the user’s proximity to the device and gaze direction.
Modeling Challenges The journey of this feature began as a technical prototype built on top of models developed for academic research. Deployment at scale, however, required solving real-world challenges unique to this feature. It had to:
Support a range of demographic characteristics (e.g., age, skin tones).
Adapt to the ambient diversity of the real world, including challenging lighting (e.g., backlighting, shadow patterns) and acoustic conditions (e.g., reverberation, background noise).
Deal with unusual camera perspectives, since smart displays are commonly used as countertop devices and look up at the user(s), unlike the frontal faces typically used in research datasets to train models.
Run in real-time to ensure timely responses while processing video on-device.
The evolution of the algorithm involved experiments with approaches ranging from domain adaptation and personalization to domain-specific dataset development, field-testing and feedback, and repeated tuning of the overall algorithm.
Technology Overview A Look and Talk interaction has three phases. In the first phase, Assistant uses visual signals to detect when a user is demonstrating an intent to engage with it and then “wakes up” to listen to their utterance. The second phase is designed to further validate and understand the user’s intent using visual and acoustic signals. If any signal in the first or second processing phases indicates that it isn’t an Assistant query, Assistant returns to standby mode. These two phases are the core Look and Talk functionality, and are discussed below. The third phase of query fulfillment is typical query flow, and is beyond the scope of this blog.
Phase One: Engaging with Assistant The first phase of Look and Talk is designed to assess whether an enrolled user is intentionally engaging with Assistant. Look and Talk uses face detection to identify the user’s presence, filters for proximity using the detected face box size to infer distance, and then uses the existing Face Match system to determine whether they are enrolled Look and Talk users.
For an enrolled user within range, an custom eye gaze model determines whether they are looking at the device. This model estimates both the gaze angle and a binary gaze-on-camera confidence from image frames using a multi-tower convolutional neural network architecture, with one tower processing the whole face and another processing patches around the eyes. Since the device screen covers a region underneath the camera that would be natural for a user to look at, we map the gaze angle and binary gaze-on-camera prediction to the device screen area. To ensure that the final prediction is resilient to spurious individual predictions and involuntary eye blinks and saccades, we apply a smoothing function to the individual frame-based predictions to remove spurious individual predictions.
Eye-gaze prediction and post-processing overview.
We enforce stricter attention requirements before informing users that the system is ready for interaction to minimize false triggers, e.g., when a passing user briefly glances at the device. Once the user looking at the device starts speaking, we relax the attention requirement, allowing the user to naturally shift their gaze.
The final signal necessary in this processing phase checks that the Face Matched user is the active speaker. This is provided by a multimodal active speaker detection model that takes as input both video of the user’s face and the audio containing speech, and predicts whether they are speaking. A number of augmentation techniques (including RandAugment, SpecAugment, and augmenting with AudioSet sounds) helps improve prediction quality for the in-home domain, boosting end-feature performance by over 10%.The final deployed model is a quantized, hardware-acceleratedTFLite model, which uses five frames of context for the visual input and 0.5 seconds for the audio input.
Active speaker detection model overview: The two-tower audiovisual model provides the “speaking” probability prediction for the face. The visual network auxiliary prediction pushes the visual network to be as good as possible on its own, improving the final multimodal prediction.
Phase Two: Assistant Starts Listening In phase two, the system starts listening to the content of the user’s query, still entirely on-device, to further assess whether the interaction is intended for Assistant using additional signals. First, Look and Talk uses Voice Match to further ensure that the speaker is enrolled and matches the earlier Face Match signal. Then, it runs a state-of-the-art automatic speech recognition model on-device to transcribe the utterance.
The next critical processing step is the intent understanding algorithm, which predicts whether the user’s utterance was intended to be an Assistant query. This has two parts: 1) a model that analyzes the non-lexical information in the audio (i.e., pitch, speed, hesitation sounds) to determine whether the utterance sounds like an Assistant query, and 2) a text analysis model that determines whether the transcript is an Assistant request. Together, these filter out queries not intended for Assistant. It also uses contextual visual signals to determine the likelihood that the interaction was intended for Assistant.
Overview of the semantic filtering approach to determine if a user utterance is a query intended for the Assistant.
Finally, when the intent understanding model determines that the user utterance was likely meant for Assistant, Look and Talk moves into the fulfillment phase where it communicates with the Assistant server to obtain a response to the user’s intent and query text.
Performance, Personalization and UX Each model that supports Look and Talk was evaluated and improved in isolation and then tested in the end-to-end Look and Talk system. The huge variety of ambient conditions in which Look and Talk operates necessitates the introduction of personalization parameters for algorithm robustness. By using signals obtained during the user’s hotword-based interactions, the system personalizes parameters to individual users to deliver improvements over the generalized global model. This personalization also runs entirely on-device.
Without a predefined hotword as a proxy for user intent, latency was a significant concern for Look and Talk. Often, a strong enough interaction signal does not occur until well after the user has started speaking, which can add hundreds of milliseconds of latency, and existing models for intent understanding add to this since they require complete, not partial, queries. To bridge this gap, Look and Talk completely forgoes streaming audio to the server, with transcription and intent understanding being on-device. The intent understanding models can work off of partial utterances. This results in an end-to-end latency comparable with current hotword-based systems.
The UI experience is based on user research to provide well-balanced visual feedback with high learnability. This is illustrated in the figure below.
Left: The spatial interaction diagram of a user engaging with Look and Talk. Right: The User Interface (UI) experience.
We developed a diverse video dataset with over 3,000 participants to test the feature across demographic subgroups. Modeling improvements driven by diversity in our training data improved performance for all subgroups.
Conclusion Look and Talk represents a significant step toward making user engagement with Google Assistant as natural as possible. While this is a key milestone in our journey, we hope this will be the first of many improvements to our interaction paradigms that will continue to reimagine the Google Assistant experience responsibly. Our goal is to make getting help feel natural and easy, ultimately saving time so users can focus on what matters most.
Acknowledgements This work involved collaborative efforts from a multidisciplinary team of software engineers, researchers, UX, and cross-functional contributors. Key contributors from Google Assistant include Alexey Galata, Alice Chuang, Barbara Wang, Britanie Hall, Gabriel Leblanc, Gloria McGee, Hideaki Matsui, James Zanoni, Joanna (Qiong) Huang, Krunal Shah, Kavitha Kandappan, Pedro Silva, Tanya Sinha, Tuan Nguyen, Vishal Desai, Will Truong, Yixing Cai, Yunfan Ye; from Research including Hao Wu, Joseph Roth, Sagar Savla, Sourish Chaudhuri, Susanna Ricco. Thanks to Yuan Yuan and Caroline Pantofaru for their leadership, and everyone on the Nest, Assistant, and Research teams who provided invaluable input toward the development of Look and Talk.
Discover tools to translate unstructured data to structured data to help healthcare organizations harness relevant insights and improve healthcare delivery and patient experiences.
Natural language processing (NLP) can be defined as the combination of artificial intelligence (AI), computer science, and computational linguistics to understand human communication and extract meaning from unstructured spoken or written material.
NLP use cases for healthcare have increased in the last few years to accelerate the development of therapeutics and improve quality of patient care through language understanding and predictive analytics.
The healthcare industry generates vast amounts of unstructured data, but it is difficult to derive insights without finding ways to structure and represent that data in a computable form. Developers need the tools to translate unstructured data to structured data to help healthcare organizations harness relevant insights and improve healthcare delivery and patient care.
Transformer-based NLP has emerged as a paradigm shift in the performance of text-based healthcare workflows. Because of its versatility, NLP can structure virtually any proprietary or public data to spark insights in healthcare, leading to a wide variety of downstream applications that directly impact patient care or augment and accelerate drug discovery.
NLP for drug discovery
NLP is playing a critical role in accelerating small molecule drug discovery. Prior knowledge on the manufacturability or contraindications of a drug can be extracted from academic publications and proprietary data sets. NLP can also help with clinical trial analysis and accelerate the process of taking a drug to market.
Transformer architectures are popular in NLP, but these tools can also be used to understand the language of chemistry and biology. For example, text-based representations of chemical structure such as SMILES (Simplified Input Molecular Line Entry System) can be understood by transformer-based architectures leading to incredible capabilities for drug property evaluation and generative chemistry.
MegaMolBART, a large transformer model developed by AstraZeneca and NVIDIA, is used for a wide range of tasks, including reaction prediction, molecular optimization, and de novo molecule generation.
Transformer-based NLP models are instrumental in understanding and predicting the structure and function of biomolecules like proteins. Much like they do for natural language, transformer-based representations of protein sequences provide powerful embeddings for use in downstream AI tasks, like predicting the final folded state of a protein, understanding the strength of protein-protein or protein-small molecule interactions, or in the design of protein structure provided a biological target.
NLP for clinical trial insights
Once a drug has been developed, patient data plays a large role in the process of taking it to market. Much of the patient data that is collected through the course of care is contained in free text, such as clinical notes from patient visits or procedural results.
While these data are easily interpretable by a human, combining insights across clinical free text documents requires making information across diverse documents interoperable, such that the health of the patient is represented in a useful way.
Modern NLP algorithms have accelerated our ability to derive these insights, helping to compare patients with similar symptoms, suggesting treatments, discovering diagnostic near-misses, and providing clinical care navigation and next-best-action prediction.
NLP to enhance clinical experiences
Many patient interactions with the hospital system are remote, in part due to the growing use of telehealth services that stemmed from COVID-19. Those telehealth visits can be converted into structured information with the help of NLP.
For physicians and surgeons, speech to text capabilities can turn verbal discussions with patients and clinical teams into text, which can then be stored in electronic health records (EHR). Applications include summarizing patient visits, catching near-misses, and predicting optimal treatment regimens.
Removing the burden of clinical documentation for each patient’s visit allows providers to spend more time and energy offering the best care for each patient, and simultaneously reduces physician burnout. NLP can also help hospitals predict patient outcomes such as readmission or sepsis.
Learn more about NLP in healthcare
View on-demand sessions from the NVIDIA Healthcare and Life Sciences NLP Developer Summit to learn more about the use of NLP in healthcare. Session topics include best practices and insights for applications from speech AI in clinics to drug discovery.
Browse NVIDIA’s collection of biomedical pre-trained language models, as well as highly optimized pipelines for training NLP models on biomedical and clinical text, in the Clara NLP NGC Collection.
NVIDIA Isaac Replicator, built on the Omniverse Replicator SDK, can help you develop a cost-effective and reliable workflow to train computer vision models using synthetic data.
Synthetic data is an important tool in training machine learning models for computer vision applications. Researchers from NVIDIA have introduced a structured domain randomization system within Omniverse Replicator that can help you train and refine models using synthetic data.
Omniverse Replicator is an SDK built on the NVIDIA Omniverse platform that enables you to build custom synthetic data generation tools and workflows. The NVIDIA Isaac Sim development team used Omniverse Replicator SDK to build NVIDIA Isaac Replicator, a robotics-specific synthetic data generation toolkit, exposed within the NVIDIA Isaac Sim app.
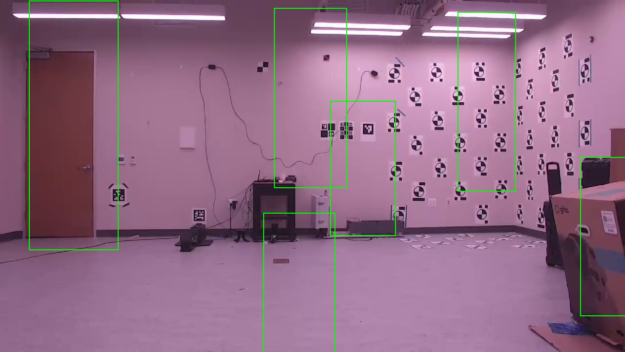
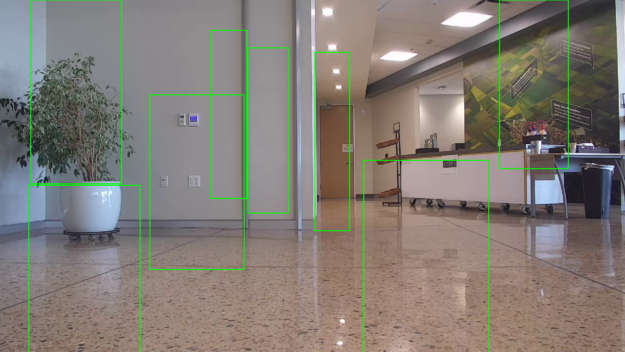
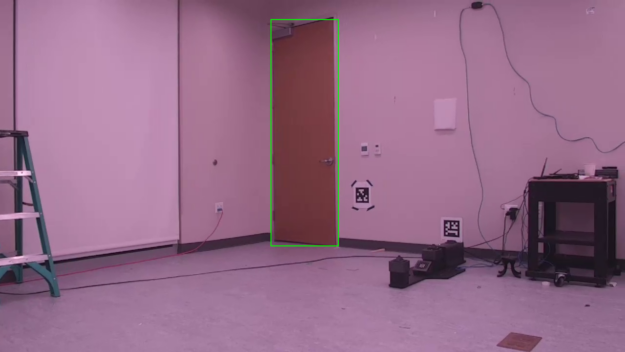
We explored using synthetic data generated from synthetic environments for a recent project. Trimble plans to deploy Boston Dynamics’ Spot in a variety of indoor settings and construction environments. But Trimble had to develop a cost-effective and reliable workflow to train ML-based perception models so that Spot could autonomously operate in different indoor settings. By generating data from a synthetic indoor environment using structured domain randomization within NVIDIA Isaac Replicator, you can train an off-the-shelf object detection model to detect doors in the real indoor environment.
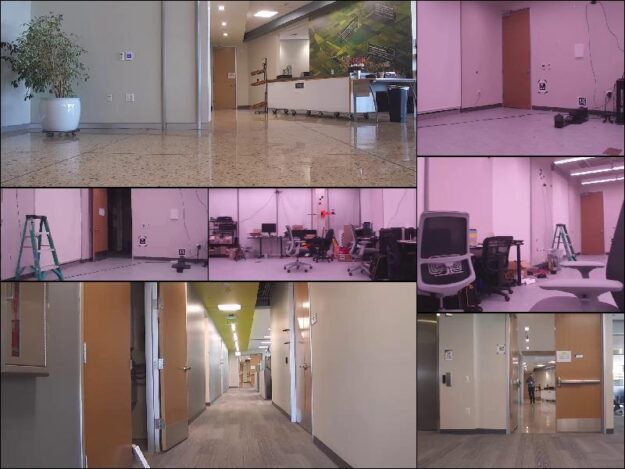
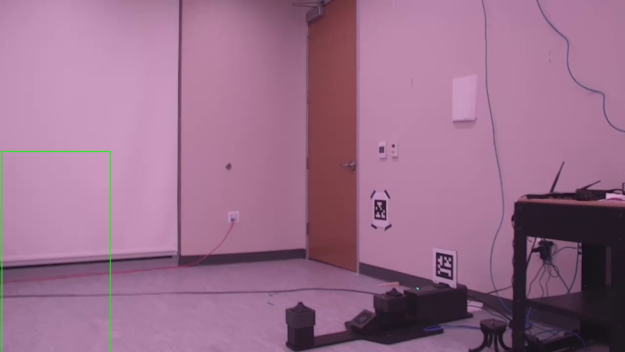
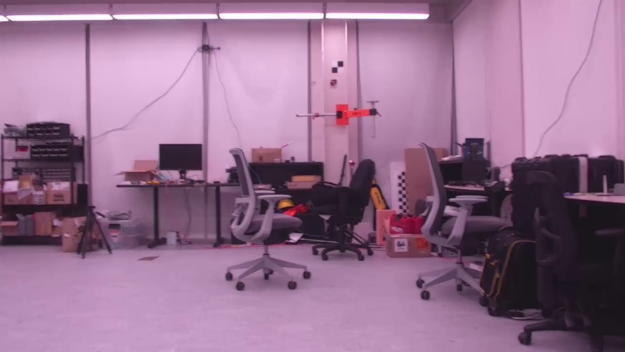
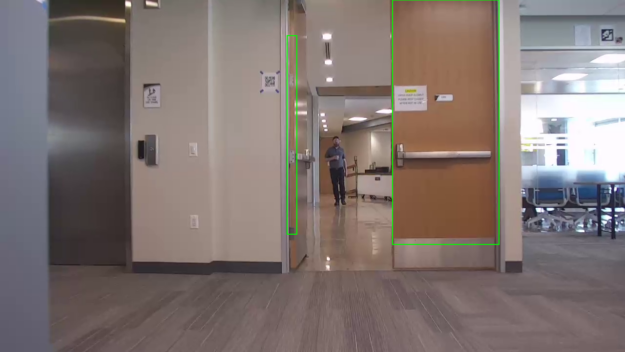
Figure 1. A few images from the test set of real 1,000 images
Sim2Real domain gap
Given that synthetic data sets are generated using simulation, it is critical to close the gap between the simulation and the real world. This gap is called the domain gap, which can be divided into two pieces:
Appearance gap: The pixel level differences between two images. These differences can be a result of differences in object detail, materials, or in the case of synthetic data, differences in the capabilities of the rendering system used.
Content gap: Refers to the difference between the domains. This includes factors like the number of objects in the scene, their diversity of type and placement, and similar contextual information.
A critical tool for overcoming these domain gaps is domain randomization (DR), which increases the size of the domain generated for a synthetic dataset. DR helps ensure that we include the range that best matches reality, including long-tail anomalies. By generating a wider range of data, we might find that a neural network could learn to better generalize across the full scope of the problem.
The appearance gap can be further closed with high fidelity 3D assets, and ray tracing or path tracing-based rendering, using physically based materials, such as those defined with the MDL. Validated sensor models and domain randomization of their parameters can also help here.
Creating the synthetic scene
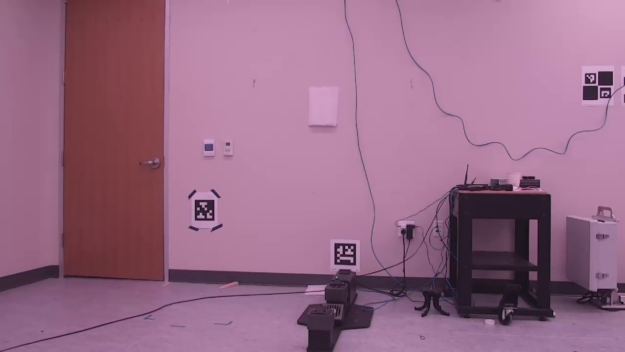
We imported the BIM Model of the indoor scene into NVIDIA Isaac Sim from Trimble SketchUp through the NVIDIA Omniverse SketchUp Connector. However, it looked rough with a significant appearance gap between sim and reality. Video 1 shows Trimble_DR_v1.1.usd.
Video 1. Starting indoor scene after it was imported into NVIDIA Isaac Sim from Trimble SketchUp through SketchUp Omniverse Connector
To close the appearance gap, we used NVIDIA MDL to add some textures and materials to the doors, walls, and ceilings. That made the scene look more realistic.
Video 2. Indoor scene after adding MDL materials
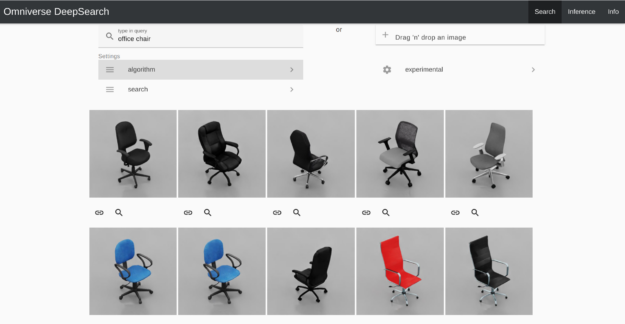
To close the content gap between sim and reality, we added props such as desks, office chairs, computer devices, and cardboard boxes to the scene through Omniverse DeepSearch, an AI-enabled service. Omniverse DeepSearch enables you to use natural language inputs and imagery for searching through the entire catalog of untagged 3D assets, objects, and characters.
These assets are publicly available in NVIDIA Omniverse.
Figure 2.Omniverse DeepSearch makes it easy to tag and search across 3D models
We also added ceiling lights to the scene. To capture the variety in door orientation, a domain randomization (DR) component was added to randomize the rotation of the doors, and Xform was used to simulate door hinges. This enabled the doors to open, close, or stay ajar at different angles. Video 3 shows the resulting scene with all the props.
Video 3. Indoor scene after adding props
Synthetic data generation
At this point, the Iterative process of synthetic data generation (SDG) was started. For the object detection model, we used TAO DetectNet V2 with a ResNet-18 backbone for all the experiments.
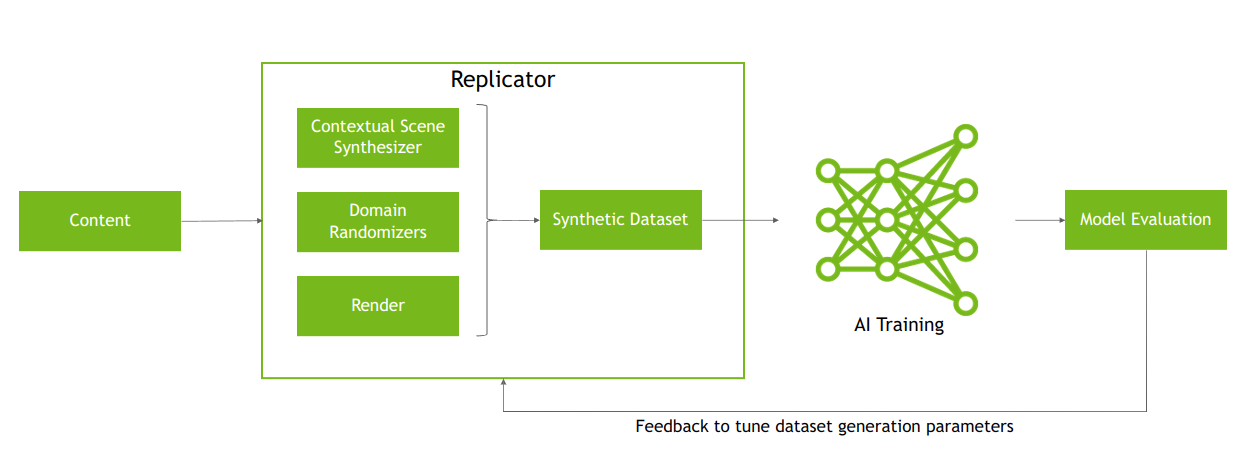
We fixed all model hyperparameters constant at their default values, including the batch size, learning rate, and dataset augmentation config parameters. In synthetic data generation, you iteratively tune the dataset generation parameters instead of model hyperparameters.
Figure 3. The iterative process of synthetic data generation where dataset generation parameters are tuned based on feedback from model evaluation
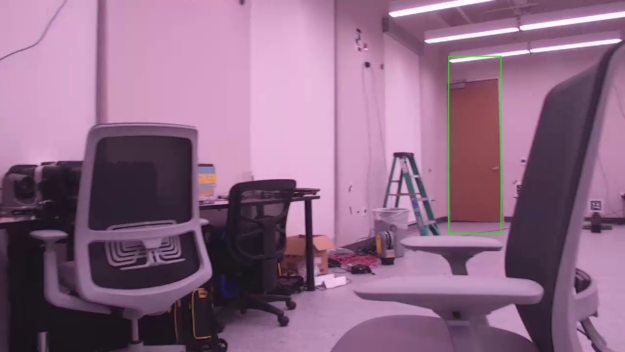
The Trimble v1.3 scene contains 500 ray-traced images and environment props and no DR components except for Door Rotation. The door Texture was held fixed. Training on this scene resulted in 5% AP on the real test set (~1,000 images).
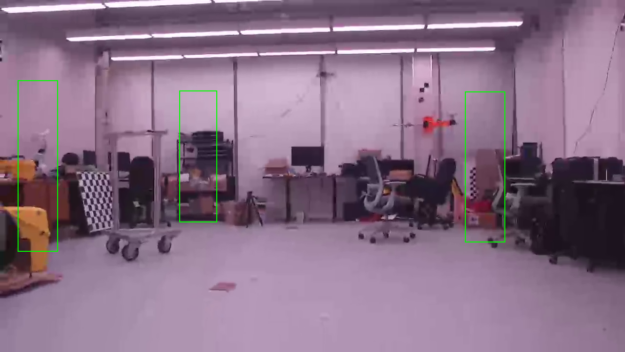
Figure 4. Model’s predictions on real images after being trained on synthetic indoor scene from Video 3
As you can see from the model’s prediction on real images, the model was failing to detect real doors adequately because it overfits to the texture of the simulated door. The model’s poor performance on the synthetic validation dataset with different textured doors confirmed this.
Another observation was that the lighting was held steady and constant in simulation, whereas reality has a variety of lighting conditions.
To prevent overfitting to the texture of the doors, we applied randomization to the door texture, randomizing between 30 different wood-like textures. To vary the lighting, we added DR over the ceiling lights to randomize the movement, intensity, and color of lights. Now that we were randomizing the texture of the door, it was important to give the model some learning signal on what makes a door besides its rectangular shape. We added realistic metallic door handles, kick plates, and door frames to all the doors in the scene. Training on 500 images from this improved scene yielded 57% AP on the real test set.
Video 4.Indoor scene after adding DR components for door rotation, texture, and color and movement of lights
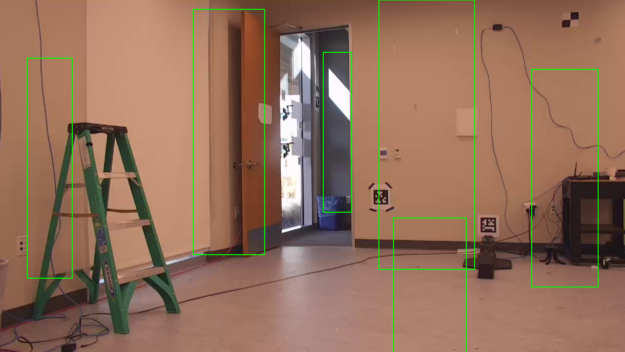
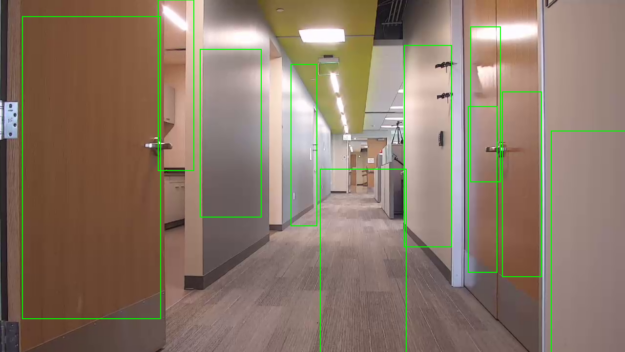
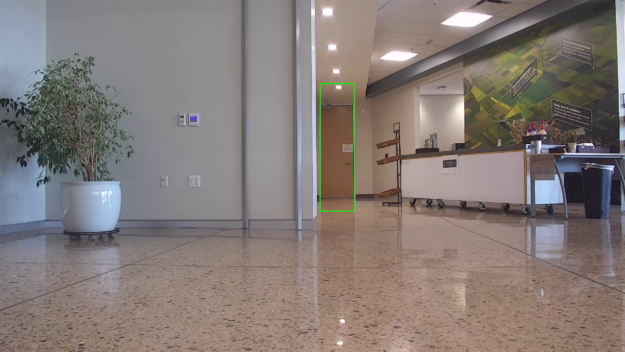
This model was doing better than before, but it was still making false positive predictions on potted plants and QR codes on the walls in test real images. It was also doing poorly on the corridor images where we had multiple doors lined up. It had a lot of false positives in low-temperature lighting conditions (Figure 5).
a) Low temperature light with yellow hue along with QR codes on wallsb) Lots of QR codes on walls all over real imagesc) Shiny granite floor with potted plantsd) Corridor with carpet floor and lots of doorsFigure 5. Model’s predictions on real images after being trained on improved synthetic indoor scene from Video 4
To make the model robust to noise like QR codes on walls, we applied DR over the texture of the walls with different textures, including QR codes and other synthetic textures.
We added a few potted plants to the scene. We already had a corridor, so to generate synthetic data from it, two cameras were added along the corridor along with ceiling lights.
We added DR over light temperature, along with intensity, movement, and color, to have the model better generalize in different lighting conditions. We also noticed a variety of floors like shiny granite, carpet, and tiles in real images. To model these, we applied DR to randomize the material of the floor between different kinds of carpet, marble, tiles, and granite materials.
Similarly, we added a DR component to randomize the texture of the ceiling between different colors and different kinds of materials. We also added a DR visibility component to randomly add a few carts in the corridor in simulation, hoping to minimize the model’s false positives over carts in real images.
The synthetic dataset of 4,000 images generated from this scene got around 87% AP on the real test set by training only on synthetic data, achieving decent Sim2Real performance.
Video 5. Final scene with more DR components
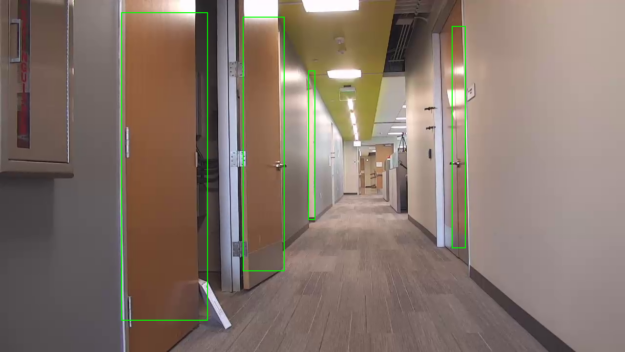
Figure 6 shows a few inferences on real images from the final model.
Figure 6. Model’s predictions on real images after being trained on final synthetic indoor scene from Video 5
Synthetic data generation in Omniverse
Using Omniverse connectors, MDL, and easy-to-use tools like DeepSearch, it’s possible for ML engineers and data scientists with no background in 3D design to create synthetic scenes.
NVIDIA Isaac Replicator makes it easy to bridge the Sim2Real gap by generating synthetic data with structured domain randomization. This way, Omniverse makes synthetic data generation accessible for you to bootstrap perception-based ML projects.
The approach presented here should be scalable, and it should be possible to increase the number of objects of interest and easily generate new synthetic data every time you want to detect additional new objects.
For more information, see the following resources:

 NVIDIA AI platform makes LLMs accessible. Announcing new parallelism techniques and a hyperparameter tool to speed-up training by 30% on any number of GPUs.
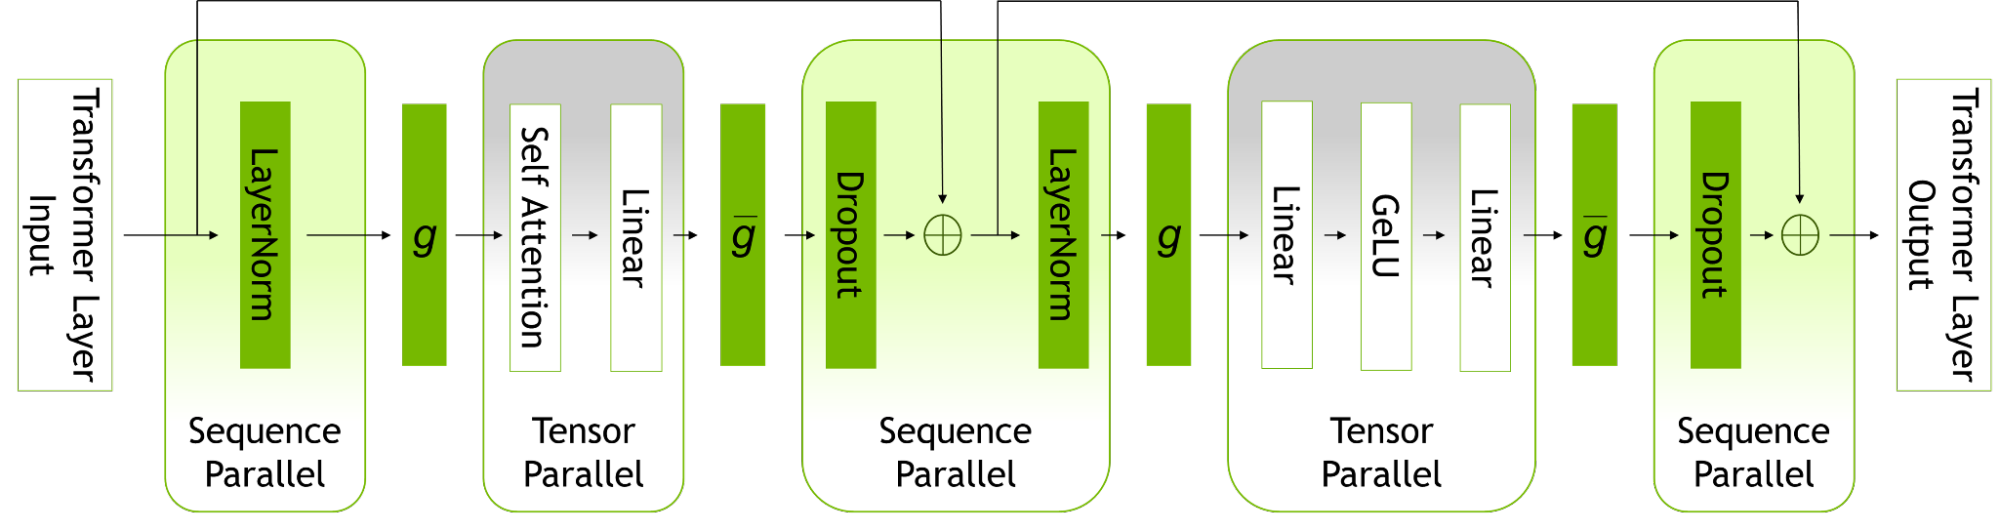


 Enhancements, fixes, and new support for AWS Graviton3 C7g instances, Arm SVE, Rocky Linux OS, OpenMP Tools visibility in Nsight Developer Tools, and more.
 Many times two dimensions are insufficient for analyzing image data. cuCIM is an open-source, accelerated, computer vision and image-processing software library for multidimensional images.


 Discover tools to translate unstructured data to structured data to help healthcare organizations harness relevant insights and improve healthcare delivery and patient experiences.
 NVIDIA Isaac Replicator, built on the Omniverse Replicator SDK, can help you develop a cost-effective and reliable workflow to train computer vision models using synthetic data.