
Sparklyr 1.7 delivers much-anticipated improvements, including R interfaces for image and binary data sources, several new spark_apply() capabilities, and better integration with sparklyr extensions.
Hello everyone
So I have an object detection model in a flask app
https://github.com/fayez-als/obj-api/blob/main/app.py
The model receives an image and send the detected object back, I can’t figure out where to deploy it, aws ec2 serves it over http not https, heroku gives an error that the model is above 500mg.
Any suggestions are highly appreciated
submitted by /u/RepeatInfamous9988
[visit reddit] [comments]
Categories
Methods of Reducing Vram Required?
Currently training a CNN on images that are 1024 x 768, these are scaled down to an input shape of 256, 192
Struggling to get the model accurate with real world predictions but can’t add much more complexity to the model without getting insufficient memory errors.
Tried using tf.keras.experimental.set_memory_growth to True without much improvement.
Does anyone have any tips to reduce the amount of Vram required or do I need to get a GPU with more Vram?
GPU: RTX 3070 8GB
Tensorflow: 2.5
CUDA: 11.2
submitted by /u/Cooperrrrr
[visit reddit] [comments]
Categories
Prioritized Experience Replay with TF-Agents


|
submitted by /u/kschroeder97 [visit reddit] [comments] |
How to use a tf hub model inside a model built with the functional API?
submitted by /u/Aselvija
[visit reddit] [comments]
Categories
CodeReading – 4. Python Code Style
Code Reading은 잘 작성되어 있는 프레임워크, 라이브러리, 툴킷 등의 다양한 프로젝트의 내부를 살펴보는 시리즈 입니다. 프로젝트의 아키텍처, 디자인철학이나 코드 스타일 등을 살펴보며, 구체적으로 하나하나 살펴보는 것이 아닌 전반적이면서 간단하게 살펴봅니다.
이번 포스트에서는 프로젝트는 아니지만, 코드 자체와 관련이 깊은 Python 언어의 코드 스타일에 대해서 알아봅니다.
Series.
- CodeReading – 1. PyTorch
- CodeReading – 2. Flask
- CodeReading – 3. ABC
- CodeReading – 4. Python Code Style
Code Style의 중요성
코드스타일이 의미하는 것은 무엇이고, 왜 필요할까요?
코드스타일은 코드 가독성을 위해서 네이밍, 라인수, Indentation 등의 코드의 형식을 맞추는 것을 의미합니다. 이 활동은 특히 ‘협업’에 중점두고 있습니다. 즉 개인이 아닌 팀으로 일하는 경우에 사용하는 하나의 룰 혹은 가이드입니다.
이 Code Reading 시리즈에서 코드를 읽고 있는 것처럼, 코드는 기계 뿐만 아니라 사람들에게도 읽히게 됩니다. 특히 가장 많이 보게 되는 코드는 같이 협업을 하는 동료의 코드일 것 입니다. 이렇게 읽어야 하는 코드가 개인의 코드스타일에 따라서 작성되어 있다면 어떨까요? 스타일에 따라서 다르겠지만, 기본적으로 코드를 해석하는데 시간이 더 걸리게 될 것입니다. 하지만 팀 내부적으로 코드 스타일을 맞춰놓았다면, 훨씬 빠르게 로직을 이해할 수 있고 새롭게 기능을 추가하거나, 코드 리뷰를 하는 등의 다양한 활동을 조금 더 쉽게 진행할 수 있을 것 입니다.
이렇게 명확한 장점을 가지고 있는 코드스타일을 도입하는데 있어서, 한가지 주의할 점이 있습니다. 코드 스타일을 지원하는 다양한 툴이 있기도 하고, 회사마다 스타일 가이드가 있습니다. 즉 누군가에게 조금 더 선호되는 스타일이 있을 수 있지만, 딱 ‘이 스타일이 정답이다’ 라고 말할 수 없는 논술 문제에 가깝습니다. 그래서 팀 내부적으로 의논을 통해, 우리 팀에 맞는 스타일을 모두의 동의하에 정의하고 서로 맞춰나가는 것이 가장 중요합니다.
그렇다면 Pyhon Code Style에 대해서 조금 더 자세히 알아볼까요?

PEP8
Python 언어의 코드 스타일의 가장 기본이 되는 것은 PEP8 입니다. PEP(Python Enhance Proposal)은 공식적으로 운영되고 있는 개선 제안서로서, 그 중에서 PEP8 은 Style Guide for Python Code 이라는 제목으로 작성이 되어있습니다.
여기에는 다음과 같은 가이드들이 작성되어 있습니다. 간략하게 다뤄보면 다음과 같습니다.
- Indentation
# Correct:
# Aligned with opening delimiter.
foo = long_function_name(var_one, var_two,
                         var_three, var_four)

# Add 4 spaces (an extra level of indentation) to distinguish arguments from the rest.
def long_function_name(
        var_one, var_two, var_three,
        var_four):
    print(var_one)

# -------------------------
# Wrong:
# Arguments on first line forbidden when not using vertical alignment.
foo = long_function_name(var_one, var_two,
    var_three, var_four)

# Further indentation required as indentation is not distinguishable.
def long_function_name(
    var_one, var_two, var_three,
    var_four):
    print(var_one)
indentation의 경우, 함수의 arguments 들이 명확히 구별되도록 가이드하고 있습니다.
- Tabs vs Spaces
PEP8에서는 Space를 써야한다고 이야기하고 있고, 두가지를 혼합해서 사용하는 것을 금지하고 있습니다! (이 포스트 시작에 있는 그림과 연결되죠)
- 권장사항
아래와 같이 empty sequence 는 False 인 것을 이용해서, length를 기반으로 체크하지 않도록 권장하기도 합니다.
# Correct:
if not seq:
if seq:

# Wrong:
if len(seq):
if not len(seq):
가장 기본이 되는 스타일 가이드이기 때문에 전체를 한번 읽어보실 것을 추천드립니다. 대부분의 내용은 지금도 사용되고 있습니다. 다만, PEP8이 제안될 당시와 비교했을 때 개발 환경은 많이 달라졌습니다. 작은 모니터에서 다양한 크기의 모니터를 여러개 연결해서 개발을 하는 것이 흔해진 상황이죠. 그래서 Maximum Line Length의 경우에는 의견이 분분하기도 합니다. 모든 행을 79자 제한으로 제안되었지만, 더 길게 셋팅을 하는 경우도 흔하게 찾아볼 수 있습니다.
Tools
코드스타일에 관련한 도구들은 위의 PEP8을 기본으로 지원하면서 환경셋팅을 통해서 원하는대로 수정할 수 있도록 되어있습니다. 여러가지 도구들이 있지만, 최근에 가장 많이 사용하고 있는 black과 isort 두가지를 대표적으로 소개해드려고 합니다.
black
The Uncompromising Code Formatter
black은 비교적 최근(2018년)에 개발된 오픈소스로 정해진 코드의 규격에 맞춰서 정리해주는 Code Formatter 입니다. black의 가장 큰 특징은 바로 ‘타협하지 않는’ 입니다. 타협하지 않는 부분은 바로 PEP8 에서 커버하지 않고 있는, 사람마다 각각 스타일이 다른 부분입니다. 그래서 black의 공식 문서에서도 PEP을 준수하는 엄격한 하위집단이라고 이야기 하고 있습니다.
그러면 black에서 추구하는 코드 스타일에 대해서 간단하게 살펴보겠습니다.
- Maximum Line Length : 88 (80 에서 10% 늘어난 값)
- 줄 바꿈 방식
# [1] in:
ImportantClass.important_method(exc, limit, lookup_lines, capture_locals, extra_argument)

# [1] out:
ImportantClass.important_method(
    exc, limit, lookup_lines, capture_locals, extra_argument
)

# [2] in:
def very_important_function(template: str, *variables, file: os.PathLike, engine: str, header: bool = True, debug: bool = False):
    """Applies `variables` to the `template` and writes to `file`."""
    with open(file, 'w') as f:
        ...

# [2] out:
def very_important_function(
    template: str,
    *variables,
    file: os.PathLike,
    engine: str,
    header: bool = True,
    debug: bool = False,
):
    """Applies `variables` to the `template` and writes to `file`."""
    with open(file, "w") as f:
        ...

# [3] in:
if some_long_rule1
  and some_long_rule2:
    ...

# [3] out:
if (
    some_long_rule1
    and some_long_rule2
):
    ...
줄 길이에 따라서 위와 같이, 들여쓰기[1]가 되거나 파라미터가 더욱 많은 경우에는 하나하나 새로운 줄[2]에 위치하게 됩니다. 그리고 문장 길이를 맞추기 위해서 사용하는 백슬래시()가 파싱오류 등의 이슈가 있기 때문에 이를 사용하지 않는다고 말하고 있습니다.
- String: 작은따옴표(‘) 보다는 큰따옴표(“)를 선호
doc string에서도 큰따옴표(“)를 사용하고 있고, 큰따옴표로 구성된 empty string의 경우 (“”) 혼동을 줄 여지가 없기 때문이죠.
- Call chains
def example(session):
    result = (
        session.query(models.Customer.id)
        .filter(
            models.Customer.account_id == account_id,
            models.Customer.email == email_address,
        )
        .order_by(models.Customer.id.asc())
        .all()
    )
마지막으로 많은 언어에서 사용되고 있는 call chain 형식 또한 사용하고 있습니다. 저는 개인적으로 Java 와 Scala에서 이런 패턴을 많이 봐서 더 익숙하기도 하고, 어떤 로직인지 이해가기가 쉬워서 선호하는 스타일이기도 합니다.
그 외에도 다양한 주제들이 있으니 문서를 참고해보시기를 추천드립니다!
black 에서 추구하고 있는 코드스타일이 모호한 부분들을 다루고 있는 것처럼, 모두가 여기서 제안하는 스타일이 만족스럽지 않을 수 있습니다. 협업을 위한 코드스타일에 좋은 가이드이자 시작점이 아닐까 싶습니다.
isort
isort는 import 를 관리해주는 Code Formatter 입니다. 아래 예시를 보시면 바로 감이 잡히실 것 같네요.
# Before isort:
from my_lib import Object

import os

from my_lib import Object3

from my_lib import Object2

import sys

from third_party import lib15, lib1, lib2, lib3, lib4, lib5, lib6, lib7, lib8, lib9, lib10, lib11, lib12, lib13, lib14

import sys

from __future__ import absolute_import

from third_party import lib3

print("Hey")
print("yo")

# ----------------------------------------------------------------------
# After isort:
from __future__ import absolute_import

import os
import sys

from third_party import (lib1, lib2, lib3, lib4, lib5, lib6, lib7, lib8,
                         lib9, lib10, lib11, lib12, lib13, lib14, lib15)

from my_lib import Object, Object2, Object3

print("Hey")
print("yo")
위의 예제에서 보는 것처럼, import 되는 package의 종류를 아래 4가지로 관리하고 있습니다.
__future__: Python2 에서 3의 기능을 사용하기 위해서 Import 하는 모듈built-in modules: os, sys, collections 등 Python의 기본 내장 모듈third party: pip를 통해서 설치한 외부 library 들 (e.g. requests, pytorch 등)my library: 스스로 만든 package
black 과의 큰 차이점은 다양한 옵션들을 제공하는 것입니다. 위의 예시에서 third_party 의 모듈 여러개를 import 하는 방식에서 한 줄로 나열하는 방식, 하나씩 줄을 바꾸는 경우 등 다양한 옵션들이 있는 것을 확인하실 수 있습니다.
# 0 - Grid
from third_party import (lib1, lib2, lib3,
                         lib4, lib5, ...)

# 1 - Vertical
from third_party import (lib1,
                         lib2,
                         lib3
                         lib4,
                         lib5,
                         ...)

...
# 3 - Vertical Hanging Indent (Black Style)
from third_party import (
    lib1,
    lib2,
    lib3,
    lib4,
)

...
관련해서 옵션이 11개 있으니, 원하는 대로 설정해서 사용하시면 될 것 같습니다. 만약에 위에서 소개했던 black과 같이 사용한다면 3번 옵션으로 셋팅해서 사용하면 스타일을 유지할 수 있게 됩니다. isort 에서는 다른 Code Formatter 라이브러리들끼리는 서로가 호환되도록 개발을 모두 해놓았기 때문에 간단한 설정으로 양쪽 모두 사용하실 수 있을 것 입니다.
끝으로
이번 포스트에서는 Code Style을 왜 맞추어야 하는지 그리고 Python 코드 스타일 가이드 PEP8에서 시작해서 쉽게 적용해볼 수 있는 Tool 을 소개시켜 드렸습니다. 서문에서 이야기 한 것처럼, 코드 스타일은 다른 무엇이 아닌 협업을 위한 것 입니다. 그래서 코드 스타일 자체보다는 이것을 도입하기 까지의 과정이 더 중요하다고 생각이 드네요. ‘함께’ 더 잘 일하기 위한 것이니까요.
References
Categories
Questions about certificate exam
Is visualizing data a necessity to solving the problems?
Is there an age requirement?
Does the exam normally take the full 5 hours?
submitted by /u/Sad_Combination9971
[visit reddit] [comments]
I (dumb) thought anaconda would automatically choose the proper version for the type of chip, turns out I have been using the intel-based python all this time instead of the native version.
/Users/x/opt/anaconda3/envs/ml/bin/python: Mach-O 64-bit executable x86_64
It should say:
... Mach-O 64-bit executable arm64
Now, it is normal to use the intel based version if not already updated to native silicon? I guess I’m just missing out on M1 performance?
From my understanding, the only way to download the native Python 3.9X versions is through homebrew / miniforge: TLDR. Is it worth updating, especially considering I’m starting to use TensorFlow, etc. for ML? Also, what happens to all my current envs and packages I have in (the current, intel based ) anaconda if I switch to Miniforge? Do they all translate, or what happens to the packages not optimised for arm64?
Or is the performance not life changing at all and I should save myself headaches and keep using TensorFlow 2.0.0 on the intel-based anaconda / python 3.6?
submitted by /u/capital-man
[visit reddit] [comments]
Categories
Accelerating Blender Python Using CUDA
 Simulated or synthetic data generation is an important emerging trend in the development of AI tools. Classically, these datasets can be used to address low-data problems or edge-case scenarios that might now be present in available real-world datasets. Emerging applications for synthetic data include establishing model performance levels, quantifying the domain of applicability, and next-generation … Continued
Simulated or synthetic data generation is an important emerging trend in the development of AI tools. Classically, these datasets can be used to address low-data problems or edge-case scenarios that might now be present in available real-world datasets.
Emerging applications for synthetic data include establishing model performance levels, quantifying the domain of applicability, and next-generation systems engineering, where AI models and sensors are designed in tandem.
Blender is a common and compelling tool for generating these datasets. It is free to use and open source but, just as important, it is fully extensible through a powerful Python API. This feature of Blender has made it an attractive option for visual image rendering. As a result, it has been used extensively for this purpose, with 18+ rendering engine options to choose from.
Rendering engines integrated into Blender, such as Cycles, often come with tightly integrated GPU support, including state-of-the-art NVIDIA RTX support. However, if high performance levels are required outside of a visual rendering engine, such as the render of a synthetic SAR image, the Python environment can be too sluggish for practical applications. One option to accelerate this code is to use the popular Numba package to precompile portions of the Python code into C. This still leaves room for improvement, however, particularly when it comes to the adoption of leading GPU architectures for scientific computing.
GPU capabilities for scientific computing can be available from directly within Blender, allowing for simple unified tools that leverage Blender’s powerful geometry creation capabilities as well as cutting-edge computing environments. As of the recent changes in Blender 2.83+, this can be done using CuPy, a GPU-accelerated Python library devoted to array calculations, directly from within a Python script.
In line with these ideas, the following tutorial compares two different ways of accelerating matrix multiplication. The first approach uses Python’s Numba compiler while the second approach uses the NVIDIA GPU-compute API, CUDA. Implementation of these approaches can be found in the rleonard1224/matmul GitHub repo, along with a Dockerfile that sets up an anaconda environment from which CUDA-accelerated Blender Python scripts can be run.
Matrix multiplication algorithms
As a precursor to discussing the different approaches used to accelerate matrix multiplication, we briefly review matrix multiplication itself.
For the product of two matrices ![[A cdot B]](https://s0.wp.com/latex.php?latex=%5BA+%5Ccdot+B%5D&bg=ffffff&fg=000&s=0&c=20201002)
![[A]](https://s0.wp.com/latex.php?latex=%5BA%5D&bg=ffffff&fg=000&s=0&c=20201002)
![[B]](https://s0.wp.com/latex.php?latex=%5BB%5D&bg=ffffff&fg=000&s=0&c=20201002)
rows and
columns, that is, an
matrix.
matrix.
- The product
results in an
matrix.
If the first element in each row and each column of ![[C]](https://s0.wp.com/latex.php?latex=%5BC%5D&bg=ffffff&fg=000&s=0&c=20201002)
![[C[i,j]]](https://s0.wp.com/latex.php?latex=%5BC%5Bi%2Cj%5D%5D&bg=ffffff&fg=000&s=0&c=20201002)
![[C[i,j] = Sigma_{r = 1}^{n} A[i,r] cdot B[r,j]]](https://s0.wp.com/latex.php?latex=%5BC%5Bi%2Cj%5D+%3D+%5CSigma_%7Br+%3D+1%7D%5E%7Bn%7D+A%5Bi%2Cr%5D+%5Ccdot+B%5Br%2Cj%5D%5D&bg=ffffff&fg=000&s=0&c=20201002)
Numba acceleration
The Numba compiler can be applied to a function in a Python script by using the numba.jit decorator. By precompilation into C, the use of the numba.jit decorator significantly reduces the run times of loops when used in Python code. Because matrix multiplication translated directly into code requires nested for loops, use of the numba.jit decorator significantly reduces the run times of a matrix multiplication function written in Python. The matmulnumba.py Python script implements matrix multiplication and uses the numba.jit decorator.
CUDA acceleration
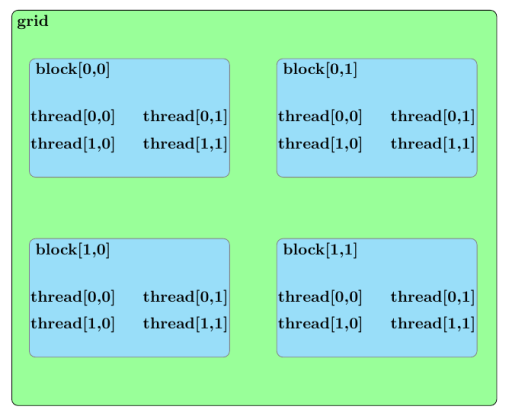
Before we discuss an approach to accelerate matrix multiplication using CUDA, we should broadly outline the parallel structure of a CUDA kernel launch. All parallel processes within a kernel launch belong to a grid. A grid is composed of an array of blocks and each block is composed of an array of threads. The threads within a grid compose the fundamental parallel processes launched by a CUDA kernel. Figure 2 outlines a sample parallel structure of this kind.
Now that this summary of the parallel structure of a CUDA kernel launch is spelled out, the approach used to parallelize matrix multiplication in the matmulcuda.py Python script can be described as follows.
Suppose the following are to be calculated by a CUDA kernel grid composed of a 2D array of blocks with each block composed of a 1D array of threads:
- matrix product
Also, further assume the following:
- The number of blocks in the x-dimension of the grid (
) is greater than or equal to
).
- The number of blocks in the y-dimension of the grid (
) is greater than or equal to
(
).,
- The number of threads in each block (
) is greater than or equal to
).
The elements of the matrix product
You can obtain further parallel enhancement by assigning, to each thread of the block to which
To avoid a race condition, the summing of these atomicAdd function. The atomicAdd function signature consists of a pointer as the first input and a numerical value as the second input. The definition adds the numerical value input to the value pointed to by the first input and later stores this sum in the location pointed to by the first input.
Assume that the elements of ![[textrm{tid}(i,j)]](https://s0.wp.com/latex.php?latex=%5B%5Ctextrm%7Btid%7D%28i%2Cj%29%5D&bg=ffffff&fg=000&s=0&c=20201002)
![[[i,j]]](https://s0.wp.com/latex.php?latex=%5B%5Bi%2Cj%5D%5D&bg=ffffff&fg=000&s=0&c=20201002)
![[C[i,j] = textrm{atomicAdd}(C[i,j], A[i, textrm{tid}(i,j)] cdot B[textrm{tid}(i,j), j])]](https://s0.wp.com/latex.php?latex=%5BC%5Bi%2Cj%5D+%3D+%5Ctextrm%7BatomicAdd%7D%28C%5Bi%2Cj%5D%2C+A%5Bi%2C+%5Ctextrm%7Btid%7D%28i%2Cj%29%5D+%5Ccdot+B%5B%5Ctextrm%7Btid%7D%28i%2Cj%29%2C+j%5D%29%5D&bg=ffffff&fg=000&s=0&c=20201002)
Figure 3 summarizes this parallel arrangement for the multiplication of two sample matrices of ![[2 times 2]](https://s0.wp.com/latex.php?latex=%5B2+%5Ctimes+2%5D&bg=ffffff&fg=000&s=0&c=20201002)

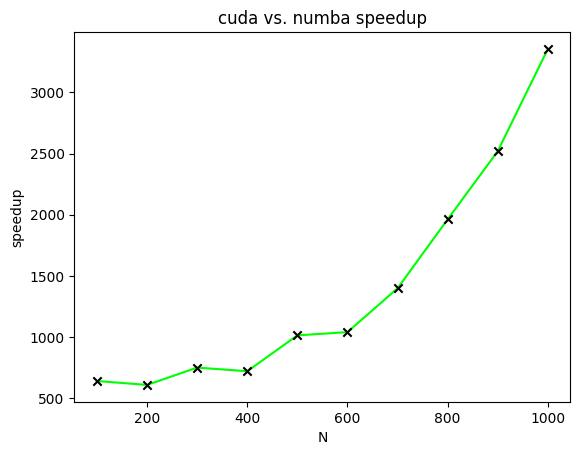
Speedups
Figure 4 displays the speedups of CUDA-accelerated matrix multiplication relative to Numba-accelerated matrix multiplication for matrices of varying sizes. In this figure, speedups are plotted for the calculation of two ![[N times N]](https://s0.wp.com/latex.php?latex=%5BN+%5Ctimes+N%5D&bg=ffffff&fg=000&s=0&c=20201002)
![[N]](https://s0.wp.com/latex.php?latex=%5BN%5D&bg=ffffff&fg=000&s=0&c=20201002)
Future work
Given Blender’s role as a computer graphics tool, one relevant area of application suitable for CUDA acceleration relates to solving the visibility problem through ray tracing. The visibility problem can be broadly summarized as follows: A camera exists at some point in space and is looking at a mesh composed of, for instance, triangular elements. The goal of the visibility problem is to determine which mesh elements are visible to the camera and which are instead occluded by other mesh elements.
Ray tracing can be used to solve the visibility problem. A mesh whose visibility you are trying to determine is composed of
Each ray has an endpoint at a different mesh element. If a ray reaches its endpoint without being occluded by another mesh element, then the endpoint mesh element is visible from the camera. Figure 5 shows this procedure.
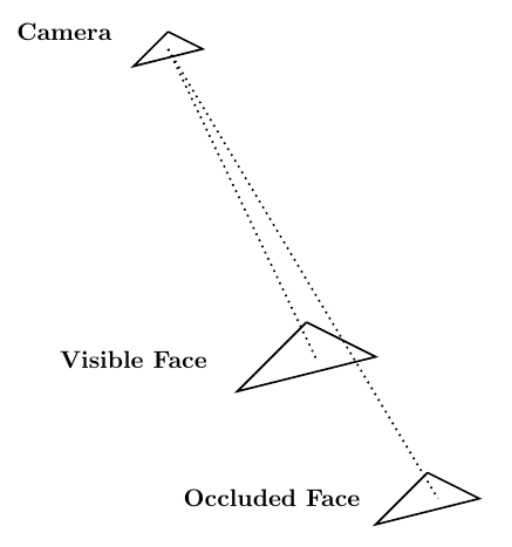
The nature of the use of ray tracing to solve the visibility problem makes it an ![[mathcal{O}(N^{2})]](https://s0.wp.com/latex.php?latex=%5B%5Cmathcal%7BO%7D%28N%5E%7B2%7D%29%5D&bg=ffffff&fg=000&s=0&c=20201002)
Summary
This post described two different approaches for how to accelerate matrix multiplication. The first approach used the Numba compiler to decrease the overhead associated with loops in Python code. The second approach used CUDA to parallelize matrix multiplication. A speed comparison demonstrated the effectiveness of CUDA in accelerating matrix multiplication.
Because the CUDA-accelerated code described earlier can be run as a Blender Python script, any number of algorithms can be accelerated using CUDA from within a Blender Python environment. That greatly increases the effectiveness of Blender Python as a scientific computing tool.
If you have questions or comments, please comment below or contact us at info@rendered.ai.
 Learn about the latest GPU Operator releases which include support for multi-instance GPU Support, pre-installed NVIDIA drivers, Red Hat OpenShift 4.7, and more.
Reliably provisioning servers with GPUs in Kubernetes can quickly become complex as multiple components must be installed and managed to use GPUs. The GPU Operator, based on the Operator Framework, simplifies the initial deployment and management of GPU servers. NVIDIA, Red Hat, and others in the community have collaborated on creating the GPU Operator.
To provision GPU worker nodes in a Kubernetes cluster, the following NVIDIA software components are required:
- NVIDIA Driver
- NVIDIA Container Toolkit
- Kubernetes device plugin
- Monitoring
These components should be provisioned before GPU resources are available to the cluster and managed during the cluster operation.
The GPU Operator simplifies both the initial deployment and management of the components by containerizing all components. It uses standard Kubernetes APIs for automating and managing these components, including versioning and upgrades. The GPU Operator is fully open source. It is available on NGC and as part of the NVIDIA EGX Stack and Red Hat OpenShift.
The latest GPU Operator releases, 1.6 and 1.7, include several new features:
- Support for automatic configuration of MIG geometry with NVIDIA Ampere Architecture products
- Support for preinstalled NVIDIA drivers and the NVIDIA Container Toolkit
- Updated support for Red Hat OpenShift 4.7
- Updated GPU Driver version to include support for NVIDIA A40, A30, and A10
- Support for RuntimeClasses with Containerd
Multi-Instance GPU support
Multi-Instance GPU (MIG) expands the performance and value of each NVIDIA A100 Tensor Core GPU. MIG can partition the A100 or A30 GPU into as many as seven instances (A100) or four instances (A30), each fully isolated with their own high-bandwidth memory, cache, and compute cores.
Without MIG, different jobs running on the same GPU, such as different AI inference requests, compete for the same resources, such as memory bandwidth. With MIG, jobs run simultaneously on different instances, each with dedicated resources for compute, memory, and memory bandwidth. This results in predictable performance with quality of service and maximum GPU utilization. Because simultaneous jobs can operate, MIG is ideal for edge computing use cases.
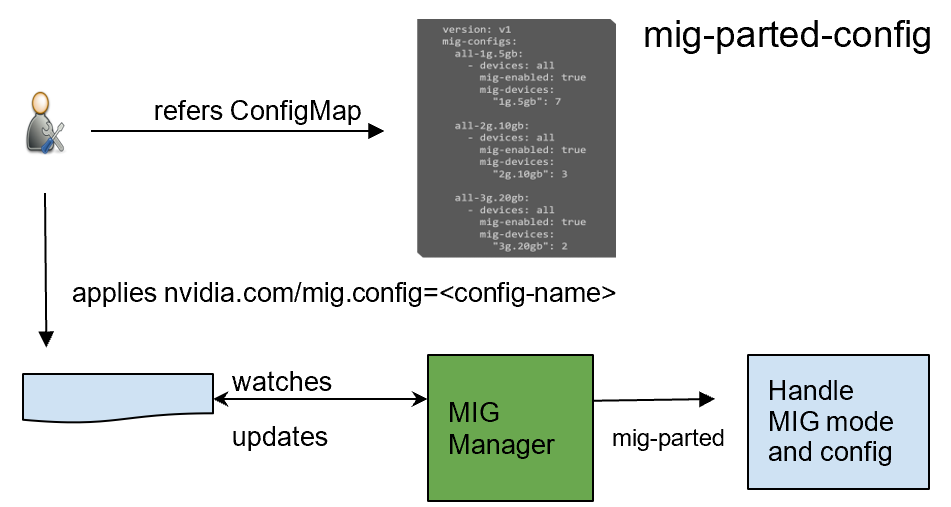
GPU Operator 1.7 added a new component called NVIDIA MIG Manager for Kubernetes, which runs as a DaemonSet and manages MIG mode and MIG configuration changes on each node. You can apply MIG configuration on the node by adding a label that indicates the predefined configuration name to be applied. After applying MIG configuration, GPU Operator automatically validates that MIG changes are applied as expected. For more information, see GPU Operator with MIG.
Preinstalled drivers and Container Toolkit
GPU Operator 1.7 now supports selectively installing NVIDIA Driver and Container Toolkit (container config) components. This new feature provides great flexibility for environments where the driver or nvidia-docker2 packages are preinstalled. These environments can now use GPU Operator for simplified management of other software components like Device Plugin, GPU Feature Discovery Plugin, DCGM Exporter for monitoring, or MIG Manager for Kubernetes.
Install command with only the drivers preinstalled:
 helm install --wait --generate-name
      nvidia/gpu-operator
      --set driver.enabled=false
Install command with both drivers and nvidia-docker2 preinstalled:
 helm install --wait --generate-name
      nvidia/gpu-operator
      --set driver.enabled=false
      --set toolkit.enabled=false
Added support for Red Hat OpenShift
We continue our line of support for Red Hat OpenShift,
- GPU Operator 1.6 and 1.7 include support for the latest Red Hat OpenShift 4.7 version.
- GPU Operator 1.5 supports Red Hat OpenShift 4.6.
- GPU Operator 1.4 and 1.3 support Red Hat OpenShift 4.5 and 4.4, respectively.
GPU Operator is an OpenShift certified operator. Through the OpenShift web console, you can install and start using the GPU Operator with only a few mouse clicks. Being a certified operator makes it significantly easier for you to use NVIDIA GPUs with Red Hat OpenShift.
GPU Driver support for NVIDIA A40, A30, and A10
We updated the GPU Driver version to include support for NVIDIA A40, A30, and A10.
NVIDIA A40
The NVIDIA A40 delivers the data center-based solution that designers, engineers, artists, and scientists need for meeting today’s challenges. Built on the NVIDIA Ampere Architecture, the A40 combines the latest generation RT Cores, Tensor Cores, and CUDA Cores. It has 48 GB of graphics memory for unprecedented graphics, rendering, compute, and AI performance. From powerful virtual workstations accessible from anywhere, to dedicated render and compute nodes, the A40 is built to tackle the most demanding visual computing workloads from the data center.
For more information, see NVIDIA A40.
NVIDIA A30
The NVIDIA A30 Tensor Core GPU is the most versatile mainstream compute GPU for AI inference and enterprise workloads. Tensor Cores with MIG combine with fast memory bandwidth in a low 165W power envelope, all in a PCIe form factor ideal for mainstream servers.
Built for AI inference at scale, A30 can also rapidly retrain AI models with TF32 as well as accelerate HPC applications using FP64 Tensor Cores. The combination of the NVIDIA Ampere Architecture Tensor Cores and MIG delivers speedups securely across diverse workloads, all powered by a versatile GPU enabling an elastic data center. The versatile A30 compute capabilities deliver maximum value for mainstream enterprises.
For more information, see NVIDIA A30.
NVIDIA A10
The NVIDIA A10 Tensor Core GPU is the ideal GPU for mainstream media and graphics with AI. Second-generation RT Cores and third-generation Tensor Cores enrich graphics and video applications with powerful AI. NVIDIA A10 delivers a single-wide, full-height, full-length PCIe form factor and a 150W power envelope for dense servers.
Built for graphics, media, and cloud gaming applications with powerful AI capabilities, the NVIDIA A10 Tensor Core GPU can deliver rich media experiences. It delivers up to 4k for cloud gaming, with 2.5x the graphics and over 3x the inference performance compared to the NVIDIA T4 Tensor Core GPU.
For more information, see NVIDIA A10.
RuntimeClass support with Containerd
RuntimeClass provides you with the flexibility of choosing the container runtime configuration per Pod and then applying the default runtime configuration for all Pods on each node. With this support, you can specify the specific runtime configuration for Pods running GPU-accelerated workloads and choose other runtimes for generic workloads.
GPU Operator v1.7.0 now supports auto creation of nvidia RuntimeClass when default runtime is selected as containerd during installation. You can explicitly specify this RuntimeClass name when running applications consuming GPUs.
 apiVersion: node.k8s.io/v1beta1
 handler: nvidia
 kind: RuntimeClass
 metadata:
  labels:
    app.kubernetes.io/component: gpu-operator
  name: nvidia
Summary
To start using NVIDIA GPU Operator today, see the following resources: