|
submitted by /u/kbennett1999 [visit reddit] [comments] |


|
submitted by /u/kbennett1999 [visit reddit] [comments] |
 NVIDIA created content for AWS re:Invent, helping developers learn more about applying the power of GPUs to reach their goals faster and more easily.
See the latest innovations spanning from the cloud to the edge at AWS re:Invent. Plus, learn more about the NVIDIA NGC catalog—a comprehensive collection of GPU-optimized software.
Working closely together, NVIDIA and AWS developed a session and workshop focused on learning more about NVIDIA GPUs and providing hands-on training on NVIDIA Jetson modules.
Register now for the virtual AWS re:Invent. >>
Get all the information you need to make an informed choice for which Amazon EC2 NVIDIA GPU instance to use and how to get the most out of it by using GPU-optimized software for your training and inference workloads.
This NVIDIA-sponsored session—delivered by Shashank Prasanna, an AI and ML evangelist at AWS—focuses on helping engineers, developers, and data scientists solve challenging problems with ML.
Get started with AWS IoT Greengrass v2, NVIDIA DeepStream, and Amazon SageMaker Edge Manager with computer vision in this workshop. Learn how to make and deploy a video analytics pipeline and build a people counter and deploy it to an NVIDIA Jetson Nano edge device.
This workshop is being delivered by Ryan Vanderwerf, Partner Solutions Architect, and Yuxin Yang, AI/ML IoT Architect.
Join this session to learn how to use NVIDIA Triton in your AI workflows and maximize the AI performance on your GPUs and CPUs.
NVIDIA Triton is an open source inference-serving software to deploy deep learning and ML models from any framework (TensorFlow, TensorRT, PyTorch, OpenVINO, ONNX Runtime, XGBoost, or custom) on GPU‑ or CPU‑based infrastructure.
Shankar Chandrasekaran, Sr. Product Marketing Manager of NVIDIA, discusses model deployment challenges, how NVIDIA Triton simplifies deployment and maximizes performance of AI models, how to use NVIDIA Triton on AWS, and a customer use case.
In this session, Abhilash Somasamudramath, NVIDIA Product Manager of AI Software, will show how to use free GPU-optimized software available on the NGC catalog in AWS Marketplace to achieve your ML goals.
ML has transformed many industries as companies adopt AI to improve operational efficiencies, increase customer satisfaction, and gain a competitive edge. However, the process of training, optimizing, and running ML models to build AI-powered applications is complex and requires expertise.
The NVIDIA NGC catalog provides GPU-optimized AI software including frameworks, pretrained models, and industry-specific software development keys (SDKs) that accelerate workflows. This software allows data engineers, data scientists, developers, and DevOps teams to focus on building and deploying their AI solutions faster.
Hear Ian Buck discuss the latest trends in ML and AI, how NVIDIA is partnering with AWS to deliver accelerated computing solutions, and how NVIDIA makes accessing AI solutions easier than ever.
 High performance CUTLASS template abstractions support matrix multiply operations (GEMM), Convolution AI, and improved Strided-DGrad.
NVIDIA continues to enhance CUTLASS to provide extensive support for mixed-precision computations, providing specialized data-movement, and multiply-accumulate abstractions. Today, NVIDIA is announcing the availability of CUTLASS version 2.8.
Download the free CUTLASS v2.8 software.
See the CUTLASS Release Notes for more information.
CUTLASS is a collection of CUDA C++ template abstractions for implementing high-performance matrix-multiplication (GEMM) at all levels, and scales within CUDA. It incorporates strategies for hierarchical decomposition and data movement similar to those used to implement cuBLAS.
CUTLASS decomposes these “moving parts” into reusable and modular software components abstracted by C++ template classes. These thread-wide, warp-wide, block-wide, and device-wide primitives can be specialized and tuned via custom tiling sizes, data types, and other algorithmic policy. The resulting flexibility simplifies their use as building blocks within custom kernels and applications.
To support a wide variety of applications, CUTLASS provides extensive support for mixed-precision computations, providing specialized data-movement, and multiply-accumulate abstractions for:
FP16), BFloat16 (BF16), and Tensor Float 32 (TF32) data types.FP32) data type.FP64) data type. 4b and 8b). 1b).Furthermore, CUTLASS demonstrates warp-synchronous matrix multiply operations targeting the programmable, high-throughput Tensor Cores implemented on NVIDIA Volta, Turing, and Ampere architectures.
CUTLASS implements high-performance convolution (implicit GEMM). Implicit GEMM is the formulation of a convolution operation as a GEMM. This allows CUTLASS to build convolutions by reusing highly optimized warp-wide GEMM components and below.
Have you been looking for pretrained vision transformer models in TensorFlow? Have you been frustrated that pretrained models are available only in PyTorch? And JAX…
Let me introduce TensorFlow Image Models (tfimm), a TF port of the PyTorch timm library, which in version v0.1.1 provides 37 pretrained vision transformers of the ViT and DeiT varieties.
The list of available models will grow in upcoming releases.
submitted by /u/drbottich
[visit reddit] [comments]

I’ve been trying to set up my tensorflow env and am having difficulty. For my project i need tensorflow, scikit-learn matplotlib, pandas and numpy.
When I go the conda forge route, and try to run my .py file, i get different errors for each iteration of the env that i have.
Some highlighting tensorflow-estimator; i’ve tried using different versions of this module, and tried different version of python and different versions of tensorflow.
Each environment yields a different error. So instead of trying to iterate through each version, i wanted to see if anyone had any clues to what I may be doing wrong.
Or
If you use Anaconda w/ tensorflow and the other packages i’ve mentioned, if you can give me a breakdown of your env/version numbers for corresponding packages, that would be great!
Thanks in advance!
Error I am getting when using env. that strictly installs through packages through anaconda navigator (I have tried pip, I have tried conda terminal etc)
ImportError: cannot import name ‘MomentumParameters’ from ‘tensorflow.python.tpu.tpu_embedding’ (C:Usersmeanaconda3envstf_envlibsite-packagestensorflowpythontputpu_embedding.py)
submitted by /u/Pos1tivity
[visit reddit] [comments]
 HTC released a CloudXR client to support their VIVE Focus 3, which provides a “best of both worlds” solution to the difficult tradeoffs VR developers face.
Whether building immersive theatrical experiences or virtual training solutions, XR development continues to push the limits of both content and device performance. Often, this means having to compromise on either fidelity or mobility. But with the NVIDIA CloudXR streaming solution, this is no longer the case.
This month at NVIDIA GTC, HTC announced the release of an NVIDIA CloudXR client to support their VIVE Focus 3, available now on GitHub. This provides a “best of both worlds” solution to the difficult tradeoffs VR developers typically face.
“High fidelity, cloud-based VR streaming represents the next big evolution in the XR industry, and we’re excited to continue working closely with the teams at NVIDIA to keep pushing the industry forwards,” said Shen Ye, senior director and global head of products at HTC.
The VIVE Focus 3 is the first commercially available VR headset with a custom NVIDIA CloudXR client. With seamless remote rendering powered by NVIDIA CloudXR, creative studios like Agile Lens can design extremely high fidelity immersive experiences, which would otherwise be impossible to run on a mobile chipset.
Alex Coulombe, cofounder and creative director at Agile Lens, has wanted to bring the intimacy and power of theater to the masses using technologies like VR. His latest venture, Heavenue, is a platform that integrates NVIDIA CloudXR to deliver high fidelity immersive live performances to VR headsets from the cloud.
Heavenue’s first partner is the Actors Theatre of Louisville, which is producing an immersive rendition of the classic A Christmas Carol this December. This will be the first simultaneous live stage and virtual theater performance of its kind.
The producers combined motion capture from live performers with facial and voice tracking from actors, overlaid onto a virtual avatar using Unreal Engine 4 to complete the experience. This is all hosted by CoreWeave, which offers powerful servers with a broad range of NVIDIA GPUs. It includes North America’s largest deployment of A40s, in the cloud and streamed to end users on standalone VR headsets such as the VIVE Focus 3, with the NVIDIA CloudXR. The result is a rich and immersive experience where users can freely move around the theater environment without tether restriction.
“NVIDIA CloudXR is like a bridge to the future,” Coulombe said. “This has never been possible before. It’s only now, with the advent of technologies like these that we can start to build a platform that democratizes the experience of an incredibly immersive, compelling, vivid, high fidelity live performance.”
With NVIDIA CloudXR, virtual productions and location-based experiences (LBE) are able to use the VIVE Focus 3 to deliver a more immersive experience. This shifts computing to centralized computers and removes the need to spend time navigating around cords. Having a centralized computing environment makes debugging and troubleshooting easy, creating a more user-friendly system and experience. All of this comes without impacting quality or graphical fidelity, taking full advantage of a 5K resolution and 120-degree field of view.
This application extends to any use case where mobility and high fidelity are required, such as in enterprise training, product and building design, or manufacturing floor planning.
HTC VIVE has open-sourced their CloudXR sample client for the VIVE Focus 3 on GitHub. Developers can extend the sample client source code to add bespoke features and customized user interface. Those less familiar with Android development, or just wanting to try it out, can download the prebuilt APK and install this directly into their headset to get started.
Learn more about NVIDIA CloudXR and download the HTC VIVE Focus 3 sample client today.
Smart Text Selection, launched in 2017 as part of Android O, is one of Android’s most frequently used features, helping users select, copy, and use text easily and quickly by predicting the desired word or set of words around a user’s tap, and automatically expanding the selection appropriately. Through this feature, selections are automatically expanded, and for selections with defined classification types, e.g., addresses and phone numbers, users are offered an app with which to open the selection, saving users even more time.
Today we describe how we have improved the performance of Smart Text Selection by using federated learning to train the neural network model on user interactions responsibly while preserving user privacy. This work, which is part of Android’s new Private Compute Core secure environment, enabled us to improve the model’s selection accuracy by up to 20% on some types of entities.
Server-Side Proxy Data for Entity Selections
Smart Text Selection, which is the same technology behind Smart Linkify, does not predict arbitrary selections, but focuses on well-defined entities, such as addresses or phone numbers, and tries to predict the selection bounds for those categories. In the absence of multi-word entities, the model is trained to only select a single word in order to minimize the frequency of making multi-word selections in error.
The Smart Text Selection feature was originally trained using proxy data sourced from web pages to which schema.org annotations had been applied. These entities were then embedded in a selection of random text, and the model was trained to select just the entity, without spilling over into the random text surrounding it.
While this approach of training on schema.org-annotations worked, it had several limitations. The data was quite different from text that we expect users see on-device. For example, websites with schema.org annotations typically have entities with more proper formatting than what users might type on their phones. In addition, the text samples in which the entities were embedded for training were random and did not reflect realistic context on-device.
On-Device Feedback Signal for Federated Learning
With this new launch, the model no longer uses proxy data for span prediction, but is instead trained on-device on real interactions using federated learning. This is a training approach for machine learning models in which a central server coordinates model training that is split among many devices, while the raw data used stays on the local device. A standard federated learning training process works as follows: The server starts by initializing the model. Then, an iterative process begins in which (a) devices get sampled, (b) selected devices improve the model using their local data, and (c) then send back only the improved model, not the data used for training. The server then averages the updates it received to create the model that is sent out in the next iteration.
For Smart Text Selection, each time a user taps to select text and corrects the model’s suggestion, Android gets precise feedback for what selection span the model should have predicted. In order to preserve user privacy, the selections are temporarily kept on the device, without being visible server-side, and are then used to improve the model by applying federated learning techniques. This technique has the advantage of training the model on the same kind of data that it sees during inference.
Federated Learning & Privacy
One of the advantages of the federated learning approach is that it enables user privacy, because raw data is not exposed to a server. Instead, the server only receives updated model weights. Still, to protect against various threats, we explored ways to protect the on-device data, securely aggregate gradients, and reduce the risk of model memorization.
The on-device code for training Federated Smart Text Selection models is part of Android’s Private Compute Core secure environment, which makes it particularly well situated to securely handle user data. This is because the training environment in Private Compute Core is isolated from the network and data egress is only allowed when federated and other privacy-preserving techniques are applied. In addition to network isolation, data in Private Compute Core is protected by policies that restrict how it can be used, thus protecting from malicious code that may have found its way onto the device.
To aggregate model updates produced by the on-device training code, we use Secure Aggregation, a cryptographic protocol that allows servers to compute the mean update for federated learning model training without reading the updates provided by individual devices. In addition to being individually protected by Secure Aggregation, the updates are also protected by transport encryption, creating two layers of defense against attackers on the network.
Finally, we looked into model memorization. In principle, it is possible for characteristics of the training data to be encoded in the updates sent to the server, survive the aggregation process, and end up being memorized by the global model. This could make it possible for an attacker to attempt to reconstruct the training data from the model. We used methods from Secret Sharer, an analysis technique that quantifies to what degree a model unintentionally memorizes its training data, to empirically verify that the model was not memorizing sensitive information. Further, we employed data masking techniques to prevent certain kinds of sensitive data from ever being seen by the model
In combination, these techniques help ensure that Federated Smart Text Selection is trained in a way that preserves user privacy.
Achieving Superior Model Quality
Initial attempts to train the model using federated learning were unsuccessful. The loss did not converge and predictions were essentially random. Debugging the training process was difficult, because the training data was on-device and not centrally collected, and so, it could not be examined or verified. In fact, in such a case, it’s not even possible to determine if the data looks as expected, which is often the first step in debugging machine learning pipelines.
To overcome this challenge, we carefully designed high-level metrics that gave us an understanding of how the model behaved during training. Such metrics included the number of training examples, selection accuracy, and recall and precision metrics for each entity type. These metrics are collected during federated training via federated analytics, a similar process as the collection of the model weights. Through these metrics and many analyses, we were able to better understand which aspects of the system worked well and where bugs could exist.
After fixing these bugs and making additional improvements, such as implementing on-device filters for data, using better federated optimization methods and applying more robust gradient aggregators, the model trained nicely.
Results
Using this new federated approach, we were able to significantly improve Smart Text Selection models, with the degree depending on the language being used. Typical improvements ranged between 5% and 7% for multi-word selection accuracy, with no drop in single-word performance. The accuracy of correctly selecting addresses (the most complex type of entity supported) increased by between 8% and 20%, again, depending on the language being used. These improvements lead to millions of additional selections being automatically expanded for users every day.
Internationalization
An additional advantage of this federated learning approach for Smart Text Selection is its ability to scale to additional languages. Server-side training required manual tweaking of the proxy data for each language in order to make it more similar to on-device data. While this only works to some degree, it takes a tremendous amount of effort for each additional language.
The federated learning pipeline, however, trains on user interactions, without the need for such manual adjustments. Once the model achieved good results for English, we applied the same pipeline to Japanese and saw even greater improvements, without needing to tune the system specifically for Japanese selections.
We hope that this new federated approach lets us scale Smart Text Selection to many more languages. Ideally this will also work without manual tuning of the system, making it possible to support even low-resource languages.
Conclusion
We developed a federated way of learning to predict text selections based on user interactions, resulting in much improved Smart Text Selection models deployed to Android users. This approach required the use of federated learning, since it works without collecting user data on the server. Additionally, we used many state-of-the-art privacy approaches, such as Android’s new Private Compute Core, Secure Aggregation and the Secret Sharer method. The results show that privacy does not have to be a limiting factor when training models. Instead, we managed to obtain a significantly better model, while ensuring that users’ data stays private.
Acknowledgements
Many people contributed to this work. We would like to thank Lukas Zilka, Asela Gunawardana, Silvano Bonacina, Seth Welna, Tony Mak, Chang Li, Abodunrinwa Toki, Sergey Volnov, Matt Sharifi, Abhanshu Sharma, Eugenio Marchiori, Jacek Jurewicz, Nicholas Carlini, Jordan McClead, Sophia Kovaleva, Evelyn Kao, Tom Hume, Alex Ingerman, Brendan McMahan, Fei Zheng, Zachary Charles, Sean Augenstein, Zachary Garrett, Stefan Dierauf, David Petrou, Vishwath Mohan, Hunter King, Emily Glanz, Hubert Eichner, Krzysztof Ostrowski, Jakub Konecny, Shanshan Wu, Janel Thamkul, Elizabeth Kemp, and everyone else involved in the project.
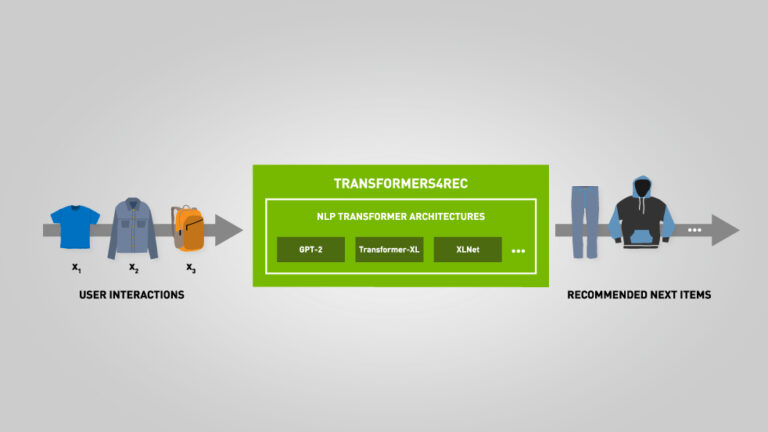 Check out NVIDIA Merlin’s latest updates including Transformers4Rec and SparseOperations Kit.
Data scientists and machine learning engineers use many methods, techniques, and tools to prep, build, train, deploy, and optimize their machine learning models. While technical leads cite the importance of leveraging open source software for recommender team workflows, the majority of popular machine learning methods, libraries, and frameworks are not designed to support and accelerate recommender workflows.
NVIDIA Merlin is designed to streamline recommender workflows. The latest update includes Transformers4Rec, a new library that wraps HuggingFace Transformer Architectures to build pipelines for session-based recommendations. It also adds SparseOperationsKit (SOK), a new Python package that supports sparse training and inference with Deep Learning (DL).
This latest release reaffirms the commitment of NVIDIA to help machine learning engineers and data scientists develop and optimize their recommender systems—with open source canonical building blocks.
Recommender methods popularized in mainstream media often rely upon long-term user profiles or lifetime user behavior. Yet, ecommerce and media companies acquiring new ongoing active users must provide relevant recommendations to first-time and early-visit users. Relevant recommendations enable increased user engagement, retention, and conversion to subscription services.
Utilizing session-based recommenders with Transformers4Rec, data scientists and machine learning engineers are able to solve the cold-start problem by leveraging contextual and recent user interactions to predict a user’s next action and provide relevant recommendations. The NVIDIA Merlin team designed Transformers4Rec to be used as a standalone solution or within an ensemble of recommendation models.
Recommender teams that work with massive datasets benefit from using deep learning (DL) recommenders. Merlin HugeCTR is a DL training framework designed for recommender systems and the latest update includes SOK, a new open source Python package that supports sparse training and inference.
It is also compatible with DL frameworks including TensorFlow. SOK provides embedding model parallelism functionality to use GPUs, including scaling from a single GPU to multiple GPUs. Most common DL frameworks do not support model-parallelism, which makes it challenging to use all available GPUs in a cluster. Yet, SOK being compatible with DL frameworks, including TensorFlow, helps fill that void.
The latest update to NVIDIA Merlin, including Transformers4Rec and SOK, strengthens streamlining and accelerating recommender workflows with open-source interoperability and performance enhancements.
For more information about the latest release download NVIDIA Merlin today.
A picture worth a thousand words now takes just three or four words to create, thanks to GauGAN2, the latest version of NVIDIA Research’s wildly popular AI painting demo. The deep learning model behind GauGAN allows anyone to channel their imagination into photorealistic masterpieces — and it’s easier than ever. Simply type a phrase like Read article >
The post ‘Paint Me a Picture’: NVIDIA Research Shows GauGAN AI Art Demo Now Responds to Words appeared first on The Official NVIDIA Blog.
Hello
I am trying to fine-tune a Bert model using the well-known Movie Review dataset on M1 Chip.
The ETA for an epoch is estimated at 10 hours to refine all 66M of parameters.
In order to reduce the ETA, I thought to set the first two layers as `trainable=False`, so the trainable parameters now are 2K.
Even if I dropped the trainable parameters, nothing is changed, ETA is still 10h.
Do you think it is normal or there is something wrong on my side?
Thanks
submitted by /u/i_cook_bits
[visit reddit] [comments]