
|
submitted by /u/RubiksCodeNMZ [visit reddit] [comments] |

 DataBloom
|
|
submitted by /u/RubiksCodeNMZ [visit reddit] [comments] |
I’ll link the StackOverflow post: https://stackoverflow.com/questions/69267805/spyder-tensorflow-stuck-on-first-epoch
Help is deeply appreciated. Thanks.
submitted by /u/Snoo37084
[visit reddit] [comments]
 Preview and test Cumulus Linux in your own environment, at your own pace, without organizational or economic barriers.
Looking to try open networking for free? Try NVIDIA Cumulus VX—a free virtual appliance that provides all the features of NVIDIA Cumulus Linux. You can preview and test Cumulus Linux in your own environment, at your own pace, without organizational or economic barriers. You can also produce sandbox environments for prototype assessment, preproduction rollouts, and script development.
Cumulus VX runs on all popular hypervisors, such VirtualBox and VMware VSphere, and orchestrators, such as Vagrant and GNS3.
Our website has the images needed to run NVIDIA Cumulus VX on your preferred hypervisor—download is simple. What’s more, we provide a detailed guide on how to install and set up Cumulus VX to create this simple two leaf, one spine topology.
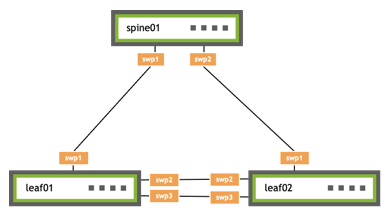
With these three switches up and running, you are all set to try out NVIDIA Cumulus Linux features, such as traditional networking protocols (BGP and MLAG), and NVIDIA Cumulus-specific technologies, such as ONIE and Prescriptive Topology Manager (PTM). And, not to worry, the Cumulus Linux User’s Guide is always close at hand to help you out, as well as the community Slack channel, where you can submit questions and engage with the wider community.
If your needs are different, or if you have platform or disk limitations, we also provide an alternative to NVIDIA Cumulus VX. NVIDIA Cumulus in the Cloud is a free, personal, virtual data center network that provides a low-effort way to see NVIDIA Cumulus technology in action—no hypervisor needed.
 The NVIDIA Maxine Video Effects SDK offers AI-based visual features that transform noisy, low-resolution video streams into pleasant user experiences. This post demonstrates how you can run these effects with standard webcam input and easily integrate them into video conference and content creation pipelines.
Video conferencing, audio and video streaming, and telecommunications recently exploded due to pandemic-related closures and work-from-home policies. Businesses, educational institutions, and public-sector agencies are experiencing a skyrocketing demand for virtual collaboration and content creation applications. The crucial part of online communication is the video stream, whether it’s a simple video call or streaming content to a broad audience. At the same time, these streams are the most network bandwidth-intensive part of online communication, often accompanied by noise and artifacts.
To solve these video quality challenges, the NVIDIA Maxine Video Effects SDK offers AI-based visual features that transform noisy, low-resolution video streams into pleasant user experiences. This post demonstrates how you can run these effects with standard webcam input and easily integrate them into video conference and content creation pipelines.
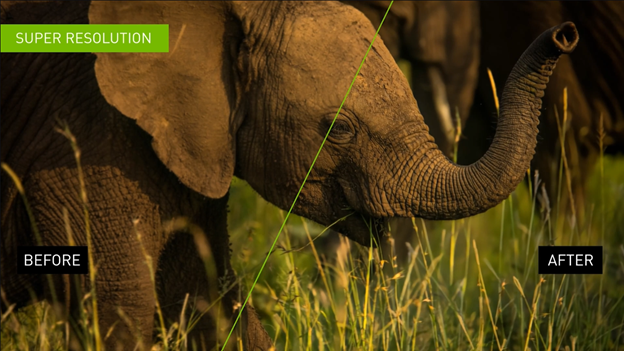
For poor video quality that arises from the low resolution of the image frames, the Maxine Video Effects SDK provides two state-of-the-art AI-based visual effects: Super Resolution and Upscaler.
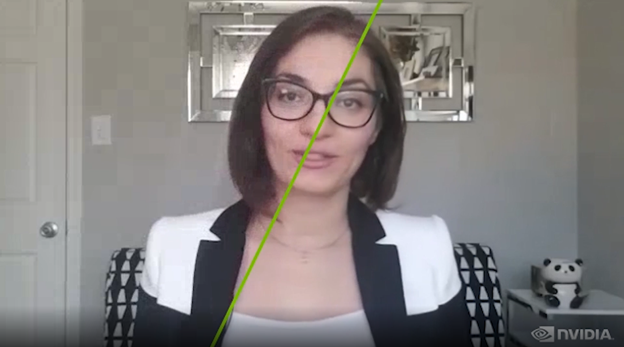
Super Resolution (Figure 1) generates a superior quality image with higher resolution and better textures from the provided input image. It offers holistic enhancements while preserving the content. This visual effect is best used on lossless compression data such as H.264. You can use this feature to scale media by 1.33x, 1.5x, 2x, 3x, and 4x.
To tune up the Super Resolution effect, select its mode:
Upscaler (Figure 2) is a fast and light-weighted method for increasing the video resolution of an input video while also adding detail to the image. It focuses on the geometric structure of the frame’s content and enhances its details. Besides better image resolution, the Upscaler effect produces crisper and sharper images.
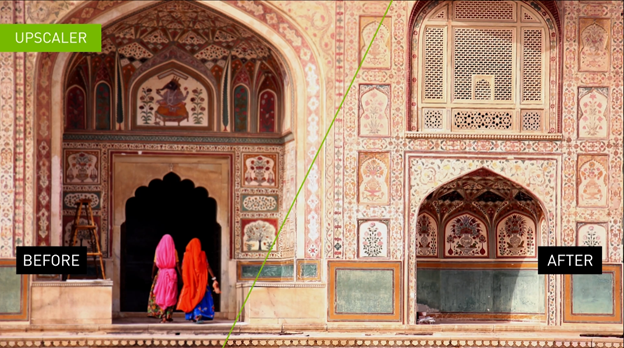
You can set Upscaler’s enhancement parameter within [0,1] range:
By default, Upscaler’s enhancement parameter is set to 0.4.
The underlying causes of video noise that make or break the end-user experience are numerous. However, the two most common sources of noise are webcam noise and encoding artifacts.
Examples of webcam noise sources include the camera sensor type, exposure, or illumination level. This is especially true in the context of end-user–generated streams, if the environment is not well lit or the camera being used is of poor quality. These types of noises are highly dependent on the type of sensor in the camera.
Encoding artifacts in video streams are a consequence of the bandwidth constraints required to transmit frames. Lossy compression typically involves discarding some of the textural information in an image as well as data encoding. Common examples of lossy compression standards would be JPEG for images and H.264 for videos. When streaming this media, the stream bandwidth per unit of time is called bitrate.
In a streaming environment, the bandwidth available to stream the compressed content is not constant. This variability causes situations where the encoder has fewer bits than needed to compress the frame resulting in compression artifacts. Compression artifacts can take many forms, but one of the most common form is a blocky artifact.
The Video Noise Removal (Figure 3) feature of the Maxine Video Effects SDK enables you to de-noise the webcam streams and preserve details, leading to better end-user experiences.
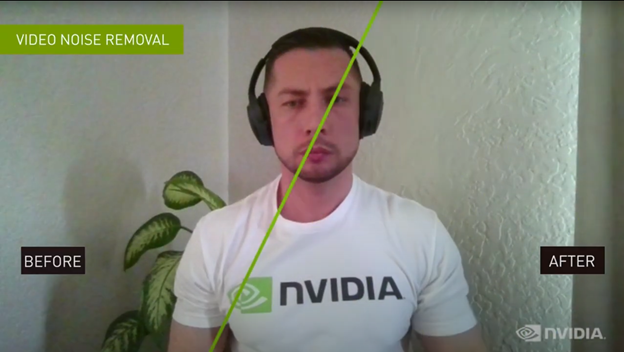
This feature has two variants with strength values:
The Maxine Artifact Reduction feature (Figure 4) reduces blocky artifacts encountered when bandwidth drops on a video call. It also reduces ringing and mosquito noises, while preserving the details of the original video.
This AI-based feature is optimized for two modes:
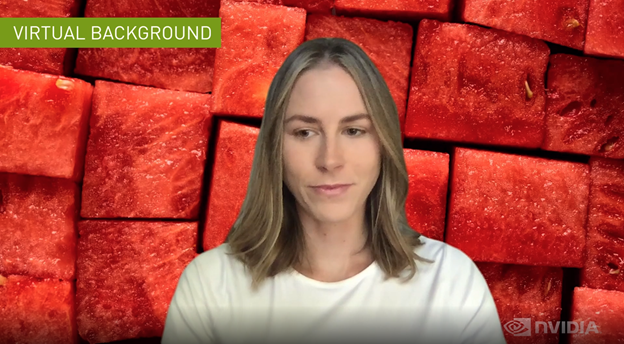
To enable end users to join a meeting from an environment that is neither personal nor distracting, the Maxine Video Effects SDK offers the Virtual Background feature.
The Virtual Background feature (Figure 5) essentially generates a mask to segment out the foreground, in this case, people from the stream. You can provide any media as a background, whether image or video. You can also implement multiple creative applications, like adding multiple users in the same background. For example, if two commentators are talking about a live event, you can segment both onto the live feed of the event. Another example is segmenting out users and overlaying them on their computer’s live feed. This way, single or multiple users can present at the same time in real time while retaining immersion. All these operations use the parallelism that a GPU provides, increasing the number of streams that can be processed in real time.
The Virtual Background feature runs in two modes:
You can also use this feature to generate a blurred background with tunable blur strength.
For processing precompressed videos or videos with noise, along with providing a higher resolution, we recommend chaining Upscaler with Artifact Reduction or Video Noise Removal, depending on the use case. For more information, see Exploring the API. You could also get an out-of-the-box experience with the UpscalePipeline sample application packaged with the SDK.
NVIDIA offers the Maxine Video Effects SDK through Docker containers, and on both Windows and Linux platforms in the form of SDK packages.
The benefits of using containers are high scalability, and time-and-cost savings due to reduced deployment and adoption time. Using containers with Kubernetes provides a robust and easy-to-scale deployment strategy. In addition, because of the prepackaged nature of containers, you don’t have to worry about specific installations inside the container.
In this post, we focus on how to use the Maxine Video Effects SDK with containers and Windows. Before proceeding with the installation, make sure that you meet all the hardware requirements.
If you have considerable experience with the NVIDIA software stack and want to deploy the Video Effects SDK on a bare-metal Linux system, see the Maxine Getting Started page.
There are four steps to install and take advantage of the high-performance Video Effects SDK and its state-of-the-art AI models on containers:
You would need access to NVIDIA Turing, NVIDIA Volta, or NVIDIA Ampere Architecture generation data center GPUs: T4, V100, A100, A10, or A30.
Installing the SDK on Windows is a straightforward process:
You must have an NVIDIA RTX card to benefit from the accelerated throughput and reduced latency of the Maxine Video Effects SDK on Windows. To run this SDK on a data center card like A100, use the Linux package.
The Video Effects SDK comes packaged with five sample applications:
These applications contain sample code to run all the features in the Video Effects SDK. To experience these features, you can also build the application and use prebuilt Windows bash scripts to run them.
You can build the applications using the build_samples.sh script found in the /VideoFX/share folder for the SDK. If you are using the Docker container, this is the folder of entry.
bash build_samples.sh’
The script builds the sample apps and installs some sample, app-specific dependencies. This step might take a few minutes. After it’s built, you can find at least one bash script per application in the folder where you built the applications. Here’s a closer look at one of the applications:
#!/bin/sh

. ./setup_env.sh

VideoEffectsApp
        --model_dir=$_VFX_MODELS
        --in_file=$_VFX_SHARE/samples/input/input1.jpg
        --out_file=ar_1.png
        --effect=ArtifactReduction
        --mode=1
        --show

VideoEffectsApp
        --model_dir=$_VFX_MODELS
        --in_file=$_VFX_SHARE/samples/input/input1.jpg
        --out_file=ar_0.png
        --effect=ArtifactReduction
        --mode=0
        --show

VideoEffectsApp
        --model_dir=$_VFX_MODELS
        --in_file=$_VFX_SHARE/samples/input/input2.jpg
        --out_file=sr_0.png
        --effect=SuperRes
        --resolution=2160
        --mode=0
        --show

VideoEffectsApp
        --model_dir=$_VFX_MODELS
        --in_file=$_VFX_SHARE/samples/input/input2.jpg
        --out_file=sr_1.png
        --effect=SuperRes
        --resolution=2160
        --mode=1
        --show
This is an example of the command line that refers to one of the sample applications, VideoEffectsApp. You can tweak the following arguments to experience different feature capabilities:
--effect: Choose the effect: ArtifactReduction, SuperRes, or Upscale.--mode: Toggle between two modes: 0, 1.--strength: Toggles the Upscaler enhancement multiplier: 0, 1.--resolution: Use to input the target resolution of the selected media. For instance, if you have a 720p media to double, use 1440.When running these effects locally, you can use the keyboard controls to toggle the effects and experience the effects live with your webcam feed. For more information, see the Sample Applications Reference. If you are interested in chaining these effects, keep reading. Finally, if you are interested in learning more about batching and maximizing throughput, see the BatchEffectApp sample application.
Chaining effects is quite interesting for many applications. This post focuses on how to chain two effects that work well together: Artifact Reduction and Upscaler. Another example would be running Video Noise Removal and Super Resolution or Upscaler for a noisy webcam stream. You can pick and choose the effects that best fit your use case.
Here’s more about the API and its usage. Figure 6 shows the high-level process of using the functions from the Video Effects SDK:
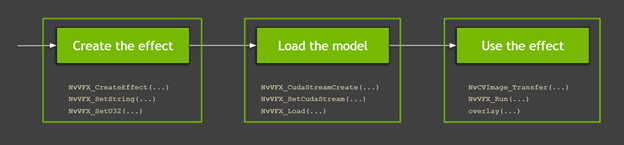
The following video covers this flow, but this process has many granular details, which we discuss later in this post. Also, the video touches on the basics that you must know while working with GPUs and API details for the Maxine virtual background. All code examples in this post are available in the SDK sample applications.
The first step is creating the effects to use. In this post, we discuss Artifact Reduction and Upscaler. You can create an instance of the specified type of video effect filter with the NvVFX_CreateEffect function. This function requires an effect selector and returns the effect handle. The effect selector is a string with which you can pick the effect to create.
NvVFX_Handle _arEff;
NvVFX_Handle _upscaleEff;
NvVFX_EffectSelector first;
NvVFX_EffectSelector second;

NvVFX_CreateEffect(first, &_arEff);
NvVFX_CreateEffect(second, &_upscaleEff);
Then, use the NvVFX_SetString function to specify the location of the model for the feature.
NvVFX_SetString(_arEff, NVVFX_MODEL_DIRECTORY, modelDir);
NvVFX_SetString(_upscaleEff, NVVFX_MODEL_DIRECTORY, modelDir);
Most of the Video Effects SDK features have modes. These modes, as discussed previously, are essentially two different variants of the same effect. In this case, Artifact Reduction has two modes that you can set with the NvVFX_SetU32 function. In the case of Upscaler, this is a floating-point that can be set to any number between 0 and 1 using the NvVFX_SetF32 function.
int FLAG_arStrength = 0;
float FLAG_upscaleStrength= 0.2f;

NvVFX_SetU32(_arEff, NVVFX_STRENGTH, FLAG_arStrength);
NvVFX_SetF32(_upscaleEff, NVVFX_STRENGTH, FLAG_upscaleStrength);
As the effects have been created, here’s how to use CUDA and load the models. A CUDA stream is a set of operations executed in the exact sequence in which they were issued. With that in mind, the first step is to create this stream. You can create this stream with the NvVFX_CudaStreamCreate function.
CUstream _stream;
NvVFX_CudaStreamCreate(&_stream);
Now that you have the stream, assign the effects to the stream. You achieve this with the NvVFX_SetCudaStream function.
NvVFX_SetCudaStream(_arEff, NVVFX_CUDA_STREAM, stream));
NvVFX_SetCudaStream(_upscaleEff, NVVFX_CUDA_STREAM, stream);
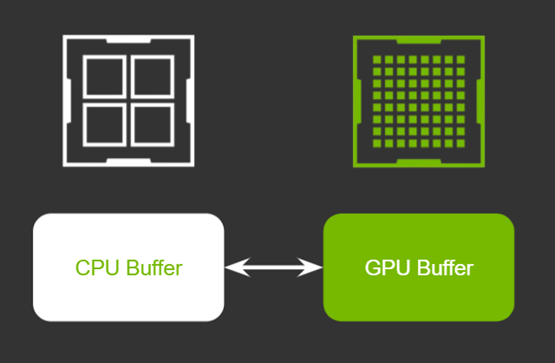
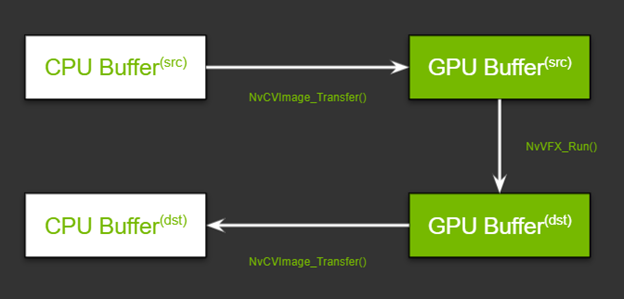
Now that a CUDA stream is in place, here’s how to move data. In this case, you are moving image frames. If you are new to GPUs, you might ask, “Why and where we are moving the data?”
GPUs typically have their own dedicated video RAM (VRAM). This is like the usual RAM that is plugged into the motherboard of a system. The key advantage of having dedicated VRAM is that the data stored in this memory is processed significantly faster than the data on a regular RAM. When we say, “Move the data from CPU memory to GPU memory,” we are referring to the memory transfers between these two types of RAM.
In a typical scenario using a single effect, this transfer would be effortless, requiring two CPU memory buffers and two GPU buffers. In both cases, one would be for the source and the other would be for the processed frame.
As you are chaining the features that require two different image pixel layouts, there is an added layer of complexity. You must have two more buffers on the GPU, one to store the output frame for the first effect and the other to store the input of the second effect. Figure 9 shows the flow. Don’t worry about the function names just yet; we review them in the Run the effects section later in this post.
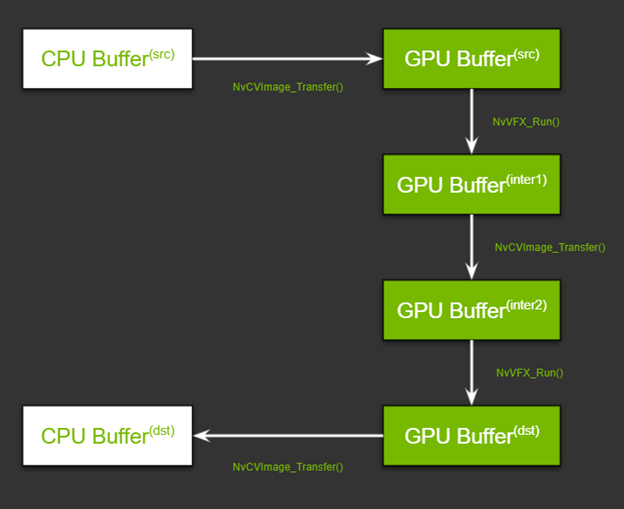
With this high-level understanding in mind, here’s how set up the pipeline. There are two steps in setting up this pipeline: allocating memory and specifying the input and output buffers.
First, allocate memory for the GPU buffers, using the NvCVImage_Alloc function.
NvCVImage _srcGpuBuf;
NvCVImage _interGpuBGRf32pl;
NvCVImage _interGpuRGBAu8;
NvCVImage _dstGpuBuf;

// GPU Source Buffer
NvCVImage_Alloc(&_srcGpuBuf, _srcImg.cols, _srcImg.rows, NVCV_BGR, NVCV_F32, NVCV_PLANAR, NVCV_GPU, 1);

// GPU Intermediate1 Buffer
NvCVImage_Alloc(&_interGpuBGRf32pl, _srcImg.cols, _srcImg.rows, NVCV_BGR, NVCV_F32, NVCV_PLANAR, NVCV_GPU, 1);

// GPU Intermediate2 Buffer
NvCVImage_Alloc(&_interGpuRGBAu8, _srcImg.cols, _srcImg.rows, NVCV_RGBA, NVCV_U8, NVCV_INTERLEAVED, NVCV_GPU, 32);

// GPU Destination Buffer
NvCVImage_Alloc(&_dstGpuBuf, _dstImg.cols, _dstImg.rows, NVCV_RGBA, NVCV_U8, NVCV_INTERLEAVED, NVCV_GPU, 32);
That seems like a complicated function, but on a high level, you are specifying basic parameters for the desired type of buffer for the given type of image frame. For example, is it an RGBA image? Does each component have 8 bits? Are the bits in a planar, chunky, or any other format? For more information about specifics, see Setting the Input and Output Image Buffers.
Second, specify the input and output buffers that you created for each effect, using the NvVFX_SetImage function.
// Setting buffers for
NvVFX_SetImage(_arEff, NVVFX_INPUT_IMAGE,  &_srcGpuBuf);
NvVFX_SetImage(_arEff, NVVFX_OUTPUT_IMAGE, &_interGpuBGRf32pl);

NvVFX_SetImage(_upscaleEff, NVVFX_INPUT_IMAGE, &_interGpuRGBAu8);
NvVFX_SetImage(_upscaleEff, NVVFX_OUTPUT_IMAGE, &_dstGpuBuf);
Lastly, load the models. The NvVFX_Load function does the same. It also validates if the parameters selected for effect are valid.
NvVFX_Load(_arEff);
NvVFX_Load(_upscaleEff);
Now that the pipeline is set up, you can proceed to run the effects. Move the frames from the CPU/GPU source into the corresponding input buffer. The NvCVImage_Transfer function can be used to move the frames, and the NvVFX_Run function is used to run the effect.
// Frame moves from CPU buffer to GPU src buffer
NvCVImage_Transfer(&_srcVFX, &_srcGpuBuf, 1.f/255.f, stream, &_tmpVFX);

// Running Artifact Reduction
NvVFX_Run(_arEff, 0);

// Frame moves from GPU intermediate buffer 1 to buffer 2
NvCVImage_Transfer(&_interGpuBGRf32pl, &_interGpuRGBAu8, 255.f, stream, &_tmpVFX);

// Running Upscaler
NvVFX_Run(_upscaleEff, 0));

// Frame moves from GPU destination buffer to CPU buffer
NvCVImage_Transfer(&_dstGpuBuf, &_dstVFX, 1.f, stream, &_tmpVFX));
On the first pass, it might seem that there are multiple moving parts, but there are only three major steps: creating the effect, setting up CUDA streams along with managing the data flow, and finally running the effects.
All three of the Maxine SDKs—Video Effects SDK, Audio Effects SDK, and Augmented Reality SDK—are designed similarly. You can apply this same concept to the Audio Effects and Augmented Reality SDKs with minor modifications.
As demonstrated in this post, the Maxine Video Effects SDK provides many AI features that enable you to take a noisy low-resolution video and deliver high-quality video to your end users. Furthermore, you can chain multiple effects together and create a video pipeline. To apply these visual effects to your video conferencing, streaming, or telecommunication applications, see Maxine Getting Started page. Let us know what you think or if you have any questions.
Multimodal visio-linguistic models rely on rich datasets in order to model the relationship between images and text. Traditionally, these datasets have been created by either manually captioning images, or crawling the web and extracting the alt-text as the caption. While the former approach tends to result in higher quality data, the intensive manual annotation process limits the amount of data that can be created. On the other hand, the automated extraction approach can lead to bigger datasets, but these require either heuristics and careful filtering to ensure data quality or scaling-up models to achieve strong performance. An additional shortcoming of existing datasets is the dearth of coverage in non-English languages. This naturally led us to ask: Can one overcome these limitations and create a high-quality, large-sized, multilingual dataset with a variety of content?
Today we introduce the Wikipedia-Based Image Text (WIT) Dataset, a large multimodal dataset, created by extracting multiple different text selections associated with an image from Wikipedia articles and Wikimedia image links. This was accompanied by rigorous filtering to only retain high quality image-text sets. As detailed in “WIT: Wikipedia-based Image Text Dataset for Multimodal Multilingual Machine Learning”, presented at SIGIR ‘21, this resulted in a curated set of 37.5 million entity-rich image-text examples with 11.5 million unique images across 108 languages. The WIT dataset is available for download and use under the Creative Commons license. We are also excited to announce that we are hosting a competition with the WIT dataset in Kaggle in collaboration with Wikimedia Research and other external collaborators.
| Dataset | Images | Text | Contextual Text | Languages |
| Flickr30K | 32K | 158K | – | < 8 |
| SBU Captions | 1M | 1M | – | 1 |
| MS-COCO | 330K | 1.5M | – | < 4; 7 (test only) |
| CC-3M CC-12M |
3.3M 12M |
3.3M 12M |
– – |
1 1 |
| WIT | 11.5M | 37.5M | ~119M | 108 |
| WIT’s increased language coverage and larger size relative to previous datasets. |
The unique advantages of the WIT dataset are:
Generating the Dataset
The main goal of WIT was to create a large dataset without sacrificing on quality or coverage of concepts. Thus, we started by leveraging the largest online encyclopedia available today: Wikipedia.
For an example of the depth of information available, consider the Wikipedia page for Half Dome (Yosemite National Park, CA). As shown below, the article has numerous interesting text captions and relevant contextual information for the image, such as the page title, main page description, and other contextual information and metadata.
 |
| Example wikipedia page with various image-associated text selections and contexts we can extract. From the Wikipedia page for Half Dome : Photo by DAVID ILIFF. License: CC BY-SA 3.0. |
 |
| Example of the Wikipedia page for this specific image of Half Dome. From the Wikipedia page for Half Dome : Photo by DAVID ILIFF. License: CC BY-SA 3.0. |
We started by selecting Wikipedia pages that have images, then extracted various image-text associations and surrounding contexts. To further refine the data, we performed a rigorous filtering process to ensure data quality. This included text-based filtering to ensure caption availability, length and quality (e.g., by removing generic default filler text); image-based filtering to ensure each image is a certain size with permissible licensing; and finally, image-and-text-entity–based filtering to ensure suitability for research (e.g., excluding those classified as hate speech). We further randomly sampled image-caption sets for evaluation by human editors, who overwhelmingly agreed that 98% of the samples had good image-caption alignment.
Highly Multilingual
With data in 108 languages, WIT is the first large-scale, multilingual, multimodal dataset.
| # of Image-Text Sets | Unique Languages | # of Images | Unique Languages |
| > 1M | 9 | > 1M | 6 |
| 500K – 1M | 10 | 500K – 1M | 12 |
| 100K – 500K | 36 | 100K – 500K | 35 |
| 50K – 100K | 15 | 50K – 100K | 17 |
| 14K – 50K | 38 | 13K – 50K | 38 |
| WIT: coverage statistics across languages. |
 |
| Example of an image that is present in more than a dozen Wikipedia pages across >12 languages. From the Wikipedia page for Wolfgang Amadeus Mozart. |
The First Contextual Image-Text Dataset
Most multimodal datasets only offer a single text caption (or multiple versions of a similar caption) for the given image. WIT is the first dataset to provide contextual information, which can help researchers model the effect of context on image captions as well as the choice of images.
 |
| WIT dataset example showing image-text data and additional contextual information. |
In particular, key textual fields of WIT that may be useful for research include:
WIT has broad coverage across these different fields, as shown below.
| Image-Text Fields of WIT | Train | Val | Test | Total / Unique |
| Rows / Tuples | 37.1M | 261.8K | 210.7K | 37.6M |
| Unique Images | 11.4M | 58K | 57K | 11.5M |
| Reference Descriptions | 16.9M | 150K | 104K | 17.2M / 16.7M |
| Attribution Descriptions | 34.8M | 193K | 200K | 35.2M / 10.9M |
| Alt-Text | 5.3M | 29K | 29K | 5.4M / 5.3M |
| Context Texts | – | – | – | 119.8M |
| Key fields of WIT include both text captions and contextual information. |
A High-Quality Training Set and a Challenging Evaluation Benchmark
The broad coverage of diverse concepts in Wikipedia means that the WIT evaluation sets serve as a challenging benchmark, even for state-of-the-art models. We found that for image-text retrieval, the mean recall scores for traditional datasets were in the 80s, whereas for the WIT test set, it was in the 40s for well-resourced languages and in the 30s for the under-resourced languages. We hope this in turn can help researchers to build stronger, more robust models.
WIT Dataset and Competition with Wikimedia and Kaggle
Additionally, we are happy to announce that we are partnering with Wikimedia Research and a few external collaborators to organize a competition with the WIT test set. We are hosting this competition in Kaggle. The competition is an image-text retrieval task. Given a set of images and text captions, the task is to retrieve the appropriate caption(s) for each image.
To enable research in this area, Wikipedia has kindly made available images at 300-pixel resolution and a Resnet-50–based image embeddings for most of the training and the test dataset. Kaggle will be hosting all this image data in addition to the WIT dataset itself and will provide colab notebooks. Further, the competitors will have access to a discussion forum in Kaggle in order to share code and collaborate. This enables anyone interested in multimodality to get started and run experiments easily. We are excited and looking forward to what will result from the WIT dataset and the Wikipedia images in the Kaggle platform.
Conclusion
We believe that the WIT dataset will aid researchers in building better multimodal multilingual models and in identifying better learning and representation techniques, ultimately leading to improved Machine Learning models in real-world tasks over visio-linguistic data. For any questions, please contact wit-dataset@google.com. We would love to hear about how you are using the WIT dataset.
Acknowledgements
We would like to thank our co-authors in Google Research: Jiecao Chen, Michael Bendersky and Marc Najork. We thank Beer Changpinyo, Corinna Cortes, Joshua Gang, Chao Jia, Ashwin Kakarla, Mike Lee, Zhen Li, Piyush Sharma, Radu Soricut, Ashish Vaswani, Yinfei Yang, and our reviewers for their insightful feedback and comments.
We thank Miriam Redi and Leila Zia from Wikimedia Research for collaborating with us on the competition and providing image pixels and image embedding data. We thank Addison Howard and Walter Reade for helping us host this competition in Kaggle. We also thank Diane Larlus (Naver Labs Europe (NLE)), Yannis Kalantidis (NLE), Stéphane Clinchant (NLE), Tiziano Piccardi Ph.D. student at EPFL, Lucie-Aimée Kaffee PhD student at University of Southampton and Yacine Jernite (Hugging Face) for their valuable contribution towards the competition.

 Maxine’s Audio Effects SDK enables you to build applications that integrate features such as noise removal and room echo removal into your applications to improve audio quality. This post showcases these effects and how to build applications that provide high audio quality.
With audio and video streaming, conferencing, and telecommunication on the rise, it has become essential for developers to build applications with outstanding audio quality and enable end users to communicate and collaborate effectively. Various background noises can disrupt communication, ranging from traffic and construction to dogs barking and babies crying. Moreover, a user could talk in a large room that amplifies echoes.
NVIDIA Maxine offers an easy-to-use Audio Effects SDK with AI neural network audio quality enhancement algorithms to address poor audio quality in virtual collaboration and content creation applications. With the Audio Effects SDK, you can remove virtually any type of noise, including room echo, and build applications that enable easy-to-understand conversations and productive meetings.
In this post, you learn how to build high audio-quality applications using containers on Linux or SDK on Windows platforms. All are demonstrated with prebuilt sample applications.
The Maxine Audio Effects SDK enables you to integrate noise removal, and room echo removal features for narrowband, wideband, and ultra-wideband audio into your applications.
As we have started working from home more, there are many potential noise sources in the background of our calls, such as the sound of keystrokes or the compressor of an air conditioner. The distractions around us become a part of our surroundings, like slamming doors, moving furniture, or vacuuming.
With the Noise Removal effect, you can remove different noise profiles from audio streams while retaining the emotional aspects of the speaker’s voice. For example, when an end user is excited and pitching the new idea in an elevated tone with an air conditioner in the background, noise removal retains only the speaker’s voice.
When a person speaks in a closed room, the sound bounces off all the surrounding surfaces. How much the voice gets absorbed, dampened, or continues to reflect for multiple iterations depends upon the surfaces’ size, geometry, and material. Such continued sound wave reflections build up over time and cause reverberations.
The echo is more noticeable in large rooms with more reflective surfaces, such as concrete or stone walls. For example, think about the voice sound reverberations in a high-ceiling cathedral. Such reverberant voices are unsuitable for popularly used speech encoding methods such as linear predictive coding or code-excited linear prediction. The encoding of reverberant speech results in severe distortions, rendering voices unintelligible in extreme cases.
It is essential to remove such reverberations from the voice recording before sending it. In situations where echo removal is not possible before encoding, it is essential to remove as much of the echo as possible before rendering the decoded voice through the speaker to the listener. The Room Echo Cancellation effect eliminates unwanted echoes from speech when users talk in a reverberant environment. In addition, this feature supports wideband and ultra-wideband signals.
You can combine the noise removal and room echo removal features for better end-to-end audio quality in both directions.
Using containers with Kubernetes provides a robust and easy-to-scale deployment strategy. We offer the Maxine Audio Effects SDK for Windows and Linux platforms in addition to prepackaged containers. The benefits of using containers are high scalability and time and cost savings due to faster deployment and reduced maintenance time. In addition, because of the prepackaged nature of containers, you don’t have to worry about specific installations inside the container.
In this post, we focus on how to use the Audio Effects SDK containers. Before proceeding with the installation, make sure that you meet all the hardware requirements.
If you have considerable experience with NVIDIA TensorRT and cuDNN and want to deploy the Audio Effects SDK on a bare-metal Linux system, download the SDK for your specific platform on the Maxine Getting Started page.
There are four steps to install and take advantage of high-performance Audio Effects SDK and its state-of-the-art AI models on containers:
You need access to NVIDIA Turing, NVIDIA Volta, or NVIDIA Ampere Architecture generation data center GPUs: T4, V100, A100, A10, or A30.
Installing the SDK on Windows is a straightforward process:
You must have an NVIDIA RTX card to benefit from the accelerated throughput and reduced latency of the Audio Effects SDK on Windows. To run this SDK on a datacenter card like A100, use the Linux package.
The Audio Effects SDK comes with the prebuilt effects_demo and effects_delayed_streams_demo sample applications to demonstrate how to use the SDK. You can also build your own sample application. In this post, we focus on running the effects_demo sample application.
The effects_demo application demonstrates how to use the SDK to apply effects to audio. It can be used to apply Noise Removal, Room Echo Cancellation, or both effects combined to input audio files and write the outputs to file.
To run this application, navigate to the samples/effects_demo directory and run the application using one of the following scripts:
$ ./run_effect.sh -a turing -s 16 -b 1 -e denoiser
$ ./run_effect.sh -a turing -s 48 -b 1 -e dereverb
$ ./run_effect.sh -a turing -s 16 -b 400 -e denoiser
$ ./run_effect.sh -a turing -s 48 -b 400 -e dereverb_denoiser
The run_effect.sh bash script accepts the following arguments:
-a: Architecture can be NVIDIA Turing, NVIDIA Volta, A100, or A10, depending on your GPU.-s: Sample rate to use 48/16 in KHz.-b: Batch size.-e: Effect to run:
denoiser (NR)dereverb (RER)dereverb_denoiser (combined)You can also execute the effects_demo binary by passing a configuration file as follows:
# For running denoiser on NVIDIA Turing GPU with 48kHz input and batch size 1
$ ./effects_demo -c turing_denoise48k_1_cfg.txt
This config file should contain the following parameters:
effect sample_rate model : Models are available in the /usr/local/AudioFX/models directory within the container.real_time : Simulates audio reception from the physical device or stream.intensity_ratio : Specifies the denoising intensity ratio.input_wav_listoutput_wav_listAfter you run the effects_demo sample application, the denoised output files are available in the same directory as the executable.
The effects_delayed_streams_demo application demonstrates handling delayed streams. In telecommunication, where the user’s audio might not reach the server in real time, we recommend applying the denoising effect in a delayed manner. In this sample application, each of the input streams fall under one of the following categories:
one_step_delay_streams: These streams have a delay of one frame. For example, if the frame size is 5 ms, these streams have a delay of 5 ms.two_step_delay_streams: These streams have a delay of two frames. For example, if the frame size is 5 ms, these streams have a delay of 10 ms.always_active_streams: These streams have no delay and are always active.To run this application, navigate to the samples/effects_delayed_streams_demo directory and execute the binary as follows:
$ ./effects_delayed_streams_demo -c config-file
Here, -c config-file is the path to the configuration file, for example, turing_denoise48k_10_cfg.txt. The configuration file accepts the following parameters:
effect frame_size: An unsigned integer that specifies the number of samples per frame per audio stream for the audio effect.sample_rate model : Models are available in the /usr/local/AudioFX/models directory within the container.one_step_delay_streams: Specifies the stream identifiers that belong to the one_step_delay_streams category.two_step_delay_streams: Specifies the stream identifiers that belong to the two_step_delay_streams category.input_wav_listoutput_wav_listAfter you run the effects_delayed_streams_demo sample application, the denoised output files are available in the same directory as the executable.
The sample applications use easy-to-use Audio Effects SDK APIs to run the effects. They capitalize on significant performance advantages and control over batching of low-level APIs. Creating and running the audio effects in Maxine is a simple three-step process (Figure 1).
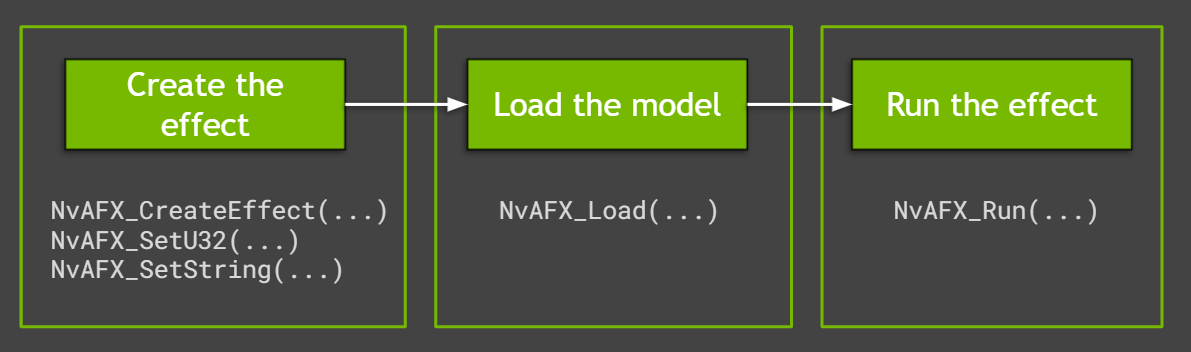
To create the effect for either noise removal or room echo removal, call the NvAFX_CreateEffect function that takes a handle with the required parameters. This function returns the status code after creating the desired effect. Check for any errors using this status code before proceeding further.
// Create and handle

NvAFX_Handle handle;

// Call CreateEffect function and pass any one of the desired effects:
// NVAFX_EFFECT_DENOISER, NVAFX_EFFECT_DEREVERB,
// NVAFX_EFFECT_DEREVERB_DENOISER

NvAFX_Status err = NvAFX_CreateEffect(NVAFX_EFFECT_DENOISER, &handle);
Each provided model supports a specific audio sample rate that can be specified by calling NvAFX_SetU32. The sample_rate value should be an unsigned 32-bit integer value (48000/16000). Additionally, the proper model path for the GPU platform used should be passed using the NvAFX_SetString API call as follows:
// Pass parameter selector NVAFX_PARAM_SAMPLE_RATE and unsigned int
// Pass parameter selector NVAFX_PARAM_MODEL_PATH and character string
NvAFX_Status err;
err = NvAFX_SetU32(handle, NVAFX_PARAM_SAMPLE_RATE, sample_rate);
err = NvAFX_SetString(handle, NVAFX_PARAM_MODEL_PATH, model_file.c_str());
As the number of I/O audio channels and the number of samples per frame are preset for each effect, you must pass these parameters to the effects function. To get the list of supported values, call the NvAFX_GetU32 function, which returns the list of preset values.
// Pass the selector string to get specific information like:
// NVAFX_PARAM_NUM_SAMPLES_PER_FRAME,
// NVAFX_PARAM_NUM_CHANNELS,

unsigned num_samples_per_frame, num_channels;
NvAFX_Status err;
err = NvAFX_GetU32(handle, NVAFX_PARAM_NUM_SAMPLES_PER_FRAME,
&num_samples_per_frame);
err = NvAFX_GetU32(handle, NVAFX_PARAM_NUM_CHANNELS, &num_channels);
To run the effect on a GPU, you must get the list of supported devices using the NvAFX_GetSupportedDevices function, which fetches the number of supported GPUs.
// The function fills the array with the CUDA device indices of devices
// that are supported by the model, in descending order of preference,
// where the first device is the most preferred device.

int numSupportedDevices = 0;
NvAFX_GetSupportedDevices(handle, &numSupportedDevices, nullptr);
std::vector ret(num);
NvAFX_GetSupportedDevices(handle, &numSupportedDevices, ret.data());
You can then set the GPU device to be used by passing the correct GPU device number, as follows:
NvAFX_SetU32(handle, NVAFX_PARAM_USE_DEFAULT_GPU, use_default_gpu_)
After the effect is created, the model must be loaded using the NvAFX_Load function. Loading an effect selects and loads a model and validates the parameters that were set for the effect. This function loads the model into the GPU memory and makes it ready for inference. To load an audio effect, call the NvAFX_Load function and specify the effect handle that was created.
NvAFX_Status err = NvAFX_Load(handle);
Finally, run the loaded audio effect to apply the desired effect on the input data. After an effect is run, the contents of the input memory buffer are read, the audio effect is applied, and the output is written to the output memory buffer. Call the NvAFX_Run function for running the loaded audio effect on the input buffer.
// Pass the effect handle, input, and output memory buffer, and the parameters of the effect

NvAFX_Status err = NvAFX_Run(handle, input, output, num_samples,num_channels);
After the audio effect is applied on the input memory buffer and is no longer required, clean up the resources using the NvAFX_DestroyEffect(handle) function call by passing the effect handle.
NvAFX_Status err = NvAFX_DestroyEffect(handle);
Now that we have explored details on Maxine Audio Effects features, shown you how to run the sample applications with appropriate parameters, and explored the easy-to-use, high-performance API, you can start integrating these amazing AI audio features into your applications using Maxine containers or bare metal on Windows, and on Linux.
For more information, see the Maxine Getting Started page. Let us know what you think or if you have any questions.
Of the 8.3 billion tons of virgin plastic waste created each year, despite decades of efforts to reduce the amount that ends up in landfills, only about 9 percent gets recycled. London-based computer vision startup Recycleye looks to give those recycling numbers a big boost with its AI-driven system for identifying waste materials. By automating Read article >
The post Trash Talk: Startup’s AI-Driven Detection System Primed to Take a Bite Out of Global Waste appeared first on The Official NVIDIA Blog.
When working on future skyscrapers, bridges or other projects, Kohn Pedersen Fox looks beyond traditional processes. The global architecture firm aims to find the most creative and optimal design using advanced technologies like generative design, deep learning and immersive visualization. And during design reviews, KPF relies on collaborative sessions so their teams, clients and stakeholders Read article >
The post Architecture Firm Brings New Structure to Design Workflows With Real-Time Rendering and Virtual Collaboration appeared first on The Official NVIDIA Blog.
NVIDIA Canvas, the AI-powered painting app that enables artists to paint by material, using AI to turn doodles into beautiful artwork, released an update today introducing custom styles. Now users can apply the look and feel or “style” of their own images to their final Canvas painting. Supporting the new Canvas update is the September Read article >
The post Find the Love We Shared in September: NVIDIA Canvas Update Paints With New Styles appeared first on The Official NVIDIA Blog.
This post is a follow up on this one: https://www.reddit.com/r/tensorflow/comments/pk5dqj/custom_loss_function_error_attributeerror/
Basically I need to compute 3 derivatives of the ANN I’m training with respect to (wrt) some input variables. I need those derivatives for a custom loss function.
I finally managed to calculate the 2 first order partial derivatives. The problem is in the second order derivative. It returns NoneType and I don’t know why. I’ve already tried different examples to no avail. For example tried the Jacobian (https://www.tensorflow.org/api_docs/python/tf/GradientTape#jacobian).
import pandas as pd from tensorflow import keras import tensorflow as tf from tensorflow.keras import layers, losses import numpy as np # Hyperparameters n_hidden_layers = 2 # Number of hidden layers. n_units = 128 # Number of neurons of the hidden layers. n_batch = 64 # Number of observations used per gradient update. n_epochs = 30 # Sample data x_train = {'strike': [200, 2925], 'Time to Maturity': [0.312329, 0.0356164], "RF Rate": [0.08, 2.97], "Sigma 20 Days Annualized": [0.123251, 0.0837898], "Underlying Price": [1494.82, 2840.69] } call_X_train = pd.DataFrame(x_train, columns = ['strike', "Time to Maturity", "RF Rate", "Sigma 20 Days Annualized", "Underlying Price"] ) x_test = {'strike': [200], 'Time to Maturity': [0.0356164], "RF Rate": [2.97], "Sigma 20 Days Annualized": [0.0837898], "Underlying Price": [2840.69] } call_X_test = pd.DataFrame(x_test, columns = ['strike', "Time to Maturity", "RF Rate", "Sigma 20 Days Annualized", "Underlying Price"] ) y_train = np.array([1285.25, 0.8]) call_y_train = pd.Series(y_train) y_test = np.array([0.8]) call_y_test = pd.Series(y_test) # Creates hidden layers def hl(tensor, n_units): hl_output = layers.Dense(n_units, activation = layers.LeakyReLU(alpha = 1))(tensor) # alpha = 1 makes the function LeakyReLU C^inf return hl_output # Create model using Keras' Functional API def mlp3_call(n_hidden_layers, n_units): # Create input layer inputs = keras.Input(shape = (call_X_train.shape[1],)) x = layers.LeakyReLU(alpha = 1)(inputs) # Create hidden layers for _ in range(n_hidden_layers): x = hl(x, n_units) # Create output layer outputs = layers.Dense(1, activation = keras.activations.softplus)(x) # Actually create the model model = keras.Model(inputs=inputs, outputs=outputs) return model # Custom loss function def constrained_mse(y_true, y_pred): mse = losses.mse(y_true, y_pred) x = tf.convert_to_tensor(call_X_train, np.float32) with tf.GradientTape() as tape: tape.watch(x) with tf.GradientTape(persistent=True) as tape2: tape2.watch(x) y = model(x) grad_y = tape2.gradient(y, x) dy_dstrike = grad_y[0, 0] dy_dttm = grad_y[0, 1] d2y_dstrike2 = tape.gradient(dy_dstrike, x[:,0]) loss = mse + dy_dstrike + dy_dttm + d2y_dstrike2 return loss model = mlp3_call(n_hidden_layers, n_units) model.compile(loss = constrained_mse, optimizer = keras.optimizers.Adam(),) history = model.fit(call_X_train, call_y_train, batch_size = n_batch, epochs = n_epochs, validation_split = 0.01, verbose = 1)
submitted by /u/Snoo37084
[visit reddit] [comments]