Trying to write a custom Keras layer to perform RoI pooling quickly. I have an implementation that relies on repeated tf.map_fn() calls but it is painfully slow. I’ve seen some that use ordinary Python for-loops and I thought I’d try my own. Executed on its own using a model that consists only of this custom layer, it works just fine. However when used in a training loop (where I repeatedly call Model.predict_on_batch and Model.train_on_batch), it produces bizarre results.
It’s quite difficult to figure out what exactly is going on because reading the layer output is non-trivial and I suspect is giving me a result different than what Keras sees during training.
So I’ve inserted a print statement and notice that during training, it will produce numerical tensors on some steps, e.g.:
tf.Tensor( [8.87275487e-02 0.00000000e+00 0.00000000e+00 0.00000000e+00 6.44880116e-01 0.00000000e+00 2.37839603e+00 0.00000000e+00 0.00000000e+00 2.50582743e+00 0.00000000e+00 0.00000000e+00 4.21218348e+00 0.00000000e+00 0.00000000e+00 0.00000000e+00 0.00000000e+00 4.73125458e+00 0.00000000e+00 0.00000000e+00 0.00000000e+00 0.00000000e+00 9.98033524e-01 0.00000000e+00 0.00000000e+00 0.00000000e+00 4.39077109e-01 0.00000000e+00 0.00000000e+00 0.00000000e+00 1.72268832e+00 0.00000000e+00 1.20860779e+00 0.00000000e+00 0.00000000e+00 2.05427575e+00 0.00000000e+00 0.00000000e+00 0.00000000e+00 0.00000000e+00 0.00000000e+00 0.00000000e+00 0.00000000e+00 0.00000000e+00 2.32518530e+00 0.00000000e+00 8.84961128e-01 0.00000000e+00 0.00000000e+00 1.05681539e+00 0.00000000e+00 0.00000000e+00 0.00000000e+00 0.00000000e+00 3.33451724e+00 1.71899879e+00 0.00000000e+00 0.00000000e+00 0.00000000e+00 9.97039509e+00
But on most steps I see this:
Tensor("model_3/roi_pool/map/while/Max:0", shape=(512,), dtype=float32) Tensor("model_3/roi_pool/map/while/Max_1:0", shape=(512,), dtype=float32) Tensor("model_3/roi_pool/map/while/Max_2:0", shape=(512,), dtype=float32) Tensor("model_3/roi_pool/map/while/Max_3:0", shape=(512,), dtype=float32) Tensor("model_3/roi_pool/map/while/Max_4:0", shape=(512,), dtype=float32) Tensor("model_3/roi_pool/map/while/Max_5:0", shape=(512,), dtype=float32)
I believe these are tensor objects being used to construct a compute graph for deferred execution? I’m not sure why it is choosing to do this on most steps but not all.
This is causing training to fail to progress because it behaves similarly to returning a tensor full of zeros.
My layer code:
“` class RoIPoolingLayer(Layer): “”” Input shape: Two tensors [xmaps, x_rois] each with shape: x_maps: (samples, height, width, channels), representing the feature maps for this batch, of type tf.float32 x_rois: (samples, num_rois, 4), where RoIs have the ordering (y, x, height, width), all tf.int32 Output shape: (samples, num_rois, pool_size, pool_size, channels) “”” def __init(self, pool_size, **kwargs): self.pool_size = pool_size super().init_(**kwargs)
def get_config(self): config = { “pool_size”: self.pool_size, } base_config = super(RoIPoolingLayer, self).get_config() return dict(list(base_config.items()) + list(config.items()))
def compute_output_shape(self, input_shape): map_shape, rois_shape = input_shape assert len(map_shape) == 4 and len(rois_shape) == 3 and rois_shape[2] == 4 assert map_shape[0] == rois_shape[0] # same number of samples num_samples = map_shape[0] num_channels = map_shape[3] num_rois = rois_shape[1] return (num_samples, num_rois, self.pool_size, self.pool_size, num_channels)
def call(self, inputs): return tf.map_fn( fn = lambda input_pair: RoIPoolingLayer._compute_pooled_rois(feature_map = input_pair[0], rois = input_pair[1], pool_size = self.pool_size), elems = inputs, fn_output_signature = tf.float32 # this is absolutely required else the fn type inference seems to fail spectacularly )
def _compute_pooled_rois(feature_map, rois, pool_size): num_channels = feature_map.shape[2] num_rois = rois.shape[0] pools = [] for roi_idx in range(num_rois): region_y = rois[roi_idx, 0] region_x = rois[roi_idx, 1] region_height = rois[roi_idx, 2] region_width = rois[roi_idx, 3] region_of_interest = tf.slice(feature_map, [region_y, region_x, 0], [region_height, region_width, num_channels]) x_step = tf.cast(region_width, dtype = tf.float32) / tf.cast(pool_size, dtype = tf.float32) y_step = tf.cast(region_height, dtype = tf.float32) / tf.cast(pool_size, dtype = tf.float32) for y in range(pool_size): for x in range(pool_size): pool_y_start = y pool_x_start = x
pool_y_start_int = tf.cast(pool_y_start, dtype = tf.int32) pool_x_start_int = tf.cast(pool_x_start, dtype = tf.int32) y_start = tf.cast(pool_y_start * y_step, dtype = tf.int32) x_start = tf.cast(pool_x_start * x_step, dtype = tf.int32) y_end = tf.cond((pool_y_start_int + 1) < pool_size, lambda: tf.cast((pool_y_start + 1) * y_step, dtype = tf.int32), lambda: region_height ) x_end = tf.cond((pool_x_start_int + 1) < pool_size, lambda: tf.cast((pool_x_start + 1) * x_step, dtype = tf.int32), lambda: region_width ) y_size = tf.math.maximum(y_end - y_start, 1) # if RoI is smaller than pool area, y_end - y_start can be less than 1 (0); we want to sample at least one cell x_size = tf.math.maximum(x_end - x_start, 1) pool_cell = tf.slice(region_of_interest, [y_start, x_start, 0], [y_size, x_size, num_channels]) pooled = tf.math.reduce_max(pool_cell, axis=(1,0)) # keep channels independent print(pooled) pools.append(pooled) return tf.reshape(tf.stack(pools, axis = 0), shape = (num_rois, pool_size, pool_size, num_channels))
“`
Note the print statement in the loop.
Strangely, if I build a simple test model consisting of only this layer (i.e., in my unit test), I can verify that it does work:
input_map = Input(shape = (9,8,num_channels)) # input map size input_rois = Input(shape = (num_rois,4), dtype = tf.int32) # N RoIs, each of length 4 (y,x,h,w) output = RoIPoolingLayer(pool_size = pool_size)([input_map, input_rois]) model = Model([input_map, input_rois], output)
I can then call model.predict() on some sample input and I get valid output.
But in a training loop, where I perform a prediction followed by a training step on the trainable layers, it’s not clear what it is doing. My reference implementation works fine (it does not use for-loops).
How can I debug this further?
Thank you 🙂


")
 The most commonly diagnosed cancer in the US today is skin cancer. There are three main variants: melanoma, basal cell carcinoma (BCC), and squamous cell carcinoma (SCC). Though melanoma only accounts for roughly 1% of all skin cancers, it is the most fatal, metastasizing rapidly without early detection and treatment. This makes early detection critical, …
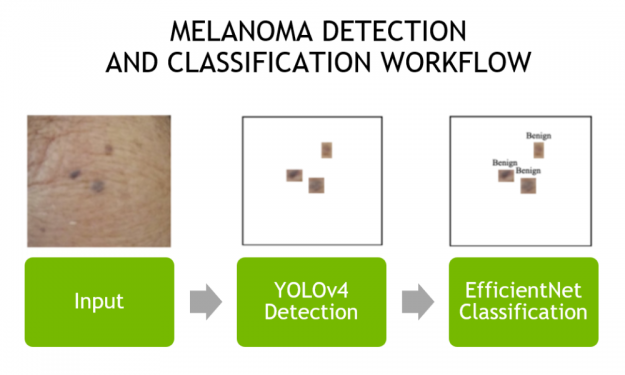
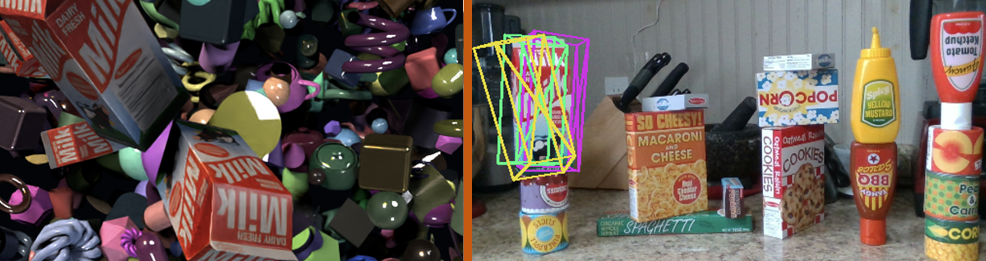
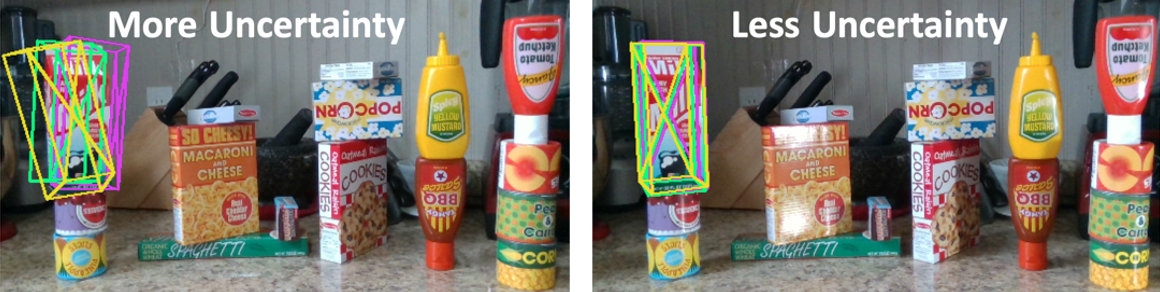
 Researchers from NVIDIA, University of Texas at Austin and Caltech developed a simple, efficient, and plug-and-play uncertainty quantification method for the 6-DoF object pose estimation task, using an ensemble of K pre-trained estimators with different architectures and/or training data sources.
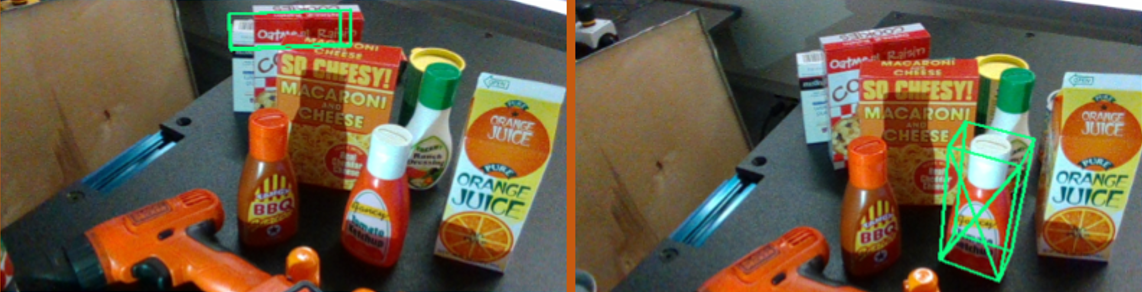
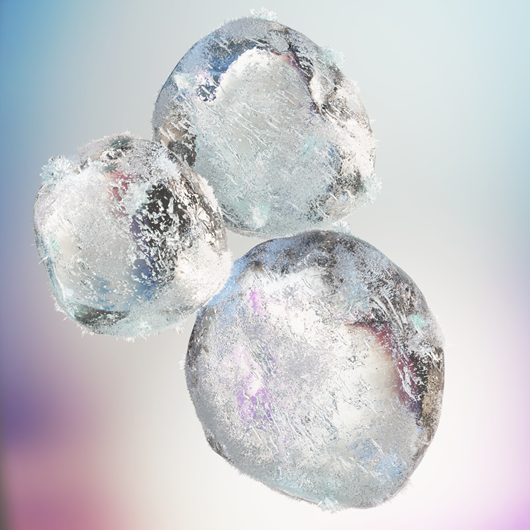
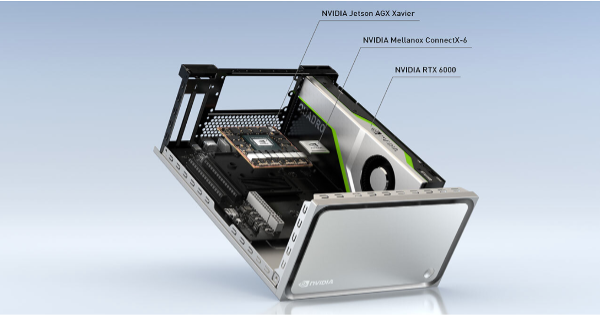
 NVIDIA RTX ray tracing has transformed graphics and rendering. With powerful software applications like Luxion KeyShot, more users can take advantage of RTX technology to speed up graphic workflows — like rendering caustics.