The factories of the future will have a soul — a “digital twin” that blends man and machine in stunning new ways. In a demo blending reality and virtual reality, robotics and AI, to manage one of BMW’s automotive factories, NVIDIA CEO Jensen Huang Monday rolled out a stunning vision of the future of manufacturing. Read article >
NVIDIA technology has been behind some of the world’s most stunning virtual reality experiences. Each new generation of GPUs has raised the bar for VR environments, producing interactive experiences with photorealistic details to bring new levels of productivity, collaboration and fun. And with each GTC, we’ve introduced new technologies and software development kits that help Read article >
Developers can use cuQuantum to speed up quantum circuit simulations based on state vector, density matrix, and tensor network methods by orders of magnitude.
Quantum computing has the potential to offer giant leaps in computational capabilities. Until it becomes a reality, scientists, developers, and researchers are simulating quantum circuits on classical computers.
NVIDIA cuQuantum is an SDK of optimized libraries and tools for accelerating quantum computing workflows. Developers can use cuQuantum to speed up quantum circuit simulations based on state vector, density matrix, and tensor network methods by orders of magnitude.
The research community – including academia, laboratories, and private industry – are all using simulators to help design and verify algorithms to run on quantum computers. These simulators capture the properties of superposition and entanglement and are built on quantum circuit simulation frameworks including Qiskit, Cirq, ProjectQ, Q#, etc.
We showcase accelerated quantum circuit simulation results based on industry estimations, extrapolations, and benchmarks on real-world computers like ORNL’s Summit, and NVIDIA’s Selene, and reference collaborations with numerous industry partners.
“Using the Cotengra/Quimb packages, NVIDIA’s new cuQUANTUM SDK, and the Selene supercomputer, we’ve generated a sample of the Sycamore quantum circuit at depth=20 in record time (less than 10 minutes). This sets the benchmark for quantum circuit simulation performance and will help advance the field of quantum computing by improving our ability to verify the behavior of quantum circuits.”
Johnnie Gray, Research Scientist, Caltech Garnet Chan, Bren Professor of Chemistry, Caltech
Learn more about cuQuantum, our latest benchmark results, and apply for early interest today here.
How to replace the code snippet with TensorFlow 1.14.1 feature_columns = [tf. contrib. layers. real_value_column ( “” , dimension = 98)] in TensorFlow 2.4.1?
The Omniverse platform provides researchers, developers, and engineers with the ability to virtually collaborate and work between different software applications. Omniverse Kaolin is an interactive application that acts as a companion to the NVIDIA Kaolin library, helping 3D deep learning researchers accelerate their process.
The Kaolin app leverages the Omniverse platform, USD format and RTX rendering to provide interactive tools that allow visualizing 3D outputs of any deep learning model as it is training, inspecting 3D datasets to find inconsistencies and gain intuition, and rendering large synthetic datasets from collections of 3D data.
Omniverse Kaolin enables users to reduce the time needed to develop AI research for a wide range of 3D applications.
TRAINING VISUALIZER
The Omniverse Kaolin Training Visualizer extension allows interactive visualization of 3D checkpoints exported using Kaolin Library python API. By scrubbing through iterations, researchers can see the progression of training over time, and visualize multiple textures and labels that may be predicted for each 3D model.
The 3D checkpoints can include meshes, point clouds and voxel grids in any number of categories, with multiple textures and labels supported for meshes. The extension also allows creating and saving custom layouts for visualizing results consistently across experiments.
DATASET VISUALIZER
The performance of machine learning models can depend heavily on the properties of the training data. The Omniverse Kaolin Dataset Visualizer extension allows sampling and visualizing batches from 3D datasets to gain intuition and identify problems that can hinder learning.
DATA GENERATOR
Many machine learning techniques rely on images and ground truth labels for training, and synthetic data is a powerful tool to support such applications. The Omniverse Kaolin Data Generator extension uses NVIDIA RTX ray and path tracing to render massive image datasets from a collection of 3D data, while also exporting custom ground truth labels from a variety of sensors.
OptiX 7.3 brings temporal denoising and improvements to OptiX Curves primitives and new features to the OptiX Demand Loading library
OptiX 7.3 brings temporal denoising and improvements to OptiX Curves primitives and new features to the OptiX Demand Loading library
NVIDIA Optix Ray Tracing Engine is a scalable and seamless framework that offers optimal ray tracing performance on GPUs. In this spring’s update to the OptiX SDK, developers will be able to leverage temporal denoising, faster curve intersectors, and fully asynchronous demand loading library.
Smoother Denoising for Moving Sequences
The OptiX denoiser comes with a brand new denoising mode called temporal denoising, which is engineered to denoise multi-frame animation sequences without getting any of the low-frequency denoiser artifacts in the animation that you get when you denoise animated frames separately. The results are impressively smooth, and this update will be a boon to users of the OptiX denoiser who want to remove noise from moving sequences. This has been one of our most requested features and now it’s here. This release of the OptiX denoiser comes with yet another performance increase as well, and the recent AOV (layered) denoising and brand new temporal denoising are fast enough on the current generation of NVIDIA GPUs to be used in real time for interactive applications, with plenty of room to spare for rendering.
left: Denoising each frame separately; right: Temporal Denoising
Improved Curves For Better Ray Tracing Performance
OptiX 7.3 comes with a round of updates to the curve primitive intersectors. Our new cubic and quadratic curve intersectors are 20% to 80% faster with this release, and even the already very fast linear intersector (up to 2x faster than cubic) has improved in performance a bit as well. All the intersectors now support backface culling by default, which makes it easier for developers to support shadows, transparency, and other lighting effects that depend on reflected and transmitted secondary rays from hair and curves. The best kept secret so far about OptiX curves is how fast they are with OptiX motion blur on the new generation of Ampere GPUs. With Ampere’s new hardware acceleration of motion blur, we’re seeing performance increases on motion blurred hair up to 3x faster than motion blurred hair on Turing cards.
Image courtesy Koke Nunez. Rendered in Otoy Octane.
Faster Object Loading Without Extra GPU Resources
The demand loading library, included with the OptiX 7.3 download, has also received updates. It is now fully asynchronous, with sparse texture tiles loaded in the background by multiple CPU threads in parallel with OptiX kernels executing on the GPU. Support has also been added for multiple streams, which allows for the hiding of texture I/O latency and an easier implementation of bucketed rendering approach. This increased parallelism, in conjunction with additional performance updates present in the OptiX 7.3 SDK should offer a compelling reward for adding demand loading in your projects. A new sample has been added and the existing associated samples have been updated to give you a great place to start.
Image courtesy Daniel Bates. Rendered in Chaos V-Ray
Python plays a key role within the science, engineering, data analytics, and deep learning application ecosystem. NVIDIA has long been committed to helping the Python ecosystem leverage the accelerated massively parallel performance of GPUs to deliver standardized libraries, tools, and applications. Today, we’re introducing another step towards simplification of the developer experience with improved Python … Continued
Python plays a key role within the science, engineering, data analytics, and deep learning application ecosystem. NVIDIA has long been committed to helping the Python ecosystem leverage the accelerated massively parallel performance of GPUs to deliver standardized libraries, tools, and applications. Today, we’re introducing another step towards simplification of the developer experience with improved Python code portability and compatibility.
Our goal is to help unify the Python CUDA ecosystem with a single standard set of low-level interfaces, providing full coverage of and access to the CUDA host APIs from Python. We want to provide an ecosystem foundation to allow interoperability among different accelerated libraries. Most importantly, it should be easy for Python developers to use NVIDIA GPUs.
CUDA Python: The long and winding road
To date, access to CUDA and NVIDIA GPUs through Python could only be accomplished by means of third-party software such as Numba, CuPy, Scikit-CUDA, RAPIDS, PyCUDA, PyTorch, or TensorFlow, just to name a few. Each wrote its own interoperability layer between the CUDA API and Python.
By releasing CUDA Python, NVIDIA is enabling these platform providers to focus on their own value-added products and services. NVIDIA also hopes to lower the barrier to entry for other Python developers to use NVIDIA GPUs. The initial release of CUDA Python includes Cython and Python wrappers for the CUDA Driver and runtime APIs.
In future releases, we may offer a Pythonic object model and wrappers for CUDA libraries (cuBLAS, cuFFT, cuDNN, nvJPEG, and so on). Upcoming releases may also be available with source code on GitHub or packaged through PIP and Conda.
CUDA Python workflow
Because Python is an interpreted language, you need a way to compile the device code into PTX and then extract the function to be called at a later point in the application. It’s not important for understanding CUDA Python, but Parallel Thread Execution (PTX) is a low-level virtual machine and instruction set architecture (ISA). You construct your device code in the form of a string and compile it with NVRTC, a runtime compilation library for CUDA C++. Using the NVIDIA Driver API, manually create a CUDA context and all required resources on the GPU, then launch the compiled CUDA C++ code and retrieve the results from the GPU. Now that you have an overview, jump into a commonly used example for parallel programming: SAXPY.
The first thing to do is import the Driver API and NVRTC modules from the CUDA Python package. In this example, you copy data from the host to device. You need NumPy to store data on the host.
import cuda_driver as cuda  # Subject to change before release
import nvrtc  # Subject to change before release
import numpy as np
Error checking is a fundamental best practice in code development and a code example is provided. For brevity, error checking within the example is omitted. In a future release, this may automatically raise exceptions using a Python object model.
def ASSERT_DRV(err):
    if isinstance(err, cuda.CUresult):
       if err != cuda.CUresult.CUDA_SUCCESS:
           raise RuntimeError("Cuda Error: {}".format(err))
   elif isinstance(err, nvrtc.nvrtcResult):
       if err != nvrtc.nvrtcResult.NVRTC_SUCCESS:
           raise RuntimeError("Nvrtc Error: {}".format(err))
   else:
       raise RuntimeError("Unknown error type: {}".format(err))
It’s common practice to write CUDA kernels near the top of a translation unit, so write it next. The entire kernel is wrapped in triple quotes to form a string. The string is compiled later using NVRTC. This is the only part of CUDA Python that requires some understanding of CUDA C++. For more information, see An Even Easier Introduction to CUDA.
saxpy = """
extern "C" __global__
void saxpy(float a, float *x, float *y, float *out, size_t n)
{
 size_t tid = blockIdx.x * blockDim.x + threadIdx.x;
 if (tid


Go ahead and compile the kernel into PTX. Remember that this is executed at runtime using NVRTC. There are three basic steps to NVRTC:
Create a program from the string.
Compile the program.
Extract PTX from the compiled program.
In the following code example, compilation is targeting compute capability 75, or Turing architecture, with FMAD enabled. If compilation fails, use nvrtcGetProgramLog to retrieve a compile log for additional information.
Before you can use the PTX or do any work on the GPU, you must create a CUDA context. CUDA contexts are analogous to host processes for the device. In the following code example, the Driver API is initialized so that the NVIDIA driver and GPU are accessible. Next, a handle for compute device 0 is passed to cuCtxCreate to designate that GPU for context creation. With the context created, you can proceed in compiling the CUDA kernel using NVRTC.
# Initialize CUDA Driver API
err, = cuda.cuInit(0)

# Retrieve handle for device 0
err, cuDevice = cuda.cuDeviceGet(0)

# Create context
err, context = cuda.cuCtxCreate(0, cuDevice)
With a CUDA context created on device 0, load the PTX generated earlier into a module. A module is analogous to dynamically loaded libraries for the device. After loading into the module, extract a specific kernel with cuModuleGetFunction. It is not uncommon for multiple kernels to reside in PTX.
# Load PTX as module data and retrieve function
ptx = np.char.array(ptx)
err, module = cuda.cuModuleLoadData(ptx.ctypes.get_data())
err, kernel = cuda.cuModuleGetFunction(module, b"saxpy")
Next, get all your data prepared and transferred to the GPU. For increased application performance, you can input data on the device to eliminate data transfers. For completeness, this example shows how you would transfer data to and from the device.
NUM_THREADS = 512  # Threads per block
NUM_BLOCKS = 32768  # Blocks per grid

a = np.array([2.0], dtype=np.float32)
n = np.array(NUM_THREADS * NUM_BLOCKS, dtype=np.uint32)
bufferSize = n * a.itemsize

hX = np.random.rand(n).astype(dtype=np.float32)
hY = np.random.rand(n).astype(dtype=np.float32)
hOut = np.zeros(n).astype(dtype=np.float32)
With the input data a, x, and y created for the SAXPY transform device, resources must be allocated to store the data using cuMemAlloc. To allow for more overlap between compute and data movement, use the asynchronous function cuMemcpyHtoDAsync. It returns control to the CPU immediately following command execution.
Python doesn’t have a natural concept of pointers, yet cuMemcpyHtoDAsync expects void*. Therefore, XX.ctypes.get_data retrieves the pointer value associated with XX.
With data prep and resources allocation finished, the kernel is ready to be launched. To pass the location of the data on the device to the kernel execution configuration, you must retrieve the device pointer. In the following code example, int(dXclass) retries the pointer value of dXclass, which is CUdeviceptr, and assigns a memory size to store this value using np.array.
Like cuMemcpyHtoDAsync, cuLaunchKernel expects void** in the argument list. In the earlier code example, it creates void** by grabbing the void* value of each individual argument and placing them into its own contiguous memory.
# The following code example is not intuitive
# Subject to change in a future release
dX = np.array([int(dXclass)], dtype=np.uint64)
dY = np.array([int(dYclass)], dtype=np.uint64)
dOut = np.array([int(dOutclass)], dtype=np.uint64)

args = [a, dX, dY, dOut, n]
args = np.array([arg.ctypes.get_data() for arg in args], dtype=np.uint64)
Now the kernel can be launched:
err, = cuda.cuLaunchKernel(
   kernel,
   NUM_BLOCKS,  # grid x dim
   1,  # grid y dim
   1,  # grid z dim
   NUM_THREADS,  # block x dim
   1,  # block y dim
   1,  # block z dim
   0,  # dynamic shared memory
   stream,  # stream
   args.ctypes.get_data(),  # kernel arguments
   0,  # extra (ignore)
)

err, = cuda.cuMemcpyDtoHAsync(
   hOut.ctypes.get_data(), dOutclass, bufferSize, stream
)
err, = cuda.cuStreamSynchronize(stream)
The cuLaunchKernel function takes the compiled module kernel and execution configuration parameters. The device code is launched in the same stream as the data transfers. That ensures that the kernel’s compute is performed only after the data has finished transfer, as all API calls and kernel launches within a stream are serialized. After the call to transfer data back to the host is executed, cuStreamSynchronize is used to halt CPU execution until all operations in the designated stream are finished.
# Assert values are same after running kernel
hZ = a * hX + hY
if not np.allclose(hOut, hZ):
   raise ValueError("Error outside tolerance for host-device vectors")
Perform verification of the data to ensure correctness and finish the code with memory clean up.
Performance is a primary driver in targeting GPUs in your application. So, how does the above code compare to its C++ version? Table 1 shows that the results are nearly identical. NVIDIA NSight Systems was used to retrieve kernel performance and CUDA Events was used for application performance.
The following command was used to profile the applications:
nsys profile -s none -t cuda --stats=true
C++
Python
Kernel execution
352µs
352µs
Application execution
1076ms
1080ms
Table 1. Kernel and application performance comparison.
CUDA Python is also compatible with NVIDIA Nsight Compute, which is an interactive kernel profiler for CUDA applications. It allows you to have detailed insights into kernel performance. This is useful when you’re trying to maximize performance (Figure 1).
Figure 1. Screenshot of Nsight Compute CLI output of CUDA Python example.
Get started with CUDA Python
CUDA Python coming soon, along with a detailed description of APIs, installation notes, new features, and examples. For more information, see the following posts:
The upcoming NVIDIA CloudXR 2.1 release will deliver support for Apple iOS AR devices, including iPads and iPhones.
The upcoming NVIDIA CloudXR 2.1 release will deliver support for Apple iOS AR devices, including iPads and iPhones.
Built on NVIDIA RTX technology, CloudXR is an advanced streaming technology that delivers VR and AR across 5G and Wi-Fi networks.XR users no longer need to be physically tethered to a high-performance computer to experience rich, immersive environments.
The CloudXR SDK runs on NVIDIA servers located in the cloud, edge or on-premises, delivering the advanced graphics performance needed for wireless virtual, augmented or mixed reality environments.
An early adopter of CloudXR on iOS is Brightline Interactive, a company that provides immersive VR and AR technology solutions to customers. Brightlight Interactive is using CloudXR to enhance immersive experiences and services for clients.
“With the addition of iOS support within CloudXR, we can now deploy content in a platform-agnostic way, enabling us to expand capabilities for delivery and increase our ability to target content for end clients,” said Jason Powers, chief creative technologist at Brightline Interactive. “From a developer perspective, porting apps from Android to iOS, especially for real-time rendered content, can be painstaking work. By utilizing CloudXR, we can quickly and easily add iOS as a target platform for our real-time networked augmented reality experience.”
The key features of CloudXR 2.1 include:
Apple iOS client will be available. This client sample is based on Apple ARKit.
WaveVR client sample is now updated to WaveVR SDK 3.2.0
Android client sample is now using Gradle version 6.1.1
Windows client sample is now using SDL version 2.0.14, as well as has a fix for dependencies on dynamic link libraries
Streaming parameters are optimized for networks with high jitter
Video bitstreams now signal sRGB transfer characteristics in bitstream header
Various minor bug fixes and optimizations
The CloudXR iOS integration will soon be available in NVIDIA Omniverse.
Omniverse is a collaboration and simulation platform that streamlines 3D production pipelines across industries by giving individual users and globally dispersed teams the ability to collaborate between leading industry applications in a shared virtual space in real time. With the newest CloudXR iOS integration, Omniverse users will also be able to stream AR content using their iOS tablets and phones.
The latest versions of Nsight Systems 2021.2 and, Nsight Compute 2021.1 are now available with new features for GPU profiling and performance optimization.
Today we announced the latest versions of Nsight Systems 2021.2 and, Nsight Compute 2021.1 – now available with new features for GPU profiling and performance optimization.
We also announced the Nsight Visual Studio Code Edition, NVIDIA’s new addition to the series of world class developer tools for CUDA programming and debugging.
Nsight Systems 2021.2
Nsight Systems 2021.2, introduces support for GPU metrics sampling and tracing of CUDA Unified Memory page faults on the CPU and GPU. There’s also support for Reflex SDK, CUDA 11.3, and additional enhancements in network trace, including: NCCL, NVSHMEM, OpenSHMEM, and MPI fortran.
The GPU metrics sampling feature allows you to view and analyze low level utilization details on a timeline. These provide a system wide overview of efficiency for your GPU workloads. They include metrics on IO activity including throughput for PCIe, NVLink, and DRAM. They also show SM utilization, TensorCore activity, instructions issued, warp occupancy and unallocated warps.
This expands Nsight Systems ability to profile system-wide activity and help track GPU workloads and their CPU origins. By providing a deeper understanding of the GPU utilization over multiple processes and contexts; covering the interop of Graphics and Compute workloads including CUDA, OptiX, DirectX and Vulkan ray tracing + rasterization APIs.
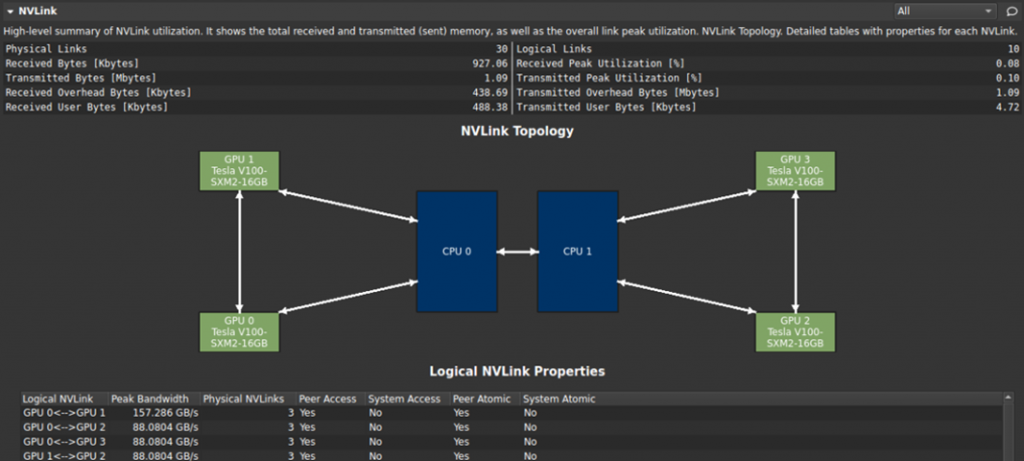
Nsight Compute 2021.1 is available now and adds a new NVLink topology and properties section to help users understand the hardware layout of their platform and how it may be impacting performance.
Figure 2. NVLInk Topology and Properties Section
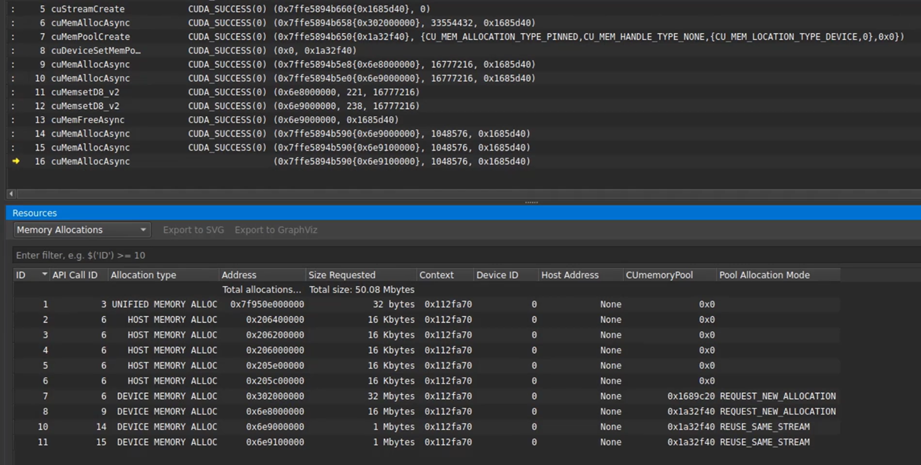
This new version also adds OptiX 7 API stepping, MacOS 11 Big Sur host support, and improved resource tracking capabilities for user objects, stream capture, and asynchronous suballocations.
Figure 3. CUDA asynchronous allocation tracking
These new features give the user increased visibility into the dynamic performance behavior of their workloads and how they are using hardware and software resources.
Nsight Visual Studio Code Edition provides syntax highlighting, CUDA debugging, Problems tab integration for nvcc, and Intellisense features for kernel functions including auto-completion, go to definition, and find all references.

 Developers can use cuQuantum to speed up quantum circuit simulations based on state vector, density matrix, and tensor network methods by orders of magnitude.
  3D deep learning researchers can enter NVIDIA Omniverse and simplify their workflows with the Omniverse Kaolin app, now available in open beta.
 OptiX 7.3 brings temporal denoising and improvements to OptiX Curves primitives and new features to the OptiX Demand Loading library


 Python plays a key role within the science, engineering, data analytics, and deep learning application ecosystem. NVIDIA has long been committed to helping the Python ecosystem leverage the accelerated massively parallel performance of GPUs to deliver standardized libraries, tools, and applications. Today, we’re introducing another step towards simplification of the developer experience with improved Python …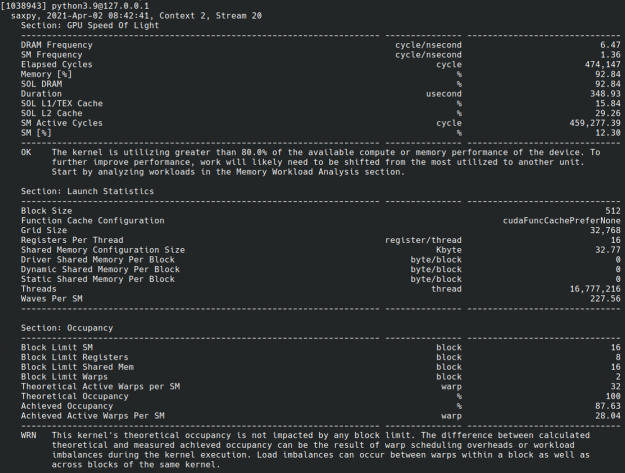
 The upcoming NVIDIA CloudXR 2.1 release will deliver support for Apple iOS AR devices, including iPads and iPhones.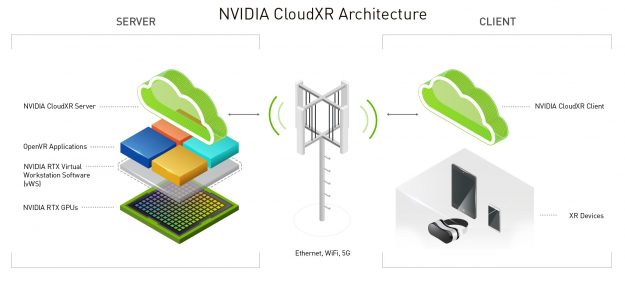
 The latest versions of Nsight Systems 2021.2 and, Nsight Compute 2021.1 are now available with new features for GPU profiling and performance optimization.