이번 포스트에서는 그 동안 모아온 데이터에 대한 이야기를 집중적으로 해보려고 합니다. 왜 이 데이터들을 모았는지, 그리고 그 동안 모아온 데이터가 무엇을 말하고 있는지에 대한 이야기 입니다.

출처 : http://quantifiedself.com/지금까지의 시리즈
Github: https://github.com/DongjunLee/quantified-self
‘오늘 하루 알차게 보냈다!’ 이 말을 숫자로 표현할 수 있을까요?
Quantified Self 를 주제로 사이드 프로젝트를 진행하면서, 정량적으로 정의하고 싶던 것이 있습니다.
‘오늘 하루 알차게 보냈다!, 뿌듯하다!’ 혹은 ‘아.. 오늘은 아무것도 한 것이 없네..’ 이러한 하루하루에 대한 느낌들 입니다. 느낌이라는 것 자체가 주관적이라는 것을 알고 계실 것입니다. 하루에 대한 평가는 주관이 기본이 되며, 특히 개개인이 가지는 가치관 이라던가, 선호에 따라서 각각 다르게 평가할 수 있습니다. 그래서 실 데이터를 보면서 오늘 하루를 제가 어떤 식으로 평가를 할 것인지 이야기하기 전에, 제가 중요하게 여기는 것을 먼저 이야기 해보고자 합니다.
저는 ‘습관’을 굉장히 중요시 여기고, 하루하루 무언가 꾸준히 하면서 쌓아올린 것이 결국에 나중에 결과를 만들어 낸다고 믿고 있습니다. 이 칼럼(습관은 자신의 참 모습을 보여주는 창이다)에서, 제가 생각하는 습관의 중요성을 잘 말해주고 있습니다.
계몽주의 철학자 데이비드 흄은 이런 습관에 대한 고대와 중세의 해석을 더욱 확장했습니다. 흄은 습관이 바로 인간을 인간으로 만든다고 생각했습니다. 그는 습관을 모든 ‘정신이 그 작동을 의지’하는, ’우주의 접착제(cement)’라 불렀습니다. 예를 들어, 우리는 공을 높이 던지고 떨어지는 것을 볼 수 있습니다. 그는 습관에 의해 우리가 몸을 움직여 공을 던지고 그 공의 궤적을 바라볼 수 있으며, 이를 통해 원인과 결과의 관계를 파악할 수 있다고 생각했습니다. 흄에게 인과론은 바로 습관에 의한 연상작용이었습니다. 그는 언어, 음악, 인간관계 등 경험을 유용한 무언가로 바꾸는 모든 기술이 습관에 의해 만들어진다고 믿었습니다. 곧, 습관은 우리가 세상을 살아가고 이 세상의 원리를 이해하기 위해 반드시 필요한 도구였습니다. 흄에게 습관은 ‘인간 삶의 거대한 안내자’였습니다.
습관에서 ‘무엇을 할 것인가’ 역시 굉장히 중요한 주제입니다. 여기에는 당장 해야 하는 일 보다는 자기 계발에 해당하는 일들이 해당됩니다.

스티븐 코비의 시간관리 매트릭스
작업에는 몇가지 종류가 있습니다. <성공하는 사람들의 7가지 습관> 에서 나오는 시간관리 매트릭스가 그 중의 하나 일 것 입니다. ‘긴급함’ 과 ‘중요함’ 2가지 척도로서 작업들을 나누는 것입니다. 여기서 제 2사분면은 중장기 계획, 인간관계 유지, 자기계발 등 당장 급하지는 않지만 미래에 큰 보상을 주는 일들이 포함됩니다.
목표는 이렇게 정리할 수 있겠네요.
- 자신이 발전할 수 있는 일들에 시간을 많이 사용하고,
- 이 활동들을 꾸준히 지속하는 것
이제 제가 어떠한 하루들을 목표로 하는 지 이해 하셨을 것이라 생각이 됩니다. 그 동안의 포스트에서는 데이터를 수집하기 위한 준비와, 그 과정에서 몇가지 자동화도 작업 해보았습니다. 최근 포스트에서는 데이터 시각화도 하면서 대쉬보드도 만들어보았지요. 이 일련의 작업들의 궁극적인 목적은 실제 데이터들을 보면서, ‘생산적인 하루’를 보내고 있는지, 이런 하루를 보내려면 앞으로 어떻게 하면 좋을지 데이터를 보면서 저 자신을 더 깊게 이해하기 위함이였습니다.
생산적인 하루에 대한 Metric 을 정해보자.
생산적인 하루를 정량적인 숫자로 표현하기 위해서는 몇가지 단계를 거칠 필요가 있습니다. ‘오늘 하루 알차게 보냈다!’ 이 문장을 분해를 하는 것입니다. 먼저 이 느낌에 포함이 되는 요소들은 무엇이 있을까요? 예를 들어, 이런 요소들이 있을 것 입니다. 잠은 잘 잤는지, 하려고 했던 To do list 는 다 완료 했는지, 또 그 작업들을 할때 집중해서 했는지, 하루를 기분 좋게 보냈는지, 크게는 이러한 요소들이 있을 것 입니다.
제가 뽑은 요소는 다음의 5가지 입니다. Attention, Happy, Productive, Sleep, Habit. 이제 각각의 요소들을 어떻게 정량적으로 평가할 수 있을지 한번 더 단계를 들어가서 보시죠.
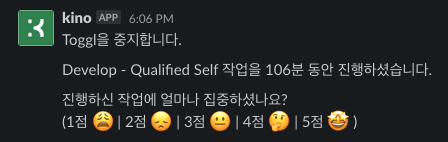
Attention, 작업에 대한 집중
- 진행한 작업들에 대해서 얼마나 집중했는지는 의미합니다.
- 기본적으로 40분 이상 진행한 작업에 대해서 집중도를 물어보게 만들어 놓았습니다.
- 집중도에 대한 점수는 1~5점 척도로 되어있습니다.
Happy, 그 당시의 기분
- 하루를 기준으로 200분 마다 그 당시의 기분에 대해서 물어봅니다.
- 행복도에 대한 점수 역시 1~5점이 기준입니다.

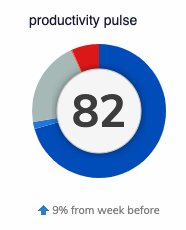
Productive, 각종 Tool을 활용한 생산성 점수
- RescueTime 는 PC/모바일을 사용한 기록을 가지고
Productive Pulse 라는 점수를 계산하여 제공해주고 있습니다. (이 값이 어떻게 구해지는 지는 이 링크에서 확인하실 수 있습니다.)
- Toggl 에서는 오늘 하루 기록된 작업시간이 8시간 이상부터 100점, 그 아래로는 시간에 비례해서 점수를 차감합니다.
(예를 들어, 7시간 작업 시 → 87.5점, 6시간 작업 시 → 75점)

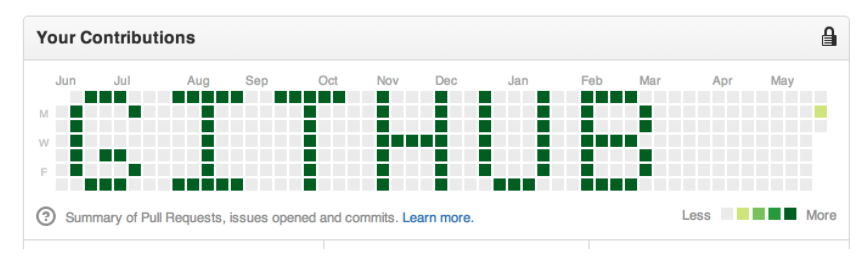
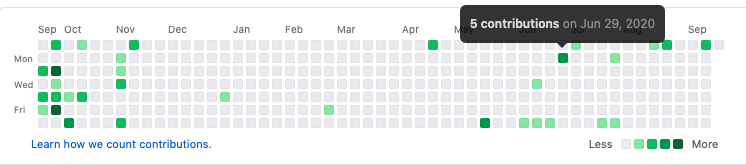
- Github 에서 오늘을 기준으로 10일 동안의 Commit의 합이 10개 이상부터 100점, 그 아래로는 커밋 수에 비례해서 측정됩니다. 아래 contributions 의 수를 의미합니다.
- Todoist 에서는 100점을 기준으로, 완료하지 못한 일들 (+ 기한이 지난 경우 포함)을 우선순위에 따라 차감을 하게 됩니다.
우선순위는 아래와 같이 4가지가 있고, 높은 우선 순위부터 5, 4, 3, 2 점씩 차감이 됩니다.

- 위의 각각의 항목들은 모두 100점 만점이 기준이 됩니다. 여기서 종합 생산성 점수는 다음과 같습니다
Productive = Github (10) + Toggl (30) + Todoist (50) + RescueTime (10)
Sleep, 수면 시간
- 7시간을 이상은 전부 100점, 그 아래로는 시간과 비례해서 점수를 측정합니다.
- 수면에 대해서는 약간 관대하게 점수를 재고 있었습니다. (너무 잠을 많이 자는 것이 오히려 피곤함을 초래하는 경우도 있기 때문이죠)
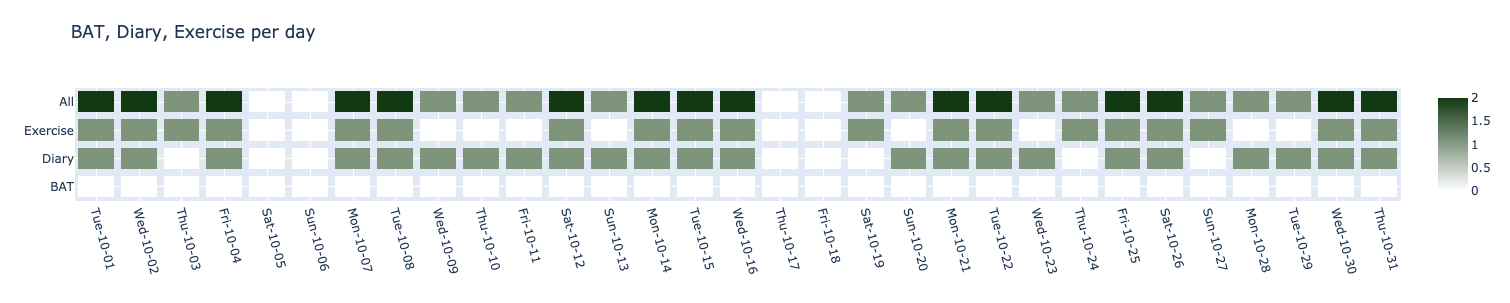
Habit, 매일하는 습관에 해당하는 활동들
- 개별 항목 하나하나가 5점의 점수를 가집니다.
- 매일 하려고 하는 습관에 해당하는 일로서 다음의 일들이 습관에 해당합니다.
이제 각각의 항목들을 정리했으니, 마지막으로 이 각각의 점수를 종합해서 오늘 하루를 점수를 매겨보겠습니다.
오늘 하루에 대한 점수 = Attention(20) + Happy(10) + Productive(30) + Sleep(20) + RepeatTask(10) + Habit(15)
이 기준을 모두 만족하면서, 100점을 얻으려면 다음과 같은 일들이 필요합니다. 모든 진행한 작업들에 대해서 집중을 해야하고, 기분도 좋아야 하며, 일일커밋 역시 꾸준히 해주고, 8시간 이상 생산적인 작업을 하고, 등록했던 모든 To do list는 완료를 하고, 컴퓨터를 생산적인 소스 위주로 작업을 하면서, 잠은 7시간 이상 자고, 운동, 공부한 것 정리, 일기 모두 완료를 해야겠네요….😱
이렇게 제가 바라보는 오늘 하루에 대한 점수를 정량화 할 수 있는 식을 만들어 보았습니다. 처음 말한 것처럼, 무엇을 중요시하는 지에 따라서 점수에 대한 비중은 조절할 수 있을 것이고 자신의 생활 패턴에 따라서 기록할 수 있는 수단 또한 달라 질 수 있을 것 입니다.
4년 간의 데이터가 말해주는 것들
사이드 프로젝트를 시작하고, 데이터를 수집하기 시작한 것은 2017-01-30 부터 입니다. 대략 4년째 이렇게 계속해서 Kino를 사용하고 있습니다. 특별히 문제가 없는 이상, 앞으로도 이렇게 사용을 하게 될 것 같네요. 🙂
그럼 그 동안의 데이터의 변화를 보면서 제가 생산적인 하루들을 보냈는지 이야기 해보려고 합니다.
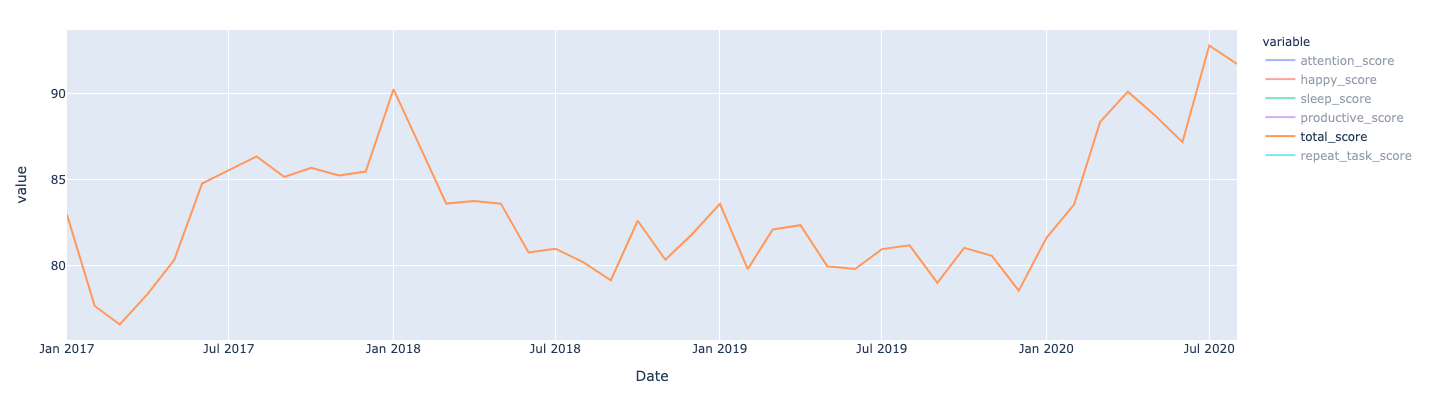
그림 1 – 월간 종합점수의 변화위의 도표는 월간 평균 total_score(종합 점수) 를 기준으로 만들어진 라인 차트입니다. 사이드 프로젝트를 시작하는 초반에 열심히 하면서 점수가 올라가다가.. 2018년 상반기부터 떨어지기 시작하는 것이 보입니다. 이 시기가 네이버로 이직을 했던 시기인데, 이직을 하고 나서는 사이드 프로젝트 및 따로 진행했던 ML/DL 논문 구현 들은 하지 않고 회사 일에 더 집중했던 시기입니다. 그리고 2020년부터는 다시 이 QS 프로젝트에 신경을 쓰면서 점수가 올라간 시기입니다. 회사 일도 좋지만, 그 외의 시간을 잘 활용하는 것이 중요한 것 같다는 생각이 드네요. 조금 더 자세히 데이터들을 살펴보려고 합니다.
사이드 프로젝트의 재미 그리고 연구/개발에서 미팅/관리 작업으로
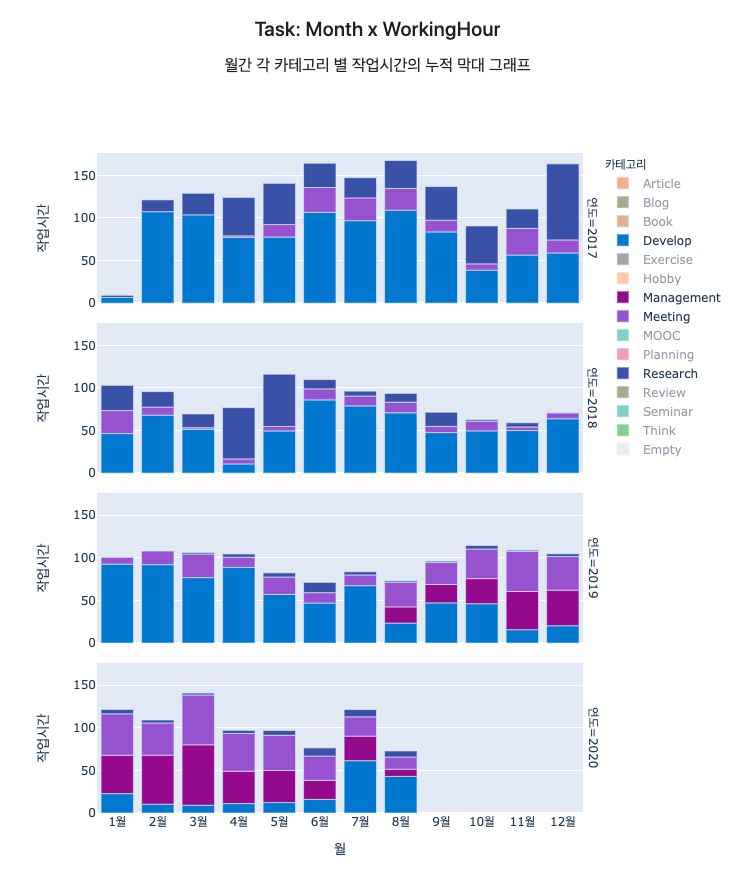
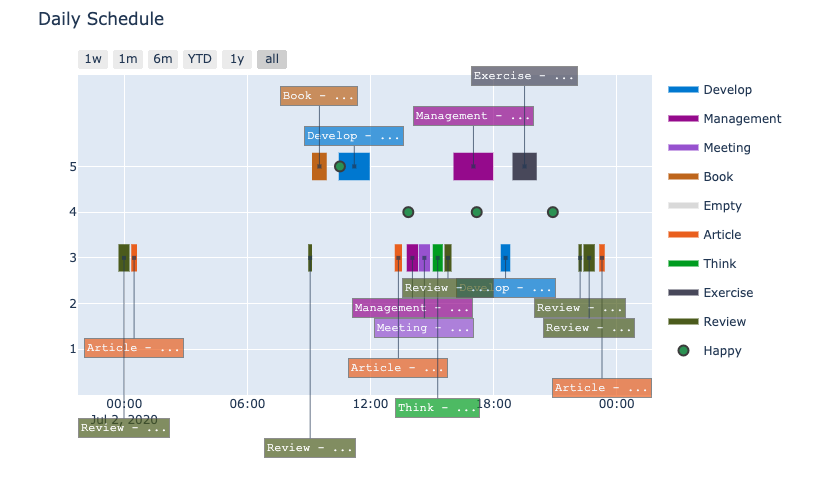
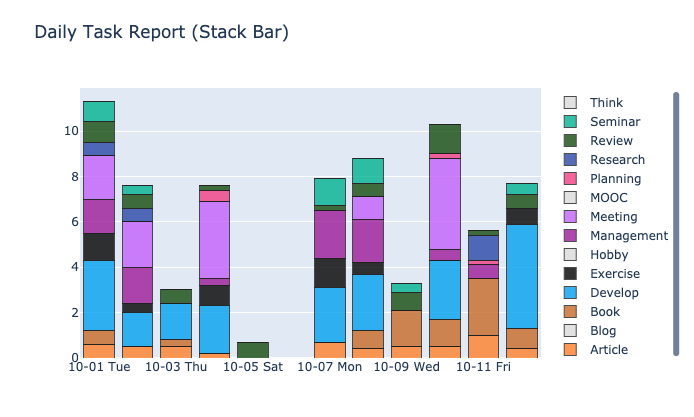
그림 2 – 각각의 월을 기준으로 각 작업들의 작업시간을 카테고리에 따라 누적한 누적막대차트이 도표는 월을 기준으로, 각 작업들의 시간을 누적막대로 구성하였습니다. 주요한 작업들인 연구/개발과 미팅/관리만을 표시해보았습니다. 위에서 언급한 것처럼, 2017년에는 이 QS 사이드 프로젝트를 정말 재미있게 개발을 하던 시기이기도 하고, Deep Learning 공부를 하면서 논문 재구현에 힘을 쓰던 시기이기도 합니다. 실제로 작업 시간의 차이가 유의미하게 크기 때문에.. 종합 점수의 차이 또한 이해가 되네요.
2019년도에는 미팅/관리의 작업들이 확 늘어나게 되는데, 커리어의 변화가 이렇게 보이기도 합니다. 관련해서 커리에 대한 이야기는 2019 회고에서 더 자세히 확인할 수 있습니다.
생산적인 하루에 대한 상관관계
이제 다음 데이터를 조금 더 자세히 살펴볼까요? 먼저 보고자 하는 것은 잠 입니다.
‘잠을 더 자면, 그 날의 기분이 더 좋을 것인가?’ 라는 직관적인 생각을 확인해보고자 합니다.
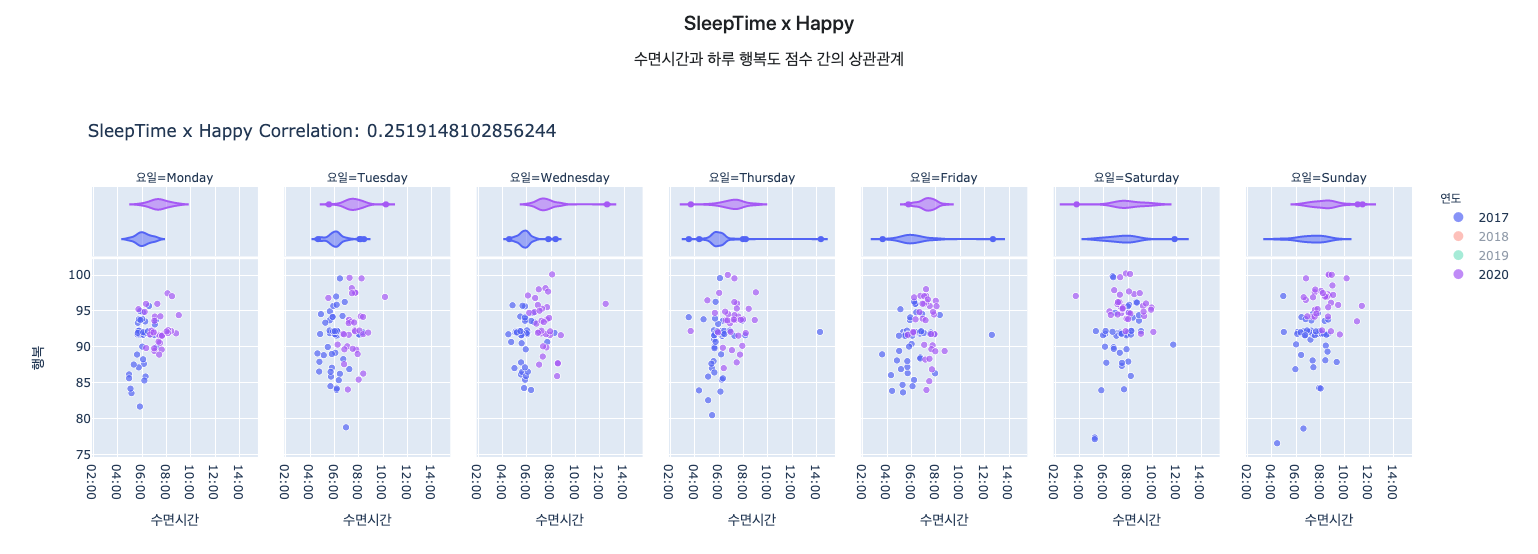
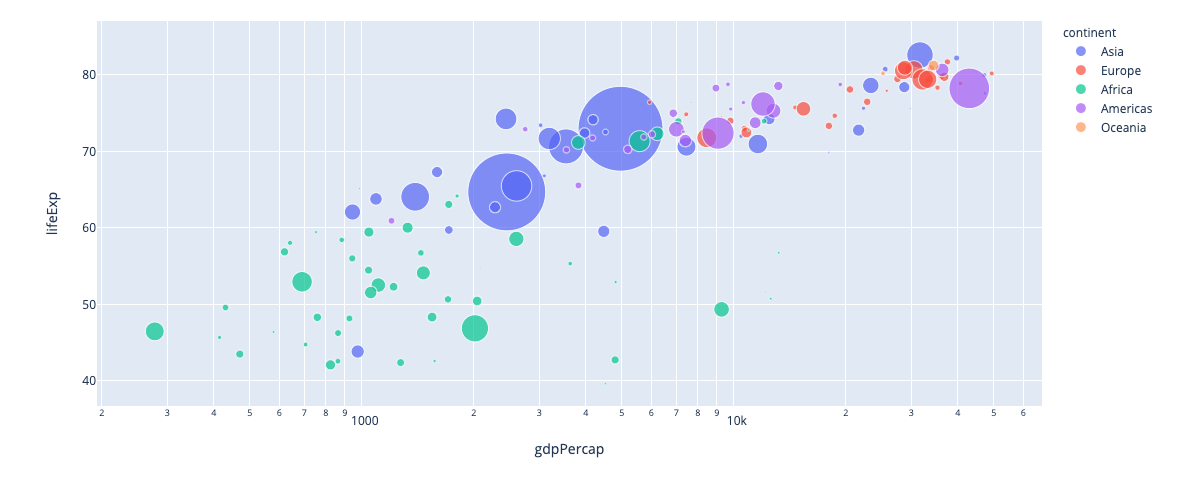
그림 3- 수면시간에 따른 행복도 점수의 산점도 차트위 도표를 보면 2017년도의 점들이 2020년에 비해서 왼쪽에 위치한 경향성을 확인할 수 있습니다. 2017년에는 평일에는 보통 5~6시간을 잤고, 2020년에 7~8시간을 자는 것을 확인할 수 있습니다. 이것은 사실 통근 시간에 따른 삶의 질을 확연하게 보여주는 것이기도 합니다. 각각의 연도에 집에서 회사까지 출근하는 시간이 각각 1시간 30분, 30분 이 걸리기 때문이죠. (이렇게 통근 시간이 중요합니다..)
수면 시간은 여러가지로 생활에 영향을 미칠 것 입니다. 예전에 왕복 3시간 통근 하던 때를 추억해보면, 아주 큰 영향이라고 느껴집니다. 데이터는 어떻게 말을 해줄까요? 수면시간과 하루의 행복도 점수 평균에 대한 상관 계수 (0.252) 로 약한 상관관계가 있다는 것을 알 수가 있습니다. 제가 느끼는 느낌의 정도와 상관계수는 차이가 있어보이나, 수면시간의 중요성은 똑같이 말을 해주고 있습니다.
다음으로 종합 점수에 대해서 전체 상관관계를 한번 봐볼까요?
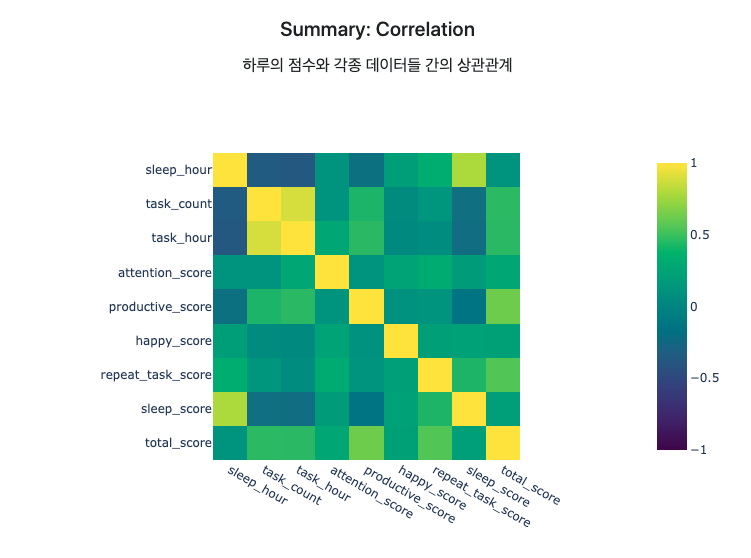
그림 4 – 수면시간, 작업 수와 작업시간, 그리고 각종 점수들의 상관계수종합점수에 대해서 가장 강한 상관관계를 가지고 있는 것은 ‘생산성 점수’ (0.62) 입니다. 종합 점수에서 30%으로 가장 큰 비율을 차지하고 있기도 하고, 생산성 점수와 작업의 집중도는 연결되어 있기 때문에 어쩌면 당연한 결과일 것 입니다. 그 다음으로는 점수의 변동이 큰 반복작업 점수 (0.54), 작업시간 (0.42) 으로 작업에 관한 것들이 또한 강한 상관관계를 보여주고 있습니다. 수면 점수(0.20) 와 행복도 점수(0.22) 그리고 집중도 점수(0.27) 는 상대적으로 약한 상관 관계를 보여주고 있네요. 지금의 Metric에서의 생산성은 일정한 기준을 통과하면 만점을 주고 있기 때문에, 질보다는 기본적인 양이 더 중요하게 고려되고 있음을 말해주고 있습니다.
상관계수를 보다 보니, 막연하게 알고 있던 것을 데이터를 통해 확인할 수 있었습니다. 바로 잠을 포기하고 작업을 하는 경우 입니다. 수면시간과 작업시간 간의 상관계수는 (-0.37)으로 음의 상관관계를 보여주고 있습니다. 그에 비해서 수면시간과 집중도 간의 상관계수는 (0.11)으로 아주 약한 상관관계를 보이고 있습니다. 직관적으로는 수면시간이 작업 집중도에 중요한 요소일 것이라고 생각하였는데, 생각과는 약간 다른 결과를 보여주고 있네요. 오히려 수면 시간 보다는 그날의 기분 (0.25) 가 더 상관계수가 높았습니다. 위에서 수면시간과 행복도에 대한 약한 상관관계가 있음을 확인했었기 때문에, 같이 연결해서 봐야할 것입니다.
여기서 지금 Metric의 한계점이 보이기도 합니다. 잠을 줄이면서 공부를 더 한다면, 평소보다 점수는 더 높게 나올 것 입니다. 하지만 ‘꾸준함’을 생각해보면 잠 또한 더 중요하게 생각해야 할 것입니다. 이런 한계점들에 대해서는 아래에서 더 나은 Metric 에서 이야기를 해보고자 합니다.
다음으로는 종합점수와 가장 높은 상관 관계를 보이는 작업에 대해서 조금 더 디테일하게 살펴보겠습니다.
작업의 종류에 따른 집중도와 각 변수들과의 상관계수
어떠한 작업에 대해서 집중도에 관여하는 요소들은 무엇이 있을까요? (Category) 어떠한 작업을 하는지, (When) 언제 하는지, (Mood) 그 당시의 기분은 어떠한지, 조금 더 세부적으로 들어가면 방해요소는 없었는지, 난이도는 적절한지 등의 다양한 요소가 있을 것 입니다. 여기서 데이터를 보려고 하는 것은 작업의 종류, 시간대, 기분을 가지고 살펴보려고 합니다.
여기에는 아래와 같은 가정을 가지고 살펴보려고 합니다.
- 일에 더 집중하게 될 수록, 그에 따라서 기분도 좋다.
(몰입, 집중도 점수와 행복도 점수의 상관관계가 높은 경우)
- 작업을 오래 할수록, 해당 작업에 집중할 수도 있고 집중이 안 될 수도 있다.
(집중도 점수와 작업시간의 상관관계)
- 작업은 언제 시작하느냐에 따라서 집중도에 영향을 줄 수 있다.
(집중도 점수와 시작시간의 상관관계)
예) 12시에 점심식사 시간인데, 11시 반에 개발을 시작하는 경우
지금처럼 고려되는 범주의 수가 3개 이상일 때는 산점도 매트릭스가 범주 간의 관계를 확인할 수 있어서 적합한 방식입니다.
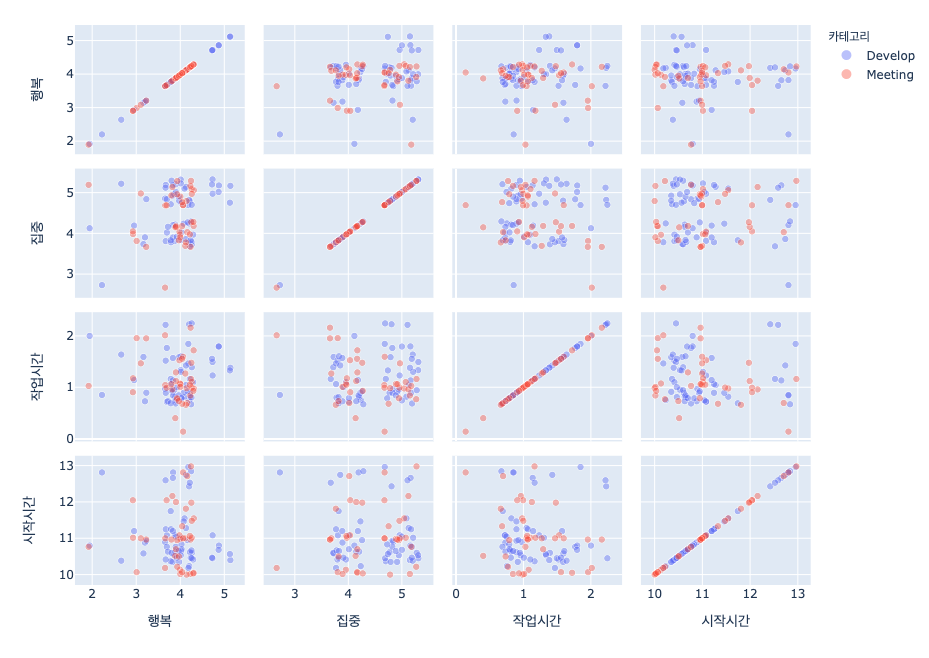
그림 5-1 평일 오전 시간대(오전 10시 ~ 오후 1시)의 ‘개발’, ‘미팅’ 에 대한 산점도 매트릭스작업은 굉장히 다양한 조건들이 있기 때문에, 세부적으로 조건을 가지고 살펴볼 필요가 있습니다. 위 도표는 오전시간을 대상으로 ‘개발’, ‘미팅’ 에 대한 산점도 매트릭스 입니다. 눈으로 확인할 수 있는 작업의 특성은 다음과 같습니다. 미팅은 보통 1시간 단위로 진행이 되므로 10, 11, 12 시에 몰려있는 것을 알 수가 있습니다. 그리고 개발에 대한 작업은 최소 1시간 정도의 집중을 위한 시간을 필요로 하기 때문에, 10시~11시 사이에 밀집되어 있는 것을 확인할 수 있습니다. 이러한 현상을 상관계수로도 확인을 할 수가 있습니다.
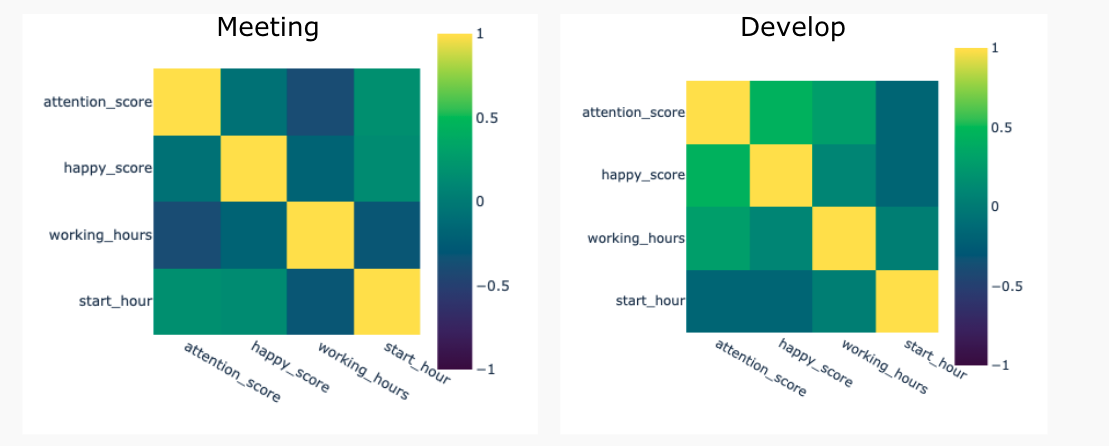
그림 5-2 평일 오전 시간의 ‘개발’, ‘미팅’ 에 대한 상관계수위의 상관계수 도표를 통해서, 집중도와 각 변수들간의 관계가 차이가 있음이 눈에 확인히 보입니다. 눈에 띄는 차이는 1) 행복도점수와 2) 작업 시간 입니다.
먼저 행복점수 입니다. 개발을 하면서 일에 집중하면 할수록, 그에 따라서 기분이 좋음(0.44)을 보이고 있습니다. 그에 비해서 미팅의 경우에는 작업과 행복도 간에는 상관관계가 없다(-0.07)고 볼 수 있습니다. 오전에는 미팅보다는 개발 작업을 하는 것이 더욱 집중하면서 진행한다는 것을 말해주고 있지 않나 싶습니다.
다음은 작업 시간입니다. 위에서 말한 것과 비슷한 경향으로서, 오전에 진행하는 미팅의 경우 시간이 길수록 집중력이 떨어지는 경향(-0.39)이 보이는 반면 개발은 작업시간이 길수록 더 집중력이 높았던 경향(0.29)을 보이고 있습니다.
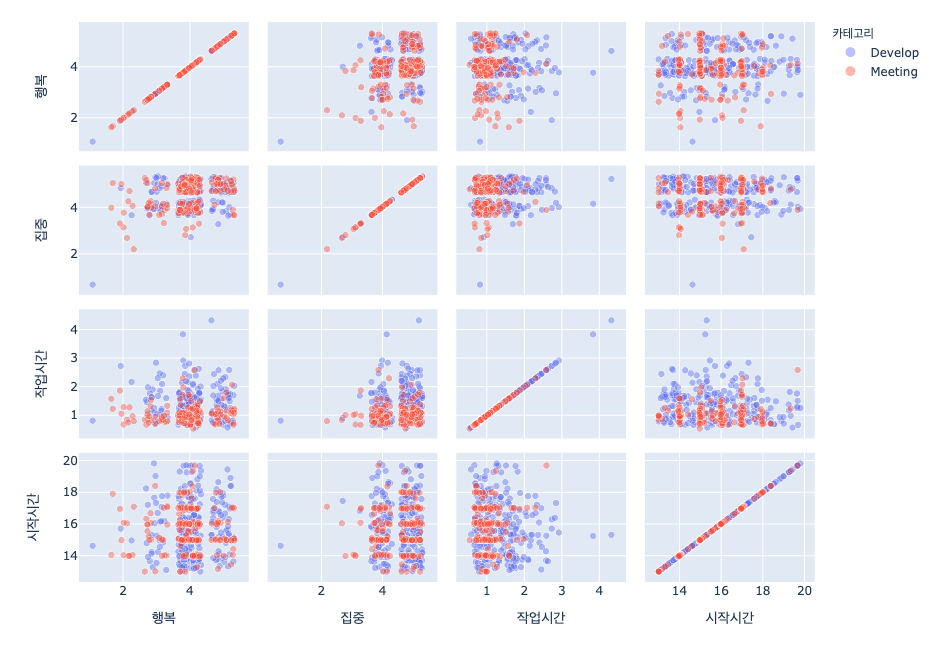
그림 6-1 평일 오후 시간대 (오후 1~8시)의 ‘개발’, ‘미팅’ 에 대한 산점도 매트릭스위의 도표는 오후 시간대에 대한 같은 조건의 산점도 매트릭스입니다. 오전보다는 오후 시간을 더 길게 활용하고 있기 때문에 점들이 확실히 더 많아 보이네요. 여기에서도 오전에서와 비슷하게, 미팅작업은 대부분 정시에 몰려있는 모습이 보이고, 미팅은 보통 1시간, 개발은 1~2시 사이에 몰려있는 것을 확인할 수 있습니다. 그리고 개발에서는 대부분 행복도 점수가 3~5 점이나, 미팅 작업에서 행복도 점수가 2점으로 떨어진 경우들도 보입니다. 이것은 개발에 비해서 상대적으로 컨트롤이 어려운, 미팅이 가지는 특성이 아닐까 싶습니다.
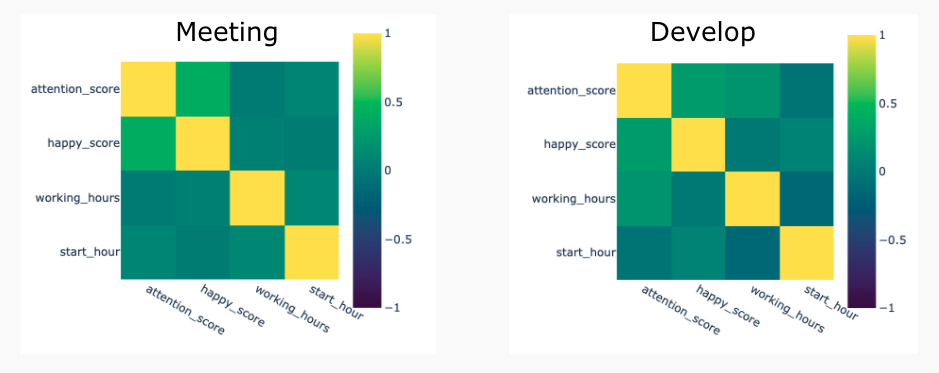
그림 6-2 평일 오후 시간의 ‘개발’, ‘미팅’ 에 대한 상관계수오전과 마찬가지로 상관계수를 살펴보겠습니다. 위와 마찬가지로 1) 행복도 점수 2) 작업 시간으로 집중도의 상관 관계를 비교해보려고 합니다.
가장 큰 차이는 오후에 진행한 미팅은 집중도와 행복도 간의 상관관계가 높다는 것(0.41) 이였습니다. 개별 케이스마다 차이점이 있겠지만, 점들을 보면 행복도 점수 2~5점에 많이 흩어져 있는 것이 보입니다. 미팅은 불필요하게 초대를 받거나 때로는 참관을 하기도 하고, 제대로 된 진전이 없는 경우도 있습니다. 이러한 상황에 따라서 집중도 점수도 차이가 날 것이고 그때의 기분 또한 자연스럽게 연결이 될 것이기 때문입니다.
그에 비해서 오후에는 미팅의 작업시간이 길어도 별로 문제가 되지 않았습니다. 상관계수 0.01 으로 아무런 상관관계가 없다고 보이고 있었습니다. 개발의 경우에는 오전보다는 조금 낮지만 (0.21), 여전히 오래 개발을 할수록 집중을 했었다라는 것을 말해주고 있습니다.
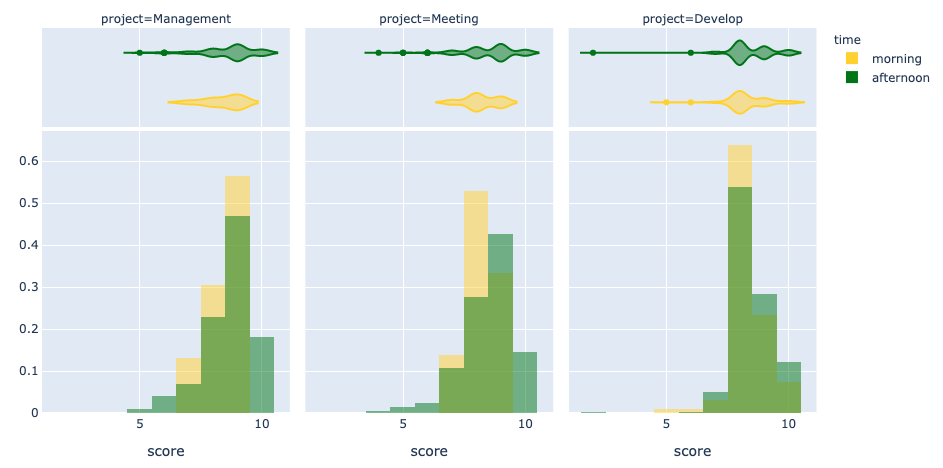
그림 6-3 개발/미팅/관리 작업들의 몰입 점수에 대한 오전/오후 별 히스토그램위의 상관관계들을 보았을 때, 아침 혹은 오후에 따라서 작업에 몰입하는 경향에 차이가 있음을 알 수가 있습니다. 집중도가 높으면서 기분이 좋은 경우를 몰입하는 상황(집중도 점수 + 행복도 점수)이라고 가정하고 작업들의 분포를 살펴보았습니다. 미팅/관리 쪽의 일들은 오전보다는 오후에 높은 점수 쪽으로 분포가 되어있고, 개발은 거의 비슷한 분포를 보이고 있네요.
이렇게 시간대에 따라서 영향을 받는 작업들이 있는 반면에, 아무런 상관관계가 없는 것도 있을 것입니다.
바로 ‘운동’ 입니다.
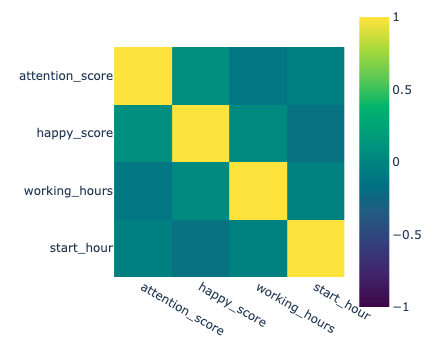
그림 7-1 평일 모든 시간대의 ‘운동’ 대한 상관계수운동의 특성상, 언제 시작을 하던 (0.08), 혹은 얼마나 하던 (-0.02), 집중해서 하게 되고, 하고 나면 상쾌하기 때문이 아닐까 싶습니다. 실제로 운동에 대한 작업들은 거의 대부분이 5점에 있습니다. 이 조커와 같은 운동에 대한 효과는 운동을 한 날과 하지 않은 날을 비교해보면 더 그 차이를 체감할 수 있습니다.
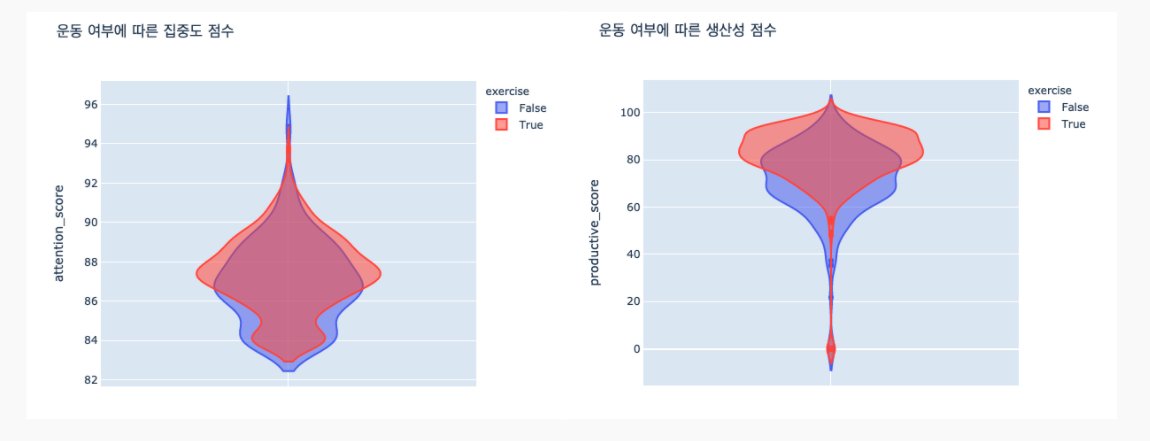
그림 7-2 운동 여부에 따른 바이올린 차트운동을 한 경우인, 빨간색 바이올린 도표가 조금 더 위로 위치해 있는 것을 볼 수 있습니다. 운동을 한 날이 하지 않는 날보다 조금 더 집중하는 편이고, 작업을 더 많이한다는 것을 말해주고 있습니다.
지금까지의 정보들을 종합해보면 다음과 같은 전략으로 하루의 작업들을 배치할 수 있을 것 입니다.
- 오전에는 일찍 연구/개발을 시작해서 점심 먹기 전까지 쭉 집중
- 연구/개발 작업은 오래할 수 있는 시간을 충분히 확보하고 진행
- 미팅/관리 작업들은 오전보다는 오후에 진행
- 운동은 아무때나 일정에 맞춰서 하되, 꼭 해주기
자기계발에 해당하는 우선 순위 2 의 작업들
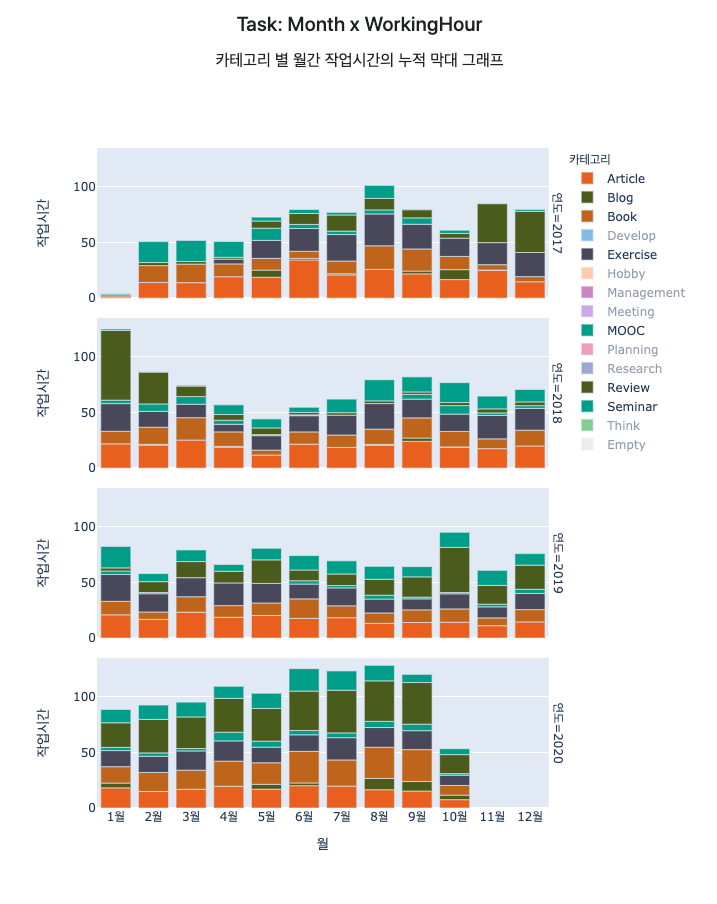
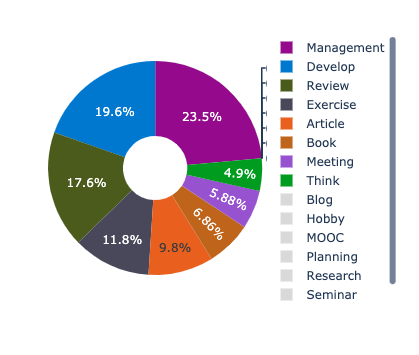
그림 8 – 우선순위 2에 해당하는 작업 카테고리의 월간 작업시간 막대 그래프흔히 자기계발에 해당하는 시간들로 카테고리를 정리하였습니다. 여기에는 책을 읽고, 운동을 꾸준히 해주며, 각종 세미나와 강의를 듣고, 공부한 것을 정리하기도 하고, 일기를 쓰고, 명상을 하는 등의 다양한 활동들이 포함됩니다. 2018년 1월에 이상하게 데이터가 틔는 부분이 있지만, 전체적으로는 조금씩 시간을 늘려나가는 모습을 볼 수 있습니다. 명확한 목표 수치가 있는 것은 아니지만, 계속해서 공부를 하면서 꾸준히 월마다 80~100 시간은 쓰고자 하고 있습니다.
Metric은 고정이 아니라, 목표에 맞춰서 계속 변화합니다.
그 동안의 데이터를 분석해보니, 지금은 처음에 목표로 잡고 있던 Metric에는 근접한 생활을 하고 있다고 생각이 들었습니다. 이렇게 습관을 만드는 것이 어렵네요.
살면서 목표는 계속해서 변화하게 됩니다. 그에 따라서 Metric 또한 달라져야 할 것 입니다. 그리고 목표가 바뀌는 것 외에도 새로운 데이터를 수집할 수 있게 되거나, 기존의 데이터를 다른 방식으로 수집하게 된다면 이에 따른 목표 설정이 새로 필요할 것입니다. 현재 몇가지 변화를 주고 있는데, 가장 큰 변화는 아래 3가지 입니다.
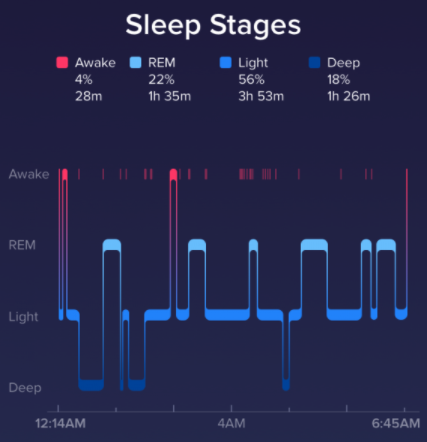
출처: https://blog.fitbit.com/sleep-stages-explained/
- 수면 : 현재는 Fitbit Versa 를 통해서 조금 더 정확한 수면에 대한 정보를 얻고 있습니다. 개인적으로 잠에 대한 관심도 많고, 가끔 밤에 잠이 안 와서 밤잠을 설친 날에는 그날 하루가 피곤해지는 것을 경험하다보니.. 자연스럽게 수면에 대해서 점수도 더 올리고 엄격한 기준을 적용해보려고 하고 있습니다.
위의 그래프에서 보는 것처럼, 잠은 REB, Light, Deep 의 단계를 순환하고 그것을 잡아주고 있기 때문에 더 정확한 진단이 가능할 것입니다. 그 동안은 단순히 잠을 자기 시작한 시간, 일어난 시간을 기준으로 했기 때문에 수면시간과의 상관관계도 더 정확히 알아볼 수 있을 것입니다.
- 블로그 작성 : 많은 개발자분들에게 블로그는 꾸준히 해보려고 하지만 정말 잘 안되는 것 중의 하나일 것이라고 생각합니다. 저에게는 특히 그랬네요. 최근에는 글로 자신의 생각을 정리해보는 것이 정말 중요하고, 저만의 컨텐츠를 만들어보고 싶다는 생각으로 노력을 해보고 있습니다.
블로그는 특별히 습관으로 만들기 위해 신경 쓰는 부분이라 habit 에 포함시켜서 진행 시, 5점을 주도록 설정하였네요. (다른 습관들은 자리를 잡아서 점수를 줄였습니다. 5→3점)
-
작업의 질 : 지금까지 집중했던 것은 ‘일단 하자’ 였습니다. 어느정도는 습관으로 자리를 잡은 지금은 ‘더 잘하자’ 에 포커스를 맞춰보고자 합니다. 작업의 질에 집중하는 이유는 의 한 구절을 인용해 보고자 합니다. 이제야 A작업을 어느정도는 해냈고, B 작업을 할 수 있는 단계가 되었다고 생각하기 때문입니다.함께>
더글러스는 작업을 세 가지 수준으로 구분합니다. A, B, C 작업입니다.
A 작업은 원래 그 조직이 하기로 되어 있는 일을 하는 걸 말합니다.
B 작업은 A 작업을 개선하는 걸 말합니다. 제품을 만드는 사이클에서 시간과 품질을 개선하는 것이죠
C 작업은 B 작업을 개선하는 것 입니다. 개선 사이클 자체의 시간과 품질을 개선하는 것입니다. … 한마디로 개선하는 능력을 개선하는 걸 말합니다.
더글러스는 “우리가 더 잘하는 것을 더 잘하게 될수록 우리는 더 잘하는 걸 더 잘 그리고 더 빨리 하게 될 것이다” – 복리의 비밀, 34 페이지 중
끝으로
이번 포스트에서는 ‘생산적인 하루’ 를 정량적으로 수치화해보고, 직접 정의를 해본 Metric으로 점수를 산정해보았습니다. 그 동안의 데이터를 살펴보면서, 예전에는 더 열심해 했었는데.. 라는 생각도 하고 조금 더 자세히 데이터들을 분석해보면 하루를 조금 더 효율적으로 보낼 수 있는 방향도 알아보았습니다. 무엇보다도 저 자신을 더 이해할 수 있었습니다. 또한 2020년이 되어서야 데이터를 모으는 것에 그치지 않고, 한 걸음 더 나아갈 수 있었습니다. 가장 중요한 것은 액션 즉, 행동이기에, 이렇게 자신에 대한 데이터들을 통해 현실을 제대로 인지하고 그에 따라서 조금 더 나은 방향으로 행동에 변화를 이끌어 낼 수 있으면 좋겠습니다.
여러분의 하루는 어떤 식으로 수치화를 할 수 있을까요? 또 데이터에서 어떤 것들은 얻고 있으신가요?