Categories
Misc

Accelerating Machine Learning Model Inference on Google Cloud Dataflow with NVIDIA GPUs

Today, in partnership with NVIDIA, Google Cloud announced Dataflow is bringing GPUs to the world of big data processing to unlock new possibilities. With Dataflow GPU, users can now leverage the power of NVIDIA GPUs in their machine learning inference workflows. Here we show you how to access these performance benefits with BERT.  Google Cloud’s Dataflow … Continued

Today, in partnership with NVIDIA, Google Cloud announced Dataflow is bringing GPUs to the world of big data processing to unlock new possibilities. With Dataflow GPU, users can now leverage the power of NVIDIA GPUs in their machine learning inference workflows. Here we show you how to access these performance benefits with BERT. 

Google Cloud’s Dataflow is a managed service for executing a wide variety of data processing patterns including both streaming and batch analytics. It has recently added GPU support can now accelerate machine learning inference workflows, which are running on Dataflow pipelines. 

Please check out Google Cloud’s launch post for more exciting new features. In this post, we will showcase the performance benefits and TCO improvement with NVIDIA GPU acceleration by deploying a Bidirectional Encoder Representations from Transformers (BERT) model fine-tuned on “Question Answering” tasks on Dataflow. We show TensorFlow inference in Dataflow with CPU, how to run the same code on GPU with a significant performance boost, showcase the best performance after we convert the model through NVIDIA TensorRT, and deploy through TensorRT’s python API with Dataflow. Check out NVIDIA sample code to try now. 
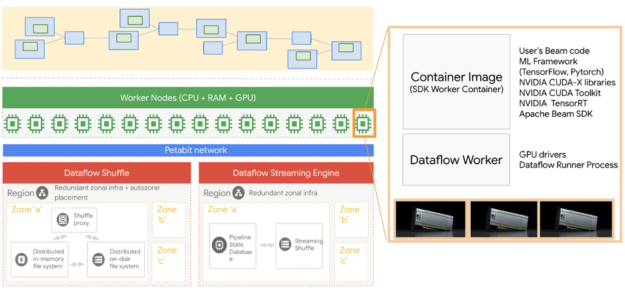
Overview of GCP Dataflow GPU support.
Figure 1. Dataflow Architecture and GPU runtime.

There are several steps we will be touching on in this post. We start by creating an environment on our local machine to run all of these Dataflow jobs. For additional details, please refer to the Dataflow Python quick start guide.

Creating an environment

 It is recommended to create a virtual environment for Python, we use virtualenv here:

virtualenv -p 

When using Dataflow, it is required to align the Python version in your development environment with the Dataflow runtime Python version. More specifically, when running a Dataflow pipeline, you should use the same Python version and Apache Beam SDK version to avoid unexpected errors.

Now, we activate the virtual environment.

source /bin/activate

One of the most important things to pay attention to before activating a virtual environment is to be sure that you are not operating in another virtual environment, as this usually causes issues.

After activating our virtual environment, we are ready to install the required packages. Even though our jobs are running on Dataflow, we still need a couple of packages locally so that Python does not complain when we run our code locally.

pip install apache-beam[gcp]
pip install TensorFlow==2.3.1

You can experiment with different versions of TensorFlow but the key here is to align the version you have here and the version that you will be using in the Dataflow environment. Apache Beam and its Google Cloud components are also required.

Getting the fine-tuned BERT model

NVIDIA NGC has plenty of resources ranging from GPU-optimized containers to fine-tuned models. We explore several NGC resources.

The first resource we will be using is a BERT large model that is fine-tuned for the SquadV2 question answering task and contains 340 million parameters. The following command will download the BERT model.

wget --content-disposition 
https://api.ngc.nvidia.com/v2/models/nvidia/bert_tf_savedmodel_large_qa_squad2_amp_384/versions/19.03.0/zip -O bert_tf_savedmodel_large_qa_squad2_amp_384_19.03.0.zip

With the BERT model we just downloaded, automatic mixed precision (AMP) is used during training and the sequence length is 384.

We also need a vocabulary file and we get it from a BERT checkpoint that can be obtained from NGC with the following command:

wget --content-disposition 
https://api.ngc.nvidia.com/v2/models/nvidia/bert_tf_ckpt_large_qa_squad2_amp_128/versions/19.03.1/zip -O bert_tf_ckpt_large_qa_squad2_amp_128_19.03.1.zip

After getting these resources, we just need to uncompress them and locate them in our working folder. We will be using a custom docker container and these models will be included in our image.

Custom Dockerfile

We will be using a custom Dockerfile that is derived from a GPU-optimized NGC TensorFlow container. NGC TensorFlow (TF) containers are the best option when accelerating TF models using NVIDIA GPUs.

We then add a couple of more steps to copy these models and the files we have. You can find the Dockerfile here and below is a snapshot of the Dockerfile.

FROM nvcr.io/nvidia/tensorflow:20.11-tf2-py3
RUN pip install --no-cache-dir apache-beam[gcp]==2.26.0 ipython pytest pandas && 
    mkdir -p /workspace/tf_beam
COPY --from=apache/beam_python3.6_sdk:2.26.0 /opt/apache/beam /opt/apache/beam
ADD. /workspace/tf_beam
WORKDIR /workspace/tf_beam
ENTRYPOINT [ "/opt/apache/beam/boot"]

The next steps are to build the docker file and push it to the Google Container Registry (GCR). You can do this with the following command. Alternatively, you can use the script we created here. If you are using the script from our repo, you can simply do bash build_and_push.sh

project_id=""
docker build . -t "gcr.io/${project_id}/tf-dataflow-${USER}:latest"
docker push "gcr.io/${project_id}/tf-dataflow-${USER}:latest"

Running jobs

If you have already authenticated your Google account, you can simply run the Python files we provided here by calling the run_cpu.sh and run_gpu.sh scripts are available in the same repo.

CPU TensorFlow Inference in Dataflow (TF-CPU)

The bert_squad2_qa_cpu.py file in the repo is designed to answer questions based on a description text document. The batch size is 16, meaning that we will be answering 16 questions at each inference call and there are 16,000 questions (1,000 batches of questions). Note that BERT could be fine-tuned for other tasks given a specific use case.

When running a job on Dataflow, by default it auto-scales based on real-time CPU usage. If you want to disable this feature you need to set autoscaling_algorithm to NONE. This will let you pick how many workers to use throughout the life of your job. Alternatively, you can let Dataflow auto-scale your job and limit the maximum number of workers to be used by setting the max_num_workers parameter.

We recommend setting a job name rather than using the auto-generated name to better follow your jobs by setting the job_name parameter. This job name will be the prefix for the compute instance that is running your job.

Accelerating with GPU (TF-GPU)

To execute the same dataflow TensorFlow inference job with GPU support, we need to set the following parameters. For additional information, please refer to Dataflow GPU documentation. For additional information, please refer to Dataflow GPU documentation.

--experiment "worker_accelerator=type:nvidia-tesla-t4;count:1;install-nvidia-driver"

The parameter preceding enables us to have an NVIDIA T4 Tensor Core GPU attached to the Dataflow worker VM, which is also visible as a Compute VM instance running our job. Dataflow will automatically install required NVIDIA drivers that support CUDA11.

The bert_squad2_qa_gpu.py file is almost the same as the bert_squad2_qa_cpu.py file. This means that with very little to no changes we can have our jobs running using NVIDIA GPUs. In our examples, we have a couple of additional GPU setups such as setting the memory growth with the code below.

physical_devices = tf.config.list_physical_devices('GPU')
tf.config.experimental.set_memory_growth(physical_devices[0], True)

Inference with NVIDIA optimized libraries

NVIDIA TensorRT optimizes Deep Learning models for inference and provides low latency and high throughput (for more information). Here, we use the NVIDIA TensorRT optimization to BERT model and use it to answer questions on a Dataflow pipeline with GPU at the speed of light. Users could follow the TensorRT demo BERT github repository.

We also use Polygraphy, which is a high-level python API for TensorRT to load the TensorRT engine file and run inference. In Dataflow code, the TensorRT model is encapsulated with a shared utility class, allowing all threads from a Dataflow worker process to make use of it.

Comparing CPU and GPU runs

In Table 10, we provided total run times and resources used for sample runs. The final cost for a Dataflow job is a linear combination of total vCPU time, total memory time, and total hard disk usage. For the GPU case, there is a GPU component as well.

Framework Machine Workers Count Total execution time Total vCPU time Total memory time Total HDD PD time TCO Improvement
TF-CPU n1-standard-8 2 2:46:00 43.5 163.13 1359.4 1x
TF-GPU N1-standard-4 + T4 1 0:35:51 2.25 8.44 140.64 9.2x
TensorRT N1-standard-4 + T4 1 0:09:51 0.53 1.99 33.09 38x
Table. Total run time and resource usage for sample TF-CPU, TF-GPU, and TensorRT runs.

Note that the table preceding is compiled based on a run and the exact number might slightly fluctuate but according to our experiments the ratios did not change much.

The total savings including the cost and run-time savings is more than 10x when accelerating our model with NVIDIA GPUs (TF-GPU) compared to using CPUs (TF-CPU). This means that when we use NVIDIA GPUs for inference on this task, we can have faster run times and lower costs compared to running your model using only CPUs.

With NVIDIA optimized inference libraries such as TensorRT, the user could run more complex and bigger models on GPU in Dataflow. TensorRT further accelerates the same job 3.6x faster compared to running it with TF-GPU, which yields 4.2x cost saving. Compare TensorRT with TF-CPU, we get 17x less execution time that provides around 38x less bill.

Summary

In this post, we compared TF-CPU, TF-GPU, and TensorRT inference performance for the question answering task running on Google Cloud Dataflow. Dataflow users can get great benefits by leveraging GPU workers and NVIDIA optimized libraries.

Accelerating deep learning model inference with NVIDIA GPUs and NVIDIA software is super easy. By adding or changing a couple of lines, we can run models using TF-GPU or TensorRT. We provided scripts and source files here and here for reference.

Acknowledgments

We would like to thank Shan Kulandaivel, Valentyn Tymofieiev, and Reza Rokni from the Google Cloud Dataflow team, and Jill Milton and Fraser Gardiner from NVIDIA for their support and invaluable feedback.

Categories
Misc

Learn More About Real-Time Ray Traced Caustics in Free Ray Tracing Gems II Chapter

We’ve been counting down to the release of Ray Tracing Gems II by providing early releases of select chapters once every week in July. This week’s chapter presents two real-time techniques for rendering caustics effects with ray tracing.
In just two weeks, on August 4, Ray Tracing Gems II will be available to download for free in its entirety, or to purchase as a physical release from Apress or Amazon. We’ve been counting down to this date by providing early releases of select chapters once every week in July. Today’s chapter presents two real-time techniques for rendering caustics effects with ray tracing. The first is built on an adaptive photon scattering approach that can depict accurate caustic patterns from metallic and transparent surfaces after multiple ray bounces. The second is specialized for water caustics cast after a single-bounce reflection or refraction and is appropriate for use on water surfaces that cover large areas of a scene. Both techniques are fully dynamic, low cost, and ready-to-use with no data preprocessing requirements.

You can download the full chapter free here. 

We’ve collaborated with our partners to make four limited edition versions of the book, including custom covers that highlight real-time ray tracing in Fortnite, Control, Watch Dogs: Legion, and Quake II RTX.

To win a limited edition print copy of Ray Tracing Gems II, enter the giveaway contest here: https://developer.nvidia.com/ray-tracing-gems-ii

Categories
Misc

Shopping Smart: AiFi Using AI to Spark a Retail Renaissance

Walk into a store. Grab your stuff. And walk right out again, without stopping to check out. In just the past three months, California-based AiFi has helped Choice Market increase sales at one of its Denver stores by 20 percent among customers who opted to skip the checkout line. It allowed Żappka, a Polish convenience Read article >

The post Shopping Smart: AiFi Using AI to Spark a Retail Renaissance appeared first on The Official NVIDIA Blog.

Categories
Misc

Speeding Up Deep Learning Inference Using TensorFlow, ONNX, and NVIDIA TensorRT

This post was updated July 20, 2021 to reflect NVIDIA TensorRT 8.0 updates. In this post, you learn how to deploy TensorFlow trained deep learning models using the new TensorFlow-ONNX-TensorRT workflow. This tutorial uses NVIDIA TensorRT 8.0.0.3 and provides two code samples, one for TensorFlow v1 and one for TensorFlow v2. TensorRT is an inference … Continued

This post was updated July 20, 2021 to reflect NVIDIA TensorRT 8.0 updates.

In this post, you learn how to deploy TensorFlow trained deep learning models using the new TensorFlow-ONNX-TensorRT workflow. This tutorial uses NVIDIA TensorRT 8.0.0.3 and provides two code samples, one for TensorFlow v1 and one for TensorFlow v2. TensorRT is an inference accelerator.

First, a network is trained using any framework. After a network is trained, the batch size and precision are fixed (with precision as FP32, FP16, or INT8). The trained model is passed to the TensorRT optimizer, which outputs an optimized runtime also called a plan. The .plan file is a serialized file format of the TensorRT engine. The plan file must be deserialized to run inference using the TensorRT runtime. 

To optimize models implemented in TensorFlow, the only thing you have to do is convert models to the ONNX format and use the ONNX parser in TensorRT to parse the model and build the TensorRT engine. Figure 1 shows the high-level ONNX workflow. 

Diagram of multiple tools sending input to ONNX, to the TensorRT Optimizer, which outputs a serialized plan file for use in the TensorRT Runtime.
Figure 1. ONNX workflow.

In this post, we discuss how to create a TensorRT engine using the ONNX workflow and how to run inference from the TensorRT engine. More specifically, we demonstrate end-to-end inference from a model in Keras or TensorFlow to ONNX, and to the TensorRT engine with ResNet-50, semantic segmentation, and U-Net networks. Finally, we explain how you can use this workflow on other networks. 

Download the code examples and unzip. You can run either the TensorFlow 1 or the TensorFlow 2 code example by follow the appropriate README. After downloading the file, you should also download labels.py from the Cityscapes dataset scripts repo and place it in the same folder as the other scripts.

ONNX overview

ONNX is an open format for machine learning and deep learning models. It allows you to convert deep learning and machine learning models from different frameworks such as TensorFlow, PyTorch, MATLAB, Caffe, and Keras to a single format.

It defines a common set of operators, common sets of building blocks of deep learning, and a common file format. It provides a definition of a computation graph, as well as built-in operators. The list of ONNX nodes that may have one or more inputs or outputs forms an acyclic graph. 

ResNet ONNX workflow example

In this example, we show how to use the ONNX workflow on two different networks and create a TensorRT engine. The first network is ResNet-50.

The workflow consists of the following steps:

  1. Convert the TensorFlow/Keras model to a .pb file.
  2. Convert the .pb file to the ONNX format.
  3. Create a TensorRT engine. 
  4. Run inference from the TensorRT engine.

Requirements

#IF TensorFlow 1
pip install tensorflow-gpu==1.15.0 keras==2.3.1
#IF TensorFlow 2
pip install tensorflow-gpu==2.4.0 keras==2.4.3

#Other requirements
pip install -U keras2onnx tf2onnx==1.8.2 pillow pycuda scikit-image

#Check installation
python -c "import keras;print(keras.version)"

Converting the model to .pb

The first step is to convert the model to a .pb file. The following code example converts the ResNet-50 model to a .pb file:

import tensorflow as tf
import keras
from tensorflow.keras.models import Model
import keras.backend as K
K.set_learning_phase(0)

def keras_to_pb(model, output_filename, output_node_names):

   """
   This is the function to convert the Keras model to pb.

   Args:
      model: The Keras model.
      output_filename: The output .pb file name.
      output_node_names: The output nodes of the network. If None, then
      the function gets the last layer name as the output node.
   """

   # Get the names of the input and output nodes.
   in_name = model.layers[0].get_output_at(0).name.split(':')[0]

   if output_node_names is None:
       output_node_names = [model.layers[-1].get_output_at(0).name.split(':')[0]]

   sess = keras.backend.get_session()

   # The TensorFlow freeze_graph expects a comma-separated string of output node names.
   output_node_names_tf = ','.join(output_node_names)

   frozen_graph_def = tf.graph_util.convert_variables_to_constants(
       sess,
       sess.graph_def,
       output_node_names)

   sess.close()
   wkdir = ''
   tf.train.write_graph(frozen_graph_def, wkdir, output_filename, as_text=False)

   return in_name, output_node_names

# load the ResNet-50 model pretrained on imagenet
model = keras.applications.resnet.ResNet50(include_top=True, weights='imagenet', input_tensor=None, input_shape=None, pooling=None, classes=1000)

# Convert the Keras ResNet-50 model to a .pb file
in_tensor_name, out_tensor_names = keras_to_pb(model, "models/resnet50.pb", None) 

In addition to Keras, you can also download ResNet-50 from the following locations:

  • Deep Learning Examples GitHub repository: Provides the latest deep learning example networks. You can also see the ResNet-50 branch, which contains a script and recipe to train the ResNet-50 v1.5 model. 
  • NVIDIA NGC Models: It has the list of checkpoints for pretrained models. As an example, search on ResNet-50v1.5 for TensorFlow and get the latest checkpoint from the Download page.

Converting the .pb file to ONNX 

The second step is to convert the .pb model to the ONNX format. To do this, first install tf2onnx. 

After installing tf2onnx, there are two ways of converting the model from a .pb file to the ONNX format. The first way is to use the command line and the second method is by using Python API. Run the following command:

python -m tf2onnx.convert  --input /Path/to/resnet50.pb --inputs input_1:0 --outputs probs/Softmax:0 --output resnet50.onnx 

Creating the TensorRT engine from ONNX

To create the TensorRT engine from the ONNX file, run the following command: 

import tensorrt as trt

TRT_LOGGER = trt.Logger(trt.Logger.WARNING)
trt_runtime = trt.Runtime(TRT_LOGGER)
def build_engine(onnx_path, shape = [1,224,224,3]):

   """
   This is the function to create the TensorRT engine
   Args:
      onnx_path : Path to onnx_file. 
      shape : Shape of the input of the ONNX file. 
  """
   with trt.Builder(TRT_LOGGER) as builder, builder.create_network(1) as network, builder.create_builder_config() as config, trt.OnnxParser(network, TRT_LOGGER) as parser:
       config.max_workspace_size = (256 with open(onnx_path, 'rb') as model:
           parser.parse(model.read())
       network.get_input(0).shape = shape
       engine = builder.build_engine(network, config)
       return engine

def save_engine(engine, file_name):
   buf = engine.serialize()
   with open(file_name, 'wb') as f:
       f.write(buf)
def load_engine(trt_runtime, plan_path):
   with open(plan_path, 'rb') as f:
       engine_data = f.read()
   engine = trt_runtime.deserialize_cuda_engine(engine_data)
   return engine

This code should be saved in the engine.py file, and is used later in the post.

This code example contains the following variable:  

  • max_workspace_size:  Maximum GPU temporary memory that ICudaEngine can use at execution time.

The builder creates an empty network (builder.create_network()) and the ONNX parser parses the ONNX file into the network (parser.parse(model.read())). You set the input shape for the network (network.get_input(0).shape = shape), after which the builder creates the engine (engine = builder.build_cuda_engine(network)). To create the engine, run the following code example:

import engine as eng
import argparse
from onnx import ModelProto
import tensorrt as trt 
 
 engine_name = “resnet50.plan”
 onnx_path = "/path/to/onnx/result/file/"
 batch_size = 1 
 
 model = ModelProto()
 with open(onnx_path, "rb") as f:
    model.ParseFromString(f.read())
 
 d0 = model.graph.input[0].type.tensor_type.shape.dim[1].dim_value
 d1 = model.graph.input[0].type.tensor_type.shape.dim[2].dim_value
 d2 = model.graph.input[0].type.tensor_type.shape.dim[3].dim_value
 shape = [batch_size , d0, d1 ,d2]
 engine = eng.build_engine(onnx_path, shape= shape)
 eng.save_engine(engine, engine_name) 

In this code example, you first get the input shape from the ONNX model. Next,  create the engine, and then save the engine in a .plan file.

Running inference from the TensorRT engine:

The TensorRT engine runs inference in the following workflow: 

  1. Allocate buffers for inputs and outputs in the GPU.
  2. Copy data from the host to the allocated input buffers in the GPU.
  3. Run inference in the GPU. 
  4. Copy results from the GPU to the host. 
  5. Reshape the results as necessary. 

These steps are explained in detail in the following code example. This code should be saved in the inference.py file, and is used later in this post.

import tensorrt as trt
import pycuda.driver as cuda
import numpy as np
import pycuda.autoinit 

def allocate_buffers(engine, batch_size, data_type):

   """
   This is the function to allocate buffers for input and output in the device
   Args:
      engine : The path to the TensorRT engine. 
      batch_size : The batch size for execution time.
      data_type: The type of the data for input and output, for example trt.float32. 
   
   Output:
      h_input_1: Input in the host.
      d_input_1: Input in the device. 
      h_output_1: Output in the host. 
      d_output_1: Output in the device. 
      stream: CUDA stream.

   """

   # Determine dimensions and create page-locked memory buffers (which won't be swapped to disk) to hold host inputs/outputs.
   h_input_1 = cuda.pagelocked_empty(batch_size * trt.volume(engine.get_binding_shape(0)), dtype=trt.nptype(data_type))
   h_output = cuda.pagelocked_empty(batch_size * trt.volume(engine.get_binding_shape(1)), dtype=trt.nptype(data_type))
   # Allocate device memory for inputs and outputs.
   d_input_1 = cuda.mem_alloc(h_input_1.nbytes)

   d_output = cuda.mem_alloc(h_output.nbytes)
   # Create a stream in which to copy inputs/outputs and run inference.
   stream = cuda.Stream()
   return h_input_1, d_input_1, h_output, d_output, stream 

def load_images_to_buffer(pics, pagelocked_buffer):
   preprocessed = np.asarray(pics).ravel()
   np.copyto(pagelocked_buffer, preprocessed) 

def do_inference(engine, pics_1, h_input_1, d_input_1, h_output, d_output, stream, batch_size, height, width):
   """
   This is the function to run the inference
   Args:
      engine : Path to the TensorRT engine 
      pics_1 : Input images to the model.  
      h_input_1: Input in the host         
      d_input_1: Input in the device 
      h_output_1: Output in the host 
      d_output_1: Output in the device 
      stream: CUDA stream
      batch_size : Batch size for execution time
      height: Height of the output image
      width: Width of the output image
   
   Output:
      The list of output images

   """

   load_images_to_buffer(pics_1, h_input_1)

   with engine.create_execution_context() as context:
       # Transfer input data to the GPU.
       cuda.memcpy_htod_async(d_input_1, h_input_1, stream)

       # Run inference.

       context.profiler = trt.Profiler()
       context.execute(batch_size=1, bindings=[int(d_input_1), int(d_output)])

       # Transfer predictions back from the GPU.
       cuda.memcpy_dtoh_async(h_output, d_output, stream)
       # Synchronize the stream
       stream.synchronize()
       # Return the host output.
       out = h_output.reshape((batch_size,-1, height, width))
       return out 

The first two lines are for determining the dimensions for input and output. You create page-locked memory buffers in host (h_input_1, h_output). Then, you allocate device memory for input and output the same size as host input and output (d_input_1, d_output). The next step is to create the CUDA stream for copying data between the allocated memory from device and host. 

In this code example, in the do_inference function, the first step is to load images to buffers in the host using the load_images_to_buffer function. Then the input data is transferred to the GPU (cuda.memcpy_htod_async(d_input_1, h_input_1, stream)) and inference is run using context.execute. Finally the results are copied from GPU to the host (cuda.memcpy_dtoh_async(h_output, d_output, stream)).

Semantic segmentation ONNX workflow example

In the post Fast INT8 Inference for Autonomous Vehicles with TensorRT 3, the author covered the process of UFF workflow for a semantic segmentation model.

In this post, you use similar networks to run the ONNX workflow for semantic segmentation. The network consists of a VGG16-based encoder and three upsampling layers implemented using a deconvolutional layer. The network is trained in about 40,000 iterations on the Cityscapes Dataset. 

There are multiple ways of converting the TensorFlow model to an ONNX file. One way is the one explained in the ResNet50 section. Keras also has its own Keras-to-ONNX file converter. Sometimes, some of the layers are not supported in the TensorFlow-to-ONNX but they are supported in the Keras to ONNX converter. Depending on the Keras framework and the type of layers used, you may need to choose between converters. 

In the following code example, you directly convert the Keras model to ONNX using the Keras-to-ONNX converter. Download the pretrained semantic segmentation file, semantic_segmentation.hdf5.

import keras
import tensorflow as tf
from keras2onnx import convert_keras

def keras_to_onnx(model, output_filename):
   onnx = convert_keras(model, output_filename)
   with open(output_filename, "wb") as f:
       f.write(onnx.SerializeToString())

semantic_model = keras.models.load_model('/path/to/semantic_segmentation.hdf5')
keras_to_onnx(semantic_model, 'semantic_segmentation.onnx') 

Figure 2 shows the architecture of the network.

Figure 2. The VGG16-based semantic segmentation model.

As in the previous example, use the following code example to create the engine for semantic segmentation.

import engine as eng
from onnx import ModelProto
import tensorrt as trt


engine_name = 'semantic.plan'
onnx_path = "semantic.onnx"
batch_size = 1

model = ModelProto()
with open(onnx_path, "rb") as f:
  model.ParseFromString(f.read())

d0 = model.graph.input[0].type.tensor_type.shape.dim[1].dim_value
d1 = model.graph.input[0].type.tensor_type.shape.dim[2].dim_value
d2 = model.graph.input[0].type.tensor_type.shape.dim[3].dim_value
shape = [batch_size , d0, d1 ,d2]
engine = eng.build_engine(onnx_path, shape= shape)
eng.save_engine(engine, engine_name) 

To test the output of the model, use the Cityscapes Dataset. To work with Cityscapes, you must have the following functions: sub_mean_chw and color_map.  

In the following code example, sub_mean_chw is for subtracting the mean value from the image as the preprocessing step and color_map is the mapping from the class ID to a color. The latter is used for visualization. 

import numpy as np
from PIL import Image
import tensorrt as trt
import labels  # from cityscapes evaluation script
import skimage.transform

TRT_LOGGER = trt.Logger(trt.Logger.WARNING)
trt_runtime = trt.Runtime(TRT_LOGGER)

MEAN = (71.60167789, 82.09696889, 72.30508881)
CLASSES = 20

HEIGHT = 512
WIDTH = 1024

def sub_mean_chw(data):
   data = data.transpose((1, 2, 0))  # CHW -> HWC
   data -= np.array(MEAN)  # Broadcast subtract
   data = data.transpose((2, 0, 1))  # HWC -> CHW
   return data

def rescale_image(image, output_shape, order=1):
   image = skimage.transform.resize(image, output_shape,
               order=order, preserve_range=True, mode='reflect')
   return image

def color_map(output):
   output = output.reshape(CLASSES, HEIGHT, WIDTH)
   out_col = np.zeros(shape=(HEIGHT, WIDTH), dtype=(np.uint8, 3))
   for x in range(WIDTH):
       for y in range(HEIGHT):

           if (np.argmax(output[:, y, x] )== 19):
               out_col[y,x] = (0, 0, 0)
           else:
               out_col[y, x] = labels.id2label[labels.trainId2label[np.argmax(output[:, y, x])].id].color
   return out_col  

The following code example is the rest of the code for the previous example. You must run the previous block first because you need the defined functions. Use the example to compare the output of the Keras model and TensorRT engine semantic .plan file and then visualize both outputs. Replace the placeholders /path/to/semantic_segmentation.hdf5  and input_file_path as appropriate.

import engine as eng
import inference as inf
import keras
import tensorrt as trt 

input_file_path = ‘munster_000172_000019_leftImg8bit.png’
onnx_file = "semantic.onnx"
serialized_plan_fp32 = "semantic.plan"
HEIGHT = 512
WIDTH = 1024

image = np.asarray(Image.open(input_file_path))
img = rescale_image(image, (512, 1024),order=1)
im = np.array(img, dtype=np.float32, order='C')
im = im.transpose((2, 0, 1))
im = sub_mean_chw(im)

engine = eng.load_engine(trt_runtime, serialized_plan_fp32)
h_input, d_input, h_output, d_output, stream = inf.allocate_buffers(engine, 1, trt.float32)
out = inf.do_inference(engine, im, h_input, d_input, h_output, d_output, stream, 1, HEIGHT, WIDTH)
out = color_map(out)

colorImage_trt = Image.fromarray(out.astype(np.uint8))
colorImage_trt.save(“trt_output.png”)

semantic_model = keras.models.load_model('/path/to/semantic_segmentation.hdf5')
out_keras= semantic_model.predict(im.reshape(-1, 3, HEIGHT, WIDTH))

out_keras = color_map(out_keras)
colorImage_k = Image.fromarray(out_keras.astype(np.uint8))
colorImage_k.save(“keras_output.png”)

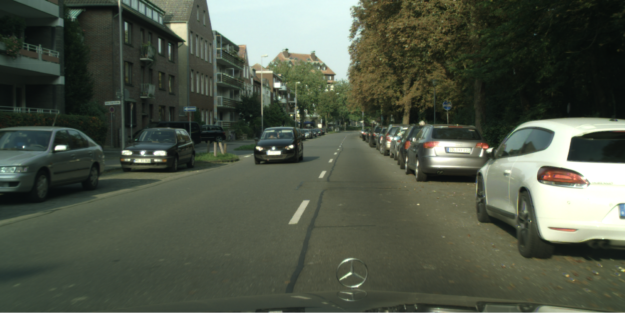
Figure 3 shows the actual image and the ground truth, and the output of Keras versus the output of the TensorRT engine. As you can see, the output for the TensorRT engine is similar to the one for Keras. 

Figure 3a. Original image.
Figure 3b. Ground truth label.
Figure 3c. Output of TensorRT.
Figure 3d. Output of Keras.

Try it on other networks

Now you can try the ONNX workflow on other networks. For more information about good examples of segmentation networks, see Segmentation models with pretrained backbones on GitHub. 

As an example, we show how to use the ONNX workflow with other networks. The network in this example is U-Net from the segmentation_models library. Here, we only loaded the model and did not train it. You may need to train these models on your preferred dataset. 

One important point about these networks is that when you load these networks, their input layer sizes are as follows: (None, None, None, 3). To create a TensorRT engine, you need an ONNX file with a known input size. Before you convert this model to ONNX, change the network by assigning the size to its input and then convert it to the ONNX format. 

As an example, load the U-Net network from this library (segmentation_models) and assign the size (244, 244, 3) to its input. After creating the TensorRT engine for the inference, do a similar conversion to what you did for semantic segmentation. Depending on the application and dataset, you may need to have a different color mapping.

# Requirement for TensorFlow 2
pip install tensorflow-gpu==2.1.0
 
# Other requirements
pip install -U segmentation-models
import segmentation_models as sm
import keras
from keras2onnx import convert_keras
from engine import *
onnx_path = 'unet.onnx'
engine_name = 'unet.plan'
batch_size = 1
CHANNEL = 3
HEIGHT = 224
WIDTH = 224

model = sm.Unet()
model._layers[0].batch_input_shape = (None, 224,224,3)
model = keras.models.clone_model(model)

onx = convert_keras(model, onnx_path)
with open(onnx_path, "wb") as f:
  f.write(onx.SerializeToString())

shape = [batch_size , HEIGHT, WIDTH, CHANNEL]
engine = build_engine(onnx_path, shape= shape)
save_engine(engine, engine_name) 

As we mentioned earlier in this post, another way of downloading pretrained models is to download them from NVIDIA NGC Models. It has a list of checkpoints for pretrained models. As an example, you can search for UNet for TensorFlow and then go to the Download page to get the latest checkpoint. 

Conclusion

In this post, we explained how to deploy deep learning applications using a TensorFlow-to-ONNX-to-TensorRT workflow, with several examples. The first example was ONNX-TensorRT on ResNet-50, and the second example was VGG16-based semantic segmentation that was trained on the Cityscapes Dataset. At the end of the post, we demonstrated how to apply this workflow on other networks.  For more information about the best performance of training and inference, see NVIDIA Data Center Deep Learning Product Performance.

Categories
Misc

Object Detection TF 1.15

Hi all, I am currently trying to implement faster rcnn using tensorflow. Due to the limitations of the machine I am working on I can only use tensorflow 1.15. However, the model that I wanted to originally use as a feature extractor is built with Keras and tf2. Now I’m left wondering what I’m supposed to use to build the model for the feature extractor if I can’t use Keras. Should I just try to implement the inception resnet model by myself? Any help would be appreciated

submitted by /u/prinse4515
[visit reddit] [comments]

Categories
Misc

Linear Regressions from Image…Is it accurate?

I’m trying to create a model to predict latitude and longitude from an image. However, my loss does not decrease at all during training, and the predictions are very far off.

Is what I’m doing realistically possible? And if so, how can I make my model more accurate?

Thanks!

submitted by /u/llub888
[visit reddit] [comments]

Categories
Misc

NVIDIA Announces TensorRT 8 Slashing BERT-Large Inference Down to 1 Millisecond

NVIDIA announced TensorRT 8.0 which brings BERT-Large inference latency down to 1.2 ms with new optimizations.

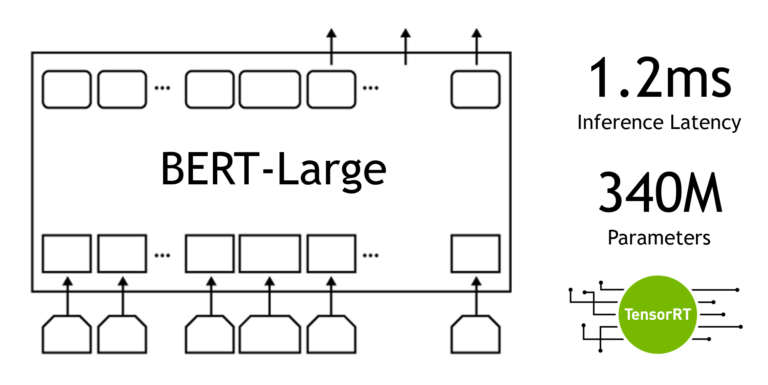
Today, NVIDIA announced TensorRT 8.0 which brings BERT-Large inference latency down to 1.2 ms with new optimizations. This version also delivers 2x the accuracy for INT8 precision with Quantization Aware Training, and significantly higher performance through support for Sparsity, which was introduced in Ampere GPUs.

TensorRT is an SDK for high-performance deep learning inference that includes an inference optimizer and runtime that delivers low latency and high throughput. TensorRT is used across industries such as Healthcare, Automotive, Manufacturing, Internet/Telecom services, Financial Services, Energy, and has been downloaded nearly 2.5 million times.

There have been several kinds of new transformer-based models used across conversational AI. New generalized optimizations in TensorRT can accelerate all such models reducing inference time to half the time vs TensorRT 7.

Highlights from this version include:

  • BERT Inference in 1.2 ms with new transformer optimizations
  • Achieve accuracy equivalent to FP32 with INT8 precision using Quantization Aware Training
  • Introducing Sparsity support for faster inference on Ampere GPUs

You can learn more about Sparsity here.

One of the biggest social media platforms in China, WeChat accelerates its search using TensorRT serving 500M users a month.

“We have implemented TensorRT-and-INT8 QAT-based model inference acceleration to accelerate core tasks of WeChat Search such as Query Understanding and Results Ranking. The conventional limitation of NLP model complexity has been broken-through by our solution with GPU + TensorRT, and BERT/Transformer can be fully integrated in our solution. In addition, we have achieved significant reduction (70%) in allocated computational resources using superb performance optimization methods. ” – Huili/Raccoonliu/Dickzhu, WeChat Search

Figure 1. Leading adopters across all verticals.

To learn more about TensorRT 8 and its features:

Follow these GTC Sessions to get yourself familiar with Technologies:

NVIDIA TensorRT is freely available to members of the NVIDIA Developer Program. To learn more, visit TensorRT product page.

Categories
Misc

NVIDIA Inference Breakthrough Makes Conversational AI Smarter, More Interactive From Cloud to Edge

NVIDIA today launched TensorRT™ 8, the eighth generation of the company’s AI software, which slashes inference time in half for language queries — enabling developers to build the world’s best-performing search engines, ad recommendations and chatbots and offer them from the cloud to the edge.

Categories
Misc

Just What You’re Looking For: Recommender Team Suggests Winning Strategies

The final push for the hat trick came down to the wire. Five minutes before the deadline, the team submitted work in its third and hardest data science competition of the year in recommendation systems. Called RecSys, it’s a relatively new branch of computer science that’s spawned one of the most widely used applications in Read article >

The post Just What You’re Looking For: Recommender Team Suggests Winning Strategies appeared first on The Official NVIDIA Blog.

Categories
Misc

Real-Time Natural Language Processing with BERT Using NVIDIA TensorRT (Updated)

Today, NVIDIA is releasing TensorRT 8.0, which introduces many transformer optimizations. With this post update, we present the latest TensorRT optimized BERT sample and its inference latency benchmark on A30 GPUs. Using the optimized sample, you can execute different batch sizes for BERT-base or BERT-large within the 10 ms latency budget for conversational AI applications.

This post was originally published in August 2019 and has been updated for NVIDIA TensorRT 8.0.

Large-scale language models (LSLMs) such as BERT, GPT-2, and XL-Net have brought exciting leaps in accuracy for many natural language processing (NLP) tasks. Since its release in October 2018, BERT (Bidirectional Encoder Representations from Transformers), with all its many variants, remains one of the most popular language models and still delivers state-of-the-art accuracy.

BERT provided a leap in accuracy for NLP tasks that brought high-quality, language-based services within the reach of companies across many industries. To use the model in production, you must consider factors such as latency and accuracy, which influences end-user satisfaction with a service. BERT requires significant compute during inference due to its 12/24-layer stacked, multihead attention network. This has posed a challenge for companies to deploy BERT as part of real-time applications.

Today, NVIDIA is releasing version 8 of TensorRT, which brings the inference latency of BERT-Large down to 1.2 ms on NVIDIA A100 GPUs with new optimizations on transformer-based networks. New generalized optimizations in TensorRT can accelerate all such models, reducing inference time to half the time compared to TensorRT 7.

TensorRT

TensorRT is a platform for high-performance, deep learning inference, which includes an optimizer and runtime that minimizes latency and maximizes throughput in production. With TensorRT, you can optimize models trained in all major frameworks, calibrate for lower precision with high accuracy, and finally deploy in production.

All the code for achieving this performance with BERT is being released as open source in this NVIDIA/TensorRT GitHub repo. We have optimized the Transformer layer, which is a fundamental building block of the BERT encoder so that you can adapt these optimizations to any BERT-based NLP task. BERT is applied to an expanding set of speech and NLP applications beyond conversational AI, all of which can take advantage of these optimizations.

Question answering (QA) or reading comprehension is a popular way to test the ability of models to understand the context. The SQuAD leaderboard tracks the top performers for this task, for a dataset and test set that they provide. There has been rapid progress in QA ability in the last few years, with global contributions from academia and companies.

In this post, we demonstrate how to create a simple QA application using Python, powered by TensorRT-optimized BERT code that NVIDIA released today. The example provides an API to input passages and questions, and it returns responses generated by the BERT model. 

Here’s a brief review of the steps to perform training and inference using TensorRT for BERT.

BERT training and inference pipeline

A major problem faced by NLP researchers and developers is scarcity of high-quality labeled training data for their specific NLP task. To overcome the problem of learning a model for the task from scratch, breakthroughs in NLP use the vast amounts of unlabeled text and break the NLP task into two parts:

  • Learning to represent the meaning of words, the relationship between them, that is, building up a language model using auxiliary tasks and a large corpus of text
  • Specializing the language model to the actual task by augmenting the language model with a relatively small, task-specific network that is trained in a supervised manner.

These two stages are typically referred to as pretraining and fine-tuning. This paradigm enables the use of the pretrained language model to a wide range of tasks without any task-specific change to the model architecture. In this example, BERT provides a high-quality language model that is fine-tuned for QA but suitable for other tasks such as sentence classification and sentiment analysis. 

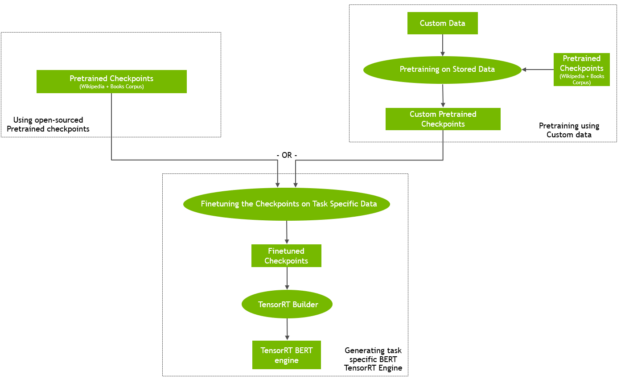
You can either start with the pretrained checkpoints available online or pretrain BERT on your own custom corpus (Figure 1). You can also initialize pretraining from a checkpoint and then continue training on custom data.

BERT TensorRT engine generation chart. A pretrained checkpoint or a checkpoint pretrained on custom data can be used as input to the TensorRT Builder, which creates the optimized engine as output.
Figure 1. Generating BERT TensorRT engine from pretrained checkpoints

Pretraining with custom or domain-specific data may yield interesting results, for example BioBert. However, it is computationally intensive and requires a massively parallel compute infrastructure to complete within a reasonable amount of time. GPU-enabled, multinode training is an ideal solution for such scenarios. For more information about how NVIDIA developers were able to train BERT in less than an hour, see Training BERT with GPUs.

In the fine-tuning step, the task-specific network based on the pretrained BERT language model is trained using the task-specific training data. For QA, this is (paragraph, question, answer) triples. Compared to pretraining, fine-tuning is generally far less computationally demanding.

To perform inference using a QA neural network:

  1. Create a TensorRT engine by passing the fine-tuned weights and network definition to the TensorRT builder.
  2. Start the TensorRT runtime with this engine.
  3. Feed a passage and a question to the TensorRT runtime and receive as output the answer predicted by the network.

Figure 2 shows the entire workflow.

Workflow diagram on how to perform inference with TensorRT runtime engine for BERT QA task. A passage and question are fed to the preprocessing module, which is connected to the TensorRT Engine Execution that runs inference on the loaded TensorRT BERT engine. The output is post-processed obtaining the resulting text answer.
Figure 2. Workflow to perform inference with TensorRT runtime engine for BERT QA task

Run the sample! 

Set up your environment to perform BERT inference with the following steps: 

  1. Create a Docker image with the prerequisites.
  2. Build the TensorRT engine from the fine-tuned weights.
  3. Perform inference given a passage and query.

We use scripts to perform these steps, which you can find in the TensorRT BERT sample repo. While we describe several options that you can pass to each script, to get started quickly, you could also run the following code example:

 # Clone the TensorRT repository and navigate to BERT demo directory
 git clone --recursive https://github.com/NVIDIA/TensorRT && cd TensorRT
  
 # Create and launch the Docker image 
 # Here we assume the following: 
 #  - the os being ubuntu-18.04 (see below for other supported versions)
 #  - cuda version is 11.3.1
 bash docker/build.sh --file docker/ubuntu-18.04.Dockerfile --tag tensorrt-ubuntu18.04-cuda11.3 --cuda 11.3.1
  
 # Run the Docker container just created
 bash docker/launch.sh --tag tensorrt-ubuntu18.04-cuda11.3 --gpus all
  
 # cd into the BERT demo folder
 cd $TRT_OSSPATH/demo/BERT
  
 # Download the BERT model fine-tuned checkpoint
 bash scripts/download_model.sh
  
 # Build the TensorRT runtime engine.
 # To build an engine, use the builder.py script.
 mkdir -p engines && python3 builder.py -m models/fine-tuned/bert_tf_ckpt_large_qa_squad2_amp_128_v19.03.1/model.ckpt -o engines/bert_large_128.engine -b 1 -s 128 --fp16 -c models/fine-tuned/bert_tf_ckpt_large_qa_squad2_amp_128_v19.03.1 

This last command builds an engine with a maximum batch size of 1 (-b 1), and sequence length of 128 (-s 128) using mixed precision (--fp16) and the BERT Large SQuAD v2 FP16 Sequence Length 128 checkpoint (-c models/fine-tuned/bert_tf_ckpt_large_qa_squad2_amp_128_v19.03.1).

Now, give it a passage and see how much information it can decipher by asking a few questions.

python3 inference.py -e engines/bert_large_128.engine -p "TensorRT is a high performance deep learning inference platform that delivers low latency and high throughput for apps such as recommenders, speech and image/video on NVIDIA GPUs. It includes parsers to import models, and plugins to support novel ops and layers before applying optimizations for inference. Today NVIDIA is open-sourcing parsers and plugins in TensorRT so that the deep learning community can customize and extend these components to take advantage of powerful TensorRT optimizations for your apps." -q "What is TensorRT?" -v models/fine-tuned/bert_tf_ckpt_large_qa_squad2_amp_128_v19.03.1/vocab.txt

The result of this command should be something similar to the following:

Passage: TensorRT is a high performance deep learning inference platform that delivers low latency and high throughput for apps such as recommenders, speech and image/video on NVIDIA GPUs. It includes parsers to import models, and plugins to support novel ops and layers before applying optimizations for inference. Today NVIDIA is open-sourcing parsers and plugins in TensorRT so that the deep learning community can customize and extend these components to take advantage of powerful TensorRT optimizations for your apps. 
Question: What is TensorRT?
Answer: 'a high performance deep learning inference platform'

Given the same passage with a different question, you should get the following result:

Question: What is included in TensorRT?
Answer: 'parsers to import models, and plugins to support novel ops and layers before applying optimizations for inference'

The answers provided by the model are accurate based on the text of the passage that was provided. The sample uses FP16 precision for performing inference with TensorRT. This helps achieve the highest performance possible on Tensor Cores in NVIDIA GPUs. In our tests, we measured the accuracy of TensorRT to be comparable to in-framework inference with FP16 precision. 

Script options

Here are the options available with the scripts. The docker/build.sh script builds the docker image using the Dockerfile supplied in the docker folder. It installs all necessary packages, depending on the OS you are selecting as Dockerfile. For this post, we used ubuntu-18.04 but dockerfiles for ubuntu-16.04 and ubuntu-20.04 are also provided.

Run the script as follows:

bash docker/build.sh --file docker/ubuntu-xx.04.Dockerfile --tag tensorrt-tag --cuda cuda_version

After creating and running the environment, download fine-tuned weights for BERT. Note that you do not need the pretrained weights to create the TensorRT engine (just the fine-tuned weights). Along with the fine-tuned weights, use the associated configuration file, which specifies parameters such as number of attention heads, number of layers, and the vocab.txt file, which contains the learned vocabulary from the training process. These are packaged with the fine-tuned model downloaded from NGC; download them using the download_model.sh script. As part of this script, you can specify the set of fine-tuned weights for the BERT model to download. The command-line parameters control the exact BERT model to be used later for model building and inference:

sh download_model.sh [tf|pyt] [base|large|megatron-large] [128|384] [v2|v1_1] [sparse] [int8-qat]
 tf | pyt tensorflow or pytorch version
 base | large | megatron-large - determine whether to download a BERT-base or BERT-large or megatron model to optimize
 128 | 384 - determine whether to download a BERT model for sequence length 128 or 384
 v2 | v1_1, fine-tuned on squad2 or squad1.1
 sparse, download sparse version
 int8-qat, download int8 weights 

Examples:

# Running with default parameters
bash download_model.sh
# Running with custom parameters (BERT-large, FP32 fine-tuned weights, 128 sequence length)
sh download_model.sh large tf fp32 128

This script by default downloads fine-tuned TensorFlow BERT-large, with FP16 precision and a sequence length of 128. In addition to the fine-tuned model, you use the configuration file, enumerating model parameters and the vocabulary file used to convert BERT model output to a textual answer. 

Next, you can build the TensorRT engine and use it for a QA example, that is, inference. The script builder.py builds the TensorRT engine for inference based on the downloaded BERT fine-tuned model. 

Make sure that the sequence length provided to the following script matches the sequence length of the model that was downloaded. 

python3 builder.py [-h] [-m CKPT] [-x ONNX] [-pt PYTORCH] -o OUTPUT
                   [-b BATCH_SIZE] [-s SEQUENCE_LENGTH] -c CONFIG_DIR [-f] [-i]
                   [-t] [-w WORKSPACE_SIZE] [-j SQUAD_JSON] [-v VOCAB_FILE]
                   [-n CALIB_NUM] [-p CALIB_PATH] [-g] [-iln] [-imh] [-sp]
                   [-tcf TIMING_CACHE_FILE] 

Here are the optional arguments:

   -h, --help    show this help message and exit
   -m CKPT, --ckpt CKPT  The checkpoint file basename, e.g.:
 basename(model.ckpt-766908.data-00000-of-00001) is model.ckpt-766908 (default: None)
   -x ONNX, --onnx ONNX  The ONNX model file path. (default: None)
   -pt PYTORCH, --pytorch PYTORCH
             The PyTorch checkpoint file path. (default: None)
   -o OUTPUT, --output OUTPUT
             The bert engine file, ex bert.engine (default: bert_base_384.engine)
   -b BATCH_SIZE, --batch-size BATCH_SIZE 
 Batch size(s) to optimize for. 
 The engine will be usable with any batch size below this, but may not be optimal for smaller sizes. Can be specified multiple times to optimize for more than one batch size.(default: [])
   -s SEQUENCE_LENGTH, --sequence-length SEQUENCE_LENGTH 
             Sequence length of the BERT model (default: [])
   -c CONFIG_DIR, --config-dir CONFIG_DIR
 The folder containing the bert_config.json, 
 which can be downloaded e.g. from https://github.com/google-research/bert#pre-trained-models (default: None)
   -f, --fp16    Indicates that inference should be run in FP16 precision 
             (default: False)
   -i, --int8    Indicates that inference should be run in INT8 precision 
             (default: False)
   -t, --strict  Indicates that inference should be run in strict precision mode
             (default: False)
   -w WORKSPACE_SIZE, --workspace-size WORKSPACE_SIZE Workspace size in MiB for 
             building the BERT engine (default: 1000)
   -j SQUAD_JSON, --squad-json SQUAD_JSON
 squad json dataset used for int8 calibration (default: squad/dev-v1.1.json)
   -v VOCAB_FILE, --vocab-file VOCAB_FILE 
 Path to file containing entire understandable vocab (default: ./pre-trained_model/uncased_L-24_H-1024_A-16/vocab.txt)
   -n CALIB_NUM, --calib-num CALIB_NUM
             calibration batch numbers (default: 100)
   -p CALIB_PATH, --calib-path CALIB_PATH 
             calibration cache path (default: None)
   -g, --force-fc2-gemm  
             Force use gemm to implement FC2 layer (default: False)
   -iln, --force-int8-skipln 
 Run skip layernorm with INT8 (FP32 or FP16 by default) inputs and output (default: False)
   -imh, --force-int8-multihead
 Run multi-head attention with INT8 (FP32 or FP16 by default) input and output (default: False)
   -sp, --sparse         Indicates that model is sparse (default: False)
   -tcf TIMING_CACHE_FILE, --timing-cache-file TIMING_CACHE_FILE 
 Path to tensorrt build timeing cache file, only available for tensorrt 8.0 and later (default: None) 

Example:

python3 builder.py -m models/fine-tuned/bert_tf_ckpt_large_qa_squad2_amp_128_v19.03.1/model.ckpt -o engines/bert_large_128.engine -b 1 -s 128 --fp16 -c models/fine-tuned/bert_tf_ckpt_large_qa_squad2_amp_128_v19.03.1 

You should now have a TensorRT engine, engines/bert_large_128.engine,  to use in the inference.py script for QA.

Later in this post, we describe the process to build the TensorRT engine. You can now provide a passage and a query to inference.py and see if the model is able to answer your queries correctly.

There are few ways to interact with the inference script: 

  • The passage and question can be provided as command-line arguments using the –passage and –question flags.
  • They can be passed in from a given file using the –passage_file and –question_file flags.
  • If neither of these flags are given during execution, you are prompted to enter the passage and question after the execution has begun.

Here are the parameters for the inference.py script:

Usage: inference.py [-h] [-e ENGINE] [-b BATCH_SIZE]
                     [-p [PASSAGE [PASSAGE ...]]] [-pf PASSAGE_FILE]
                     [-q [QUESTION [QUESTION ...]]] [-qf QUESTION_FILE]
                     [-sq SQUAD_JSON] [-o OUTPUT_PREDICTION_FILE]
                     [-v VOCAB_FILE] [-s SEQUENCE_LENGTH]
                     [--max-query-length MAX_QUERY_LENGTH]
                     [--max-answer-length MAX_ANSWER_LENGTH]
                     [--n-best-size N_BEST_SIZE] [--doc-stride DOC_STRIDE] 

This script uses a prebuilt TensorRT BERT QA engine to answer a question based on the provided passage.

Here are the optional arguments:

   -h, --help            show this help message and exit
   -e ENGINE, --engine ENGINE
                         Path to BERT TensorRT engine
   -b BATCH_SIZE, --batch-size BATCH_SIZE
                         Batch size for inference.
   -p [PASSAGE [PASSAGE ...]], --passage [PASSAGE [PASSAGE ...]]
                         Text for paragraph/passage for BERT QA
   -pf PASSAGE_FILE, --passage-file PASSAGE_FILE
                         File containing input passage
   -q [QUESTION [QUESTION ...]], --question [QUESTION [QUESTION ...]]
                         Text for query/question for BERT QA
   -qf QUESTION_FILE, --question-file QUESTION_FILE
                         File containing input question
   -sq SQUAD_JSON, --squad-json SQUAD_JSON
                         SQuAD json file
   -o OUTPUT_PREDICTION_FILE, --output-prediction-file OUTPUT_PREDICTION_FILE
                         Output prediction file for SQuAD evaluation
   -v VOCAB_FILE, --vocab-file VOCAB_FILE
                         Path to file containing entire understandable vocab
   -s SEQUENCE_LENGTH, --sequence-length SEQUENCE_LENGTH
                         The sequence length to use. Defaults to 128
   --max-query-length MAX_QUERY_LENGTH
                         The maximum length of a query in number of tokens.
                         Queries longer than this will be truncated
   --max-answer-length MAX_ANSWER_LENGTH
                         The maximum length of an answer that can be generated
   --n-best-size N_BEST_SIZE
                         Total number of n-best predictions to generate in the
                         nbest_predictions.json output file
   --doc-stride DOC_STRIDE
                         When splitting up a long document into chunks, what
                         stride to take between chunks 

BERT inference with TensorRT 

For a step-by-step description and walkthrough of the inference process, see the Python script inference.py and the detailed Jupyter notebook inference.ipynb in the sample folder. Here are a few key parameters and concepts for performing inference with TensorRT. 

BERT, or more specifically, the encoder layer, uses the following parameters to govern its operation:

  • Batch size
  • Sequence Length
  • Number of attention heads

The value of these parameters, which depend on the BERT model chosen, are used to set the configuration parameters for the TensorRT plan file (execution engine). 

For each encoder, also specify the number of hidden layers and the attention head size. You can also read all the earlier parameters from the TensorFlow checkpoint file. 

As the BERT model we are using has been fine-tuned for a downstream task of QA on the SQuAD dataset, the output for the network (that is, the output fully connected layer) is a span of text where the answer appears in the passage, referred to as  h_output in the sample. After you generate the TensorRT engine, you can serialize it and use it later with TensorRT runtime.

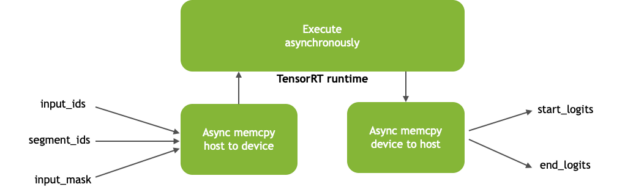
During inference, you perform memory copies from CPU to GPU and the reverse asynchronously to get tensors into and out of the GPU memory, respectively. Asynchronous memory copy operation hides the latency of memory transfer by overlapping computations with memory copy operation between device and host. Figure 3 shows the asynchronous memory copies and kernel execution.

Diagram of the TensorRT Runtime execution process. Inputs are asynchronously loaded from host to device. The engine inference is executed asynchronously. The result, again asynchronously, is copied from the device to the host.
Figure 3. TensorRT Runtime process

The inputs to the BERT model (Figure 3) include the following:

  • input_ids: tensor with token ids of paragraph concatenated along with question that is used as input for inference 
  • segment_ids: distinguishes between passage and question
  • input_mask: indicates which elements in the sequence are tokens, and which ones are padding elements

The outputs (start_logits and end_logits) represent the span of the answer, which the network predicts inside the passage based on the question.

Benchmarking BERT inference performance 

BERT can be applied both for online and offline use cases. Online NLP applications, such as conversational AI, place tight latency budgets during inference. Several models need to execute in a sequence in response to a single user query. When used as a service, the total time a customer experiences includes compute time as well as input and output network latency. Longer times lead to a sluggish performance and a poor customer experience. 

While the exact latency available for a single model can vary by application, several real-time applications need the language model to execute in under 10 ms. 

Using an NVIDIA Ampere Architecture A100 GPU, BERT-Large optimized with TensorRT 8 can perform inference in 1.2ms for a QA task similar to that available in SQuAD with batch size = 1 and sequence length = 128. 

Using the TensorRT optimized sample, you can execute different batch sizes for BERT-base or BERT-large within the 10 ms latency budget. For example, the latency for inference on a BERT-Large model with sequence length = 384 batch size = 1 on A30 with TensorRT8 was 3.62ms. The same model, sequence length =384 with highly optimized code on a CPU-only platform (**) for batch size = 1 was 76ms.

Bar chart of the compute latency in milliseconds for executing BERT-large on an NVIDIA A30 GPU with 3.6ms vs. a CPU-only server with 76ms, the GPU bar is clearly under the 10ms threshold budget for conversational AI applications.
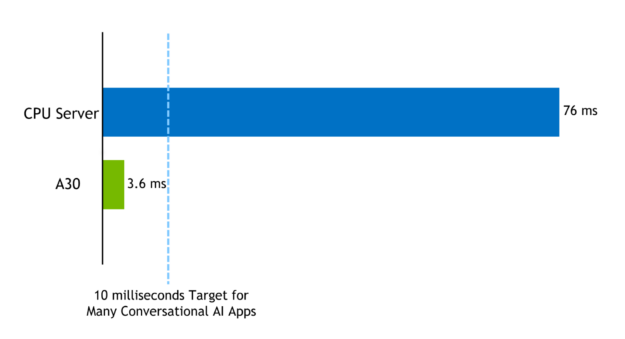
Figure 4. Compute latency in milliseconds for executing BERT-large on an NVIDIA A30 GPU vs. a CPU-only server

The performance measures the compute-only latency time for executing the network on a QA task between passing tensors as input and gathering logits as output. You can find the code used to benchmark the sample in the script scripts/inference_benchmark.sh in the repo. 

Summary 

NVIDIA is releasing TensorRT 8.0, which makes it possible to perform BERT inference in 0.74ms on A30 GPUs. The code for benchmarking inference on BERT is available as a sample in the TensorRT open-source repo. 

This post gives an overview of how to use the TensorRT sample and performance results. We further describe a workflow of how to use the BERT sample as part of a simple application and Jupyter notebook where you can pass a paragraph and ask questions related to it. The new optimizations and performance achievable makes it practical to use BERT in production for applications with tight latency budgets, such as conversational AI.

We are always looking for new ideas for new examples and applications to share. What NLP applications do you use BERT for and what examples would you like to see from us in the future?

If you have questions regarding the TensorRT sample repo, check the NVIDIA TensorRT Developer Forum to see if other members of the TensorRT community have a resolution first. NVIDIA Registered Developer Program members can also file bugs at https://developer.nvidia.com/nvidia-developer-program.

(*)

  • CPU-only specifications: Gold 6240@2.60GHz 3.9GHz Turbo (Cascade Lake) HT Off, Single node, Single Socket, Number of CPU Threads = 18, Data=Real, Batch Size=1; Sequence Length=128; nireq=1; Precision=FP32; Data=Real; OpenVINO 2019 R2
  • GPU-server specification: Gold 6140@2GHz 3.7GHz Turbo (Skylake) HT On, Single node, Dual Socket, Number of CPU Threads = 72, T4 16GB, Driver Version 418.67 (r418_00), BERT-base, Batch Size=1; Number of heads = 12, Size per head = 64; 12 layers; Sequence Length=128; Precision=FP16; XLA=Yes; Data=Real; TensorRT 5.1

(**) 

  • CPU-only specifications: Platinum 8380H@2.90GHz to 4.3 GHz Turbo (Cooper Lake) HT Off, Single node, Single Socket, Number of CPU Threads = 28, BERT-Large, Data=Real, Batch Size=1; Sequence Length=384; nireq=1; Precision=INT8; Data=Real; OpenVINO 2021 R3
  • GPU-server specification: AMD EPYC 7742@2.25GHz 3.4GHz Turbo (Rome) HT Off, Single node, Number of CPU Threads = 64, A30(GA100) 1*24258 MiB 1*56 SM, Driver Version 470.29 (r470_00), BERT-Large, Batch Size=1; Sequence Length=384; Precision=INT8; TensorRT 8.0