NVIDIA announced several major breakthroughs in conversational AI for building and deploying ASR, NLP and TTS applications.
At GTC 21, NVIDIA announced several major breakthroughs in conversational AI for building and deploying automatic speech recognition (ASR), natural language processing (NLP), and text-to-speech (TTS) applications. The conference also hosted over 60 engaging sessions and workshops featuring the latest tools, technologies and research in conversational AI and NLP.
The developer resources listed below are exclusively available to NVIDIA Developer Program members. Join today for free in order to get access to the tools and training necessary to build on NVIDIA’s technology platform here.
Conversational AI technologies are becoming ubiquitous, with countless products taking advantage of automatic speech recognition, natural language understanding, and speech synthesis coming to market. Thanks to new tools and technologies, developing conversational AI applications is easier than ever, enabling a much broader range of applications, such as virtual assistants, real-time transcription, and many more. We will give an overview of the conversational AI landscape and discuss how any organization can get started developing conversational AI applications today.
Tailoring the deep learning models in a conversational AI pipeline to your enterprise needs is time-consuming. Developing a domain-specific application typically requires several cycles of re-training, fine-tuning, and deploying the model until it satisfies the requirements. NVIDIA Jarvis helps you easily build production-ready conversational AI applications and provides tools for fine-tuning on your domain. In this session, we will walk you through the process of customizing automatic speech recognition and natural language processing pipelines to build a truly customized production-ready Conversational AI application.
Huge NLP models like Megatron-LM GPT-3, Megatron-LM Bert require tens/hundreds of gigabytes of memory to store their weights or run inference. Frequently, one GPU is not enough for such a task. One way to run inference and maximize throughput of these models is to divide them into smaller sub-parts in the pipeline-parallelism (in-depth) style and run these subparts on multiple GPUs. This method will allow us to use bigger batch size and run inference through an ensemble of subparts in a conveyor manner. TRITON inference server is an open-source inference serving software that lets teams deploy trained AI models from any framework. And this is a perfect tool that allows us to run this ensemble. In this talk, we will take Megatron LM with billions of parameters, convert it in ONNX format, and will learn how to divide it into subparts with the new tool – ONNX-GraphSurgeon. Then, we will use TRITON ensemble API and ONNX runtime background and run this model inference on an NVIDIA DGX.
World-Class ASR | Real-Time Machine Translation | Controllable Text-to-Speech Watch this demo to see Jarvis’ automatic speech recognition (ASR) accuracy when fine-tuned on medical jargon, real-time neural machine translation from English to Spanish and Japanese, and powerful controllability of neural text-to-speech.
New pre-trained models, notebooks, and sample applications for conversational AI are all available to try from the NGC catalog. You can also find tutorials for building and deploying conversational AI applications at the NVIDIA Developer Blog.
Join the NVIDIA Developer Program for all of the latest tools and resources for building with NVIDIA technologies.
NVIDIA Omniverse is an open platform built for virtual collaboration and real-time physically accurate simulation. Explore the latest resources to learn and get started with Omniverse today.
At GTC 2021 we shared a glimpse of the immense power the NVIDIA Omniverse platform can bring to the world of architecture, manufacturing, product design, robotics, gaming development, and media and entertainment. This new open, cloud-native platform makes virtual collaboration easy for creators, researchers, and engineers on photorealistic rendering projects. For a deeper understanding of the platform and its capabilities, we curated a collection of the latest resources to help you get started on Omniverse.
The developer resources listed below are exclusively available to NVIDIA Developer Program members. Join today for free in order to get access to the tools and training necessary to build on NVIDIA’s technology platform here.
We introduce NVIDIA RTX technology at a very high level (Shaders, RT Cores and Tensor Cores), then introduce the Omniverse platform. We focus on the Omniverse technology stack and give a high-level overview of its components and how developers can leverage them. Our target audience is technical artists or developers who have little-to-no exposure to the platform or creatives, who are currently trying the open beta and looking for a deeper overview of the platform and components.
Panel: Plumbing the Metaverse with USD Speakers: Dean Takahashi, VentureBeat; F. Sebastian Grassia, Pixar; Guido Quaroni, Adobe; Ivar Dahlberg, Embark Studios; Lori Hufford, Bentley Systems; Martha Tsigkari, Foster+Partners; Mattias Wikenmalm, Volvo; Perry Nightingale, WPP; Susanna Holt, Autodesk Forge
Learn more about the Pixar USD file format and discover its benefits to digital creators in all verticals. The session will provide a brief overview of USD, followed by a panel of distinguished industry luminaries to discuss their experience and adoption of the format and its benefits.
This session introduces Universal Scene Description (USD), open-source software from Pixar Animation Studios that’s used as the core representation of the 3D world within NVIDIA’s Omniverse platform. We’ll show what USD is and how assets are constructed with it. We’ll show why this standard and open representation enables interchange with 3D applications to more easily construct virtual worlds. We’ll include hands-on demo examples that illustrate USD scene construction in Python that you can try with a web browser at home, and show how to interact with USD files within Omniverse.
Learn how to connect with the Omniverse platform and be able to send data to it, establish a live sync session, as well as a USD 101 overview to get you started. This is primarily targeted at developers who want to learn how to create a plugin for an application and push data to Omniverse. However, the topic also applies to those seeking to write command line or scripted converters, as well as connecting Omniverse and a data management system. We’ll start with an overview of USD structuring and some of the basics in geometry and materials. A tour of the Sample SDK, which is available on the Omniverse Launcher, will be discussed in detail. From there, we’ll look at how we implemented a Connector for an application, like SketchUp, to discuss design considerations and material mapping and handling.
For more on-demand content, check out the collection of developer sessions from GTC 2021 to learn how industry experts and our very own Omniverse engineers use and build on top of the platform.
Get the latest resources and news about the NVIDIA technologies that are accelerating the latest innovations in HPC from industry leaders and developers.
Get the latest resources and news about the NVIDIA technologies that are accelerating the latest innovations in HPC from industry leaders and developers. Explore sessions and demos across a variety of HPC topics, ranging from weather forecasting and energy exploration to computational chemistry and molecular dynamics.
The developer resources listed below are exclusively available to NVIDIA Developer Program members. Join today for free in order to get access to the tools and training necessary to build on NVIDIA’s technology platform here.
Get an introduction to GPU computing by the lead architect of CUDA. We’ll walk through the internals of how the GPU works and why CUDA is the way that it is, and connect the dots between physical hardware and parallel computing.
Take a deep dive into the latest developments in NVIDIA software for HPC applications, including a comprehensive look at what’s new in programming models, compilers, libraries, and tools. We’ll cover topics of interest to HPC developers, targeting traditional HPC modeling and simulation, HPC+AI, scientific visualization, and high-performance data analytics.
Explore the role of key tools and toolchains on Arm servers, from Arm, NVIDIA, and elsewhere — and show how each tool fits in the end-to-end journey to production science and simulation.
SDK
Accelerate Quantum Information Science with NVIDIA cuQuantum SDK NVIDIA cuQuantum is an SDK of optimized libraries and tools for accelerating quantum computing workflows. Learn more about how NVIDIA cuQuantum speeds up quantum circuit simulations by orders of magnitude.
NVIDIA RTX enables developers to create breathtaking, interactive worlds with performance that exceeds gamers expectations. Integrating RTX has never been easier – gain access through popular game engines such as Unreal Engine or through standalone SDKs made available at GTC.
Developers, engineers, artists and leaders from game studios across the world gathered virtually at this year’s virtual GTC to learn how the latest NVIDIA technologies are revolutionizing game development.
NVIDIA RTX enables developers to create breathtaking, interactive worlds with performance that exceeds gamers expectations. Integrating RTX has never been easier – gain access through popular game engines such as Unreal Engine or through standalone SDKs.
The developer resources listed below are exclusively available to NVIDIA Developer Program members. Join today for free in order to get access to the tools and training necessary to build on NVIDIA’s technology platform here.
In this session, NVIDIA’s Richard Cowgill goes over where RTX is today in Unreal Engine 4, all the advancements in the past year, and a quick look at what’s coming up.
This session is a deep dive on how to leverage Omniverse, using new asset collaboration tools USD and MDL for game development. You’ll learn how to leverage Nucleus for collaboration, AI for asset tagging, and USD and MDL for ground truth content creation and lighting using ray tracing.
Experience the latest NVIDIA RTX technologies available in Unreal Engine 4. Toggle ray tracing on and off between reflections, shadows and translucency to see the impact these features have on NVIDIA’s Attic demo and what they could bring to your project. You’ll also learn how RTX Global Illumination adds dynamic range to the scene with multi-bounce indirect lighting. Maximize these ray-tracing settings with DLSS, which will boost the frame-rate of the Attic scene while maintaining a high resolution. With an RTX GPU, you can try this demo as a standalone build here.
RTXDI offers realistic lighting of dynamic scenes that require computing shadows from millions of area lights. Until now, this hasn’t been possible in video games in real-time. Traditionally, game developers have baked most lighting and supported a small number of “hero” lights that are computed at runtime. With RTXDI, lighting artists can render scenes with millions of dynamic area lights in real-time without complex computational overheads or disruptive changes to the artist’s workflow. In this scene, you can see neon billboards, brake lights, apartment windows, store displays, and wet roads—all acting as independent light sources. All this can now be captured in real-time with RTXDI. Learn more here.
System Latency is the measure of PC responsiveness – a critical metric for gamers that is difficult to optimize for. In this demo, we will show you how NVIDIA Reflex optimizes system latency and helps developers give players a response experience.
In this talk available on NVIDIA On-Demand, Seth Schneider (NVIDIA) and Ryan Greene (Blizzard) will provide a crash course on system latency covering: the basics of system latency, NVIDIA Reflex, and the Overwatch team’s approach to system latency optimization. If you are interested in a deep dive into system level performance, you’ve come to the right place.
Posted by AJ Maschinot, Senior Software Engineer and Jenny Huang, Product Manager, Google Research
In recent years, self-supervised representation learning, which is used in a variety of image and video tasks, has significantly advanced due to the application of contrastive learning. These contrastive learning approaches typically teach a model to pull together the representations of a target image (a.k.a., the “anchor”) and a matching (“positive”) image in embedding space, while also pushing apart the anchor from many non-matching (“negative”) images. Because labels are assumed to be unavailable in self-supervised learning, the positive is often an augmentation of the anchor, and the negatives are chosen to be the other samples from the training minibatch. However, because of this random sampling, false negatives, i.e., negatives generated from samples of the same class as the anchor, can cause a degradation in the representation quality. Furthermore, determining the optimal method to generate positives is still an area of active research.
In contrast to the self-supervised approach, a fully-supervised approach could use labeled data to generate positives from existing same-class examples, providing more variability in pretraining than could typically be achieved by simply augmenting the anchor. However, very little work has been done to successfully apply contrastive learning in the fully-supervised domain.
In “Supervised Contrastive Learning”, presented at NeurIPS 2020, we propose a novel loss function, called SupCon, that bridges the gap between self-supervised learning and fully supervised learning and enables contrastive learning to be applied in the supervised setting. Leveraging labeled data, SupCon encourages normalized embeddings from the same class to be pulled closer together, while embeddings from different classes are pushed apart. This simplifies the process of positive selection, while avoiding potential false negatives. Because it accommodates multiple positives per anchor, this approach results in an improved selection of positive examples that are more varied, while still containing semantically relevant information. SupCon also allows label information to play an active role in representation learning rather than restricting it to be used only in downstream training, as is the case for conventional contrastive learning. To the best of our knowledge, this is the first contrastive loss to consistently perform better on large-scale image classification problems than the common approach of using cross-entropy loss to train the model directly. Importantly, SupCon is straightforward to implement and stable to train, provides consistent improvement to top-1 accuracy for a number of datasets and architectures (including Transformer architectures), and is robust to image corruptions and hyperparameter variations.
Self-supervised (left) vs supervised (right) contrastive losses: The self-supervised contrastive loss contrasts a single positive for each anchor (i.e., an augmented version of the same image) against a set of negatives consisting of the entire remainder of the minibatch. The supervised contrastive loss considered in this paper, however, contrasts the set of all samples from the same class as positives against the negatives from the remainder of the batch.
The Supervised Contrastive Learning Framework SupCon can be seen as a generalization of both the SimCLR and N-pair losses — the former uses positives generated from the same sample as that of the anchor, and the latter uses positives generated from different samples by exploiting known class labels. The use of many positives and many negatives for each anchor allows SupCon to achieve state-of-the-art performance without the need for hard negative mining (i.e., searching for negatives similar to the anchor), which can be difficult to tune properly.
SupCon subsumes multiple losses from the literature and is a generalization of the SimCLR and N-Pair losses.
This method is structurally similar to those used in self-supervised contrastive learning, with modifications for supervised classification. Given an input batch of data, we first apply data augmentation twice to obtain two copies, or “views,” of each sample in the batch (though one could create and use any number of augmented views). Both copies are forward propagated through an encoder network, and the resulting embedding is then L2-normalized. Following standard practice, the representation is further propagated through an optional projection network to help identify meaningful features. The supervised contrastive loss is computed on the normalized outputs of the projection network. Positives for an anchor consist of the representations originating from the same batch instance as the anchor or from other instances with the same label as the anchor; the negatives are then all remaining instances. To measure performance on downstream tasks, we train a linear classifier on top of the frozen representations.
Cross-entropy, self-supervised contrastive loss and supervised contrastive loss Left: The cross-entropy loss uses labels and a softmax loss to train a classifier. Middle: The self-supervised contrastive loss uses a contrastive loss and data augmentations to learn representations. Right: The supervised contrastive loss also learns representations using a contrastive loss, but uses label information to sample positives in addition to augmentations of the same image.
Key Findings SupCon consistently boosts top-1 accuracy compared to cross-entropy, margin classifiers (with use of labels), and self-supervised contrastive learning techniques on CIFAR-10 and CIFAR-100 and ImageNet datasets. With SupCon, we achieve excellent top-1 accuracy on the ImageNet dataset with the ResNet-50 and ResNet-200 architectures. On ResNet-200, we achieve a top-1 accuracy of 81.4%, which is a 0.8% improvement over the state-of-the-art cross-entropy loss using the same architecture (which represents a significant advance for ImageNet). We also compared cross-entropy and SupCon on a Transformer-based ViT-B/16 model and found a consistent improvement over cross-entropy (77.8% versus 76% for ImageNet; 92.6% versus 91.6% for CIFAR-10) under the same data augmentation regime (without any higher-resolution fine-tuning).
The SupCon loss consistently outperforms cross-entropy with standard data augmentation strategies (AutoAugment, RandAugment and CutMix). We show top-1 accuracy for ImageNet, on ResNet-50, ResNet-101 and ResNet200.
We also demonstrate analytically that the gradient of our loss function encourages learning from hard positives and hard negatives. The gradient contributions from hard positives/negatives are large while those for easy positives/negatives are small. This implicit property allows the contrastive loss to sidestep the need for explicit hard mining, which is a delicate but critical part of many losses, such as triplet loss. See the supplementary material of our paper for a full derivation.
SupCon is also more robust to natural corruptions, such as noise, blur and JPEG compression. The mean Corruption Error (mCE) measures the average degradation in performance compared to the benchmark ImageNet-C dataset. The SupCon models have lower mCE values across different corruptions compared to cross-entropy models, showing increased robustness.
We show empirically that the SupCon loss is less sensitive than cross-entropy to a range of hyperparameters. Across changes in augmentations, optimizers, and learning rates, we observe significantly lower variance in the output of the contrastive loss. Moreover, applying different batch sizes while holding all other hyperparameters constant results in consistently better top-1 accuracy of SupCon to that of cross-entropy at each batch size.
Accuracy of cross-entropy and supervised contrastive loss as a function of hyperparameters and training data size, measured on ImageNet with a ResNet-50 encoder. Left: Boxplot showing Top-1 accuracy vs changes in augmentation, optimizer and learning rates. SupCon yields more consistent results across variations in each, which is useful when the best strategies are unknown a priori. Right: Top-1 accuracy as a function of batch size shows both losses benefit from larger batch sizes while SupCon has higher Top-1 accuracy, even when trained with small batch sizes.
Accuracy of supervised contrastive loss as a function of training duration and the temperature hyperparameter, measured on ImageNet with a ResNet-50 encoder. Left: Top-1 accuracy as a function of SupCon pre-training epochs. Right: Top-1 accuracy as a function of temperature during the pre-training stage for SupCon. Temperature is an important hyperparameter in contrastive learning and reducing sensitivity to temperature is desirable.
Broader Impact and Next Steps This work provides a technical advancement in the field of supervised classification. Supervised contrastive learning can improve both the accuracy and robustness of classifiers with minimal complexity. The classic cross-entropy loss can be seen as a special case of SupCon where the views correspond to the images and the learned embeddings in the final linear layer corresponding to the labels. We note that SupCon benefits from large batch sizes, and being able to train the models on smaller batches is an important topic for future research.
Acknowledgements The NeurIPS paper was jointly co-authored with Prannay Khosla, Piotr Teterwak, Chen Wang, Aaron Sarna, Yonglong Tian, Phillip Isola, Aaron Maschinot, Ce Liu, and Dilip Krishnan. Special thanks to Jenny Huang for leading the writing process for this blogpost.
Today, NVIDIA released world class speech recognition capability for enterprises to generate highly accurate transcriptions and NeMo 1.0 which includes new state-of-the-art speech and language models for democratizing and accelerating conversational AI research.
Today, NVIDIA released world class speech recognition capability for enterprises to generate highly accurate transcriptions and NeMo 1.0 which includes new state-of-the-art speech and language models for democratizing and accelerating conversational AI research.
World Class Speech Recognition
Jarvis world class speech recognition is an out-of-the-box speech service that can be easily deployed in any cloud or datacenter. Enterprises can use Transfer Learning Toolkit (TLT) to customize speech service across a variety of industries and use cases. With TLT, developers can accelerate development of custom speech and language models by 10x.
The speech recognition model is highly accurate and trained on domain-agnostic vocabulary from telecommunications, finance, healthcare, education, and also various proprietary and open-source datasets. Additionally, it was trained on noisy data, multiple sampling rates including 8khz for call centers, variety of accents, and dialogue all of which contribute to the model’s accuracy.
With Jarvis speech service, you can generate a transcription in under 10 milliseconds. It is evaluated on multiple proprietary datasets with over ninety percent accuracy and can be adapted to a wide variety of use cases and domains. It can be used in several apps such as transcribing audio in call centers, video conferencing and in virtual assistants.
T-Mobile, one of the largest telecommunication operators in the United States, used Jarvis to offer exceptional customer service.
“With NVIDIA Jarvis services, fine-tuned using T-Mobile data, we’re building products to help us resolve customer issues in real time,” said Matthew Davis, vice president of product and technology at T-Mobile.
“After evaluating several automatic speech recognition solutions, T-Mobile has found Jarvis to deliver a quality model at extremely low latency, enabling experiences our customers love.”
You can download Jarvis speech service from the NGC Catalog to start building your own transcription application today.
NeMo 1.0
NVIDIA NeMo is an open-source toolkit for researchers developing state-of-the-art (SOTA) conversational AI models. It includes collections for Automatic Speech Recognition (ASR), Natural Language Processing (NLP) and Text-to-Speech (TTS) which enables researchers to quickly experiment with new SOTA neural networks in order to create new models or build on top of existing ones.
NeMo is tightly coupled with PyTorch, PyTorch Lightning and Hydra frameworks. These integrations enable researchers to develop and use NeMo models and modules in conjunction with PyTorch and PyTorch Lightning modules. Also, with the Hydra framework and NeMo, researchers can easily customize complex conversational AI models.
Highlights of this version include:
Added speech recognition support for multiple languages and also new CitriNet and Conformer-CTC ASR models
Bidirectional Neural Machine Translation models support in five languages from English to Spanish, Russian, Mandarin, German and French
New speech synthesis models such as Fastpitch, Talknet, Fastspeech2, and also end-to-end models like Fastpitch + HiFiGAN and Fastspeech2 + HiFiGAN
Also, most NeMo models can be exported to NVIDIA Jarvis for production deployment and high-performance inference.
Learn more about what is included in NeMo 1.0 from the NVIDIA Developer Blog. NeMo is open-sourced and is available for download and use from the NGC Catalog and GitHub.
NVIDIA NeMo is a conversational AI toolkit built for researchers working on automatic speech recognition (ASR), natural language processing (NLP), and text-to-speech synthesis (TTS). The primary objective of NeMo is to help researchers from industry and academia to reuse prior work (code and pretrained models and make it easier to create new conversational AI models. … Continued
NVIDIA NeMo is a conversational AI toolkit built for researchers working on automatic speech recognition (ASR), natural language processing (NLP), and text-to-speech synthesis (TTS). The primary objective of NeMo is to help researchers from industry and academia to reuse prior work (code and pretrained models and make it easier to create new conversational AI models. NeMo is an open-source project, and we welcome contributions from the research community.
The 1.0 update brings significant architectural, code quality, and documentation improvements as well as a plethora of new state-of-the-art neural networks and pretrained checkpoints in several languages. The best way to start with NeMo is by installing it in your regular PyTorch environment:
pip install nemo_toolkit[all]
NeMo collections
NeMo is a PyTorch ecosystem project that relies heavily on two other projects from the ecosystem: PyTorch Lightning for training and Hydra for configuration management. You can also use NeMo models and modules within any PyTorch code.
NeMo comes with three main collections: ASR, NLP, and TTS. They are collections of models and modules that are ready to be reused in your conversational AI experiments. Most importantly, for most of the models, we provide weights pretrained on various datasets using tens of thousands of GPU hours.
Speech recognition
The NeMo ASR collection is the most extensive collection with a lot to offer for researchers of all levels, from beginners to advanced. If you are new to deep learning for speech recognition, we recommend that you get started with an interactive notebook for both ASR and NeMo overview. If you are an experienced researcher looking to create your own model, you’ll find various ready-to-use building blocks:
Data layers
Encoders
Augmentation modules
Text normalization and denormalization
More advanced decoders, such as RNN-T
The NeMo ASR collection provides you with various types of ASR networks: Jasper, QuartzNet, CitriNet, and Conformer. With the NeMo 1.0 update, the CitriNet and Conformer models are the next flagship ASR models providing better accuracy on word-error-rate (WER) than Jasper and QuartzNet while maintaining similar or better efficiency.
CitriNet
CitriNet is an improvement upon QuartzNet that uses several ideas originally introduced in ContextNet. It uses subword encoding through word piece tokenization and Squeeze-and-Excitation mechanism to obtain highly accurate audio transcripts while using a nonautoregressive, CTC-based decoding scheme for efficient inference.
Figure 1. CitriNet architecture.
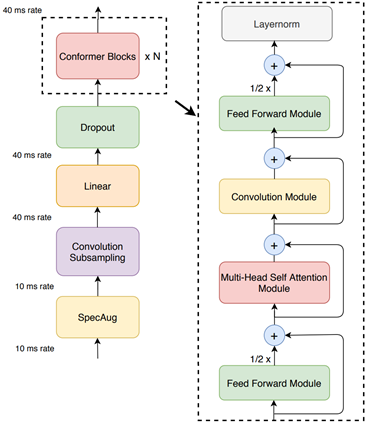
Conformer-CTC
Conformer-CTC is a CTC-based variant of the Conformer model that uses CTC loss and decoding instead of RNN-T loss, making it a nonautoregressive model. This model combines self-attention and convolution modules to achieve the best of both worlds. The self-attention modules can learn the global interaction while the convolutions efficiently capture the local correlations.
This model gives you an option to experiment with attention-based models. Due to the global context obtained by self-attention and squeeze-and-excitation mechanism, Conformer and CitriNet models have superior WER in offline scenarios.
Figure 2. Conformer-CTC architecture.
You can use Citrinet and Conformer models with CTC as well as RNN-T decoders.
We spent tens of thousands of GPU hours training ASR models in various languages. In NeMo, we offer these checkpoints back to the community for free. As of this release, NeMo has ASR models in English, Spanish, Chinese, Catalonian, Italian, Russian, French, and Polish. Moreover, we partner with Mozilla to make more pretrained models available with the help of Mozilla Common Voice project.
Hugging Face transformers have fueled many recent advances in NLP by providing a huge set of pretrained models and an easy-to-use experience for developers and researchers. NeMo is compatible with transformers in that most of the pretrained Hugging Face NLP models can be imported into NeMo. You may provide pretrained BERT-like checkpoints from transformers for the encoders of common tasks. The language models of the common tasks are initialized in default with the pretrained model from Hugging Face transformers.
NeMo is also integrated with models trained by NVIDIA Megatron, allowing you to incorporate Megatron-based encoders into your question answering and neural machine translation models. NeMo can be used to fine-tune model-parallel models based on Megatron.
Neural machine translation
In today’s globalized world, it has become important to communicate with people speaking different languages. A conversational AI system capable of converting source text from one language to another will be a powerful communication tool. NeMo 1.0 now supports neural machine translation (NMT) tasks with transformer-based models allowing you to quickly build an end-to-end language translation pipelines. This release includes pretrained NMT models for the following language pairs in both directions:
English Spanish
English Russian
English Mandarin
English German
English French
Because tokenization is an extremely important part of NLP and NeMo supports most widely used tokenizers, such as HF tokenizers, SentencePiece, and YouTokenToMe.
Speech synthesis
If humans can talk to computers, the computers should be able to talk back as well. Speech synthesis takes text as an input and generates humanized audio output. This is typically accomplished with two models: a spectrogram generator that generates spectrograms from text and a vocoder that generates audio from spectrogram. The NeMo TTS collection provides you with the following models:
Pretrained spectrogram generator models: Tacotron2, GlowTTS, Fastspeech, Fastpitch, and Talknet
Pretrained vocoder models: HiFiGan, MelGan, SqueezeWave, Uniglow, and WaveGlow
End-to-end models: FastPitchHiFiGAN and Fastspeech2 Hifigan
End-to-end conversational AI example
Here’s a simple example demonstrating how to use NeMo for prototyping a universal translator app. This app takes a Russian audio file and generates an English translation audio. You can play with it using the AudioTranslationSample.ipynb notebook.
# Start by importing NeMo and all three collections
 import nemo
 import nemo.collections.asr as nemo_asr
 import nemo.collections.nlp as nemo_nlp
 import nemo.collections.tts as nemo_tts
 # Next, automatically download pretrained models from the NGC cloud
 quartznet = nemo_asr.models.EncDecCTCModel.from_pretrained(model_name="stt_ru_quartznet15x5")
 # Neural Machine Translation model
 nmt_model = nemo_nlp.models.MTEncDecModel.from_pretrained(model_name='nmt_ru_en_transformer6x6')
 # Spectrogram generator that takes text as an input and produces spectrogram
 spectrogram_generator = nemo_tts.models.Tacotron2Model.from_pretrained(model_name="tts_en_tacotron2")
 # Vocoder model that takes spectrogram and produces actual audio
 vocoder = nemo_tts.models.WaveGlowModel.from_pretrained(model_name="tts_waveglow_88m")
 # First step is to transcribe, or recognize, what was said in the audio
 russian_text = quartznet.transcribe([Audio_sample])
 # Then, translate it to English text
 english_text = nmt_model.translate(russian_text)
 # Finally, convert it into English audio
 # A helper function that combines Tacotron2 and WaveGlow to go directly from
 # text to audio
 def text_to_audio(text):
   parsed = spectrogram_generator.parse(text)
   spectrogram = spectrogram_generator.generate_spectrogram(tokens=parsed)
   audio = vocoder.convert_spectrogram_to_audio(spec=spectrogram)
   return audio.to('cpu').numpy()
 audio = text_to_audio(english_text[0])
The best part of this example is that you can fine-tune all the models used here on your datasets. In-domain fine-tuning is a great way to improve the performance of your models on specific applications. The NeMo GitHub repo provides plenty of fine-tuning examples.
NeMo models have a common look and feel, regardless of domain. They are configured, trained, and used in a similar fashion.
Scaling with NeMo
An ability to run experiments and quickly test new ideas is key to successful research. With NeMo, you can speed up training by using the latest NVIDIA Tensor Cores and model parallel training features across many nodes and hundreds of GPUs. Much of this functionality is provided with the help of the PyTorch Lightning trainer, which has an intuitive and easy-to-use API.
For speech recognition, language modeling, and machine translation, we provide high-performance web dataset-based data loaders. These data loaders can handle scaling to tens of thousands of hours of speech data to deliver high performance in massively distributed settings with thousands of GPUs.
Text processing and dataset creation with NeMo
Proper preparation of training data and pre and post-processing are hugely important and often overlooked steps in all machine learning pipelines. NeMo 1.0 includes new features for dataset creation and speech data explorer.
NeMo 1.0 includes important text processing features such as text normalization and inverse text normalization. Text normalization converts text from written form into its verbalized form. It is used as a preprocessing step before training TTS models. It could also be used for preprocessing ASR training transcripts. Inverse text normalization (ITN) is a reverse operation and is often a part of the ASR post-processing pipeline. It is the task of converting the raw spoken output of the ASR model into its written form to improve text readability.
For example, the normalized version of “It weighs 10 kg.” would be “It weighs 10 kilograms”.
Conclusion
NeMo 1.0 release substantially improves overall quality and documentation. It adds support for new tasks such as neural machine translation and many new models pretrained in different languages. As a mature tool for ASR and TTS, it also adds new features for text normalization and denormalization, dataset creation based on CTC-segmentation and speech data explorer. These updates benefit researchers in academia and industry by making it easier for you to develop and train new conversational AI models.
Many NeMo models can be exported to NVIDIA Jarvis for production deployment and high-performance inference. NVIDIA Jarvis is an application framework for building multimodal conversational AI services that delivers real-time performance on GPUs.
Hear directly from the engineers, designers, and creators that are at the edge of developing NVIDIA Omniverse, the virtual collaboration and physically accurate simulation platform, now live on Twitch.
Hear directly from the engineers, designers, and creators that are at the edge of developing NVIDIA Omniverse, the virtual collaboration and physically accurate simulation platform, now live on Twitch.
NVIDIA Omniverse is an open platform built for creators, designers, and engineers like you to enhance collaborative visual workflows and create real-time physically accurate simulation. This means you and your team will be able to connect major design tools, assets and projects for collaborative iteration in a shared virtual space.
All the Sneak Peaks – Exclusively on Twitch
Whether it’s our latest app releases or just a behind the scenes look at our engineer’s work-from-home set-up, our Twitch streams will provide you special access to learn what Omniverse, and the people behind the platform, are all about.
Become a True Omnivore
With Twitch’s live-chat feature, you’ll be able to interact with our team in real-time. All information in our streams will be coming from Omniverse-insiders.Your input matters to us, and during our streams you can play a key role in helping us build the metaverse.
Take 3D Game Storytelling to the Next Level with Omniverse Machinima.
Omniverse Machinima enables creators to animate characters using just an audio source, render high-fidelity, realistic scenes with physically accurate materials, and simulate human motion through a video feed powered by AI-based pose estimation technology, all in real-time.
Omniverse enables universal interoperability across different applications and 3D ecosystem vendors, and provides efficient real-time scene updates, based on open-standards and protocols. The Omniverse platform is designed to act as a hub, enabling new capabilities to be exposed as microservices to any connected clients and applications.
Whether you’re looking for ways to integrate Omniverse apps into your workflow or just want to get a high-level overview of what the platform is, make sure to follow our Twitch for direct access to Omniverse-insiders.
Follow us on social: Instagram, Twitter, LinkedIn and Discord for the latest announcements and next events. See you in the Omniverse!
The 15 accepted papers and posters from NVIDIA range from simulating dynamic driving environments, to powering neural architecture search for medical imaging.
Researchers, developers, and engineers worldwide are gathering virtually this year for the annual Conference on Computer Vision and Pattern Recognition (CVPR) from June 19th to June 25th. Throughout the week, NVIDIA Research will present their recent computer vision-related projects via presentations and interactive Q&As.
The nearly 30 accepted papers from NVIDIA range from simulating dynamic driving environments, to powering neural architecture search for medical imaging.
DriveGAN is a fully differentiable simulator, it further allows for re-simulation of a given video sequence, offering an agent to drive through a recorded scene again, possibly taking different actions.
The talk will be live on Tuesday, June 22, 2021 at 10:00pm EST
From the abstract: In this work, we focus on three important aspects of NAS in 3D medical image segmentation: flexible multi-path network topology, high search efficiency, and budgeted GPU memory usage. Our method achieves the state-of-the-art performance and the top ranking on the MSD challenge leaderboard.
The talk will be live on Tuesday, June 22, 2021 at 10:00 pm EST
To view the complete list of NVIDIA Research accepted papers, workshop and tutorials, demos, and to explore job opportunities at NVIDIA, visit the NVIDIA at CVPR 2021 website.
Nithya Sambasivan, Research Scientist, Google Research
Data is a foundational aspect of machine learning (ML) that can impact performance, fairness, robustness, and scalability of ML systems. Paradoxically, while building ML models is often highly prioritized, the work related to data itself is often the least prioritized aspect. This data work can require multiple roles (such as data collectors, annotators, and ML developers) and often involves multiple teams (such as database, legal, or licensing teams) to power a data infrastructure, which adds complexity to any data-related project. As such, the field of human-computer interaction (HCI), which is focused on making technology useful and usable for people, can help both to identify potential issues and to assess the impact on models when data-related work is not prioritized.
In “‘Everyone wants to do the model work, not the data work’: Data Cascades in High-Stakes AI”, published at the 2021 ACM CHI Conference, we study and validate downstream effects from data issues that result in technical debt over time (defined as “data cascades”). Specifically, we illustrate the phenomenon of data cascades with the data practices and challenges of ML practitioners across the globe working in important ML domains, such as cancer detection, landslide detection, loan allocation and more — domains where ML systems have enabled progress, but also where there is opportunity to improve by addressing data cascades. This work is the first that we know of to formalize, measure, and discuss data cascades in ML as applied to real-world projects. We further discuss the opportunity presented by a collective re-imagining of ML data as a high priority, including rewarding ML data work and workers, recognizing the scientific empiricism in ML data research, improving the visibility of data pipelines, and improving data equity around the world.
Origins of Data Cascades We observe that data cascades often originate early in the lifecycle of an ML system, at the stage of data definition and collection. Cascades also tend to be complex and opaque in diagnosis and manifestation, so there are often no clear indicators, tools, or metrics to detect and measure their effects. Because of this, small data-related obstacles can grow into larger and more complex challenges that affect how a model is developed and deployed. Challenges from data cascades include the need to perform costly system-level changes much later in the development process, or the decrease in users’ trust due to model mis-predictions that result from data issues. Nevertheless and encouragingly, we also observe that such data cascades can be avoided through early interventions in ML development.
Different color arrows indicate different types of data cascades, which typically originate upstream, compound over the ML development process, and manifest downstream.
Examples of Data Cascades One of the most common causes of data cascades is when models that are trained on noise-free datasets are deployed in the often-noisy real world. For example, a common type of data cascade originates from model drifts, which occur when target and independent variables deviate, resulting in less accurate models. Drifts are more common when models closely interact with new digital environments — including high-stakes domains, such as air quality sensing, ocean sensing, and ultrasound scanning — because there are no pre-existing and/or curated datasets. Such drifts can lead to more factors that further decrease a model’s performance (e.g., related to hardware, environmental, and human knowledge). For example, to ensure good model performance, data is often collected in controlled, in-house environments. But in the live systems of new digital environments with resource constraints, it is more common for data to be collected with physical artefacts such as fingerprints, shadows, dust, improper lighting, and pen markings, which can add noise that affects model performance. In other cases, environmental factors such as rain and wind can unexpectedly move image sensors in deployment, which also trigger cascades. As one of the model developers we interviewed reported, even a small drop of oil or water can affect data that could be used to train a cancer prediction model, therefore affecting the model’s performance. Because drifts are often caused by the noise in real-world environments, they also take the longest — up to 2-3 years — to manifest, almost always in production.
Another common type of data cascade can occur when ML practitioners are tasked with managing data in domains in which they have limited expertise. For instance, certain kinds of information, such as identifying poaching locations or data collected during underwater exploration, rely on expertise in the biological sciences, social sciences, and community context. However, some developers in our study described having to take a range of data-related actions that surpassed their domain expertise — e.g., discarding data, correcting values, merging data, or restarting data collection — leading to data cascades that limited model performance. The practice of relying on technical expertise more than domain expertise (e.g., by engaging with domain experts) is what appeared to set off these cascades.
Two other cascades observed in this paper resulted from conflicting incentives and organizational practices between data collectors, ML developers, and other partners — for example, one cascade was caused by poor dataset documentation. While work related to data requires careful coordination across multiple teams, this is especially challenging when stakeholders are not aligned on priorities or workflows.
How to Address Data Cascades Addressing data cascades requires a multi-part, systemic approach in ML research and practice:
Develop and communicate the concept of goodness of the data that an ML system starts with, similar to how we think about goodness of fit with models. This includes developing standardized metrics and frequently using those metrics to measure data aspects like phenomenological fidelity (how accurately and comprehensively does the data represent the phenomena) and validity (how well the data explains things related to the phenomena captured by the data), similar to how we have developed good metrics to measure model performance, like F1-scores.
Innovate on incentives to recognize work on data, such as welcoming empiricism on data in conference tracks, rewarding dataset maintenance, or rewarding employees for their work on data (collection, labelling, cleaning, or maintenance) in organizations.
Data work often requires coordination across multiple roles and multiple teams, but this is quite limited currently (partly, but not wholly, because of the previously stated factors). Our research points to the value of fostering greater collaboration, transparency, and fairer distribution of benefits between data collectors, domain experts, and ML developers, especially with ML systems that rely on collecting or labelling niche datasets.
Finally, our research across multiple countries indicates that data scarcity is pronounced in lower-income countries, where ML developers face the additional problem of defining and hand-curating new datasets, which makes it difficult to even start developing ML systems. It is important to enable open dataset banks, create data policies, and foster ML literacy of policy makers and civil society to address the current data inequalities globally.
Conclusion In this work we both provide empirical evidence and formalize the concept of data cascades in ML systems. We hope to create an awareness of the potential value that could come from incentivising data excellence. We also hope to introduce an under-explored but significant new research agenda for HCI. Our research on data cascades has led to evidence-backed, state-of-the-art guidelines for data collection and evaluation in the revised PAIR Guidebook, aimed at ML developers and designers.
Acknowledgements This paper was written in collaboration with Shivani Kapania, Hannah Highfill, Diana Akrong, Praveen Paritosh and Lora Aroyo. We thank our study participants, and Sures Kumar Thoddu Srinivasan, Jose M. Faleiro, Kristen Olson, Biswajeet Malik, Siddhant Agarwal, Manish Gupta, Aneidi Udo-Obong, Divy Thakkar, Di Dang, and Solomon Awosupin.

 NVIDIA announced several major breakthroughs in conversational AI for building and deploying ASR, NLP and TTS applications.
 NVIDIA Omniverse is an open platform built for virtual collaboration and real-time physically accurate simulation. Explore the latest resources to learn and get started with Omniverse today.
 Get the latest resources and news about the NVIDIA technologies that are accelerating the latest innovations in HPC from industry leaders and developers.
 NVIDIA RTX enables developers to create breathtaking, interactive worlds with performance that exceeds gamers expectations. Integrating RTX has never been easier – gain access through popular game engines such as Unreal Engine or through standalone SDKs made available at GTC.


 Today, NVIDIA released world class speech recognition capability for enterprises to generate highly accurate transcriptions and NeMo 1.0 which includes new state-of-the-art speech and language models for democratizing and accelerating conversational AI research.
 NVIDIA NeMo is a conversational AI toolkit built for researchers working on automatic speech recognition (ASR), natural language processing (NLP), and text-to-speech synthesis (TTS). The primary objective of NeMo is to help researchers from industry and academia to reuse prior work (code and pretrained models and make it easier to create new conversational AI models. …
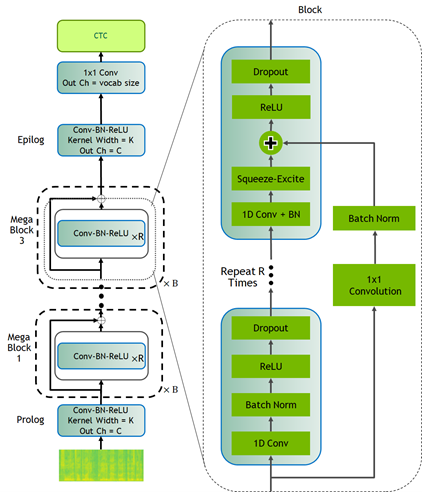
 Hear directly from the engineers, designers, and creators that are at the edge of developing NVIDIA Omniverse, the virtual collaboration and physically accurate simulation platform, now live on Twitch.
 The 15 accepted papers and posters from NVIDIA range from simulating dynamic driving environments, to powering neural architecture search for medical imaging.
