Categories
Misc

Real or Not Real? Attorney Steven Frank Uses Deep Learning to Authenticate Art

Leonardo da Vinci’s portrait of Jesus, known as Salvator Mundi, was sold at a British auction for nearly half a billion dollars in 2017, making it the most expensive painting ever to change hands. However, even art history experts were skeptical about whether the work was an original of the master rather than one of Read article >

The post Real or Not Real? Attorney Steven Frank Uses Deep Learning to Authenticate Art appeared first on The Official NVIDIA Blog.

Categories
Misc

The Need for Speed: Edge AI with NVIDIA GPUs and SmartNICs, Part 2

The NVIDIA Network Operator includes an RDMA Shared Device Plug-In and OFED Driver.

The NVIDIA GPU Operator has NVIDIA GPU Monitoring, NVIDIA Container Runtime, NVIDIA Driver, and NVIDIA Kubernetes Device Plug-In.

When deployed together, they automatically enable the GPU Direct RDMA Driver.

The NVIDIA EGX Operators are part of the NVIDIA EGX stack which contain Kubernetes, Container engine and Linux Distribution. They run bare metal virtualization.

This is the second post in a two part series.

The first post described how to integrate the NVIDIA GPU and Network Operators using preinstalled drivers.

This post describes the following tasks:

  • Clean up preinstalled driver integrations
  • Installing the Network Operator with a custom driver container
  • Installing the GPU Operator with a custom driver container

NVIDIA Driver integration

The preinstalled driver integration method is suitable for edge deployments requiring signed drivers for secure and measured boot. Use the driver container method when the edge node has an immutable operating system. Driver containers are also appropriate when not all edge nodes have accelerators.

Clean up preinstalled driver integration

First, uninstall the previous configuration and reboot to clear the preinstalled drivers.

  1. Delete the test pods and network attachment.
$ kubectl delete pod roce-shared-pod
pod "roce-shared-pod" deleted

$ kubectl delete macvlannetwork  roce-shared-macvlan-network
macvlannetwork.mellanox.com "roce-shared-macvlan-network" deleted
  1. Uninstall the Network Operator Helm chart.
$ helm delete -n network-operator network-operator
release "network-operator" uninstalled

3. Uninstall MOFED to remove the preinstalled drivers and libraries.

$ rmmod nvidia_peermem

$ /etc/init.d/openibd stop
Unloading HCA driver:                                      [  OK  ]

$ cd ~/MLNX_OFED_LINUX-5.4-1.0.3.0-rhel7.9-x86_64

$ ./uninstall.sh 

4. Remove the GPU test pod.

$ kubectl delete pod cuda-vectoradd
pod "cuda-vectoradd" deleted

5. Uninstall the NVIDIA Linux driver.

$ ./NVIDIA-Linux-x86_64-470.57.02.run --uninstall

6. Remove GPU Operator.

$ helm uninstall gpu-operator-1634173044

7. Reboot.

$ sudo shutdown -r now

Install the Network Operator with a custom driver container

This section describes the steps for installing the Network Operator with a custom driver container.

The driver build script executed in the container image needs access to kernel development and packages for the target kernel. In this example the kernel development packages are provided through an Apache web server.

Once the container is built, upload it to a repository the Network Operator Helm chart can access from the host.

The GPU Operator will use the same web server to build the custom GPU Operator driver container in the next section.

  1. Install the Apache web server and start it.
$ sudo firewall-cmd --state
not running

$ sudo yum install createrepo yum-utils httpd -y

$ systemctl start httpd.service && systemctl enable httpd.service && systemctl status httpd.service
● httpd.service - The Apache HTTP Server
   Loaded: loaded (/usr/lib/systemd/system/httpd.service; enabled; vendor preset: disabled)
   Active: active (running) since Wed 2021-10-20 18:10:43 EDT; 4h 45min ago
...
  1. Create a mirror of the upstream CentOS 7 Base package repository. It could take ten minutes or more to download all the CentOS Base packages to the web server. Note that the custom package repository requires 500 GB free space on the /var partition.
$ cd /var/www/html
$ mkdir -p repos/centos/7/x86_64/os
$ reposync -p /var/www/html/repos/centos/7/x86_64/os/ --repo=base  --download-metadata -m

3. Copy the Linux kernel source files into the Base packages directory on the web server. This example assumes the custom kernel was compiled as an RPM using rpmbuild.

$ cd repos/centos/7/x86_64/os
$ sudo cp ~/rpmbuild/RPMS/x86_64/*.rpm .

The Network Operator requires  the following files:

  • kernel-headers-${KERNEL_VERSION}
  • kernel-devel-${KERNEL_VERSION}

Ensure the presence of these additional files for the GPU Operator:

  • gcc-${GCC_VERSION}
  • elfutils-libelf.x86_64
  • elfutils-libelf-devel.x86_64
$ for i in $(rpm -q kernel-headers kernel-devel elfutils-libelf elfutils-libelf-devel gcc | grep -v "not installed"); do ls $i*; done
kernel-headers-3.10.0-1160.42.2.el7.custom.x86_64.rpm
kernel-devel-3.10.0-1160.42.2.el7.custom.x86_64.rpm
elfutils-libelf-0.176-5.el7.x86_64.rpm
elfutils-libelf-devel-0.176-5.el7.x86_64.rpm
gcc-4.8.5-44.el7.x86_64.rpm

4. Browse to the web repository to make sure it is accessible via HTTP.

$ elinks http://localhost/repos/centos/7/x86_64/os --dump
                       Index of /repos/centos/7/x86_64/os

      [1][ICO]          [2]Name       [3]Last modified [4]Size [5]Description
   --------------------------------------------------------------------------
   [6][PARENTDIR] [7]Parent Directory                        -  
   [8][DIR]       [9]base/            2021-10-21 22:55       -  
   [10][DIR]      [11]extras/         2021-10-02 00:29       -  
   --------------------------------------------------------------------------

References

   Visible links
   2. http://localhost/repos/centos/7/x86_64/os/?C=N;O=D
   3. http://localhost/repos/centos/7/x86_64/os/?C=M;O=A
   4. http://localhost/repos/centos/7/x86_64/os/?C=S;O=A
   5. http://localhost/repos/centos/7/x86_64/os/?C=D;O=A
   7. http://localhost/repos/centos/7/x86_64/
   9. http://localhost/repos/centos/7/x86_64/os/base/
  11. http://localhost/repos/centos/7/x86_64/os/extras/

5. MOFED driver container images are built from source code in the mellanox/ofed-docker repository on Github.  Clone the ofed-docker repository.

$ git clone https://github.com/Mellanox/ofed-docker.git
$ cd ofed-docker/

6. Make a build directory for the custom driver container.

$ mkdir centos
$ cd centos/

7. Create a Dockerfile that installs the MOFED dependencies and source archive into a CentOS 7.9 base image. Specify the MOFED and CentOS versions.

$ sudo cat 

8. Modify the RHEL entrypoint.sh script included in the ofed-docker repository to install the custom kernel source packages from the web server. Specify the path to the  base/Packages directory on the web server in the _install_prerequsities() function.

In this example 10.150.168.20 is the web server IP address created earlier in the section.

$ cp ../rhel/entrypoint.sh .
$ cat entrypoint.sh
...
# Install the kernel modules header/builtin/order files and generate the kernel version string.
_install_prerequisites() {
 
    echo "Installing dependencies"
    yum -y --releasever=7 install createrepo elfutils-libelf-devel kernel-rpm-macros numactl-libs initscripts grubby linux-firmware libtool
 
    echo "Installing Linux kernel headers..."
    rpm -ivh http://10.150.168.20/repos/centos/7/x86_64/os/base/Packages/kernel-3.10.0-1160.45.1.el7.custom.x86_64.rpm
    rpm -ivh http://10.150.168.20/repos/centos/7/x86_64/os/base/Packages/kernel-devel-3.10.0-1160.45.1.el7.custom.x86_64.rpm
    rpm -ivh http://10.150.168.20/repos/centos/7/x86_64/os/base/Packages/kernel-headers-3.10.0-1160.45.1.el7.custom.x86_64.rpm
 
    # Prevent depmod from giving a WARNING about missing files 
    touch /lib/modules/${KVER}/modules.order
    touch /lib/modules/${KVER}/modules.builtin
 
    depmod ${KVER}
...

9. The OFED driver container mounts a directory from the host file system for sharing driver files. Create the directory.

$ mkdir -p /run/mellanox/drivers

10. Upload the new CentOS driver image to a registry. This example uses an NGC private registry. Login to the registry.

$ sudo yum install -y podman

$ sudo podman login nvcr.io
Username: $oauthtoken
Password: *****************************************
Login Succeeded!

11. Use Podman to build the driver container image and push it to the registry.

$ sudo podman build --no-cache --tag nvcr.io/nv-ngc5g/mofed-5.4-1.0.3.0:centos7-amd64 .

12. Tag the image and push it to the registry.

$ sudo podman images nvcr.io | grep mofed
nvcr.io/nv-ngc5g/mofed-5.4-1.0.3.0 centos7-amd64 d61e555bddda 2 minutes ago  1.13 GB

13. Override the values.yaml file included in the NVIDIA Network Operator Helm chart to install the custom driver image. Specify the image name, repository, and version for the custom driver container.

$ cat 

14. Install the NVIDIA Network Operator with the new values.yaml.

$ helm install -f ./roce_shared_values_driver.yaml -n network-operator --create-namespace --wait network-operator mellanox/network-operator

15. View the pods deployed by the Network Operator. The MOFED pod should be in status Running. This is the custom driver container. Note that it may take several minutes to compile the drivers before starting the pod.

$ kubectl -n nvidia-network-operator-resources get pods
NAME                      READY   STATUS    RESTARTS   AGE
cni-plugins-ds-zr9kf      1/1     Running   0          10m
kube-multus-ds-w57rz      1/1     Running   0          10m
mofed-centos7-ds-cbs74    1/1     Running   0          10m
rdma-shared-dp-ds-ch8m2   1/1     Running   0          2m27s
whereabouts-z947f         1/1     Running   0          10m

16. Verify that the MOFED drivers are loaded on the host.

$ lsmod | egrep '^ib|^mlx|^rdma'
rdma_ucm               27022  0 
rdma_cm                65212  1 rdma_ucm
ib_ipoib              124872  0 
ib_cm                  53085  2 rdma_cm,ib_ipoib
ib_umad                27744  0 
mlx5_ib               384793  0 
mlx5_core            1360822  1 mlx5_ib
ib_uverbs             132833  2 mlx5_ib,rdma_ucm
ib_core               357959  8 rdma_cm,ib_cm,iw_cm,mlx5_ib,ib_umad,ib_uverbs,rdma_ucm,ib_ipoib
mlx_compat             55063  11 rdma_cm,ib_cm,iw_cm,auxiliary,mlx5_ib,ib_core,ib_umad,ib_uverbs,mlx5_core,rdma_ucm,ib_ipoib
mlxfw                  22321  1 mlx5_core

17. The root filesystem of the driver container should be bind mounted to the /run/mellanox/drivers directory on the host.

$ ls /run/mellanox/drivers
anaconda-post.log  bin  boot  dev  etc  home  host  lib  lib64  media  mnt  opt  proc  root  run  sbin  srv  sys  tmp  usr  var

Install the GPU Operator with a custom driver container

This section describes the steps for installing the GPU Operator with a custom driver container.

Like the Network Operator, the driver build script executed by the GPU Operator container needs access to development packages for the target kernel.

This example uses the same web server that delivered development packages to the Network Operator in the previous section.

Once the container is built, upload it to a repository the GPU Operator Helm chart can access from the host. Like the Network Operator example, the GPU Operator also uses the private registry on NGC.

  1. Build a custom driver container.
$ cd ~
$ git clone https://gitlab.com/nvidia/container-images/driver.git
$ cd driver/centos7

2. Update the CentOS Dockerfile to use driver version 470.74. Comment out unused arguments.

$ grep ARG Dockerfile 
ARG BASE_URL=http://us.download.nvidia.com/XFree86/Linux-x86_64
#ARG BASE_URL=https://us.download.nvidia.com/tesla
ARG DRIVER_VERSION=470.74
ARG DRIVER_TYPE=passthrough
ARG VGPU_LICENSE_SERVER_TYPE=FNE
ARG PUBLIC_KEY=''
#ARG PUBLIC_KEY=empty
ARG PRIVATE_KEY

3. Build the GPU driver container image and push it to NGC.

$  sudo podman build --no-cache --tag nvcr.io/nv-ngc5g/driver:470.74-centos7 .

4. View the GPU driver container image.

$ podman images nvcr.io |  grep  470
nvcr.io/nv-ngc5g/driver                             470.74-centos7           630f0f8e77f5  2 minutes ago   1.28 GB

5. Verify that the following files are available in the custom repository created for the Network Operator installation:

  • elfutils-libelf.x86_64
  • elfutils-libelf-devel.x86_64
  • kernel-headers-${KERNEL_VERSION}
  • kernel-devel-${KERNEL_VERSION}
  • gcc-${GCC_VERSION}

These files are needed to compile the driver for the custom kernel image.

$ cd /var/www/html/repos/centos/7/x86_64/os/base/Packages/

$ for i in $(rpm -q kernel-headers kernel-devel elfutils-libelf elfutils-libelf-devel gcc | grep -v "not installed"); do ls $i*; done
kernel-headers-3.10.0-1160.45.1.el7.custom.x86_64.rpm
kernel-devel-3.10.0-1160.45.1.el7.custom.x86_64.rpm
elfutils-libelf-0.176-5.el7.x86_64.rpm
elfutils-libelf-devel-0.176-5.el7.x86_64.rpm
gcc-4.8.5-44.el7.x86_64.rpm

6. Unlike the Network Operator, the GPU Operator uses a custom Yum repository configuration file. Create a Yum repo file referencing the custom mirror repository.

$ cd /var/www/html/repos

$ cat 

7. The GPU Operator uses a Kubernetes ConfigMap to configure the custom repository. The ConfigMap must be available in the gpu-operator-resources namespace. Create the namespace and the ConfigMap.

$ kubectl create ns gpu-operator-resources

$ kubectl create configmap repo-config -n gpu-operator-resources --from-file=/var/www/html/repos/custom-repo.repo
configmap/repo-config created

$ kubectl describe cm -n gpu-operator-resources repo-config 
Name:         repo-config
Namespace:    gpu-operator-resources
Labels:       
Annotations:  

Data
====
custom-repo.repo:
----
[base]
name=CentOS Linux $releasever - Base
baseurl=http://10.150.168.20/repos/centos/$releasever/$basearch/os/base/
gpgcheck=0
enabled=1

8. Install the GPU Operator Helm chart. Specify the custom repository location, the custom driver version, and the custom driver image name and location.

$ helm install nvidia/gpu-operator --generate-name --set driver.repoConfig.configMapName=repo-config  --set driver.repoConfig.destinationDir=/etc/yum.repos.d --set driver.image=driver --set driver.repository=nvcr.io/nv-ngc5g --set-string driver.version="470.74" --set toolkit.version=1.7.1-centos7 --set operator.defaultRuntime=crio

9. View the deployed pods.

$ kubectl get pods -n gpu-operator-resources
NAME                                       READY   STATUS      RESTARTS   AGE
gpu-feature-discovery-r6kq6                1/1     Running     0          3m33s
nvidia-container-toolkit-daemonset-62pbj   1/1     Running     0          3m33s
nvidia-cuda-validator-ljd5l                0/1     Completed   0          119s
nvidia-dcgm-9nsfx                          1/1     Running     0          3m33s
nvidia-dcgm-exporter-zm82v                 1/1     Running     0          3m33s
nvidia-device-plugin-daemonset-bp66r       1/1     Running     0          3m33s
nvidia-device-plugin-validator-8pbmv       0/1     Completed   0          108s
nvidia-driver-daemonset-4tx24              1/1     Running     0          3m33s
nvidia-mig-manager-kvcgc                   1/1     Running     0          3m32s
nvidia-operator-validator-g9xz5            1/1     Running     0          3m33s

10. Verify the driver is loaded.

$ lsmod |  grep  nvidia
nvidia_modeset       1195268  0 
nvidia_uvm            995356  0 
nvidia              35237551  114 nvidia_modeset,nvidia_uvm
drm                   456166  5 ast,ttm,drm_kms_helper,nvidia

11. Run nvidia-smi from the driver daemonset pod.

Defaulted container "nvidia-driver-ctr" out of: nvidia-driver-ctr, k8s-driver-manager (init)
Thu Oct 28 02:37:50 2021       
+-----------------------------------------------------------------------------+
| NVIDIA-SMI 470.74       Driver Version: 470.74       CUDA Version: 11.4     |
|-------------------------------+----------------------+----------------------+
| GPU  Name        Persistence-M| Bus-Id        Disp.A | Volatile Uncorr. ECC |
| Fan  Temp  Perf  Pwr:Usage/Cap|         Memory-Usage | GPU-Util  Compute M. |
|                               |                      |               MIG M. |
|===============================+======================+======================|
|   0  NVIDIA A100-PCI...  On   | 00000000:23:00.0 Off |                    0 |
| N/A   25C    P0    32W / 250W |      0MiB / 40536MiB |      0%      Default |
|                               |                      |             Disabled |
+-------------------------------+----------------------+----------------------+
|   1  NVIDIA A100-PCI...  On   | 00000000:E6:00.0 Off |                    0 |
| N/A   27C    P0    32W / 250W |      0MiB / 40536MiB |      0%      Default |
|                               |                      |             Disabled |
+-------------------------------+----------------------+----------------------+
                                                                               
+-----------------------------------------------------------------------------+
| Processes:                                                                  |
|  GPU   GI   CI        PID   Type   Process name                  GPU Memory |
|        ID   ID                                                   Usage      |
|=============================================================================|
|  No running processes found                                                 |
+-----------------------------------------------------------------------------+

The NVIDIA peer memory driver that enables GPUDirect RDMA is not built automatically.

Repeat this process to build a custom nvidia-peermem driver container.

This additional step is needed for any Linux operating system that the nvidia-peermem installer in GPU Operator does not yet support.

The future with NVIDIA Accelerators

NVIDIA accelerators help future-proof an edge AI investment against the exponential growth of sensor data. NVIDIA operators are cloud native software that streamline accelerator deployment and management on Kubernetes. The operators support popular Kubernetes platforms out of the box and can be customized to support alternative platforms. 

Recently, NVIDIA announced converged accelerators that combine DPU and GPU capability onto a single PCI device. The converged accelerators are ideal for edge AI applications with demanding compute and network performance requirements. The NVIDIA operators are being enhanced to facilitate converged accelerator deployment on Kubernetes.

Both the NVIDIA GPU Operator and Network Operator are open source software projects published under the Apache 2.0 license. NVIDIA welcomes upstream participation for both projects.

Register for GTC 2021 session, Exploring Cloud-native Edge AI, to learn more about accelerating edge AI with NVIDIA GPUs and SmartNICs.

Categories
Misc

whats poppin my dudes ( git diff tfjs tf.py)

anyone got any tips of the disparity between python and transpiling to javascript support? for example I made a model in py, transpiled it, and then it turns out that after all that, and lots of digging into bugs, that some transformative layers that we can use in python are not supported in the javscript version? any other things worth noting? what are the gaps?

submitted by /u/doctor_slimm
[visit reddit] [comments]

Categories
Misc

How To Build Custom Object Detector In Live Video With TensorFlow | Introduction | #AI

How To Build Custom Object Detector In Live Video With TensorFlow | Introduction | #AI submitted by /u/Minayafl
[visit reddit] [comments]
Categories
Misc

Creating Smarter Spaces with NVIDIA Metropolis and Edge AI

Graphic with NVIDIA logo and smart cars.Learn how AI-enabled video analytics is helping companies and employees work smarter and safer.
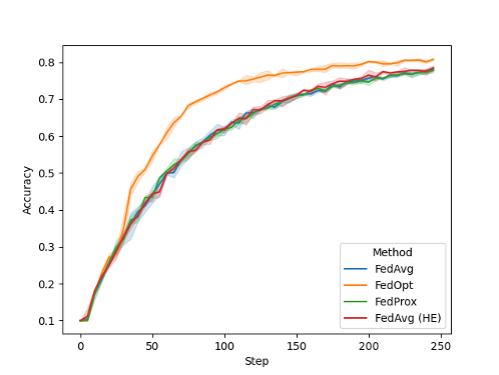
   Graphic with NVIDIA logo and smart cars.

What do a factory floor, retail store, and major roadway have in common? They are a few examples of valuable and constrained infrastructure that need to be optimized. Manufacturers aim for early detection of defects in the assembly process. Retailers seek to better understand their customer journey and deliver more frictionless checkout experiences. Traffic planners look to reduce traffic gridlock.  

Over one billion cameras are deployed worldwide in nearly all of our important spaces, generating tremendous amounts of data but without a system for analyzing this data, valuable insights are lost. Enter AI-powered computer vision, which unlocks insights hidden in the video to generate insights that enable cities and companies to improve their safety and operational efficiency. 

Optimizing AI-enabled video analytics solutions streamlines tasks across industries, from healthcare to manufacturing, helping companies and their employees to work smarter and safer.   

NVIDIA Metropolis is an application framework, set of developer tools, and partner ecosystem that unites visual data and AI to enable greater functionality and efficiency across a range of physical spaces and environments. 

Transit hubs, retail stores, and factories use vision AI applications for more efficient, accessible, and safe operations. The following examples illustrate vision AI applications transforming how we use and manage our most critical spaces. 

Airports: With terminals serving and moving millions of passengers a year, airports are small cities, industrial sites, and transportation hubs. AI-enabled video analytics solutions identify and manage incidents in real time to minimize disruptions to passengers and airport operations. These solutions help airlines accelerate airplane turnarounds, deliver safer airport operations, and provide parking management to passengers. 

Factories: Companies are increasingly automating their manufacturing processes with IoT sensors, the most common of which are video cameras. These cameras capture vast amounts of data that, when combined with the power of AI, produce valuable insights that manufacturers can use to improve operational efficiency. Real-time understanding and responses are critical, such as identifying product defects on assembly lines, scanning for workplace hazards and signaling when machines require maintenance.

Farms: Farmers around the world are turning to vision AI applications to automate and improve their operations and yield quality. These applications help in a wide range of use cases, from counting cows to detecting weeds to the robotic pollination of tomatoes. These computer vision applications help farmers revolutionize food production by improving yield and using less resources.

Stadiums: Millions of people around the world visit stadiums to enjoy live sporting and cultural events. AI-enabled video analytics solutions are used to automate perimeter protection, weapons detection, crowd analytics, parking management, and suspicious behavior monitoring to provide a safer and more cohesive experience for visitors.

Hospitals: AI-enabled video analytics solutions help keep track of operating room procedures, ultimately improving patient care and surgical outcomes. By using accurate action logging, hospital staff can monitor surgical procedures, enforce disinfecting protocols, and check medical supply inventory levels in real time. AI-enabled video analytics reduces the need for human input on certain routine tasks, giving doctors and nurses more time with their patients.

Universities: AI vision helps university administrators better understand how physical spaces, like offices, gyms, and halls, are used. AI applications can also analyze real-time video footage and generate insights that inform better campus management, from detecting crowd flow patterns to creating immediate alerts for abnormal activities like fires, accidents, or water leakage.


A new generation of AI applications at the edge is driving incredible operational efficiency and safety gains across a broad range of spaces. Download a free e-book to learn how Metropolis and edge AI are helping build smarter and safer spaces around the world.

Categories
Misc

whats poppin my dudes

any suggestions on how I could avoid the ‘loading’ aspect of a model in a server that servers client resquests to a web api endpoint? such that the model is permanently ‘loaded’ and only has to make predictions?

# to save compute time that is (duh)

beep bop

submitted by /u/doctor_slimm
[visit reddit] [comments]

Categories
Misc

How to get reproducibile results in tensorflow?

I’m working on a project based on a conda environment, by using:

  • tensorflow-gpu=2.4.0,
  • cudatoolkit=10.2.89,
  • cudnn=7.6.5.

I’d like to have reproducibile results, so I tried with:

import os import random import numpy as np from numpy.random import default_rng import tensorflow as tf random.seed(0) rng = default_rng(0) tf.random.set_seed(0) 

And launching the python script from the terminal as:

PYTHONHASHSEED=0 python /path/to/main.py 

But my results are not reproducible.

Without posting my code (because is long and includes many files), which could be some other aspects that I should consider in order to get reproducibility?

PS: the Artificial Neural Network is a CNN and is created with by adding layers as, e.g.,:tf.keras.layers.Convolution2D(…)

submitted by /u/RainbowRedditForum
[visit reddit] [comments]

Categories
Misc

Creating Robust and Generalizable AI Models with NVIDIA FLARE

NVIDIA FLARE v2.0 is an open-source federated learning SDK that is making it easier for data scientists to collaborate to develop more generalizable robust AI models by just sharing model weights rather than private data.

Federated learning (FL) has become a reality for many real-world applications. It enables multinational collaborations on a global scale to build more robust and generalizable machine learning and AI models. For more information, see Federated learning for predicting clinical outcomes in patients with COVID-19.

NVIDIA FLARE v2.0 is an open-source FL SDK that is making it easier for data scientists to collaborate to develop more generalizable robust AI models by just sharing model weights rather than private data.

For healthcare applications, this is particularly beneficial where data is patient protected, data may be sparse for certain patient types and diseases, or data lacks diversity across instrument types, genders, and geographies.

NVIDIA FLARE

NVIDIA FLARE stands for Federated Learning Application Runtime Environment. It is the engine underlying the NVIDIA Clara Train FL software, which has been used for AI applications in medical imaging, genetic analysis, oncology, and COVID-19 research. The SDK enables researchers and data scientists to adapt their existing machine learning and deep learning workflows to a distributed paradigm and enables platform developers to build a secure, privacy-preserving offering for distributed multiparty collaboration.

NVIDIA FLARE is a lightweight, flexible, and scalable distributed learning framework implemented in Python that is agnostic to your underlying training library. You can bring your own data science workflows implemented in PyTorch, TensorFlow, or even just NumPy, and apply them in a federated setting.

Maybe you’d like to implement the popular federated averaging (FedAvg) algorithm. Starting from an initial global model, each FL client trains the model on their local data for a certain amount of time and sends model updates to the server for aggregation. The server then uses the aggregated updates to update the global model for the next round of training. This process is iterated many times until the model converges.

NVIDIA FLARE provides customizable controller workflows to help you implement FedAvg and other FL algorithms, for example, cyclic weight transfer. It schedules different tasks, such as deep learning training, to be executed on the participating FL clients. The workflows enable you to gather the results, such as model updates, from each client and aggregate them to update the global model and send back the updated global models for continued training. Figure 1 shows the principle.

Each FL client acts as a worker requesting the next task to be executed, such as model training. After the controller provides the task, the worker executes it and returns the results to the controller. At each communication, there can be optional filters that process the task data or results, for example, homomorphic encryption and decryption or differential privacy.

This diagram describes the NVIDIA FLARE workflow.
Figure 1. NVIDIA FLARE workflow

Your task for implementing FedAvg could be a simple PyTorch program that trains a classification model for CIFAR-10. Your local trainer could look something like the following code example. For this post, I skip the full training loop for simplicity.

import torch
import torch.nn as nn
import torch.nn.functional as F

from nvflare.apis.dxo import DXO, DataKind, MetaKey, from_shareable
from nvflare.apis.executor import Executor
from nvflare.apis.fl_constant import ReturnCode
from nvflare.apis.fl_context import FLContext
from nvflare.apis.shareable import Shareable, make_reply
from nvflare.apis.signal import Signal
from nvflare.app_common.app_constant import AppConstants


class SimpleNetwork(nn.Module):
    def __init__(self):
        super(SimpleNetwork, self).__init__()

        self.conv1 = nn.Conv2d(3, 6, 5)
        self.pool = nn.MaxPool2d(2, 2)
        self.conv2 = nn.Conv2d(6, 16, 5)
        self.fc1 = nn.Linear(16 * 5 * 5, 120)
        self.fc2 = nn.Linear(120, 84)
        self.fc3 = nn.Linear(84, 10)

    def forward(self, x):
        x = self.pool(F.relu(self.conv1(x)))
        x = self.pool(F.relu(self.conv2(x)))
        x = torch.flatten(x, 1)  # flatten all dimensions except batch
        x = F.relu(self.fc1(x))
        x = F.relu(self.fc2(x))
        x = self.fc3(x)
        return x


class SimpleTrainer(Executor):
    def __init__(self, train_task_name: str = AppConstants.TASK_TRAIN):
        super().__init__()
        self._train_task_name = train_task_name
        self.device = torch.device("cuda:0" if torch.cuda.is_available() else "cpu")
        self.model = SimpleNetwork()
        self.model.to(self.device)
        self.optimizer = torch.optim.SGD(self.model.parameters(), lr=0.001, momentum=0.9)
        self.criterion = nn.CrossEntropyLoss()

    def execute(self, task_name: str, shareable: Shareable, fl_ctx: FLContext, abort_signal: Signal) -> Shareable:
        """
        This function is an extended function from the superclass.
        As a supervised learning-based trainer, the train function will run
        training based on model weights from `shareable`.
        After finishing training, a new `Shareable` object will be submitted
        to server for aggregation."""

        if task_name == self._train_task_name:
            epoch_len = 1

            # Get current global model weights
            dxo = from_shareable(shareable)

            # Ensure data kind is weights.
            if not dxo.data_kind == DataKind.WEIGHTS:
                self.log_exception(fl_ctx, f"data_kind expected WEIGHTS but got {dxo.data_kind} instead.")
                return make_reply(ReturnCode.EXECUTION_EXCEPTION)  # creates an empty Shareable with the return code

            # Convert weights to tensor and run training
            torch_weights = {k: torch.as_tensor(v) for k, v in dxo.data.items()}
            self.local_train(fl_ctx, torch_weights, epoch_len, abort_signal)

            # compute the differences between torch_weights and the now locally trained model
            model_diff = ...

            # build the shareable using a Data Exchange Object (DXO)
            dxo = DXO(data_kind=DataKind.WEIGHT_DIFF, data=model_diff)
            dxo.set_meta_prop(MetaKey.NUM_STEPS_CURRENT_ROUND, epoch_len)

            self.log_info(fl_ctx, "Local training finished. Returning shareable")
            return dxo.to_shareable()
        else:
            return make_reply(ReturnCode.TASK_UNKNOWN)

    def local_train(self, fl_ctx, weights, epoch_len, abort_signal):
        # Your training routine should respect the abort_signal.
        ...
        # Your local training loop ...
        for e in range(epoch_len):
        ...
            if abort_signal.triggered:
                self._abort_execution()
        ...

    def _abort_execution(self, return_code=ReturnCode.ERROR) -> Shareable:
        return make_reply(return_code)

You can see that your task implementations could be doing many different tasks. You could compute summary statistics on each client and share with the server (keeping privacy constraints in mind), perform preprocessing of the local data, or evaluate already trained models.

During FL training, you can plot the performance of the global model at the beginning of each training round. For this example, we ran with eight clients on a heterogenous data split of CIFAR-10. In the following plot (Figure 2), I show the different configurations that are available in NVIDIA FLARE 2.0 by default:

  • FedAvg
  • FedProx
  • FedOpt
  • FedAvg with secure aggregation using homomorphic encryption (FedAvg HE)
This diagram shows the different federated learning models and their accuracies.
Figure 2. Validation accuracy of the global models for different FL algorithms during training

While FedAvg, FedAvg HE, and FedProx perform comparably for this task, you can observe an improved convergence using the FedOpt setting that uses SGD with momentum to update the global model on the server.

The whole FL system can be controlled using the admin API to automatically start and operate differently configured tasks and workflows. NVIDIA also provides a comprehensive provisioning system that enables the easy and secure deployment of FL applications in the real world but also proof-of-concept studies for running local FL simulations.

This diagram shows the components of NVIDIA FLARE and their relationship.
Figure 3. NVIDIA FLARE Provision, start, operate (PSO) components, and their APIs

Get started

NVIDIA FLARE makes FL accessible to a wider range of applications. Potential use cases include helping energy companies analyze seismic and wellbore data, manufacturers optimize factory operations, and financial firms improve fraud detection models.

For more information and step-by-step examples, see NVIDIA/NVFlare on GitHub.

Categories
Misc

NVIDIA BlueField DPU Ecosystem Expands as Partners Introduce Joint Solutions

Learn how these Industry leaders have started to integrate their solutions using the DPU/DOCA architecture as key partners showcase these solutions at the recent NVIDIA GTC.

NVIDIA recently introduced the NVIDIA DOCA 1.2 software framework for NVIDIA BlueField DPUs, the world’s most advanced Data Processing Unit (DPU). This latest release builds on the momentum of the DOCA early access program to enable partners and customers to accelerate the development of applications and holistic zero trust solutions on the DPU.

NVIDIA is working with leading platform vendors and partners to integrate and expand DOCA support for commercial distributions on NVIDIA BlueField DPUs. Learn how these Industry leaders have started to integrate their solutions using the DPU/DOCA architecture as key partners showcase these solutions at the recent NVIDIA GTC.

Red Hat – “Sensitive Information Detection using the NVIDIA Morpheus AI framework
Red Hat and NVIDIA have been working together to bring the security analytics capabilities of the NVIDIA Morpheus AI application framework to the Red Hat infrastructure platforms for cybersecurity developers. This post provides a set of configuration instructions to Red Hat developers working on applications that use the NVIDIA Morpheus AI application framework and NVIDIA BlueField DPUs to secure interservice communication.  

Figure 1. Red Hat and NVIDIA High-level architecture

Juniper Networks – “Extending the Edge of the Network with Juniper Edge Services Platform (JESP)
Earlier this year, Juniper discussed the value of extending the network all the way to the server through DPU, such as the NVIDIA BlueField DPU powered SmartNICs, and how these devices can be used to provide L2-L7 networking and security services. At NVIDIA GTC, Juniper provides a sneak preview of an internal project – Juniper Edge Services Platform (JESP), which enables the extension of the network all the way to the SmartNIC.  

Figure 2. Juniper Edge Services Platform (JESP)

F5 – “Redefining Cybersecurity at the Distributed Cloud Edge with AI and Real-time Telemetry
Augmenting well-established security measures for web, application, firewall, and fraud mitigation techniques, F5 is researching techniques to detect such advanced threats, which require contextual analysis of several of these data points via large-scale telemetry, and with near real-time analysis. This is where NVIDIA BlueField-2 DPU-based real-time telemetry and NVIDIA GPU-powered Morpheus cybersecurity framework come into play.

Figure 3. F5 Advanced Threats Classification

Excelero – “Storage Horsepower for Critical Application Performance
NVMesh technology is a low-latency, distributed storage software that is deployed across machines with very high-speed local drives (NVMe SSDs, to be exact), enabling high-speed compute and high data throughput that far exceeds anything achievable with other storage alternatives – and at a significantly lower cost. Network performance is also critical and this is why Excelero is working with NVIDIA and their BlueField DPU, plus NVIDIA DOCA software platform technology.

DDN – “DDN Supercharges AI Security with NVIDIA
Along with NVIDIA, DDN is helping customers choose a data strategy that supports enterprise-scale AI workloads with a “Storage-as-a-Service” approach. This solution delivers cost-effective centralized infrastructure that meets the performance and scalability needs of complex AI applications and datasets.  

Early access to the DOCA software framework is available now.

To experience accelerated software-defined management services today, click here to register and download the BlueField DPU software package that includes DOCA runtime accelerated libraries for networking, security, and storage.

Additional Resources:
Web: DOCA Home Page
Web: BlueField DPU Home Page
DLI Course: Take the Introduction to NVIDIA DOCA for BlueField DPUs DLI Course
Whitepaper: DPU-Based Hardware Acceleration: A Software Perspective
NVIDIA Corporate Blog: NVIDIA Creates Zero-Trust Cybersecurity Platform
NVIDIA Developer Blog: NVIDIA Introduces BlueField DPU as a Platform for Zero Trust Security with DOCA 1.2

Categories
Misc

NVIDIA Announces Upcoming Events for Financial Community

SANTA CLARA, Calif., Nov. 29, 2021 (GLOBE NEWSWIRE) — NVIDIA will present at the following events for the financial community: Deutsche Bank’s Virtual AutoTech ConferenceThursday, Dec. 9, at …