It’s getting hot in here, so get your game on this GFN Thursday with 13 new games joining the GeForce NOW library, including LEGO Builder’s Journey, Phantom Abyss and the Dual Universe beta. Plus, get a sneak peek at Kena: Bridge of Spirits, coming to the cloud later this year. Break the Rules Build up Read article >
NVIDIA announced new pre-trained models and general availability of Transfer Learning Toolkit (TLT) 3.0, a core component of NVIDIA’s Train, Adapt and Optimize (TAO) platform guided workflow for creating AI.
Today, NVIDIA announced new pretrained models and general availability of Transfer Learning Toolkit (TLT) 3.0, a core component of NVIDIA’s Train, Adapt, and Optimize (TAO) platform guided workflow for creating AI. The new release includes a variety of highly accurate and performant pretrained models in computer vision and conversational AI, as well as a set of powerful productivity features that boost AI development by up to 10x.
As enterprises race to bring AI-enabled solutions to market, your competitiveness relies on access to the best development tools. The development journey to deploy custom, high-accuracy, and performant AI models in production can be treacherous for many engineering and research teams attempting to train with open-source models for AI product creation. NVIDIA offers high-quality, pretrained models and TLT to help reduce costs with large-scale data collection and labeling. It also eliminates the burden of training AI/ML models from scratch. New entrants to the computer vision and speech-enabled service market can now deploy production-class AI without a massive AI development team.
Highlights of the new release include:
A pose-estimation model that supports real-time inference on edge with 9x faster inference performance than the OpenPose model.
PeopleSemSegNet, a semantic segmentation network for people detection.
A variety of computer vision pretrained models in various industry use cases, such as license plate detection and recognition, heart rate monitoring, emotion recognition, facial landmarks, and more.
CitriNet, a new speech-recognition model that is trained on various proprietary domain-specific and open-source datasets.
A new Megatron Uncased model for Question Answering, plus many other pretrained models that support speech-to-text, named-entity recognition, punctuation, and text classification.
Training support on AWS, GCP, and Azure.
Out-of-the-box deployment on NVIDIA Triton and DeepStream SDK for vision AI, and NVIDIA Jarvis for conversational AI.
Get Started Fast
Download Transfer Learning Toolkit and access to developer resources: Get started.
Check out the latest developer tutorial: Training and Optimizing a 2D Pose-Estimation Model with the NVIDIA Transfer Learning Toolkit. Part 1 | Part 2
Integration with Data-Generation and Labeling Tools for Faster and More Accurate AI
TLT 3.0 is also now integrated with platforms from several leading partners who provide large, diverse, and high-quality labeled data—enabling faster end-to-end AI/ML workflows. You can now use these partners’ services to generate and annotate data, seamlessly integrate with TLT for model training and optimization, and deploy the model using DeepStream SDK or Jarvis to create reliable applications in computer vision and conversational AI.
Check out more partner blog post and tutorials about synthetic data and data annotation with TLT:
With PyTorch Lightning, you can scale your models to multiple GPUs and leverage state-of-the-art training features such as 16-bit precision, early stopping, logging, pruning and quantization, while enabling faster iteration and reproducibility.
Deep learning research requires working at scale. Training on massive data sets or multilayered deep networks is computationally intensive and can take an impractically long time as deep learning models are bound by memory. The key here is to compose the deep learning models in a structured way so that they are decoupled from the engineering and data, enabling researchers to conduct fast research.
PyTorch Lightning, developed by Grid.AI, is now available as a container on the NGC catalog, NVIDIA’s hub of GPU-optimized AI and HPC software. Pytorch Lightning was designed to remove the roadblocks in deep learning research and allows researchers to focus on science. Lightning is more of a style guide than a framework, enabling you to structure and organize your code while providing utilities for common functions. With PyTorch Lightning, you can scale your models to multiple GPUs and leverage state-of-the-art training features such as 16-bit precision, early stopping, logging, pruning and quantization, while enabling faster iteration and reproducibility.
Figure 1. PyTorch Lightning Philosophy
A Lightning model is composed of the following:
A LightningModule that encapsulates the model code
A Lightning DataModule that encapsulates transforms, dataset, and DataLoaders
A Lightning trainer that automates the training routine with 70+ flags to make advanced features trivial
Callbacks for users to customize Lightning using hooks
The Lightning objects are implemented as hooks that can be overridden, making every single aspect of deep learning training highly configurable. With Lightning, you have full control over every detail:
NVTAGS automates intelligent GPU assignment by profiling HPC applications and launching them with a custom GPU assignment tailored to an application and system to minimize communication costs.
Many GPU-accelerated HPC applications spend a substantial portion of their time in non-uniform, GPU-to-GPU communications. Additionally, in many HPC systems, different GPU pairs share communication links with varying bandwidth and latency. As a result, GPU assignment can substantially impact time to solution. Furthermore, on multi-node / multi-socket systems, communication performance can degrade when GPUs communicate with CPUs and NICs outside their system affinity. Because resource selection is system dependent, it is challenging to select resources such that communication costs are minimized.
NVIDIA Topology-Aware GPU Selection (NVTAGS) abstracts away the complexity of efficient resource selection. NVTAGS automates intelligent GPU assignment by profiling HPC applications and launching them with a custom GPU assignment tailored to an application and system to minimize communication costs. NVTAGS ensures that, regardless of a system’s communication topology, MPI processes communicate with the CPUs and NICs or HCAs within their own affinity.
NVTAGS improves performance of Chroma, MILC, and LAMMPS from 2% to 75% on one to 16 nodes.
Key NVTAGS Features:
Automated topology detection along with CPU and NIC/HCA binding, independent of the system and HPC application
Support for single- and multi-node, PCIe, and NVIDIA NVLink with NVIDIA Pascal, Volta, and Ampere architecture GPUs
Automatic caching of efficient GPU selection for future simulations
Straightforward integration with Slurm and Singularity
A tutorial to run your favorite Linux software, including NVIDIA CUDA, on Windows RAPIDS is now more accessible to Windows users! This post walks you through installing RAPIDS on Windows Subsystem for Linux (WSL). WSL is a Windows 10 feature that enables users to run native Linux command-line tools directly on Windows. Using this feature … Continued
This post was originally published on the RAPIDS AI Blog.
A tutorial to run your favorite Linux software, including NVIDIA CUDA, on Windows
RAPIDS is now more accessible to Windows users! This post walks you through installing RAPIDS on Windows Subsystem for Linux (WSL). WSL is a Windows 10 feature that enables users to run native Linux command-line tools directly on Windows. Using this feature does not require a dual boot environment, taking away complexity and hopefully saving you time. You’ll need access to an NVIDIA GPU with NVIDIA Pascal architecture or newer. Let’s get started right away.
Getting Started
To install RAPIDS, you’ll need to do the following:
Install the latest builds from the Microsoft Insider Program.
Install the NVIDIA preview driver for WSL 2.
Install WSL 2.
Install RAPIDS.
Steps 1–3 can be completed by following the NVIDIA CUDA on WSL guide. However, there are some gotchas. This article will walk through each section and point out what to look out for. We recommend opening a tab for the guide alongside this post to make sure that you don’t miss anything. Before you start, be aware that all the steps in the guide must be carried out in order. It’s particularly important that you install a fresh version of WSL 2 only after installing the new build and driver. Also note, CUDA toolkit will be installed along with RAPIDS in step 4. Therefore, stop following the CUDA on WSL guide after you reach theSetting up CUDA Toolkitsection.
Installing the latest builds from the Microsoft Insider program
For your program to run correctly, you need to be using Windows Build version 20145 or higher. When installing the builds, some things to note are:
Start off by navigating to your Windows menu. Select Settings > Update and Security > Windows Update. Make sure that you don’t have any pending Windows updates. If you do, click the update button to ensure you’re starting out without any.
Dev Channel (previously Fast ring): Fast ring is mentioned in the guide as the channel you should download your build from. The name of this channel is now the Dev Channel. Windows call the process of updating and installing the latest builds ‘flighting.’ During this process, you must select the DEV Channel when choosing which updates to receive.
Downloading and updating requires a restart and can take up to 90mins. Feel free to grab a coffee while you wait ;).
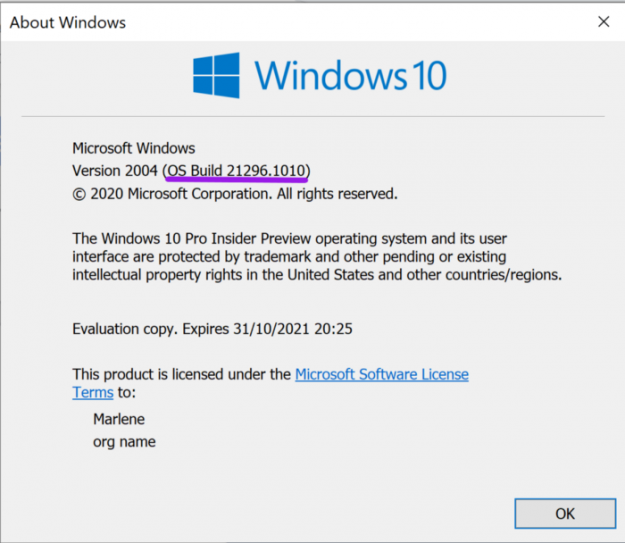
After you’ve restarted your computer, check your build version by running winver via the Windows Run command. It can be a little tricky to identify the right number. Here’s what you should look for after a successful installation (BUILD 20145 or higher):
Figure 1: Build version is now OS Build 21296 which is sufficient to run WSL2.
Once you’ve confirmed your build, move onto step 2.
Installing NVIDIA drivers
Next, you’ll need to install an NVIDIA Driver. Keep the following in mind:
Select the driver based on the type of NVIDIA GPU in your system. To verify your GPU type look for the NVIDIA Control Panel in your Start menu. The name should appear there. See the CUDA on Windows Subsystem for Linux (WSL) public preview for more information.
Once the download is complete install the driver using the executable. We strongly recommend choosing the default location for saving it.
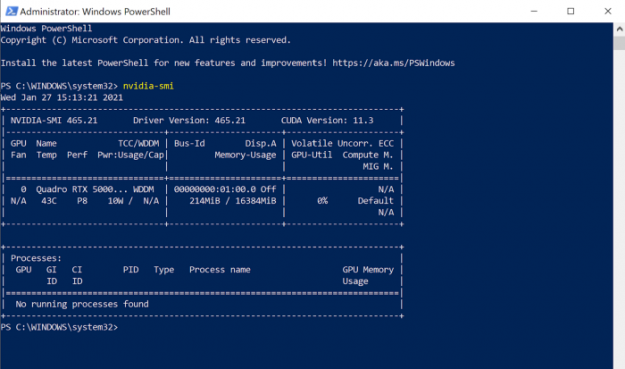
A check to ensure the driver install was successful is to run the command nvidia-smi in PowerShell. It should output a table with information about your GPU and the driver. You’ll notice the driver version is the same as the one you downloaded.
Figure 2: NVIDIA Driver has correctly been installed, version 465.21.
(Your table might be much shorter and not show any GPU processes. As long as you can see a table and no visible errors, your install should have been successful!) If your driver is successfully installed, let’s jump to step 3. If nothing appears, check if you’ve missed any of the steps and if your build version is correct.
Installing WSL 2
Next, you’ll install WSL 2 with a Linux distribution of your choice using the docs here. Make sure that the distribution you choose is supported by RAPIDS. You can confirm this here. The rest of this post describes the installation of WSL 2 with Ubuntu 18.04. These steps should work similarly with other supported distributions.
There are two ways you can install your RAPIDS supporting Linux distribution with WSL 2 on Windows 10. The instructions listed in the Windows guide can seem overwhelming so we’ve distilled it down to the most important parts here:
Using the command line
Open your command line and ensure you’re in the Admin role.
Find out which Linux distributions are available and support WSL by typing in the command wsl --list -online.
To install the distribution, use the command wsl --install -d .
For Ubuntu 18.04 this command translated to wsl --install -d Ubuntu-18.04 (be aware of the capital letter U.) This should download and install your Linux distribution.
Your selected distribution should either immediately open or appear in your Windows Start menu.
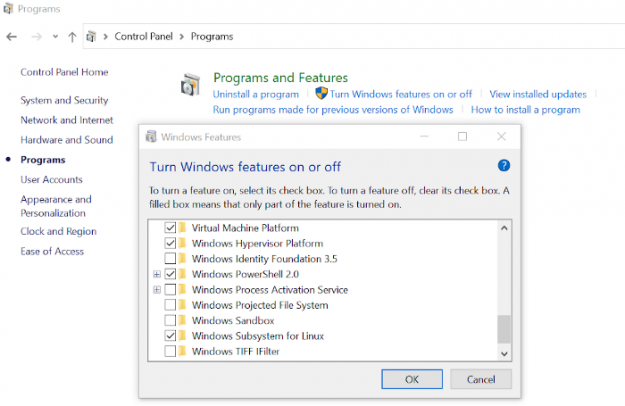
If this is not true for you, double-check that your Linux distribution and WSL install was successful by running wsl.exe -list. If no distribution appears, navigate to “Programs” in your Control Panel. Confirm that the “Windows Hypervisor Platform” and “Windows Subsystem for Linux” boxes are checked. It should look something like the image below. Once confirmed, reboot your computer and try running the install again (possibly twice.) Ideally, the WSL terminal should pop up right after the installation.
Figure 3: In case your WSL terminal install doesn’t work right away, make sure the folders checked preceding are checked on your system as well.
When opening your WSL terminal for the first time, you will be prompted to set up a default(non-root) user. Ensure that you do not skip this step, as you will need to be the root user to install other packages.
Once you’ve set the default user, proceed to reboot your machine. When you return, you’ll be all set for step 4.
Through the Microsoft Store
If you already know which distribution you would like to use, you can download and install it directly from the Microsoft Store on your machine.
You’ll need to set the default user and do a reboot in this case as well.
Once you’ve completed this step, you’re ready to install the CUDA Toolkit and almost done!
Install RAPIDS
If you don’t have it already, start by installing and activating Miniconda in your WSL terminal. We’ll be using the conda command to install the packages we need in this step.
You can install RAPIDS with a single conda command. Just type the following line in and you’re all set.
Type this command into your terminal to install RAPIDS.
To test your installation, start-up the RAPIDS virtual environment. You can do this by:
Typing out conda info --envs, which will let you know the name of the installed RAPIDS environment.
Note: cuDF is supported only on Linux and with Python versions 3.7 and later.
Finally, import any RAPIDS library or start a Jupyter notebook.
Hopefully, your installation was successful. RAPIDS is open-source, so if you managed to get this far and would like to contribute, take another look at the contributing guide of any of our libraries or join the RAPIDS Slack channel to find out more.
A pair of researchers at Northern Arizona University used GPU-based deep-learning algorithms to categorize sherds — tiny fragments of ancient pottery — as well as, or better than, four expert archaeologists. The technique, outlined in a paper published in the June issue of The Journal of Archaeological Science by Leszek Pawlowicz and Christian Downum focused Read article >
Turning doodles into stunning landscapes — there’s an app for that. The NVIDIA Canvas app, now available as a free beta, brings the real-time painting tool GauGAN to anyone with an NVIDIA RTX GPU. Developed by the NVIDIA Research team, GauGAN has wowed creative communities at trade shows around the world by using deep learning Read article >
The NVIDIA Studio ecosystem continues to deliver time-saving features and visual improvements to top creative applications. Today, Adobe announced a significant update to their 3D lineup, with new and improved tools available in the Adobe Substance 3D Collection: new versions of Substance 3D Painter, Designer and Sampler, as well as the new application Substance 3D Read article >
I’ve been trying to figure it out for about a week now but I keep getting ‘Data cardinality is ambiguous’. I’m creating a sequential model for each multivariate sequence, then concating the .output from each of those models as the input to a Keras model. I’m also feeding the inputs in as a list of each .input from each model.
Even when I make the last layer of each sequence’s model a dense layer with the same amount of units, the cardinality error still complain’s about concating different sequence lengths.

") NVIDIA announced new pre-trained models and general availability of Transfer Learning Toolkit (TLT) 3.0, a core component of NVIDIA’s Train, Adapt and Optimize (TAO) platform guided workflow for creating AI.
NVIDIA announced new pre-trained models and general availability of Transfer Learning Toolkit (TLT) 3.0, a core component of NVIDIA’s Train, Adapt and Optimize (TAO) platform guided workflow for creating AI.  With PyTorch Lightning, you can scale your models to multiple GPUs and leverage state-of-the-art training features such as 16-bit precision, early stopping, logging, pruning and quantization, while enabling faster iteration and reproducibility.
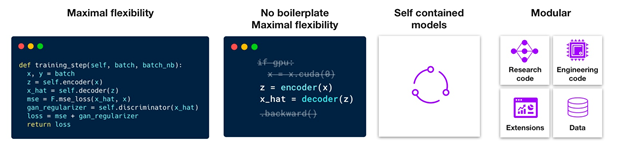
 NVTAGS automates intelligent GPU assignment by profiling HPC applications and launching them with a custom GPU assignment tailored to an application and system to minimize communication costs.
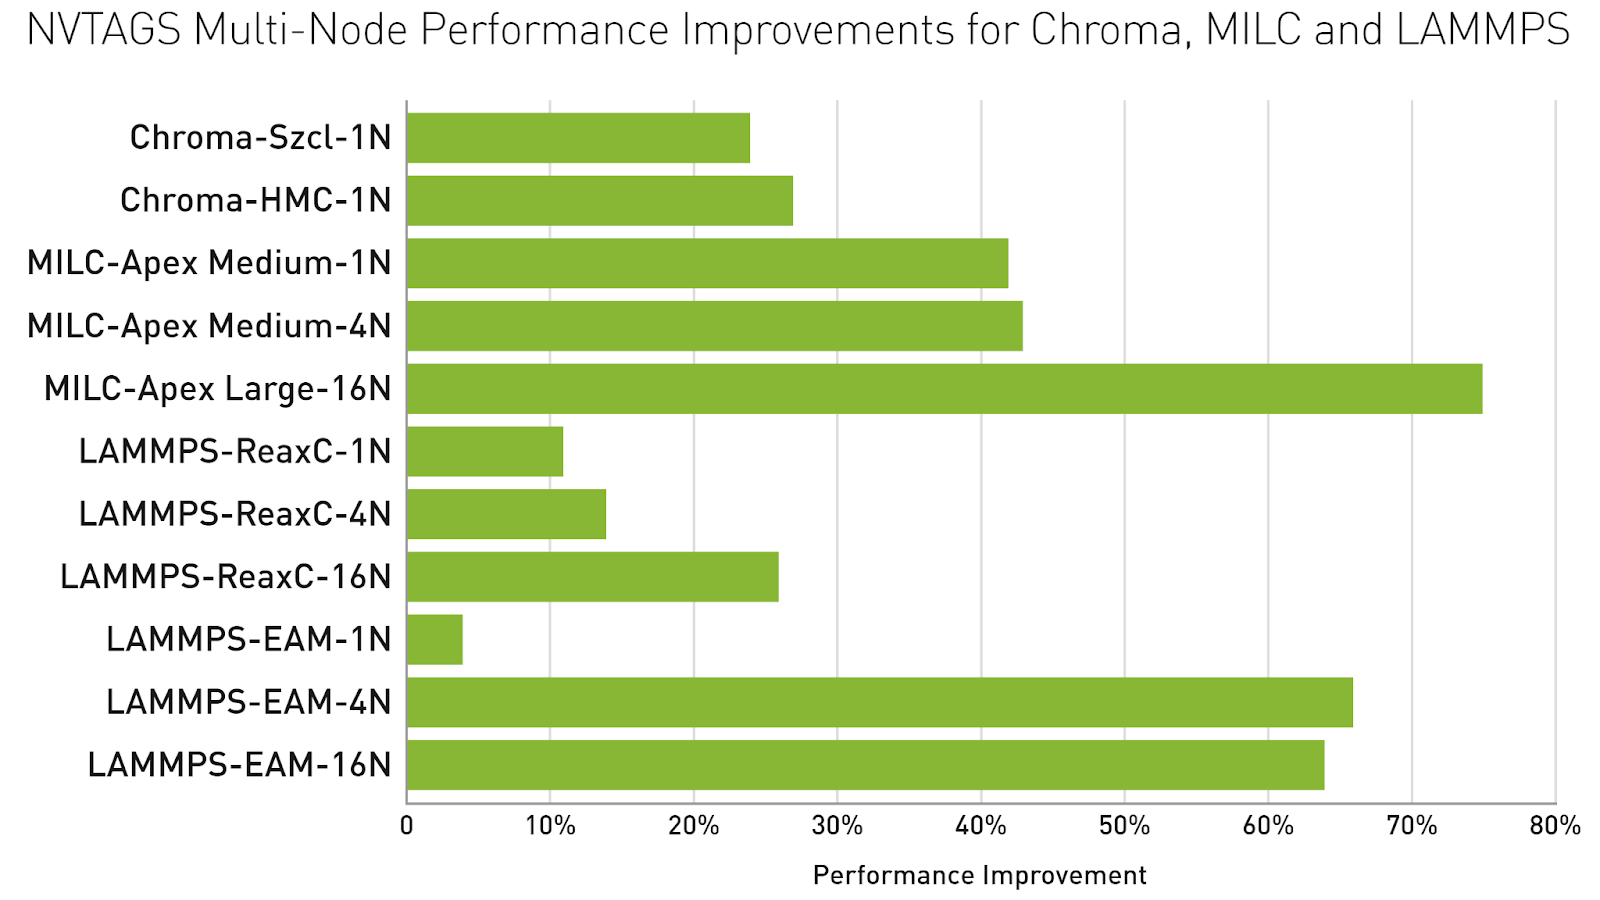
 A tutorial to run your favorite Linux software, including NVIDIA CUDA, on Windows RAPIDS is now more accessible to Windows users! This post walks you through installing RAPIDS on Windows Subsystem for Linux (WSL). WSL is a Windows 10 feature that enables users to run native Linux command-line tools directly on Windows. Using this feature …